How To Build A Cabinet From A Dresser using Burlap Inserts: Step By Step Guide
How to transform a dresser into a cool, functional cabinet with burlap inserts!
Supplies:
- Dresser with drawers
- 4 Butt hinges
- 1x2 lumber for door frames
- Kreg Jig pocket hole maker
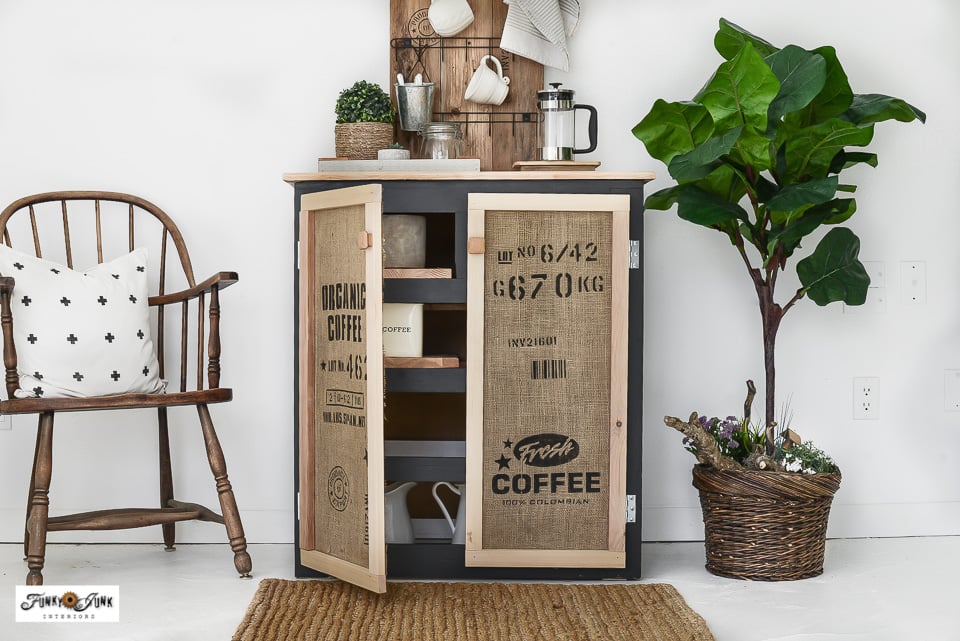
- Burlap
- Fusion Mineral Paint - Coal Black
- TSP Alternative by Fusion Mineral Paint
- Measuring tape
- 2 Wood cabinet door knobs
- Velour paint roller (leaves no brush strokes)
Instructions:
- Choose a dresser where you can easily attach hinges along the front or sides.
- Remove dresser drawers and drawer sliders. Cut insides clear of drawer dividers if desired.
- Clean, scuff sand, then paint the dresser front and sides. Sand the top down to bare wood to achieve this look.
- Measure the dresser height and width along the front, then design 2 cabinet door frames to fit. I used 1x2 lumber.
- Cut wood, then assemble each door frame with a Kreg Jig pocket hole maker.
- Place door frames onto burlap, trace inside and outside with chalk.
- Stencil the burlap panels inside the chalk lines.
- Cut the burlap outside the chalk lines.
- Flip door frames good-side-down, then staple burlap panels good-side-down onto frames.
- Attach butt hinges to the sides of each door panel.
- Install the doors onto the front of the dresser.
- Insert cut pieces of wood inside the cabinet to create shelves.
Did you try this tutorial?Share it on Instagram and tag @funkyjunkinteriors and include #funkyjunkinteriors so we can check it out!