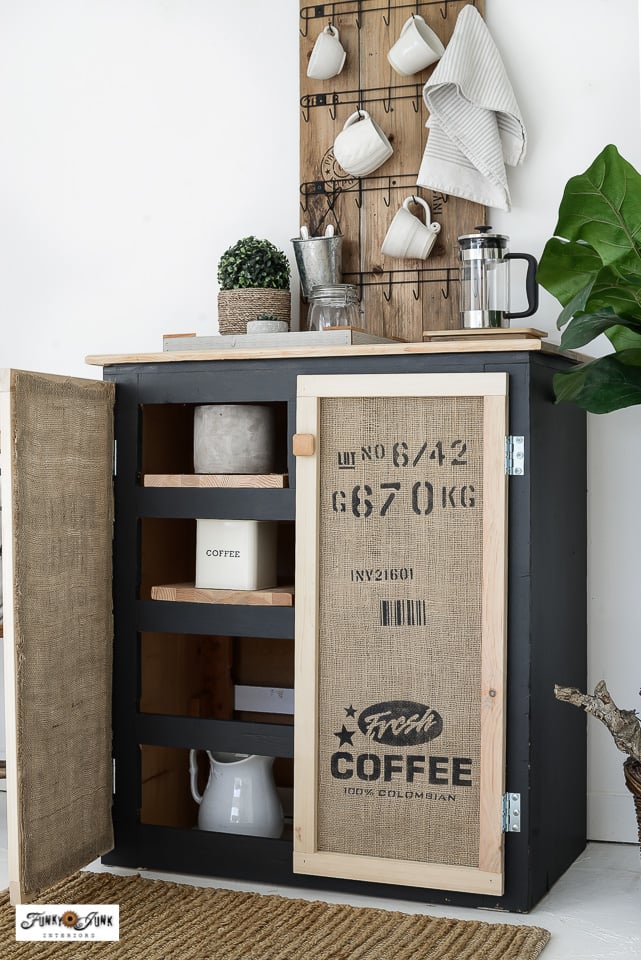
Learn how to transform an old dresser into a beautiful and functional cabinet using burlap inserts! This step-by-step guide will show you how to build a cabinet from a simple dresser, to create a unique and stylish piece of furniture as a coffee station for your home.
As a Fusion and Amazon Influencer, this post contains affiliate links in which I earn a small percentage from qualifying purchases at no extra cost to you. If you shop Fusion Mineral Paint products through this post, you will get 10% off. Thank-you for helping to support my blog!
I have a super fun revamp to share with you today!

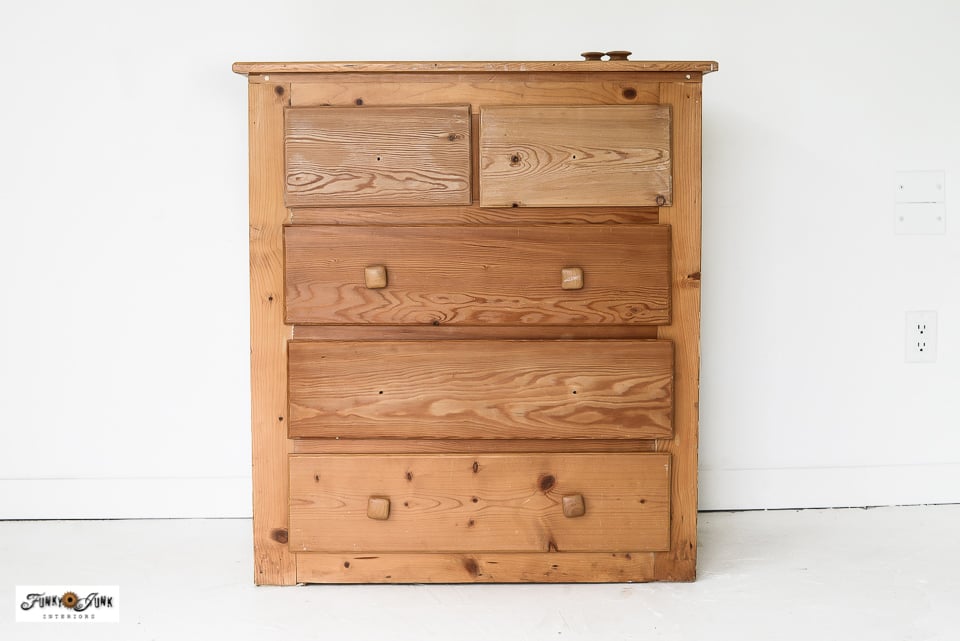
I landed a wooden dresser from the curb some time ago. It’s been sitting in my stash collecting junk on top for a long time! I just couldn’t find a big enough pull to morph it into something fabulous.
So when Hometalk reached out, challenging me to flip a dresser into a pie safe or cupboard, I knew this dresser would be perfect! It wasn’t a high quality antique I would devalue, yet it was a sturdy solid wood piece, making it a great makeover candidate!
Dressers are pretty fun to make over, since they can serve so many different purposes other than just in a bedroom holding clothes, such as:
Other unique dresser makeovers:
Painted fabric-look dresser to store sewing supplies
Rustic crate dresser for paint storage
Faux wood painted dresser to store office supplies
So this new idea of flipping a standard dresser into a cabinet with doors was a fun, new challenge I was ready for!
And while I ultimately styled it into a coffee bar, it’s very easy to customize to suit any given space!
So just in case you’d rather have a cabinet than the old dresser buried under junk in your storage area, here’s how I did it!
How to build a cabinet from a dresser
Supplies you’ll need:
Thinner lumber to build door frames: I used 1x2s
4 small butt hinges (or whatever kind is appropriate for your setup)
2 wood cabinet door knobs (I used 2 original drawer pulls)
Kreg Jig pocket hole maker (I use a K4)
Cordless drill with drill bits (I like Makita)
Orbital Sander (I like Bosch variable speed)
Burlap – I used cheap large burlap sandbags from my local hardware store
Fusion Mineral Paint in Cast Iron (get 10% off)
TSP Alternative by Fusion (get 10% off)
Velour paint roller (get 10% off) with small paint tray
Quality paint brush
Rustic stencils from Funky Junk’s Old Sign Stencils:


Removal of drawer slides
1. Remove the dresser drawer fronts and unscrew all the drawer sliding hardware if there are some.
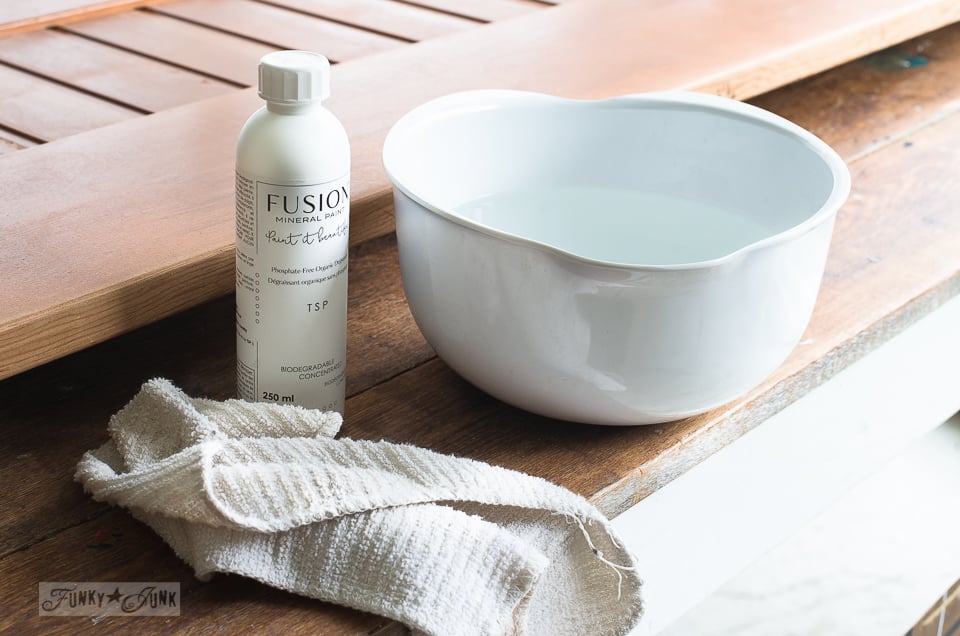
Prepping the dresser for painting
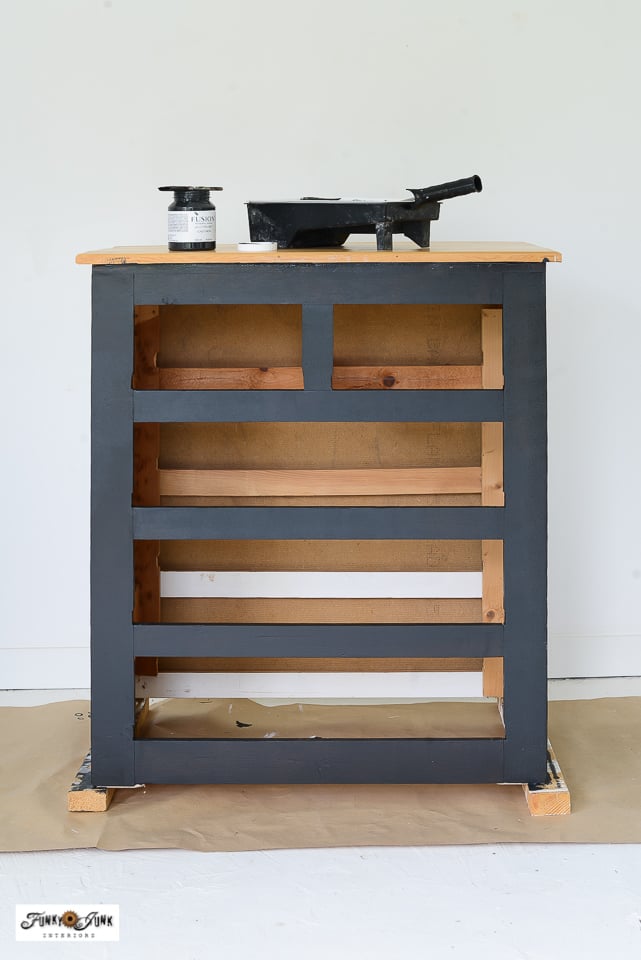
2. Prep the dresser for painting.
- To clean, I like to use Fusion’s TSP Alternative to wipe the dresser down.
- Next is a light scuff sand, but just in the areas I plan to repaint.
- I actually took the dresser outdoors and used an orbital sander across the top to remove original varnish after painting to achieve more of a raw wood countertop. But I’d suggest to do this first!
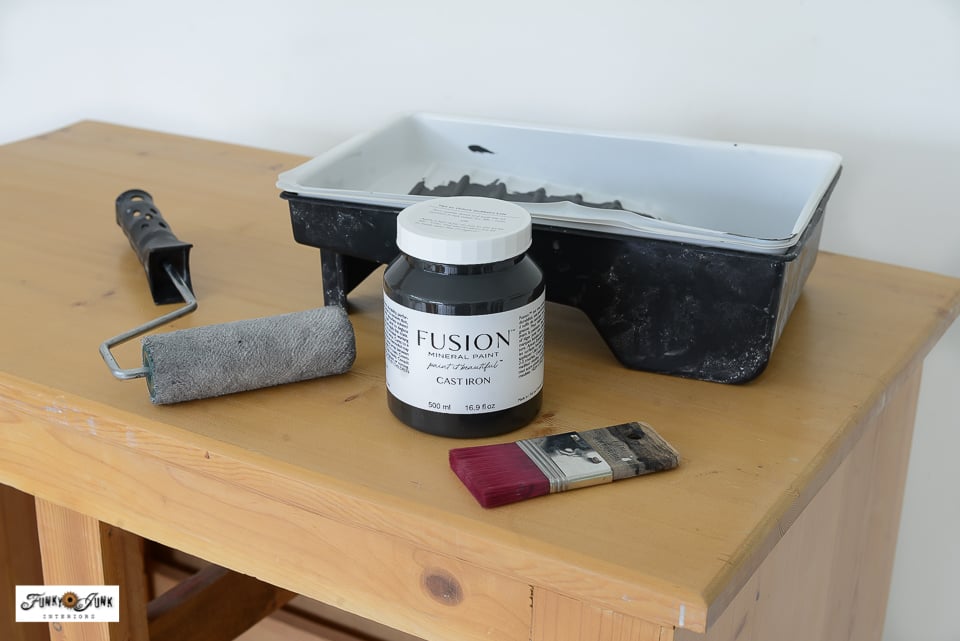
Painting the dresser
View: Fusion’s Cast Iron (get 10% off)
3. Paint the front and sides of the dresser in Fusion’s Cast Iron.
I first applied the paint using a smaller paint brush in the tighter areas, then rolled on the paint using a velour roller to avoid leaving brush strokes. The finish turned out great, and only one coat was required! Although I’d suggest 2 coats for more durability.
How to build a cabinet door
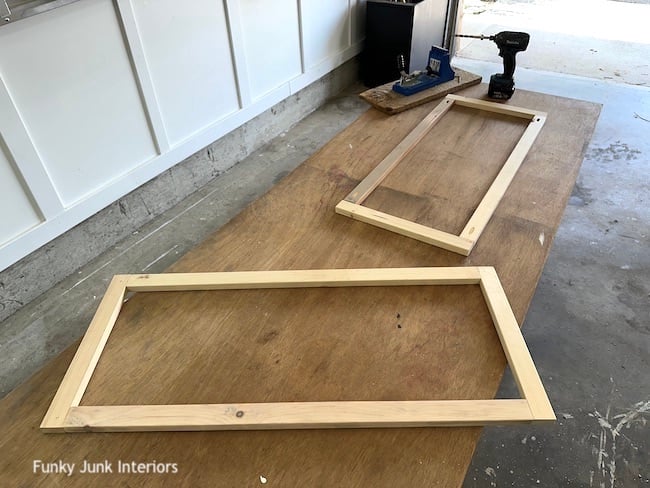
4. Measure the width of the cabinet, then cut lumber to build 2 door frames within that measurement to fit, leaving some room for attaching brackets.
I really just made my own measurements up, however here’s my details for reference:
Dresser and cabinet door measurements
- Dresser: 32″ w x 37.5″ h x 18″ deep
- Cabinet doors: 14.5″ w x 34″ h
- Lumber used: 1x2s – 1.5″ wide x cut to length to make cabinet doors fit

5. Arrange the door frame boards on a worktable, then drill pocket holes into both sides of the side boards, so they can screw into the top and bottom boards.
I like to use a Kreg pocket hole jig to create pocket holes which are really holes with deep angles, helping you to join the lumber with professional and strong results! You simply adjust the jig and the drill it comes with to the thickness of the wood you are using, then it’s ready to drill. Yes, it IS that easy.
Tip: The join will be stronger IF you screw into wood grain running sideways, vs. wood grain straight on.
Option: IF you want to build panel doors, I’d cut finished plywood sheets to fit within the frame using a table saw, jigsaw or circular saw, then attach it from the back with wood glue and brad nails.
Video tutorial: how to use a Kreg Jig
.
Watch the short video to see how easy it is to use a Kreg Jig!
Read: How to use a Kreg Jig HERE
6. Iron the burlap sandbags (or burlap material) until smooth.
Since I used sandbags, I left them doubled-up so the material was more opaque.
Stenciling burlap panels for cabinet door inserts
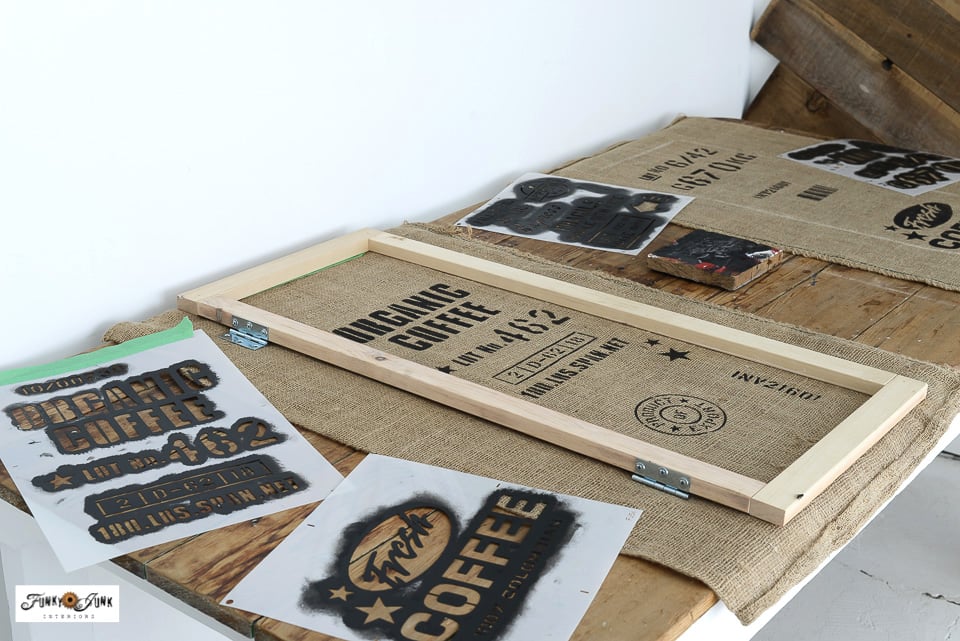
7. Place door frames onto burlap sandbags, then trace along the inside AND outside of each door frame onto the burlap with chalk.
This will guide you where to stencil the burlap (along the inside rectangle) and cut the burlap (along the outside rectangle).
8. Remove the door frames, then stencil the burlap as desired staying within the inner chalk lines.
I used various stencils arranged random-style to achieve a coffee shop look! Each one was stenciled using Fusion’s Cast Iron to tie in with the painted dresser.
Rustic stencils from Funky Junk’s Old Sign Stencils:
How to stencil for sharp images on burlap:
- place something waterproof between material and table
- position stencil and hold in place with masking tape
- dip dome-tip stencil brush into paint
- remove most paint onto a rag until brush feels dry
- tap paint through stencil until desired coverage is met
Get many more stencil tips from: How to stencil HERE
9. Cut the burlap along the outer chalk lines, so they will fit on the door frames.
How to build a cabinet door burlap panel
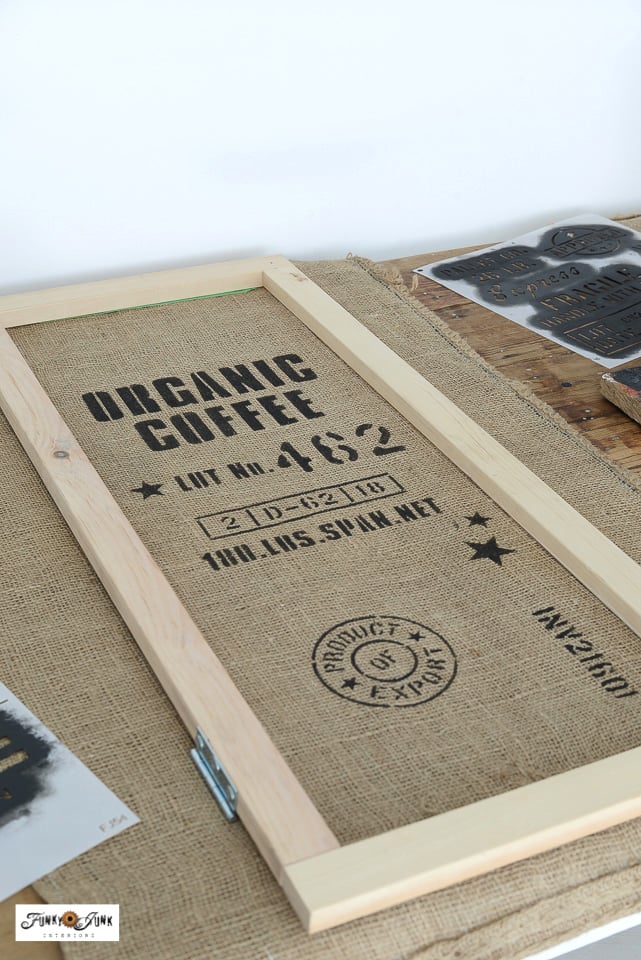
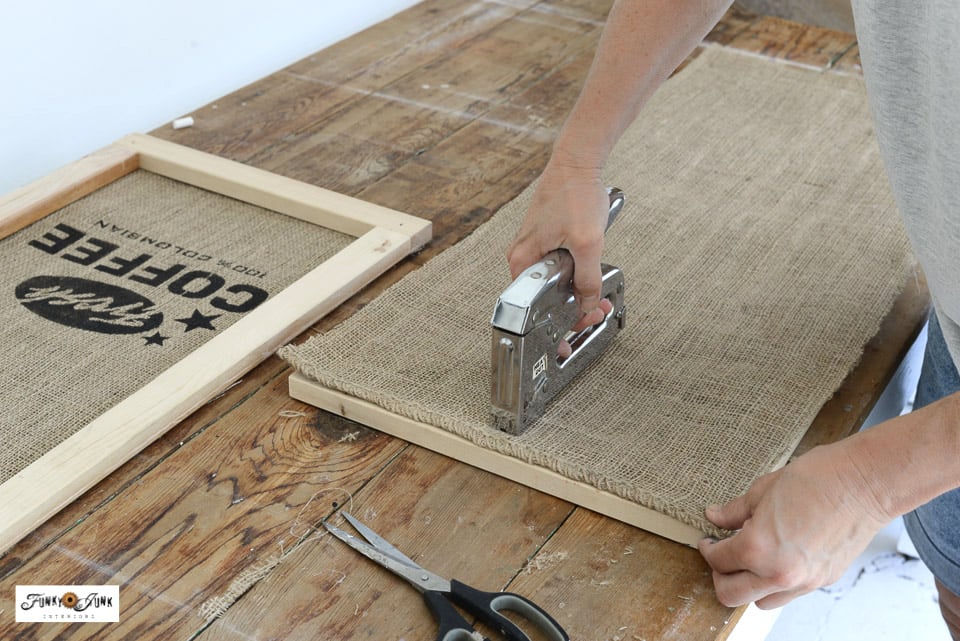
9. Turn door frames good-side-down, then cover the backs with the stenciled burlap ensuring your designs are straight. Then staple the burlap into place.
I stapled the 4 corners first, pulling the burlap tight as I worked. Then worked around each door pane until the burlap was attached without puckers.
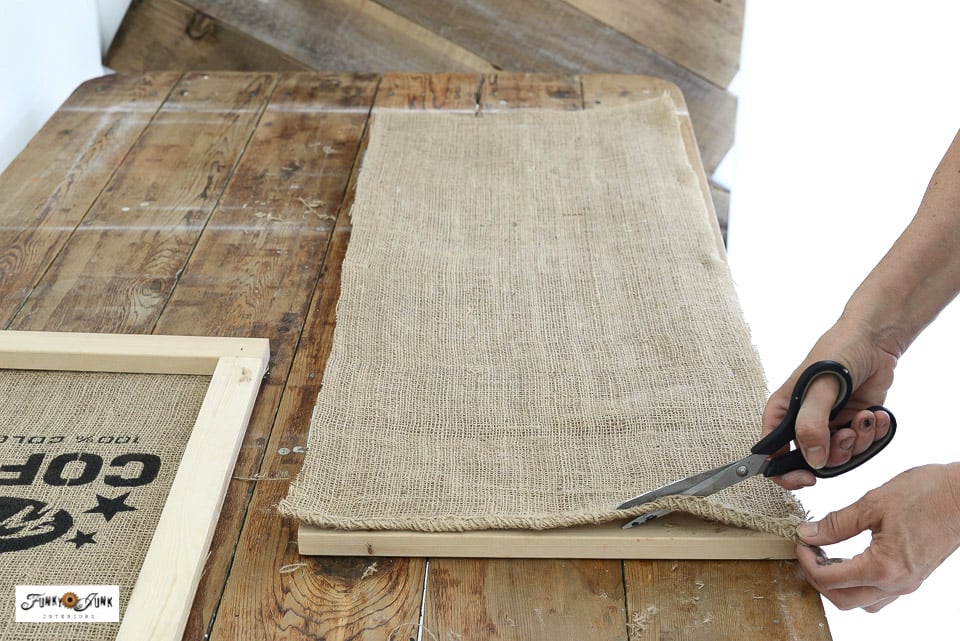
10. Cut along the burlap edges so they are trimmed between the door frames and staples.
Installing cabinet doors to front of dresser
11. Lay the door frame on a table, place 2 small butt hinges (that fit your chosen lumber) along one side, positioned approximately 4″ from the top and bottom of the door frame.
12. Pencil in the holes, then pre drill the screw holes with a small drill bit.
13. Attach the brackets to the door frame with screws, pumping them in slowly to avoid wood splitting.
14. Prop both doors across the front of the dresser, then attach the door brackets to the dresser with screws.
To make positioning easier, I placed a board across the front of the dresser first, then placed both doors on top to bring them up to the height desired before attaching to the dresser.
15. Install door pulls where desired, by pre drilling holes first, then threading the screws in from behind. Turn the knobs to tighten.
This should really be done before installing the burlap! But if you do it after like me, just make sure the drill avoids contact to any burlap or it will strip off the doors. Ask me how I know. LOL
How to build a cabinet with shelves
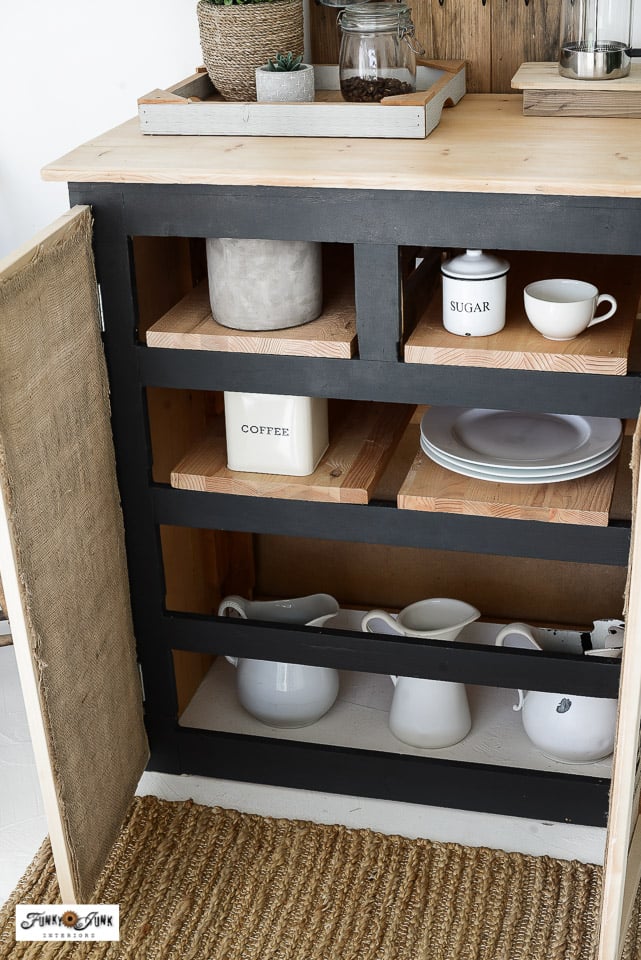
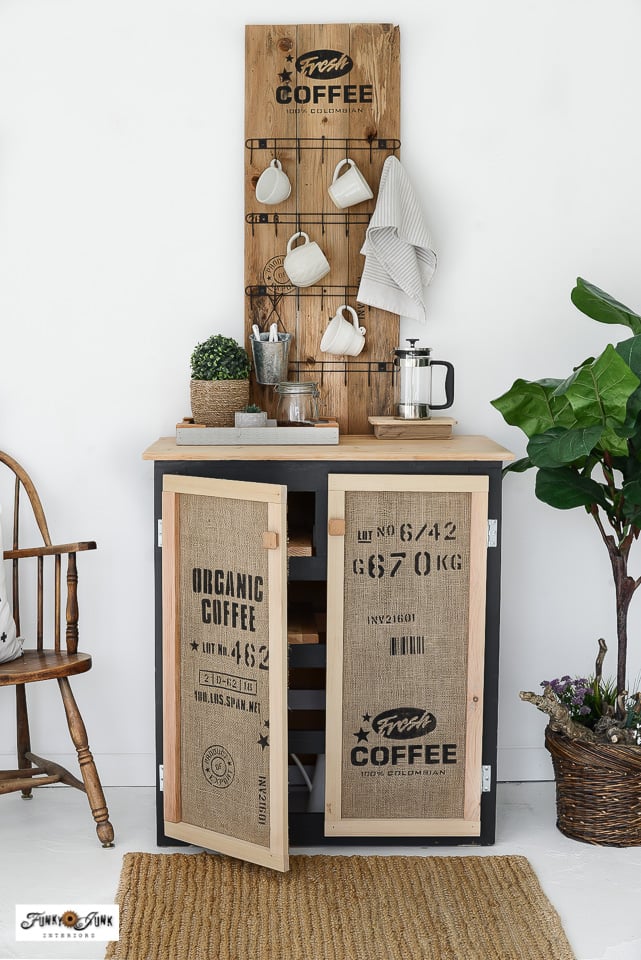
16. To create shelves inside the dresser, place cut boards inside to fit the depth and width for each drawer section.
I cut down some thicker cutting board type wood I had on hand, then slipped it into place without further attaching it. I like the beefy wooden shelves look! I didn’t cut any wood for the bottom shelf but you sure could!
You could also cut down a sheet of plywood to fit inside the spaces or in each groove. Or separate planks of wood. I tend to just work with whatever I have on hand.
Shop cabinet contents:
- Labeled coffee, tea, sugar kitchen canisters
- White farmhouse milk jugs
- Porcelain white dishes
- Jute floor mat
- Rustic wood trays
- Concrete look planter
- Storage jars with metal closures
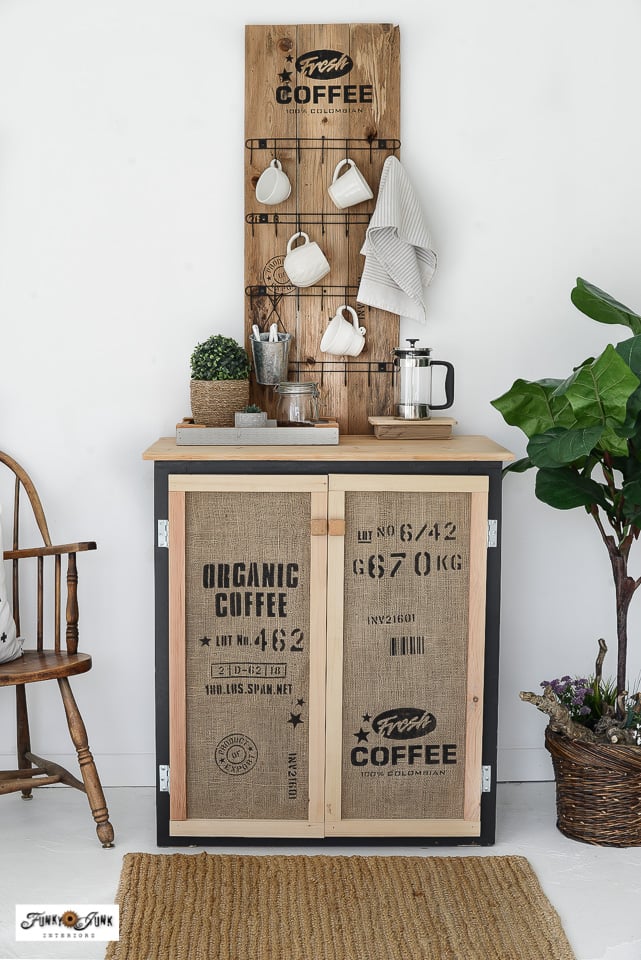
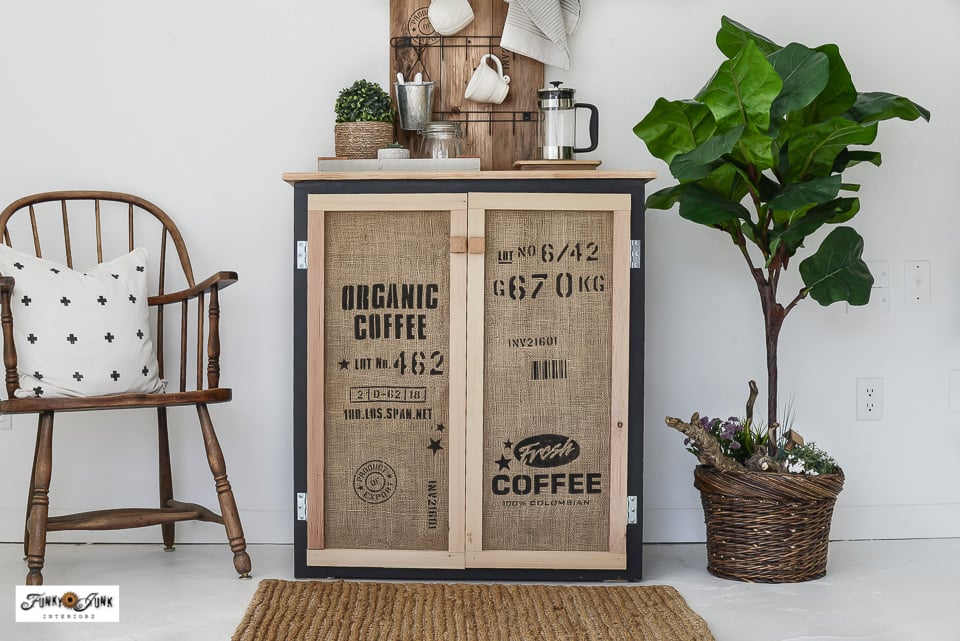
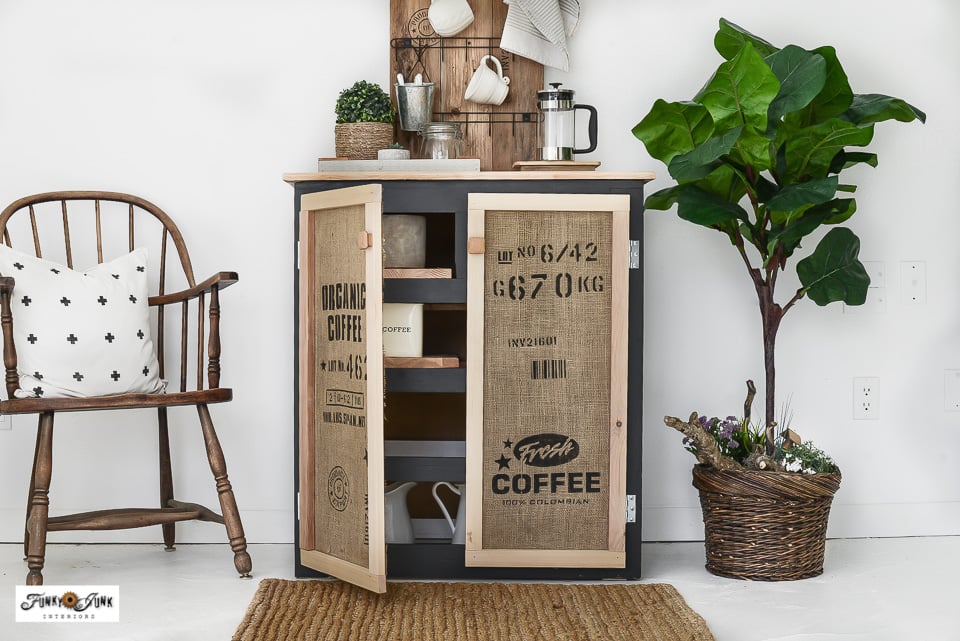
Completed dresser turned cabinet
Then stage your cupboard to whatever need you have! Since I was going for a coffee bar look, I propped up a past coffee mug hook holder above the counter on the wall to complete the look.
My goodness, this setup makes me want to rip out my kitchen and do it up like this! I LOVE the rustic look mixed in with wood and black, giving true blue coffee shop vibes, don’t you think?

View tutorial: wall mounted coffee mug rack
You may remember this coffee hooks panel from a previous post. I couldn’t NOT include it with this project. It’s such a neat piece that stores SO many mugs utilizing painted dollar store hooks! It’s a great piece that looks nothing like typical dollar store gear.
Shop the coffee station supplies:
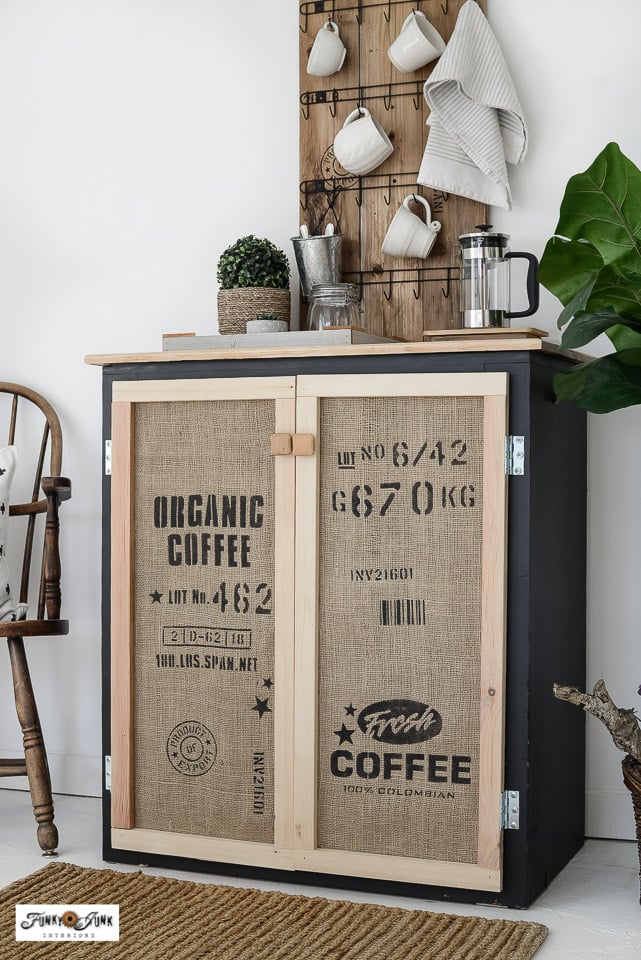
But those cabinet doors… they are so cool. I love the black stamped looking coffee graphics all over the burlap. It really lends towards a coffee shop vibe done easy, with pro results, thanks to a few coffee stencils to help get the job done!
These doors would make pretty cool bulletin boards too!
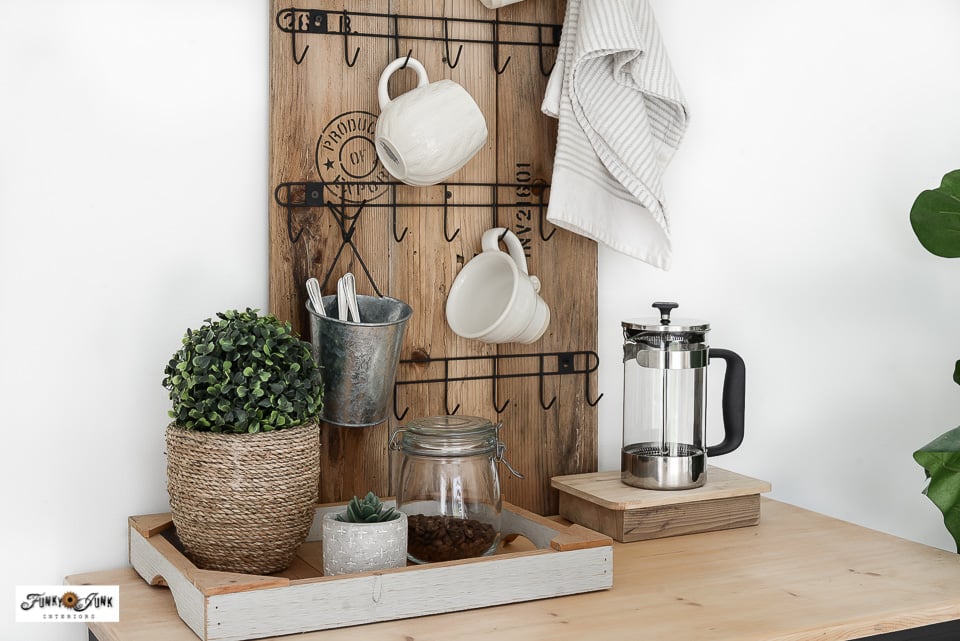
And who knew a simple dresser is the perfect height for a coffee station? While I have the coffee gear spread out on a tray and wood trivet (I made from a dollar store cutting board and slap of 2×6 scrap wood), a coffee maker would have ample room to live here.
But don’t need a coffee station? This piece could be used for whatever YOU need:
Other ways to use this dresser turned cabinet:
- TV media station – use a double drawer dresser to gain more length
- Entry table with footwear storage inside
- Toy storage in a playroom
- Office storage
- Craft room or art supplies
- Workshop tools
- Food pantry
I’m actually thinking that cabinet doors could be added to the front of a dresser even with the drawers intact. Why not hide the fact that it’s a dresser if you want it in another room? I’d bet that could work, as long as you added some kind of wood strip spacers to both sides where the doors attach.
Because honestly?
If you want to learn how to build a cabinet easily, go grab your nearest dresser and get busy creating your own rendition of DIY cabinets, by just adding a couple of doors!
Think you’d give this idea a go? What would you use yours for?
Check out other unique coffee stations to make
See other fabulous dresser makeovers with a twist
View many other unique furniture makeovers
How to build a cabinet – printable below!
How To Build A Cabinet From A Dresser using Burlap Inserts: Step By Step Guide
Supplies:
- Dresser with drawers
- 4 Butt hinges
- 1x2 lumber for door frames
- Kreg Jig pocket hole maker
- Burlap
- Fusion Mineral Paint - Coal Black
- TSP Alternative by Fusion Mineral Paint
- Measuring tape
- 2 Wood cabinet door knobs
- Velour paint roller (leaves no brush strokes)
Instructions:
- Choose a dresser where you can easily attach hinges along the front or sides.
- Remove dresser drawers and drawer sliders. Cut insides clear of drawer dividers if desired.
- Clean, scuff sand, then paint the dresser front and sides. Sand the top down to bare wood to achieve this look.
- Measure the dresser height and width along the front, then design 2 cabinet door frames to fit. I used 1x2 lumber.
- Cut wood, then assemble each door frame with a Kreg Jig pocket hole maker.
- Place door frames onto burlap, trace inside and outside with chalk.
- Stencil the burlap panels inside the chalk lines.
- Cut the burlap outside the chalk lines.
- Flip door frames good-side-down, then staple burlap panels good-side-down onto frames.
- Attach butt hinges to the sides of each door panel.
- Install the doors onto the front of the dresser.
- Insert cut pieces of wood inside the cabinet to create shelves.
What a fabulous makeover!! Thanks for the inspiration — your new cabinet looks amazing.
Ooooooo I love this. It’s got Donna written all over it. Those burlap inserts and stencilling really make it something special. I never would have thought to use sandbags as material—brilliant upcycling idea.