
Learn how to make a charming Buffalo Checked DIY Hummingbird feeder heater crate using red Christmas lights to keep nectar from freezing!
You might call me a hummingbirds fan…
After viewing how successful my neighbour next door has been with her hummingbird feeders all summer long, I wanted in!
I actually had glass hummingbird feeder, but the red stuff covering the glass part was flaking off. So I decided to replace it with a new plastic hummingbird feeder from my local hardware store for a whoppin’ $10.
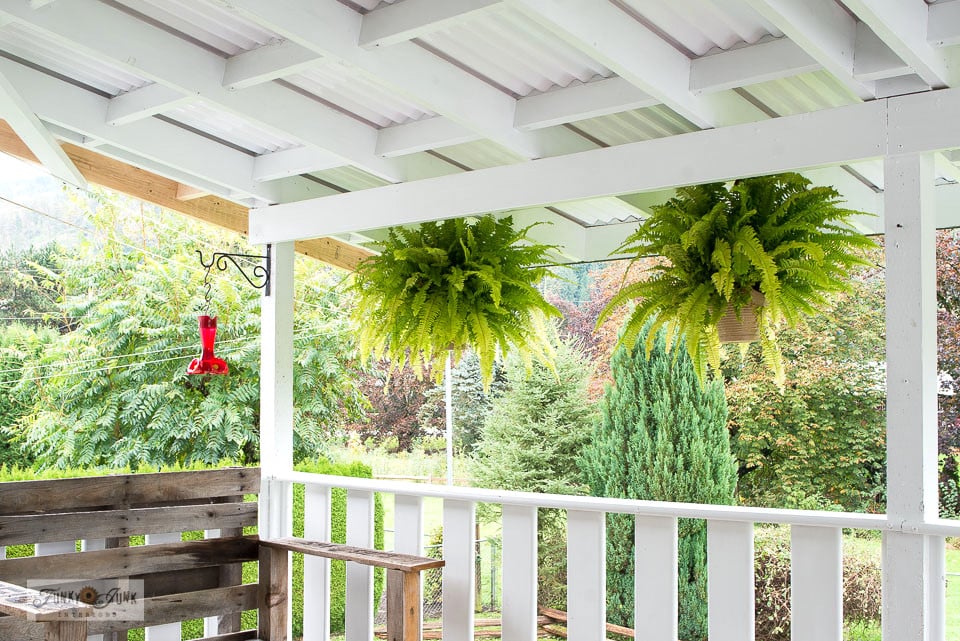
To my delight, I was impressed at how RED it was! And yes, it became a pretty popular spot! But I have noticed it does drip when the birds feed off it, so for that reason, I generally have the feeder hanging in between the two ferns so it drips to the ground down below.
Then we recently got a super cold snap with the wind howling. It looked like the hyummers had quite the time with the feeder twirling in the wind!
So I decided to snoop around in my stash to see if I could come up with a heated feeder of some sort to better protect the feeder from wind and to keep the nectar from freezing during really cold weather.
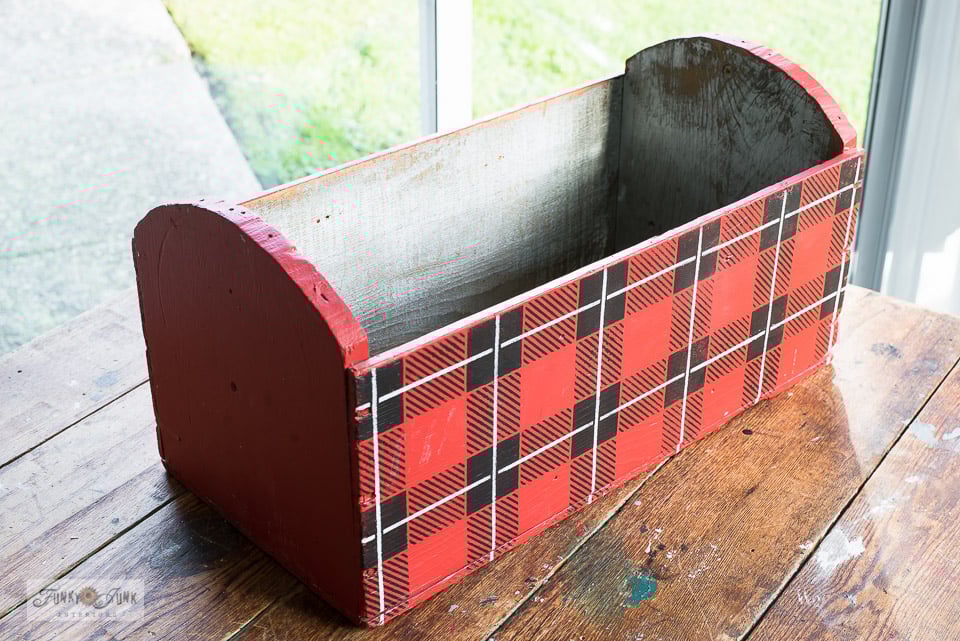
Then, BAM! How perfect would an already red Buffalo Check painted crate be at attracting them?!
Meant to be I say.
If you’d like to Buffalo Check up a crate like this too, here’s how I did it:
How to Buffalo Check / Plaid a plain crate:

Get Buffalo Check stencil HERE

To achieve this layered patterned look, Buffalo Check was stenciled on first, then the thin lines of Plaid Shirt over top.
Learn how to get the 2-toned Buffalo Check look from THIS post or watch the video below.
Video – how to Buffalo Check anything
.
.
Click video above to learn how to Buffalo Check on any surface with flawless results!

How to team up a crate to your chosen feeder
- Turn a crate on its side.
- Hold your feeder inside the crate. Attach any feeder heaters first if you have one.
- Ensure the feeder is deep enough to allow for lights inside, and the feeder can stick out a little beyond the crate sides so you can adjust where it will sit.
Once the crate was flipped on its side, it was the perfect proportion to house the hummingbird feeder inside!
An eye hook was screwed in the top, and nearly called it done.
The crate blocked the wind VERY well and it’s easy to turn around at a moment’s notice… but the hummingbirds somewhat resisted it. Since we were close to freezing temperatures, I wanted to come up with a way to keep it warmer so the nectar didn’t freeze.
I then rummaged through (more like YANKED the entire contents) of the storage area underneath the stairs, and found a string of vintage red Christmas lights… Yay!
But it’s what happened after that stunned me. Once the lights were added, the hummingbirds visited in twos! Because of those red Christmas lights! Now that’s a simple solution!
So today I’m going to share how I turned this crate into a pretty epic DIY Hummingbird feeder heater crate using Christmas lights that not only attracted the hummingbirds even more thanks to the red lights, it’s toasty warm for them too!
This post contains some Amazon affiliate links in which I earn a small percentage from qualifying purchases through these links, at no extra cost to you. Thank-you for helping to support my blog!
Buffalo Checked DIY Hummingbird feeder heater crate

Supplies I used:
- Tall enough crate to house the hummingbird feeder
- Eye-hook
- 1 string of red Christmas lights (retro kind like THESE, not LED)
- Power staple gun and ¾” staples
- Outdoor extension cord
- Cordless drill and screws
- 2 smaller pieces of wood cut to the length of the crate so it fits inside
- Hummingbird feeder (mine is exactly like THIS ONE HERE)
- find some hummingbird feeder heaters HERE if desired
- outdoor plug or extension cord

Creating light strips
.
At first I tried stapling the lights directly inside the crate. But it was a fiasco. Space was just too tight. Creating ‘light bars’ with wood worked best.
1. Do a space test run with the hummingbird feeder and the crate, and decide where the lights have the most space.
2. Cut two strips of wood the length of the inside of the crate.
3. Decide how you’ll lay out the lights, figuring out an entry and exit with the Christmas lights.
You will need the old school outdoor Christmas lights that get hot. LED won’t work. An incandescent light bulb will throw heat.
I started my string of lights from the bottom working up, then across the crate to the other side, then down again, with the string exiting on the bottom corner.
It’s easy to adjust to a safe temperature too. Simply loosen some bulbs to reduce the heat.
4. With the first light positioned to run across the short left to right, staple the first light close to the bottom of one strip of wood.
Hold the light in place, then staple on both sides of the light as close as you can get to secure it.
5. Wind the cord a couple of times around the strip of wood, until you decide on your next light position. Staple the light into place.
My wound cord ended up being kinda loose, so you may wish to use a wider piece of wood so the cord is used up and becomes tighter moreso.

Inserting light strips
6. Once one strip of wood is covered in lights, ensure you leave enough loose wire in between the two strips before starting the 2nd.

7. Cover the next strip.
8. Staple the cords down in between the lights along the front and back so they stay in place.


Attaching the light strips
9. Insert the wood strips with lights inside the crate, then play around with their positioning to ensure the lights don’t touch the crate nor hummingbird feeder.
I decided my hummingbird feeder fit better if I laid the wood strips so the lights faced each other as opposed to facing towards me.
10. Secure the wood strips from the outside of the crate with screws.
And guess what… you just made a DIY Hummingbird feeder heater crate!
The finished DIY Hummingbird feeder heater!
I screwed the crate right onto the patio rails, plugged in the lights, and BAM. The hummers few right in within moments! They even visited in twos! I was pretty thrilled!

Here’s a great comparison.
The crate with no red lights on, yet still a good wind break.

And here’s the lights on.

Finally, add the bird feeder, and try and keep them away from this little red toasty warm oasis during the freezing season!
The lights produced just enough heat to do the job. Plus, you can somewhat manage the amount of warm air by unscrewing a few bulbs if it becomes too warm.
It appears to keep the feeder from the freezing point, and provide a safe temperature that got the job done.
I’ve also found hummingbirds tend to spend more time in the feeder even when not eating just to stay warm!
I’ve also tried several other ways to insulate a hummingbird feeder which also greatly helped:
Other cold winter insulation ideas
- Line with styrofoam
- Staple on tin foil
- Add more boards to the back for more wind proofing
- Use carpet underlay scraps to line the crate exterior or interior
- Exchange two hummingbird feeders during cold weather so you always have a thawed feeder if the nectar turns slushy
- If additional heat is required, shine an outdoor heat lamp or work light on the feeder
- Hang the feeder crate under an outdoor patio roof or eaves for more protection
- Don’t have Christmas lights? Try insulating a crate, then hang a trouble light inside facing the feeder.

Hummingbird’s care & food guideline
And just in case you’ve read that increasing the sugar content in DIY hummingbird nectar helps keep it from freezing during a wind chill moreso, you are right, however that practice is not recommended by wildlife experts at all, citing that more sugar will harm hummingbirds.
The desired ratio for hummingbird nectar for all year around is 1 part white sugar to 4 parts water. Here’s how to make it:
DIY hummingbird nectar recipe – for 1 feeder
- Add ¼ cup white sugar into a cooking pot.
- Pour in 1 cup of water.
- Turn on the heat, and keep stirring, but do not bring the mixture to a boil.
- Remove from heat at the first signs of steaming appearing.
- Cool nectar completely before adding it to the top or bottom of the feeder.
- Refrigerate any extra hummingbird nectar.
When hummingbirds feed
Most hummers start feeding at the crack of dawn. So if I wake up and it’s still dark, that’s a good time to go put the feeder outdoors if it doesn’t stay out all night.
Hummingbirds tend to turn in early for the night, however I have seen mine feed until about 7pm during the winter months when it’s already dark.
How to care for a hummingbird feeder:
- Clean the feeder frequently to avoid attracting other pests and encourage bacteria.
- Refill the nectar feeder frequently to keep the nectar fresh and bacteria-free.
- At the first sight of any bugs or other birds, clean and refill the feeder.
I love seeing the hummingbird feeder heater crate lit up… especially at night! The hummers don’t appear to come at night, however I have seen them as late as about 7pm so I like to keep the feeder out all night with the lights on for them.
How to keep hummingbird feeders and nectar warm in the winter:
- Create a windbreak for your feeder. Add an outdoor safe heat source if possible.
- Have 2 hummingbird feeders on hand so you can rotate a thawed feeder with a frozen or slushy one.
- Ensure the feeder is outdoors and thawed at the crack of dawn if you don’t keep it outdoors all night.
- Check on the nectar frequently during very cold weather to ensure the nectar isn’t freezing over.
- Invest in a hummingbird heater in addition to a heated crate for added warmth for cold spells that may not require the Christmas lights to be on.
- Consider smaller feeders so they are easier to keep up with.
- Ensure every feeder has at least a wind break.
- Place feeder under a roofline for added snow cover if possible.
- Set a timer as a reminder to check on or swap out feeders.
Do I have to feed hummingbirds in the winter?
Feeding hummingbirds during the winter is most definitely extra work. However experts recommend, if you get a variety of hummingbirds during the winter months that you feed during summer, they become reliant on your feeder, so it’s imperative you keep feeding them.
If you will be away for winter or don’t think you’ll keep up, please remove the feeders well before cold weather so your hummers have a chance to find another feeding station.
Are hummingbird feeders bad for the environment?
It depends. If you keep your feeder squeaky clean at all times and change the nectar frequently, hummingbird feeders are low risk.
However at the first sign of your feeder attracting other birds or bugs, either clean immediately, or listen to wildlife guidance in your given area on best current practices.

This DIY hummingbird feeder heater create has been an effective design that works, and I get comfort knowing my little hummingbird friends will have plenty of warm and toasty meals ahead.
Do you get hummingbirds during the winter months too? How do you keep the nectar from freezing?
Buffalo Checked DIY Hummingbird feeder heater crate
Tools:
- Electric stapler
Supplies:
- hummingbird feeder
- hummingbird feeder heater
- wood crate to fit
- outdoor incandescent red Christmas lights
- Buffalo Check stencil
- Plaid Shirt stencil (for white lines)
- Fusion Mineral Paint Fort York Red, Coal Black, Casement
- wider paint brush like this Palm Pro
- dome tip stencil brush
- cup and eye hook
Instructions:
How to Buffalo Check a crate
- Paint a crate red.
- Stencil a Buffalo Check pattern on top in black.Buffalo Check stencil
- Add thinner white lines over top if desired.Plaid Shirt stencil
Adding lights
- Cut two wood boards to fit inside the crate.
- Wind 1 string red Christmas lights around the boards, attaching to themselves at the top.
- Attach boards to the inside sides of the crate so the string of lights continue and the plug side exits near your electrical source.
- Hang hummingbird feeder from the top of the crate with an eye hook.
- Attach crate outdoors in a position that best protects it from wind.
Year-around hummingbird nectar recipe
- Pour ¼ cup white sugar and 1 cup of water into a cooking pot.
- If making more nectar, ratio should be 1 part sugar to 4 parts water. Refrigerate extra.
- Turn heat on low, and heat mixture while constantly stirring.
- Do not bring to a boil. Remove from heat once you see steam forming.
- Cool nectar completely before cleaning and refilling hummingbird feeder.
When to change hummingbird nectar
- Refreshing nectar several times a week is best.
- At the first sight of bugs or other birds, clean and change immediately.
How to keep nectar from freezing
- Hang a hummingbird feeder inside a crate for wind protection. Insulate if you can.
- Add a heat source, such as a hummingbird heater, or DIY a light source such as a heat lamp or Christmas lights.
- Have two feeders to switch out during winter months for when one turns slushy or freezes.
When to feed hummingbirds
- Have feeder out at the crack of dawn if you don't leave your feeder out all night.
- Leave feeder out well beyond when you notice them stop feeding. Some late night snackers may come by!
- If you feed hummers in the summer, and they don't migrate during winter months in your area, be sure to continue to commit to keep feeding them throughout the entire winter.
Other bird-related projects:

5 minute garbage can bird bath

Outdoor fairy garden with a barn birdhouse
Visit many other backyard features HERE
Wow! Donna, that is such an ingenious idea. The hummingbirds must be so cozy when they are eating. The red plaid is gorgeous. I love red and plaid so this makes me want to make one, though not for hummingbirds just to use as maybe a kitchen utensil holder.
Carol b
Thanks Carol! Yes, I think you should go for it! I LOVE that crate and miss it holding my gloves in the front porch! haha Guess it’s time to make another…
SO cute and very inventive 🙂 I will have to try look for some old school lights now!
Another suggestion that might work for other hummer lovers, but would definitely need your cuteness worked into it somehow!… My brother was taking off for a vacation and a cold spell was coming during his absence. He did not want to leave them and have their feeder freeze while he was away. He has a covered pergola close by so he first moved the feeder to make sure they would go it it when moved. Then he hooked up an electric blanket and set the feeder on the blanket and voila! A feeder that was kept from freezing!
What a clever fix, Kimberly! So neat your brother cares to that extent! Yay for the hummers!
That’s absolutely fascinating. I know hummingbirds are attracted to bright colors but would never have thought to enclose their feeder in a bright form to make it more cozy. Do you have to change their nectar more often Donna?
Thanks Michelle! I change the feeder out when it empties, which is about once a week. Now that you mention it, I have noticed the nectar disappearing a little faster than usual!
What a cool idea, and Buffalo Check too! I don’t think it would work in Minnesota!
Bhahaa… you could be right! Our west coast winter is a tad more mild!
Very ingenious invention, with your own unique look! I hope they enjoy all your efforts! We enjoy the hummingbirds flitting around the garden surrounding our porch; they get pretty close sometimes! They drink the nectar of the flowers, so I feed them that way, I guess. Unfortunately, they need to fly someplace warmer in the winter; no way their little bodies could survive our cold. Maybe they’ll come to your house now!
Thanks Lora! Yeah, hoping to keep them interested! haha The red light seemed to really pull them in!
Here in Colorado we are warned to quit feeding the hummingbirds on Labor Day to encourage them to go south. Otherwise they stick around and freeze. Don’t know if that applies to your neck of the woods.
No, the same does not pertain to our area. Our winters are very mild so I imagine that’s why we have a variety that stay put all winter.
All the hummingbirds in Minnesota just flew North for the winter instead of South so they could try out that cute, warm feeder!
Great idea for heating the hummer food. Looks good too, though I’m not so much into that. 🙂 Here in Western WA., it’s understood that if you feed hummers after Labor Day then it’s up to you to feed them all winter, which we do.