Add farmhouse charm to any mirror with a DIY wood frame mirror makeover! An easy barn wood frame that is easy to customize! Add handy hooks for a hall tree look!

I’ve always desired a full length floor mirror done up in a unique design in the corner of my bedroom.
Mirror makeovers are fun and such a cool way to add your own personal style. One of my favs is this yardstick framed bathroom mirror HERE.

A mirror in this corner of the bedroom would be perfect, but on an angle. Which proved to be a challenge.
Then I thought of purchasing a free standing mirror. But once I looked online for ideas, the concept looked relatively easy to make with some barn wood I had left over from THIS big barnwood haul.
So how about a budget-friendly fix instead? Why not build my own wooden frame around an existing mirror?

About the mirror
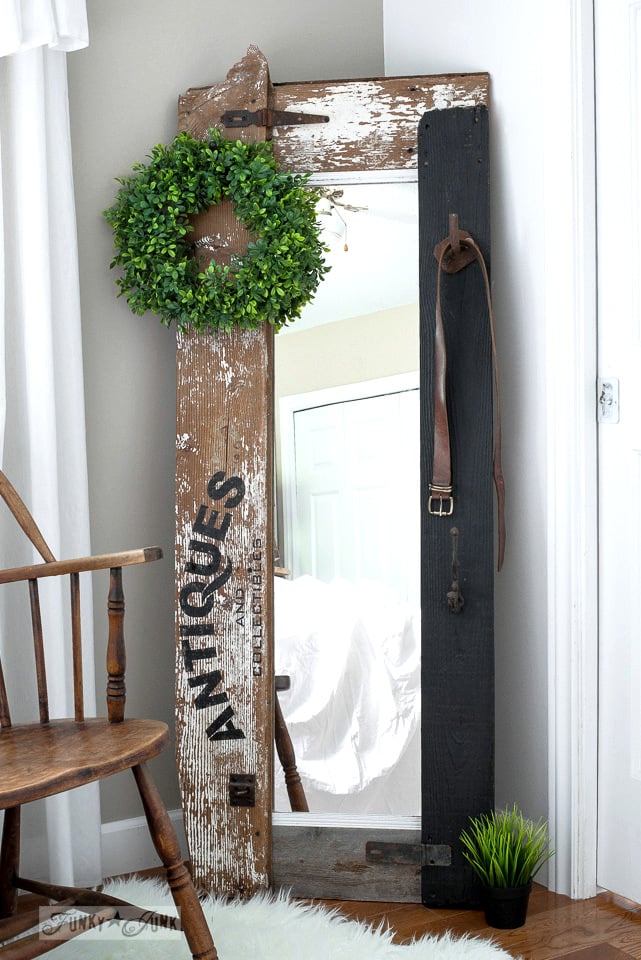
The mirror I had on hand is a very common tall and thin door mirror I’ve had for years. In fact, it came from my childhood home!
The size of the mirror is great as it doesn’t take up much width space. But I’ve always felt it could use a little more visual weight. And that’s where this hefty barnwood score came in handy!
Positioning some pieces of wood around the mirror to dry-fit my vision of a solid wood frame, I was sold. This DIY barn wood full length mirror makeover was gonna be so cool!

Plus… I could make it match my barn wood headboard, which was the very best part!
So here’s a simple DIY project on how to flip any rectangle shaped mirror into a DIY barnwood full length mirror makeover loaded with your own personal farmhouse style!
This post contains some Amazon affiliate links in which I earn a small percentage from qualifying purchases through these links, at no extra cost to you. Thank-you for helping to support my blog!
DIY barn wood full length mirror makeover
Supplies used:
rectangle mirror of your own choice
reclaimed barn wood boards as long as your chosen mirror
Top coat to protect chippy wood – I used Fusion Mineral Paint’s Tough Coat HERE (get 10% off)
Paint of choice for stenciling – I used Fusion Mineral Paint’s Coal Black HERE (get 10% off)
Stencil brush
Wood stain color if desired (I left the wood raw)
Wood screws
Cordless drill

Designing the mirror frame
1. Choose a small or large mirror with a very flat frame, or remove a mirror out of its existing frame. I left mine intact for added durability.
2. Arrange random boards to fit around the mirror’s dimensions to create a thick frame around the perimeter of your chosen mirror. The two side boards will need to be longer than the height of the mirror.
3. Cut the boards to fit around the original mirror frame, leaving the original mirror frame exposed along the top and bottom, as they will need the new boards to sit on.
How to arrange the boards
No need for miter joins this round! This is simpler.
1. Position the top and bottom boards to touch the top and bottom of the mirror, but not overlap the mirror frame.
2. Place the side boards on top of the top and bottom boards, so they completely cover the sides of the mirror’s original frame.
The yard stick shown was to hide the mirror frame, which I decided not to use after all. But it is a cool detail you could add!
Here’s an example of using a yardstick to frame THIS BATHROOM MIRROR.

Supporting the mirror inside the frame
4. Position the wall mirror inside the frame, then secure the backing of the mirror with angled cedar strips screwed into the mirror frame from the back.
This simple concept worked very well! And it’s easy to dismantle if desired too.

View the Antiques stencil HERE
About the Antiques stencil
To add some additional farmhouse charm, an Antiques stencil was used to create a sign on one of the boards.
However, any of THESE sign stencils could work!


5. Antiques was stenciled in Fusion’s Coal Black onto one of the boards to create rustic sign interest.
For some added uniqueness, the Antiques word sits sideways!
How to stencil with no paint bleed
- Position stencil with masking tape where desired.
- Load a stencil brush with paint, then remove most onto a rag until brush feels dry.
- Tap or swirl paint through the stencil to create the stenciled effect.
- Lightly distress by sanding once dry if desired.
Learn more tips on how to stencil from THIS POST.

Protecting the barn wood
6. Because the chippy barn wood kept flaking, a coat of Fusion Mineral Paint’s Tough Coat in a matte finish was brushed on top, then left to dry.
Tough Coat is a clear protective sealer that will help keep barn wood from chipping, protect you from lead paint, adds protection for the sign as well as adding a slight sheen to the wood surface so it’s easier to clean.
This is one of the best products to stock if you work with lots of reclaimed wood. I pick it up all the time.


Adding rustic hooks and hardware
7. Random rustic hooks were installed to the mirror frame so the mirror could be used like a hall tree.
Hooks come in so handy in small spaces for hanging clothes, belts, purses, or just home decor!
Some extra accessories such as rusty hinges were also added to chime in with the industrial farmhouse vibe.

One board was also painted in Fusion’s Coal Black to make the mirror frame even more unique.
This barnwood framed mirror was certainly making the room feel farmhouse cohesive already!
Imagine this full length mirror frame installed horizontally as well… would make really cool coat hooks perfect for an entryway.
So… let’s get this rustic mirror into place and decorate it up!
The finished wood frame mirror!
What a fabulous rustic mirror transformation!
Since this was a full length mirror, I felt it didn’t need a stand. If sitting against the wall, it really was tall enough as-is. The barnwood frame really beefed up the structure! Isn’t this now decorative mirror a beauty?!
However I decided to see if I could give the mirror more height without building anything else…
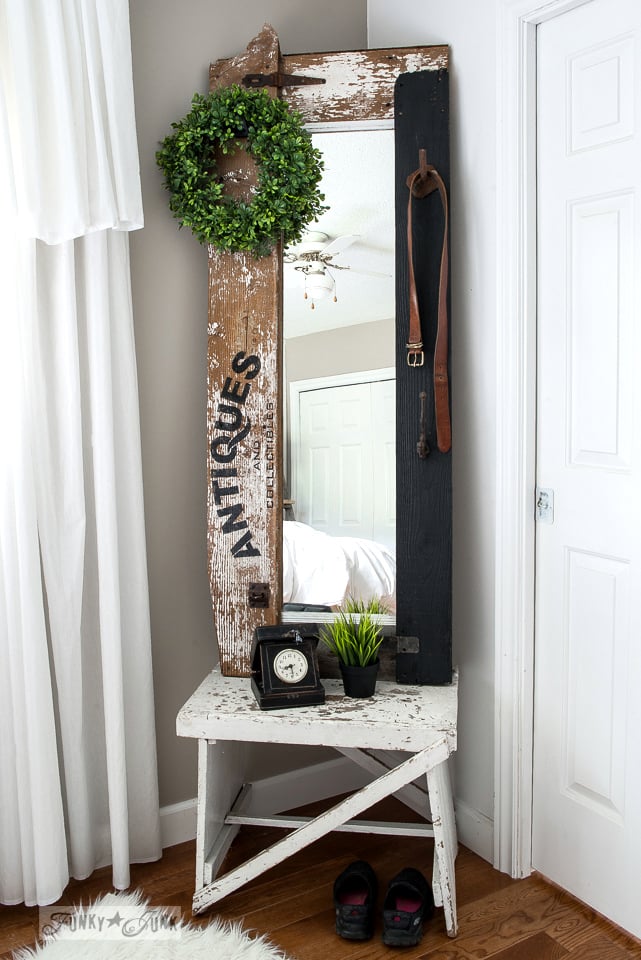
Adding a bench for extra height
A little white chippy bench became a great choice, since it ended up visually anchoring the wood frame mirror even more, while creating a little extra height!
The bench also provides extra side table space to stash some loose change or car keys.
Since the DIY mirror frame is so beefy, it’s large enough to even attach some handy coat hooks to act as a hall tree, or even small shelves if desired!

Oh goodness yes! Now that’s a DIY barn wood frame mirror makeover to love!
The added hooks are so handy to hang clothes and accessories such as a belt or purse, or perfect for decor such as a wreath or otherwise.
So really, this tall mirror became a wall tree. And that’s much more handy than just a mirror in my book.
Other places to use a wood frame mirror:
- end of a hallway
- living room
- entryway
- bathroom for towels
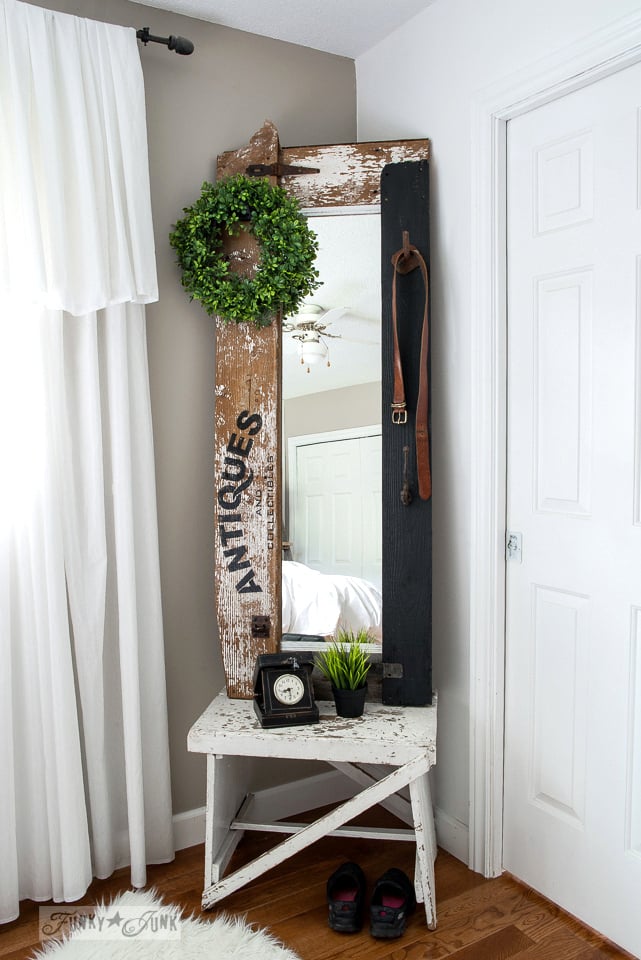
The full length mirror also ended up being the perfect addition with the barn door headboard, landing the perfect tall and much more interesting mirror I’ve always dreamed of having!
Now that’s a mirror makeover! And here I had all the supplies all along without needing to splurge after all.
Decorative mirrors such as this can take on a variety of styles. Simply choose the wood that suits your space, then frame the mirror to create your own unique dressing room space to your own taste. Whether it’s with an ornate frame or right down to farmhouse chic like this one.
Think you’ll give this easy wood frame mirror idea a go on one of your own plain mirrors? How would you style yours to suit your own room decor?
Other rustic projects to make:

Framed bathroom mirror in this salvaged bathroom tour

Learn how to build a faux barn door headboard

Learn how to build a ladder night stand
Visit other master bedroom projects HERE
And many other reclaimed wood projects HERE
I love it and the idea you used everything you already had to make it!
Love this “take” on a hall tree. And, you are so right, it is a perfect fit with the new headboard.
You are amazing. And I love how you so creatively use your stash or collection of rustic items to embellish the items you make.
Love it!! I think I will do it with my mirror!!
Before I spend time reading all the details of your mirror revamp, I just gotta tell you that I can’t wait to do the same with a mirror I’ve never really liked. And I will get to use my cordless screwdriver my husband gave me for Christmas. I charged it up and I squealed with delight when it worked. OMG – I am excited. By the way, your ceiling on your porch shows up well in the mirror. I kinda like it. Thanks for the ideas! Take care.
YESSSSS! Make that thing start working Joanne! And I want to hear a progress report!
As for the ceiling, it’s pretty awesome! It’s made from white transparent like corrugated plastic so the sunlight penetrates it somewhat. Never feels dark, it’s wonderful!
Awe-Some! I love mirrors, just not looking at my reflection. Lol!
*High 5*… Exactly… haha
OMG, I love this. What a fabulous idea. Thank you so much for sharing
Very creative! I like how you left the pointy piece on the top of the left board. And I also love the stencil idea. It’s probably a little too rustic for my home decor but I was thinking it could be used in a junk-themed garden space with or without the mirror.
Good job. Thanks for sharing the project.
Oh, and the old hardware hinges absolutely make it!
Thanks Naomi! I could totally see this idea being used with new, non chippy wood as well! Knowing how this worked out encourages me to pick cheap mirrors so I can do unique things to them! Who knew? 🙂
I’m not a mirror person but this one is just fabulous, Donna!!! Without a doubt this is my all time favorite mirror and it looks just perfect in your bedroom corner.
Sigh – I just sent one of these mirrors off to the thrift store. NOW you tell me what to do with it! LOL Beautiful results!
Your mirror looks fabulous and so Funky Junkish, Donna!
Thanks for featuring my farmhouse decoupaged bucket this week!
What an excellent idea, and a fabulous job you did here. I love it! Thanks for sharing.
I don’t care how many times I come across your website, which has been many many and all I can say is that I love everything you! Everything!
Thanks for sharing Donna! I love this idea. I’ve got a long frameless mirror sitting in my garage I wasn’t sure what to do with and now you’ve inspired me 🙂 Some old wooden pallet planks will be perfect for it. Do you think I should maybe glue the wood to the mirror or the cross support boards would be enough to hold it in place?
Hi Kasia! I think it’s a matter of whatever will work. Since my frame overlaps the mirrors from the front, I see no need for glue myself. It all depends how you decide to frame it I suppose!
I love it and love your “complete” instructions. I find many sites leave out so many steps that you really are guessing to do the project. Maybe that makes it more fun for some but not me lol! I am totally in love with your curtain valance! Any chance there’s a dyi on it?? ?♥️
Hi Linda! The curtain valance is an iron rod cut to size and hung in place with curtain rod extensions. Cut fabric (found at the thrift) is hung on the rod, pulled up from the back until a valance of sorts appears in front. Nothing fancy!
Never would have guessed; looks great!! Thank you
Eeeek! Is this a new project? I love it. You are the master at adding just the right amount of junk, without making it look junky, lol!
I LOVE it!
Haha, no, it isn’t new, but it’s still up if that counts! I LOVE it!
Very nice~ how did you get the mirror back into it’s frame once done? I think I kind missed that part? What kind of screws did you use?
My 2 daughters and I may try this we love your mirror!
Hi Rebecca! If you are referring to the mirror in the original frame, I left that as-is. I did not remove the original frame from the mirror. This is where I say that in the post:
Designing the mirror frame: 1. To beef up a frame of an existing mirror, choose one with a very flat frame, or remove a mirror out of its existing frame. I left mine intact for added durability.