Create a unique and budget-friendly 2-season decoration with this DIY tutorial for transforming wood pumpkins into a charming snowman craft! All you need are some common materials and a little creativity!
As a Fusion and Amazon Influencer, this post contains affiliate links in which I earn a small percentage from qualifying purchases at no extra cost to you. If you shop Fusion Mineral Paint products through this post, you will get 10% off. Thank-you for helping to support my blog!
Ever notice once the fall season rolls around, how quickly winter tends to follow?
It’s for this reason I like to incorporate both fall decorating and winter decorating in close proximity!
However today, I’m going to share a new project that covers BOTH fall and winter decor! Too good to be true? Not if you try this…
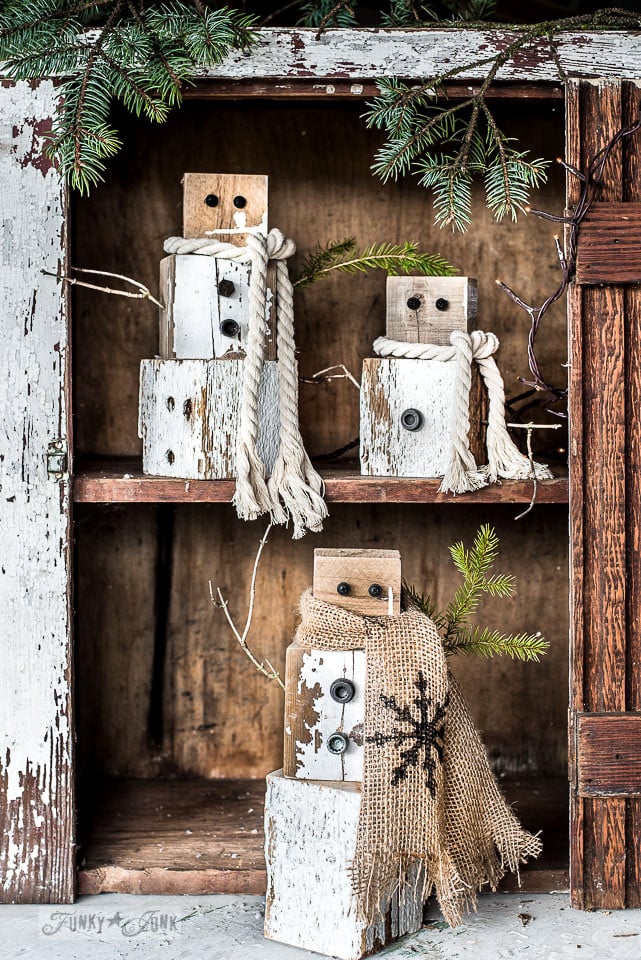
View different variations of these rusty junk wood block snowmen HERE
As a bit of a recap, I created these adorable and oh-so-easy wood block snowmen which would make easy snowman crafts for even kids to make a few years back, wearing a chippy white wood finish to mimic snow, along with plenty of rusty junk to decorate them different ways. They go viral each winter, and I still put them out! SO cute! One of my fav winter projects to-date.
However it is time for a slightly different twist! This round, one side of the wood blocks will be something you can display for fall, then turn them around for instant snowmen!
Imagine… make one craft then display it basically for 6 months out of an entire year if you wish! However this fall and winter project also goes one step further… all the supplies are common materials you will likely have on hand already. So no need to head to a store. Shop your own stash and get creating!
Ready to get your fall AND winter crafting on? Here’s what I did:
DIY Reversible Wood Pumpkin Into Snowman Craft Using Common Materials
Supplies I used:
Tools:
Orbital sander (I like Bosch variable speed)
Drill bit set that create holes
Craft materials:
2 sizes of square posts (my posts are 3″ and 4″)
Fusion Mineral Paint in Casement (10% off)
Flat brush – 10% off (I like the 2″)
Plain coloured socks (I ordered these and LOVE them for crafting with!)
Black, white and orange buttons
Faux or real small twigs to work as arms and stems
Small faux leaves or dried real leaves from outdoors
Real grapevine tendrils (or make your own with wrapped twine or wire)
Mini alphabet and numbers stamps to make a FALL tag
Toque decorations: I used tiny styrofoam balls and a cut up white fabric doily with circle shapes
Here’s some mini flat Christmas decor that could also work
White cotton rope in both .25″ and .5″
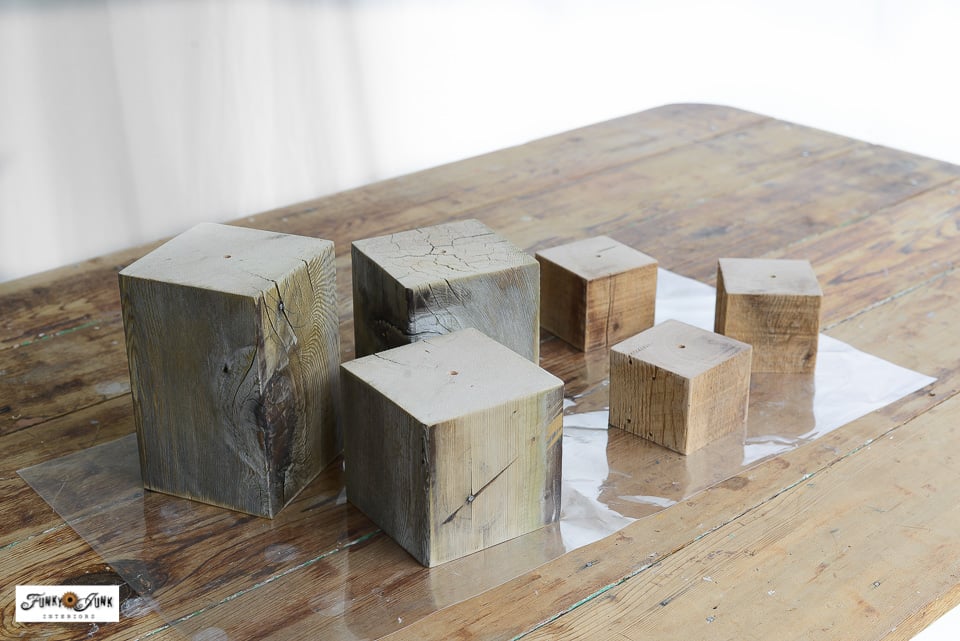
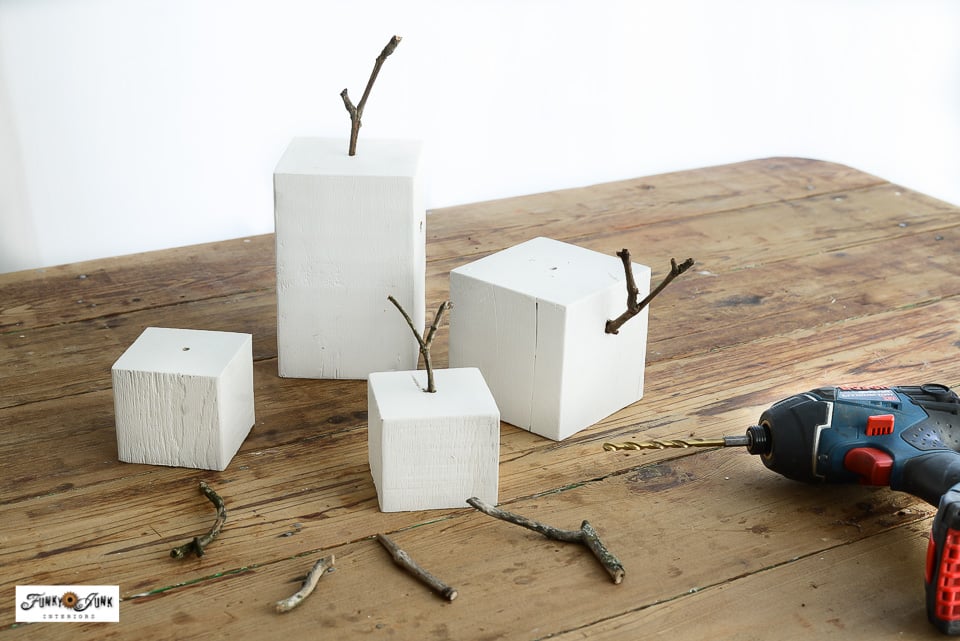
Cutting square posts into blocks
You are basically cutting wood blocks scaled to work as stacked snowmen first, that will double as pumpkins. The smaller posts become snowmen heads, with the larger posts their bodies.
1. Cut / sand a larger 4″ square post into 4″ and 6″ lengths. Cut a 5″ if you want 3. I misplaced mine!
2. Cut / sand a 3″ square post into 2.5″ lengths. I cut my heads all the same size.

Fusion Mineral Paint in Casement (10% off)
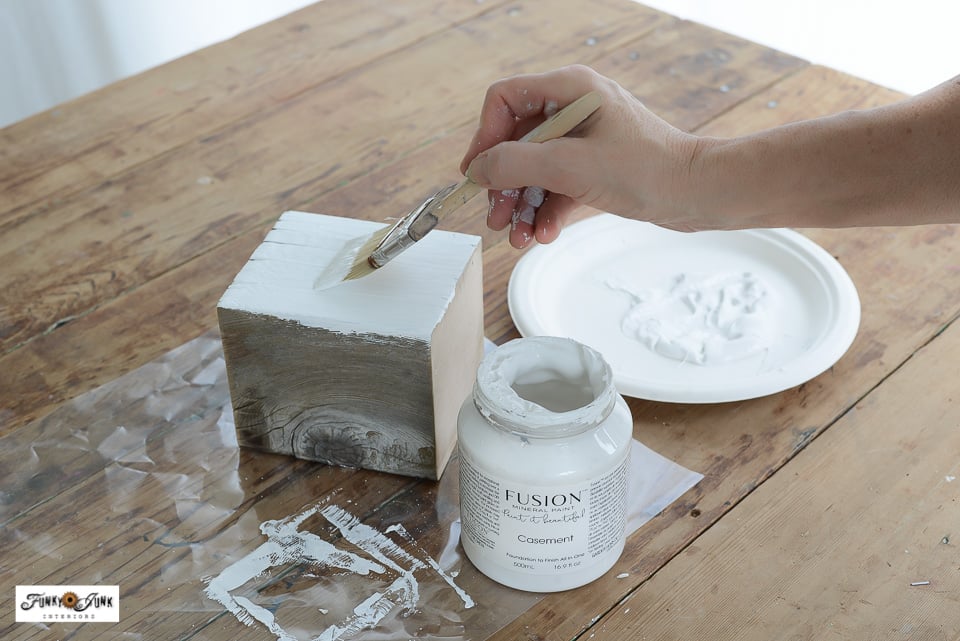
Painting all wood blocks white
3. Paint all the wood blocks white on all sides and tops with Fusion’s Casement (10% off).
I loved using the 2″ flat brush 10% off) for this simple task!
Fusion Mineral Paint in Casement (10% off)
Painting the wood blocks in white is the key to making this 2-season project to work!
I painted two coats, allowing each coat to feel dry-to-the-touch before continuing.
Set yourself up well with a drill bit kit!
Where to drill holes into wood blocks
4. Collect some small twigs from outdoors.
I particularly liked the twigs that branched off in a V shape for more interest!
5. Using a drill bit slightly larger than the twig size:
- drill holes into the tops of all the wood blocks (for pumpkin stems)
- for the LARGER blocks only, drill a left side and right side hole (for snowmen arms)
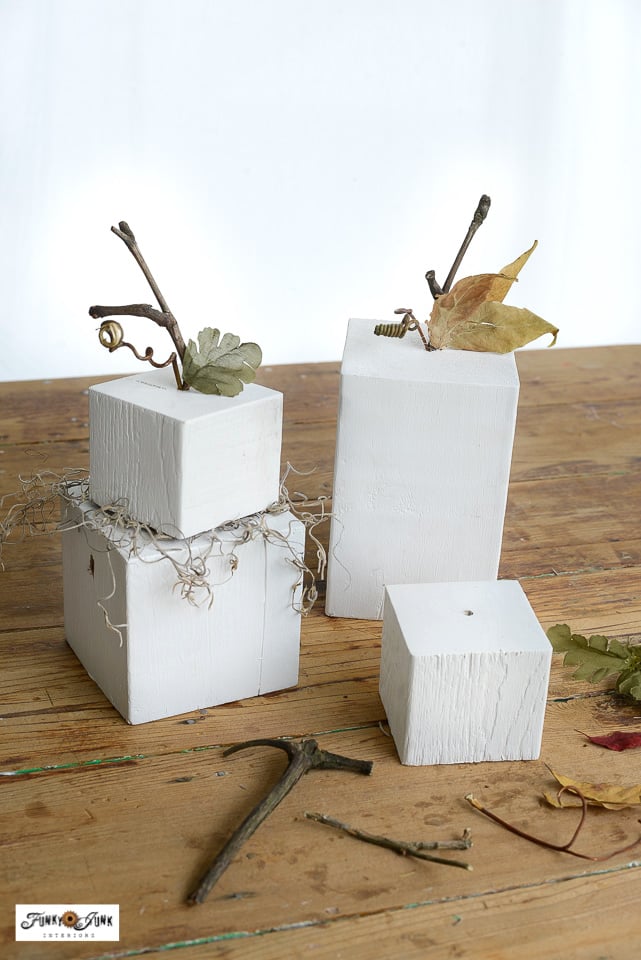

Creating leaves, tendrils and stems for pumpkins
6. Create pumpkin leaves by snipping off silk leaves from faux flowers, or hot glue together 3 outdoor leaves to better resemble pumpkin leaves.
I found just one real outdoor leaf had them resembling apples. LOL So 3 leaves is better!
You can purchase small faux fall leaves HERE

Stamping a FALL paper tag
7. Using an alphabet stamp set, stamp out the word FALL onto a paper tag.
I am smitten with this mini alphabet and number stamp kit! I’ve been using it to create custom messages of any types onto paper tags, but could also be used to make mini wood signs and such too!
8. Attach a small piece of thin twine through the tag, tie the twine in a knot, then snip off the overage.
Completed white wood pumpkins
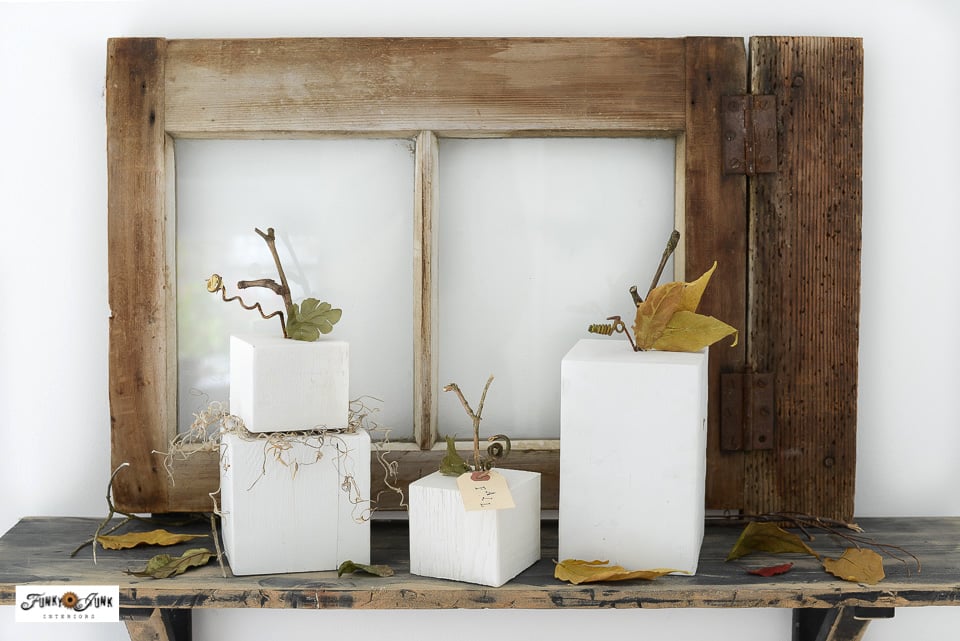
And my creative friends, I now have some of the cutest white wood pumpkins to decorate my home for fall!
The white wood pumpkins can be arranged in so many different ways! Stacked is cute with a little spanish moss in between. Or simply arrange them side-by-side for a wider display. The choice is yours!
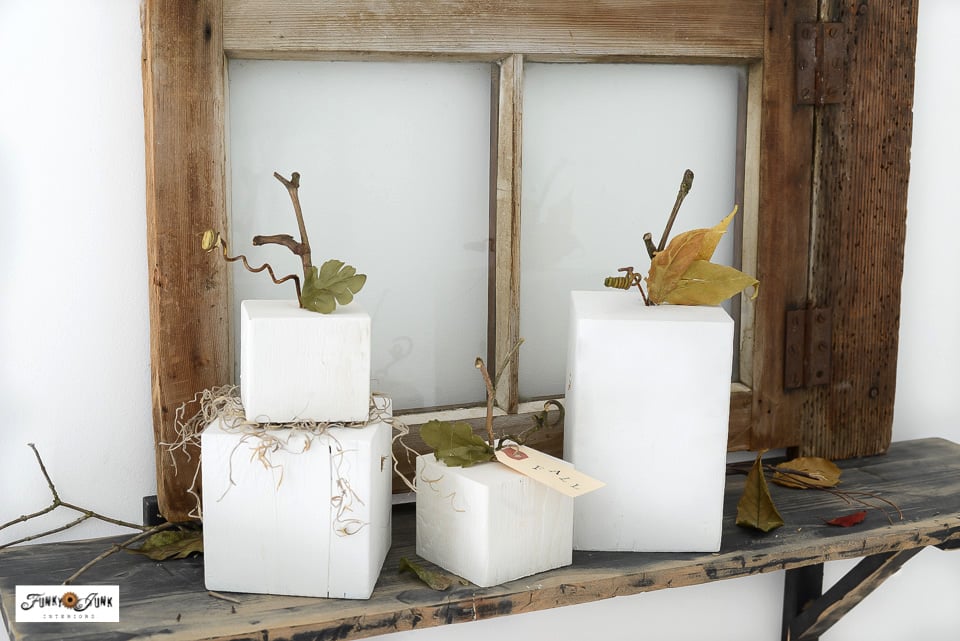
I love the white pumpkins which blend into any decor style!
How to hide the drilled side holes
And while you do see some of the side drilled holes in the pumpkins, I just position them to be less noticable. However you could trail spanish moss down those areas, or tape on a faux leaf or two if desired. Or randomly cover the pumpkins with white buttons so it becomes part of an intentional look.

Where to display wood pumpkins
The white pumpkins look especially cute against a darker backdrop, so feel free to make lots so you can display the wood pumpkins as shelf sitters, along window sills, or wherever you wish!
You could also drill larger holes along the tops off-center for real or faux taper candles to sit in!
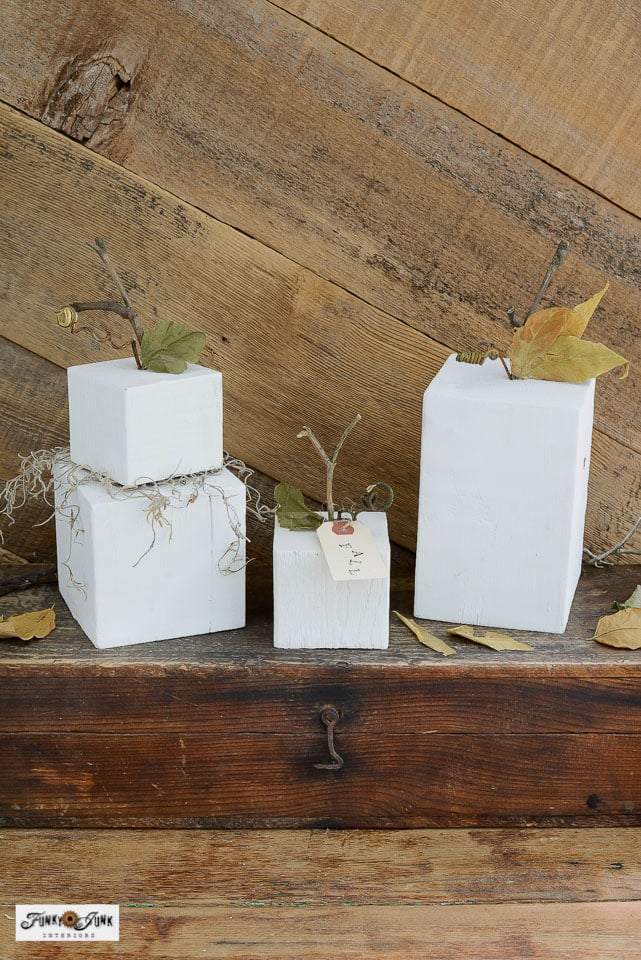
I just think the wood pumpkins are SO cute! Love the white, which make them simple and attractive to decorate with.
And here’s why the pumpkins are white… turn them around and let’s flip the same wood blocks into an instant snowman craft!

Which colour buttons to gather
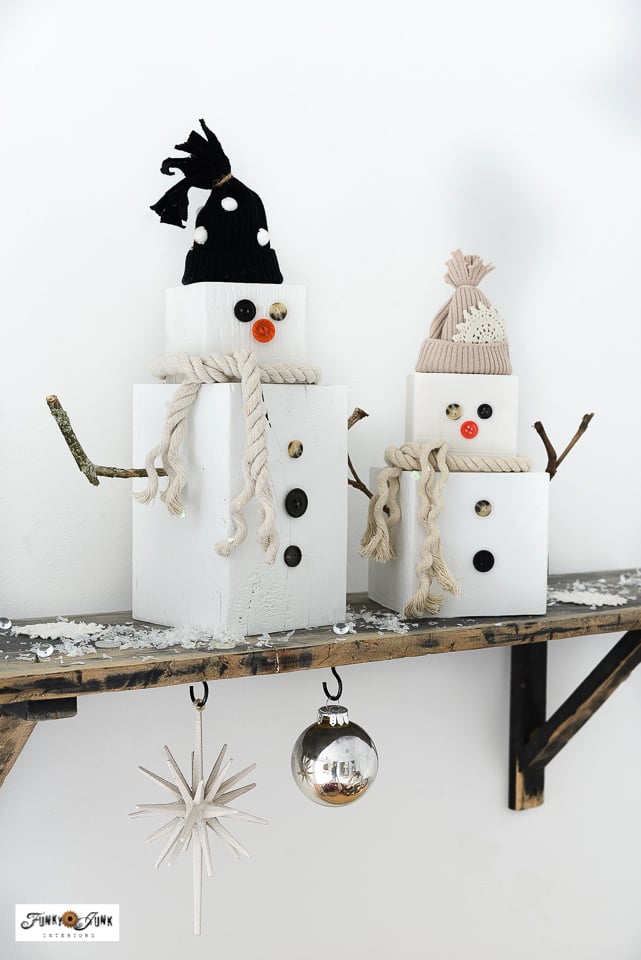
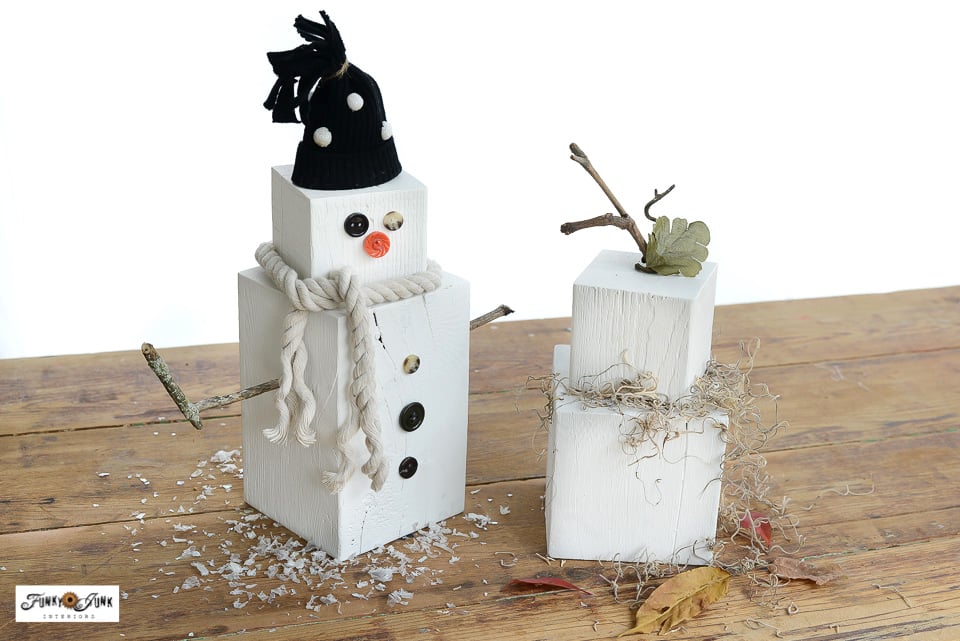
9. Collect some random buttons to create snowmen eyes, nose, buttons, plus white buttons for snow.
I used random sized, black-toned buttons for the snowmen eyes and buttons for a little more interest! Then I chose orange buttons for the snowmen noses, and some additional white buttons to mimic snow for the display.

Hot gluing buttons onto blocks for snowman craft features
10. Hot glue the eyes and nose on each small wood block, (but no mouth) then hot glue the body buttons on the larger wood blocks.
I used two buttons for the smaller blocks, and 3 buttons for the larger.

How to use thick cotton rope for snowman scarves
11. Place the snowmen heads loosely on the bodies, then wrap and cut some .25″ and .5″ white cotton rope around the necks to resemble winter scarves.
The heads stay on the bodies very nicely without permanently attaching them.
I also used a slightly thinner white rope for the smaller snowman, and thicker rope for the larger snowman. The ends of each rope were slightly unraveled to give them a tassel effect.
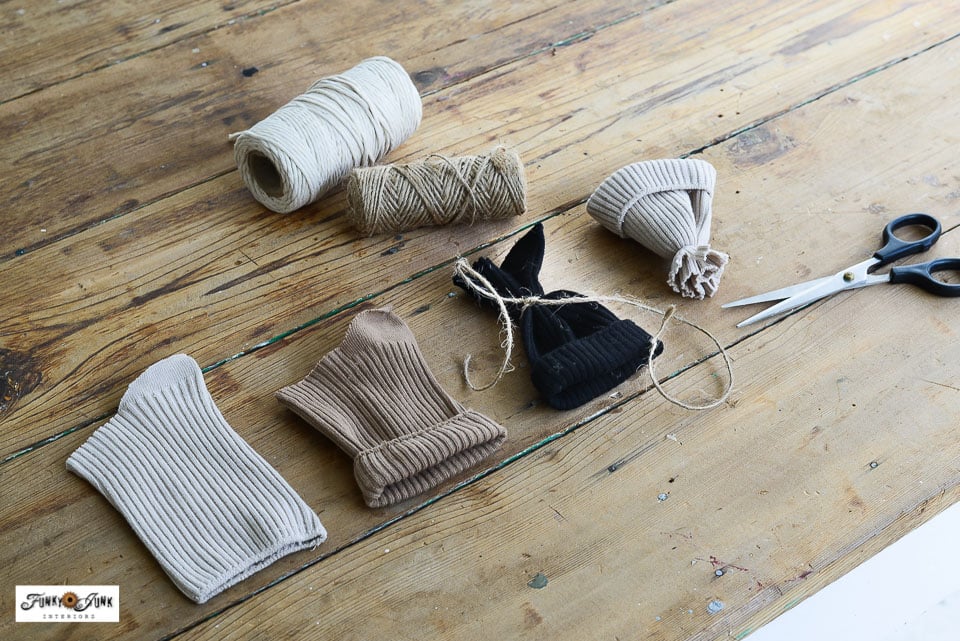
Get this bundle of neutral crew socks HERE
Creating snowman toques out of socks
12. Cut some plain coloured socks straight across at the heel mark.
I previously used the rounded part of these very socks to create THESE adorable fabric pumpkins made from socks! So I was pretty happy to come up with a way to utilize the leg part!
I purchased a new pack of various neutral socks from HERE
13. Fold, tie, then cut the socks to resemble cozy touques! Here’s how:
- Fold up the sewn side of the sock to create a cuff.
- Tie the cut side of the sock with some twine, and trim the ends off.
- Cut straight across the tied area leaving a little extra material.
- Create lots of cuts towards the knot to create a tassel effect out of the material.

How to fray the tips of the toque
Here’s a closer look at the tassel effect, which turned out so cute!
It’s kinda like making Barbie doll clothes. LOL
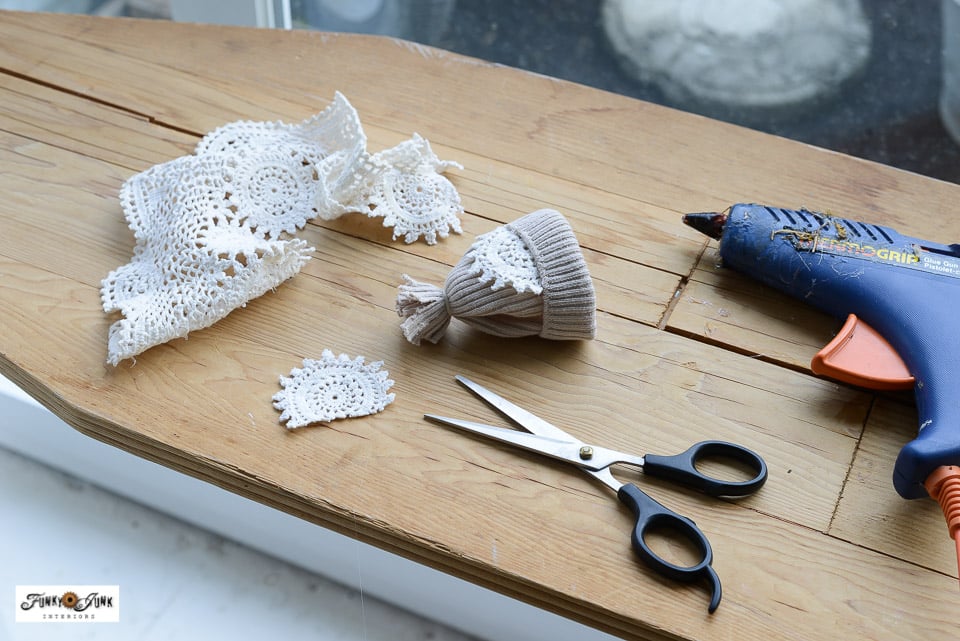
Adding doily detail onto beige toque
13. Decorate the toques if desired.
For the beige toque, I cut out a doily circle, cut a straight edge across the bottom, then tucked it into the cuff of the hat.
SO cute!! I think it resembles a snowflake. And it was a nice way to use up some doily scraps I had on hand, picked up at the thrift store for 50 cents each.

Creating a snowball design onto a black toque
To decorate the black toque, I cut some tiny styrofoam balls from a dollar store winter wreath in half using scissors, then hot glued them in random places on the black toque for a snowball or polka-dot effect.

Creating branch arms for wood snowmen
14. Now insert the same twigs you used for the pumpkin stems into the snowmen arm holes instead!
Ack!! Can you even?! I love the wonky sticks where no two are ever alike.
15. Position the toques onto the snowmen heads.
No stuffing nor glue required. They stay put quite well!
Completed wood block snowman craft
And you just flipped some adorable wood pumpkins into two endearing wood snowmen made from common materials most of us just have on hand!
Here’s one more winter decor idea you can make to accompany your snowmen…

How to make winter trees from twigs
- Clip small twigs that resemble small twiggy trees.
- Push them into a rolled ball of air dry clay, while flattening the bottoms so the trees can stand.
- Allow clay to dry overnight. Paint or leave as-is to resemble snow drifts.
See how I also displayed these winter twig trees with a wood gingerbread village HERE

Making snow decor from doilies, buttons and crystal beads
I also used the round doily circles as larger snowflakes, teamed up with a few white buttons and crystal looking beads! Then scattered them to portray a snowfall around the snowmen. So much easier to clean up than faux snow too!
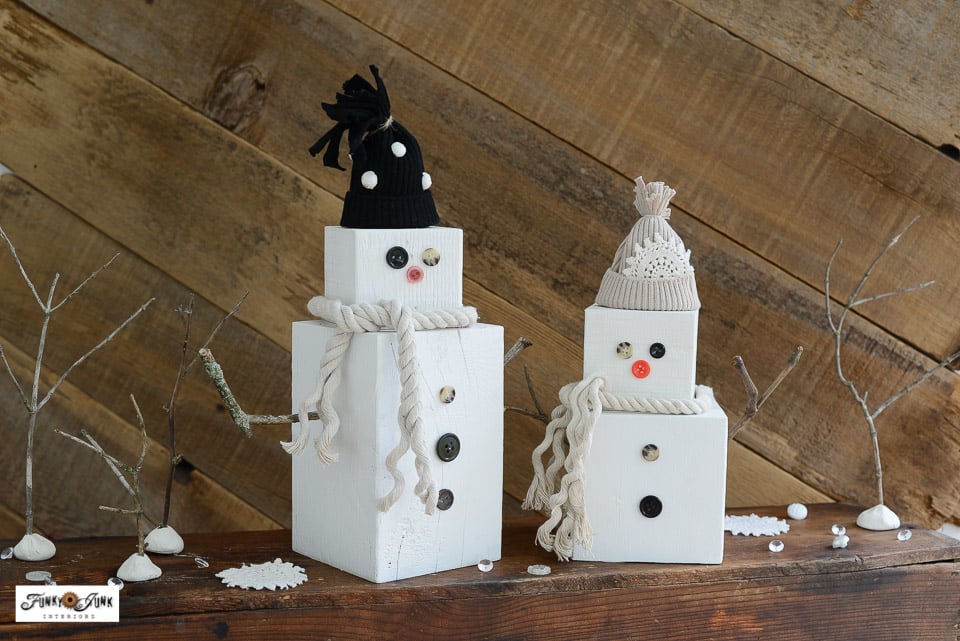
Don’t the wood snowmen look equally adorable against a darker backdrop? You can do no wrong with with this fun snowman craft!
Snowman on one side, pumpkins on the other side
Who knew how fun and creative it would be to turn simple wood blocks into 2 seasonal crafts for fall and winter? This reversible idea is the coolest! Make one craft and use it twice!
Do you think you’ll give this 2-season pumpkin and snowman craft idea a go?

Other easy wood seasonal decor to make:
Chippy white DIY Christmas trees, Pallet-style
Gingerbread Village made with 2×4 scraps
Visit all our unique fall decorating / Christmas decorating
DIY Reversible Wood Pumpkins into a Snowman Craft Using Common Materials
Supplies:
- 3" and 4" wood posts
- Fusion Mineral Paint in Casement (10% off)
- 2" flat brush (10% off)
- 1 pack of 6 neutral socks
- Black, white and orange buttons
- Glue gun
- Faux or real twigs
- Faux or real leaves
- Grapevine tendrils (or make your own)
- Mini alphabet stamps with ink pad
- Paper tags
- Thin twine
- Spanish moss
- Fabric scissors
- White cotton rope in .25" and .50"
Instructions:
- Cut a 4" post into one 4" and one 6" lengths. (if a third, cut it at 5")
- Cut a 3.5" post into two 2.5" lengths.
- Paint all the wood blocks white.
- Drill holes into the tops of ALL the wood blocks, and the left and right sides of the larger blocks only.
- Outfit small twigs to fit into each hole.
Pumpkins
- Hot glue a leaf onto a twig, team with a tendril and place inside the top holes of the blocks.
- To create stacking pumpkins, place a small block on a larger one, with spanish moss in between them.
Snowmen
- Spin the blocks around to the opposite sides.
- Small blocks: hot glue two black button eyes and an orange button nose.
- Large blocks: hot glue 2 or 3 buttons along the front
- Stack the heads onto the bodies.
- Insert twigs into the arm holes.
Create sock toques
- Cut a sock straight across at the heel area. Discard the closed in sock side.
- Fold a small cuff along the uncut side of the sock.
- Using twine, tie the sock closed above the cuff, leaving some fabric to play with on both sides of the knot.
- Using scissors, cut the tied side of the sock straight, then snip into the fabric to create a tassel effect.
- Decorate sock toques if desired. I used a white doily and foam circles.
- Place sock toques on top of each snowman head.
Scarves
- Use .5" white cotton rope, and .25" cotton rope to create snowman scarves. Wrap around the necks, cut length, then tie it together.
- Sprinkle faux snow, doily rounds, white buttons around the bottom of the snowmen to resemble snow.
Use the pumpkin side for fall.
Then simply spin around to display snowmen for winter!
Notes