Learn how to create this festive and unique DIY Noel Christmas vertical Porch Sign with a unique gift tag shape! Easily made with stencils, featuring an argyle pattern Christmas ornament for a fun twist. Read the full Christmas sign tutorial below, including a helpful video to show you how!
By now you already know I am smitten making rustic reclaimed wood signs. Especially for Christmas decor!
However, this round, I desired something a little different. Square sign boards are great! But I’ve always visioned shaping a sign like a giant gift tag that would chime in perfectly with the holiday season.
The concept is pretty simple. I visioned a tall, vertical porch sign with two edges cut on an angle along the top, with a hole punched out to resemble a hole-punched gift tag.
What a fun farmhouse styled front porch holiday sign that would be!
But what would this particular Christmas signs sayings would I choose this round?
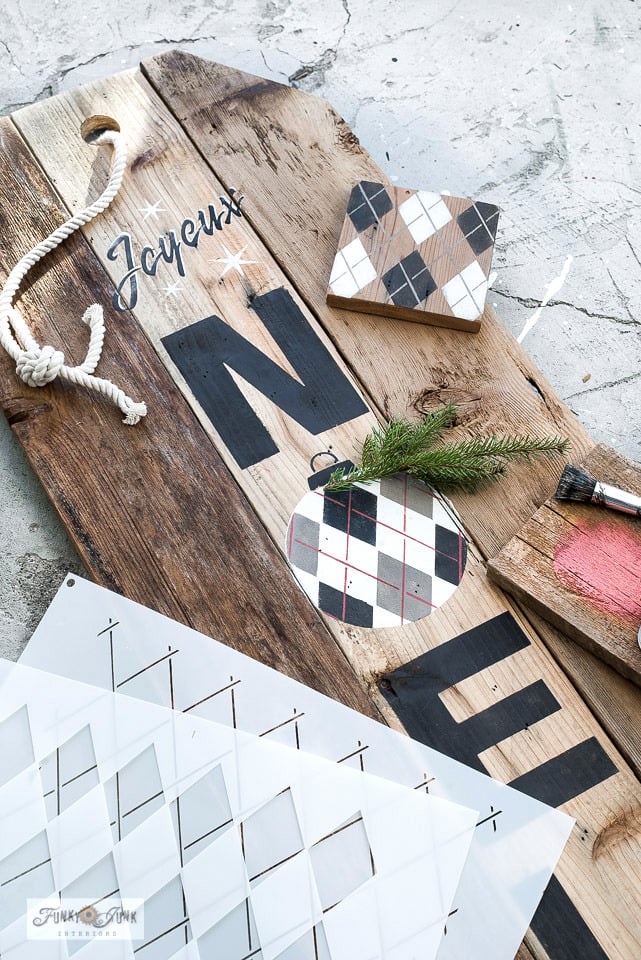
And that’s when I pulled out the Christmas stencil Joyeux Noel. Seemed fitting! It’s a traditional Christmas saying that seemed to fit an enhanced background for holiday decor.
And boy, did this Christmas porch sign turn out cool! It’s easy to make from solid wood, and is an adorable way to offer the ultimate festive welcome by the front door! Let the festivities begin!
Here’s how to make this Christmas signs DIY:
This post contains some Amazon affiliate links in which I earn a small percentage from qualifying purchases through these links, at no extra cost to you. Thank-you for helping to support my blog!
DIY Noel Christmas porch sign, gift tag style!

Stencils used for this sign
Joyeux Noel stencil
Joyeux Noel is a 3 foot tall vertical sign Christmas stencil with bold letters that pop, along with a scripted Joyeux caption surrounded by twinkling stars.
But this stencil also has a few hidden talents you’ll want to know about!

View Joy-Small Full Accessory Kit stencil HERE
Joy Small Full Accessories stencil
Joyeux Noel is designed to mix & match perfectly with Joy-Small’s Full Accessories so you can replace the O in Noel with an ornament or snowflake! Or more!
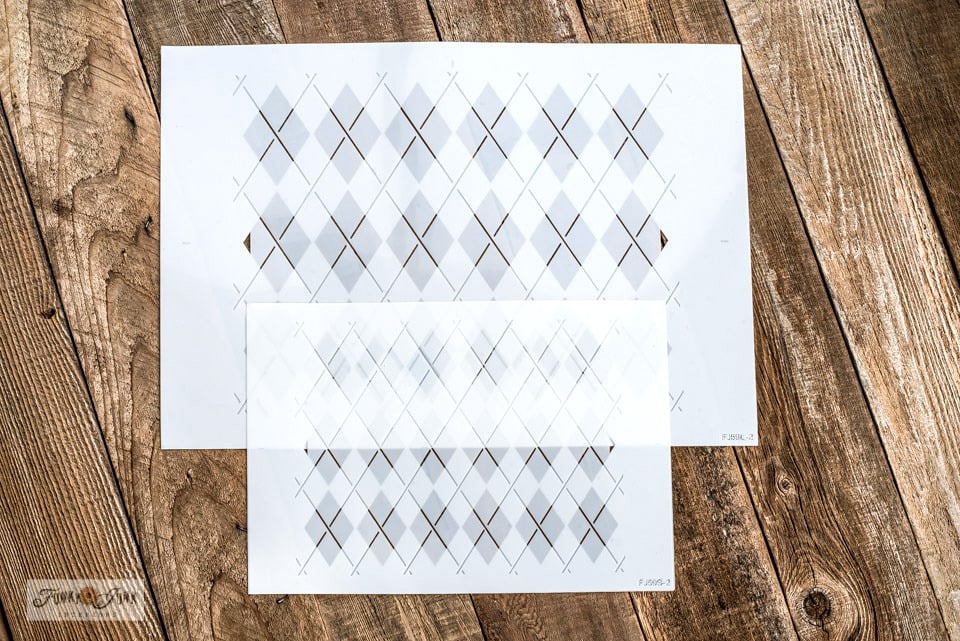
Argyle – small stencil
Argyle is a 2-piece stencil (offered in small and large – this project uses small) that helps you achieve an instant and authentic argyle pattern in a jiffy! You stencil the diamonds in rotating colors first, then overlay the thin lines on top.
.
So after playing around figuring out what I was going to do, I must say, this rustic Noel gift tag vertical sign sure turned out cool!
The gift tag sign board shape is SO easy to make, just as easy as a square sign, but with a totally different vibe!
And the ornament went even further with an added Argyle pattern to it…
This whole sign certainly has a Merry Christmas rustic vibe to it!
So here’s what I ended up doing…
Rustic Noel gift tag Christmas sign

Supplies I used:
Joy-Small Full Accessories Kit stencil
3 5.5″ x 36″ reclaimed wood fence planks
3 cedar strips for back supports
Paint of choice: I used Fusion Mineral Paint’s Ash, Raw Silk, Algonquin and Enchanted Echinacea (any pink tone)
Shop all Fusion Mineral Paint for 10% off HERE
(find a Fusion Mineral Paint retailer near you from HERE)
Stencil brushes (I prefer dome-tipped like THESE)
Cordless drill and screws

Building a gift tag sign board
1. Cut reclaimed wood planks to desired length, then sand.
- Planks: 6″ wide x 47″ long
- Overall sign dimensions: 18″ wide x 47″ tall
2. Cut parts of the two outer boards at an angle to suit.
3. Cut 3 support boards to fit across the back.
I used cedar strips that were cut just under the full width of the sign, so their edges wouldn’t show.


4. Attach the cedar strips across the entire back width of the sign using screws.


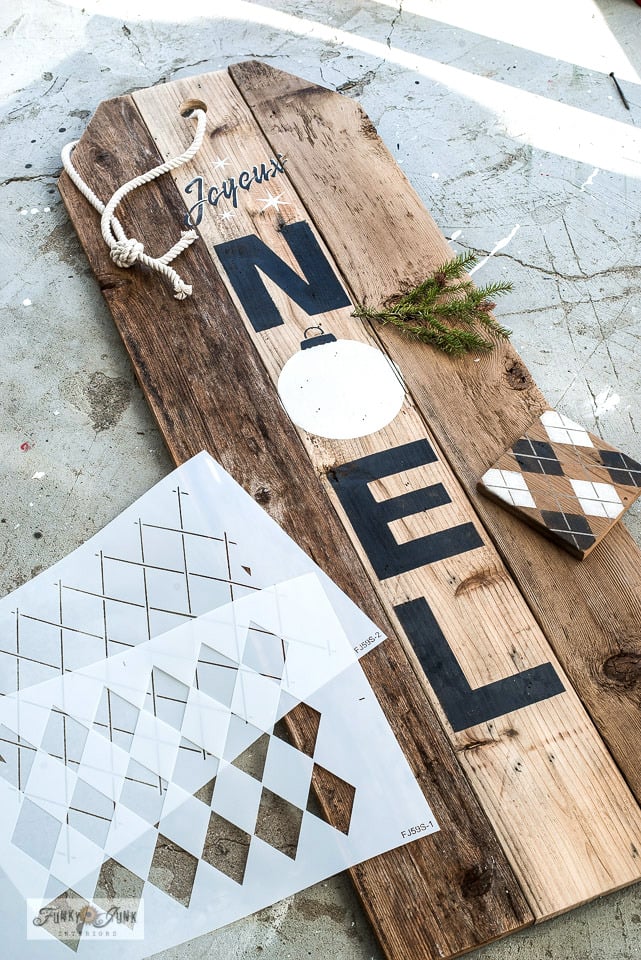
5. Using a 1.5″ forstner bit, drill a hole in the middle of the sign close to the top, to resemble a hole-punched gift card tag.
Cool, right?! It worked so good!
I had this bit from a previous project from when I made THESE RECLAIMED WOOD CANDLES. I may not use it often, but it sure is nice to have when I need it!

Stenciling the lettering
At this point, it’s all about artistic license! You can of course stencil Noel just the way it is, or do as I did and get fancy with an ornament. And even add a pattern to the ornament! Which is what I ended up doing…
All the stencil steps are shown in the video at the bottom of this post.
So here are the steps I took:
Paint used:
Fusion Mineral Paint’s Ash, Raw Silk, Algonquin and Enchanted Echinacea (any pink tone)
Shop all Fusion Mineral Paint and products for 10% off HERE!
6. Position Joyeux Noel in the middle of the sign.
7. Stencil N E L in Fusion’s Ash.

Adding an ornament
8. Stencil Joyeux and the stars in Raw Silk. Once dry, re-position the Joyeux stencil on top of where you already stenciled it, but move it a little down and to the left, then stencil in Ash.
This creates a 2-toned shadow effect, making the letters pop!
9. Position the ornament into place, and stencil the round part in Raw Silk, and the hook part in Ash.
View Argyle – Small stencil HERE
Adding an Argyle pattern
10. Once dry, position Argyle – small over top of the ornament shape.
Stencil in the diamonds rotating colours of Ash and Algonquin.
Find Argyle – Small stencil from HERE
11. Once dry, position the thin lines of Argyle where they cross as an x in the middle of the triangles. Stencil in Enchanted Echinacea.
Isn’t that Argyle ornament the cutest?!
All the stencil steps are shown in the video at the bottom of this post.
Protective finish
I did not add a protective finish, however you certainly could however anything you put on top may deepen the wood tone and create a satin finish.

Adding 3D sign decorations
12. Dress up the Argyle ornament as desired!
I added a few freshly cut evergreen branches (here’s some faux branches) tied together with a twine rope, then attached with screws. Shuffle the rope and branches to hide the screws. Or you could use hot glue.
A heavy wire (a wire coat hanger could also work!) was bent into the shape of an ornament hook, then screwed into place.
Find some faux evergreen sprigs HERE
Shop for some black craft wire to make a hook with HERE

Then a soft thick white rope was tied through the hole along the top, positioned just so, knotted, then held into place with a screw under the knot. A ribbon could look pretty too.
Tell me that isn’t the cutest thing ever!!!
And here’s the finished sign!
Check out some heavy soft white rope options HERE
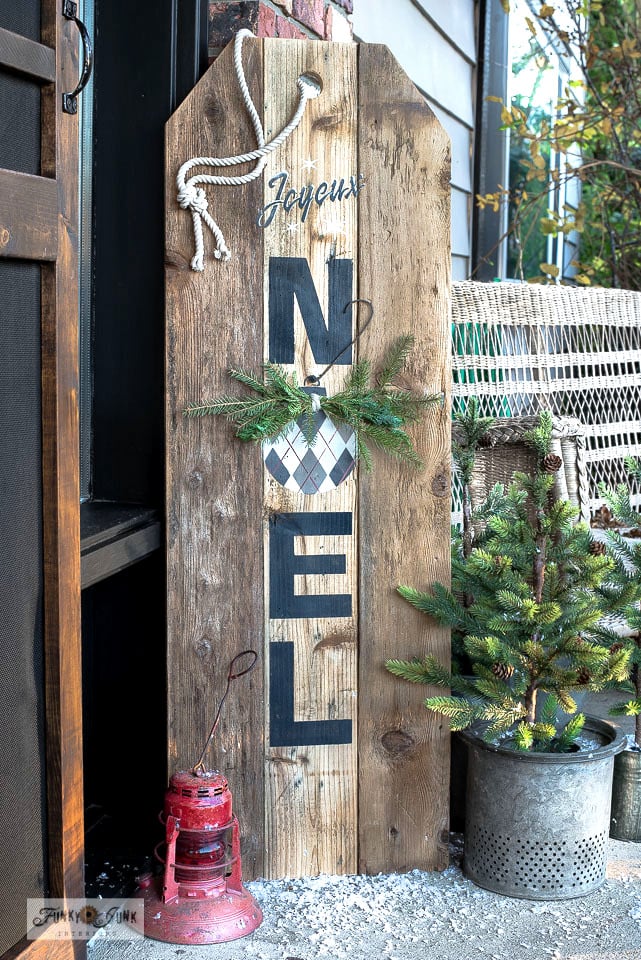
The finished Noel Christmas porch sign
This rustic Noel gift tag vertical Christmas sign is just the perfect size for the front porch!
Notice how the letters aren’t tight against the edges of the sign boards? You can make any sign feel larger by just adding more boards around the letters!
Shop for small evergreen Christmas trees HERE
View some old lantern reproductions HERE

I like a rustic wood neutral take for my own Christmas decorating, however this Rustic Noel gift tag Christmas sign can be any color or size you desire! It’s so versatile!
Video how-to
.
Watch video above to learn how to add Argyle to the ornament!

Now that’s a Merry Christmas porch sign if I ever did see one… Noel gift tag style of course! And no hand painting required this round. Stencils make it so easy, especially if you’d like to duplicate it for selling or give as a Christmas gift!
Now onto a new door mat design! Hmm… I’ve always wanted an Argyle door mat. Maybe this is the year to finally make it happen… stay tuned!
DIY Noel Christmas Porch Sign, gift tag style!
Supplies:
- Joyeux Noel stencil
- Joy - Small Full Accessories Kit
- Argyle - small stencil
- reclaimed wood planks 3 5.5" x 36"
- Fusion Mineral Paint - Ash
- Fusion Mineral Paint - Raw Silk
- Fusion Mineral Paint - Algonquin
- Fusion Mineral Paint - Echinacea (or any rose tone)
- dome-tip stencil brushes
Instructions:
- Cut wood planks to fit the Noel stencil. My overall sign size is 18" wide x 47" tall.

- Cut 45 degree angles on two of the outer top boards to create a gift tag shape.

- Hold the sign boards together with 3 attached cedar strips, placed across the top, middle and bottom of sign, screwed in from the back.
- Drill a hole at the top of the sign.
- Position the Noel stencil, then stencil N E L in Ash, and Noyeux in Raw Silk.Joyeux Noel stencil, Fusion Mineral Paint - Ash
- Reposition stencil a little up and to the right over Joyeux, then stencil in Ash.Fusion Mineral Paint - Ash
- Position ornament stencil where the O would go in Noel, and stencil in Raw Silk. Leave this stencil in place until your final pattern is complete.Fusion Mineral Paint - Raw Silk, Joy - Small Full Accessories Kit
- Position the diamond sheet of Argyle small over ornament. Stencil every other diamond rotating with Ash and Algonquin.Fusion Mineral Paint - Ash, Fusion Mineral Paint - Algonquin, Argyle - small stencil
- Remove diamond sheet, and position the thin lines of Argyle over top of diamonds.
- Stencil in a soft rose tone.Fusion Mineral Paint - Echinacea (or any rose tone)
- Tie a rope through the hole in the top, and add evergreen branches to the ornament to decorate with if desired.
Notes
Have you been making any Christmas signs? Think you’ll give a giant gift tag shape a go?
All Christmas stencils used:
.
Small Full Accessories (ornament kit)
Other vertical Christmas signs to make:

Joy with Buffalo Checked Ornament

Rustic Joy sign on chippy shiplap

Rustic Christmas tree sign in 3D tree crate
View all my other rustic Christmas sign projects HERE
Absolutely beautiful! What do you do with all the awesome signs you make? Do you sell them or do you have every inch of your house decorated with these gorgeous signs?!
Haha! Thanks Susan! And yeah, they accumulate for sure. I’m debating firing up a local FB group to sell them as I’ve shared them in a local community on FB and there was lots of interest to purchase.
I sometimes put them up for bid on FB as well if I accumulate too many. Or just reuse the materials over again!
You did it again! A rustic masterpiece!
Thank-you Carlene! Thank goodness for my beloved reclaimed wood… ALLLLLL the time! LOL
Good morning Donna. This is adorable. Gosh, but I love the wood aesthetic with the stenciling. I am inspired to try some. I am not working so much any more and have the time. I was thinking this morning that a good bit of time and thought goes into your pieces. Nice. Also, very happy on my end because we got a new computer and I can now correspond with others. Thanks for showing us your newest rustic creation.
Aww thank-you Joanne! And thanks for noticing! Yes, I do put a lot of thought into where to take something in a unique way for sure. Those projects take a little longer to dream up but my goal is to surprise myself in some small way at the very least. It’s inspiring!
Thanks for noticing! Glad you got outfitted with a new toy! Hoping to catch up on our convos online here and there!
Love it!!!
Thank-you Blissy! I’m hiding behind the front bushes waiting for your treasures to pop up… just don’t report me, k?
That’s the thing I love about your stencil line is that they can intermix. What a sweet Christmas sign, including the fun shape! People would pay big bucks for these!
Oh my goodness! I Love this. One of these days I’m gonna get me these stencils. You come up with the most creative ideas I Love them all.
Sandi
I love all of your amazing projects. Especially any that use old or made-to-look-old wood pieces. The gift tag is beautiful. And I make sure all these beauties are starred in my inbox.