Learn how to make this easy and adorable glass bowl snowman craft using stacked thrifted glass bowls! The glass resembles ice, which marries this christmas and winter project perfectly!
As a Fusion and Amazon Influencer, this post contains affiliate links in which I earn a small percentage from qualifying purchases at no extra cost to you. If you shop Fusion Mineral Paint products through this post, you will get 10% off. Thank-you for helping to support my blog!
If you were to ask me if I prefer to decorate for Christmas or winter, winter always wins. Winter decor remains in season for so much longer, plus it’s easy to add and subtract to make it perfect for either one!
Some other fun winter upcycled projects I’ve done:
Reversible wood block pumpkins and snowmen
Wood scrap trees with white chippy snow effect
Chippy wood block snowmen with junk accessories
So when the idea of creating a snowman craft using thrift store glass bowls came to be, I was all over it! I couldn’t get to the thrift stores fast enough to see what I could pull together…
While a glass bowl snowman craft is not my original idea as there are zillions all over the net, I am adding my own special twist of course! With the addition of a little ribbon and just the right hats, a couple of snowmen became a darling snow-couple in short order!
This is one of the easiest and favorite winter projects I’ve done to date! And it couldn’t be easier.
However, I have a few tips to make this one work extra amazing… here’s what I did!
Thrifted glass bowl snowman craft for winter decor
Supplies you’ll need:
Various thrifted round glass bowls, jars, etc.
Fusion Mineral Paint Odorless Solvent (10% off)
Optional yet helpful supplies:
- Decorative ribbon (I used gold fleck ribbon)
- Faux snow
- Fairy lights
- Brass or antique silver serving tray
Collect glass items that resemble snowman shapes
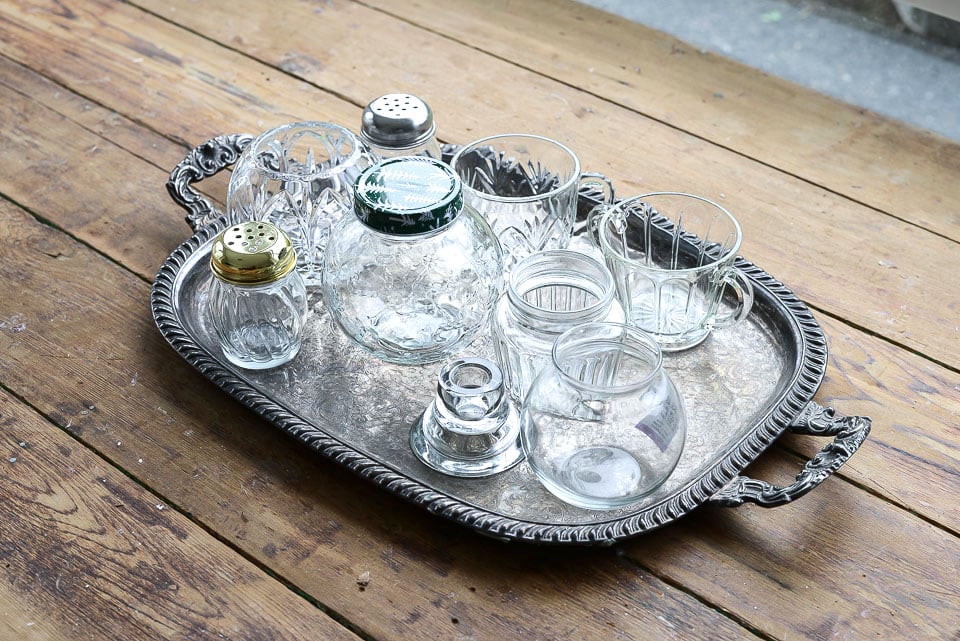
1. Gather up various round glass items that could work for a glass bowl snowman, such as: bowls, jars, sugar bowls, small parmesan cheese shakers, crystal bowls, candle holder.
When I shopped the thrift store isles, I was stacking all sorts of glass objects to figure out a good snowman look for scale and uniqueness. It was a fun challenge! I’d bet even a stacked fish bowl snowman could look cool!

Stack the glass to build a snowman
2. Stack the items to create two well-proportioned snowmen.
I created a snowman and a snowlady. The key to building a nice looking snow figure is using proportions that look good together, with lots of mixing and matching until you like what you see.
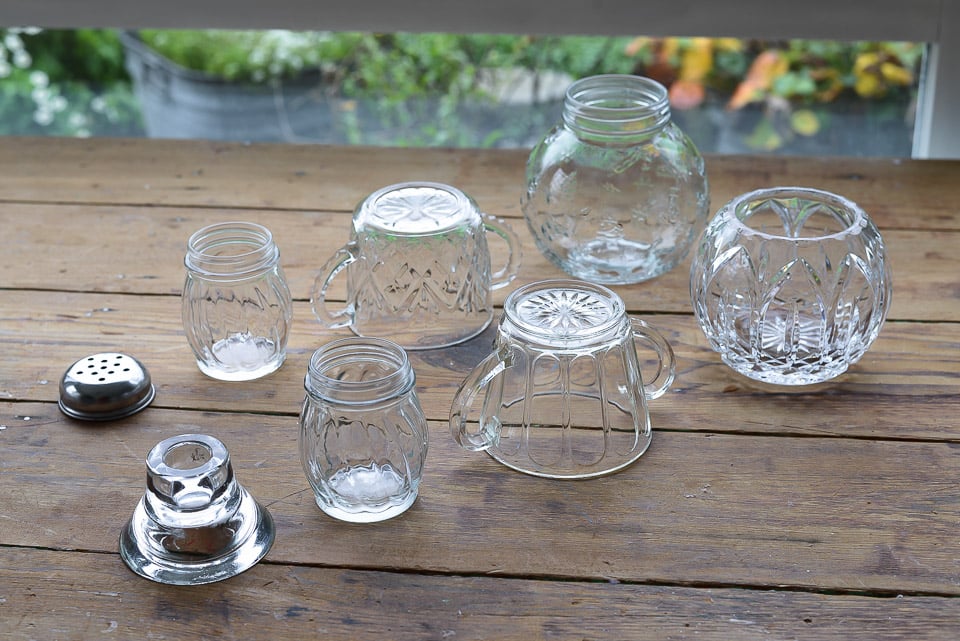
Glass components I used for each snow person
I felt fortunate to land two small parmesan shakers to use for both snowman heads so they looked like intentional companion projects! Below are all the items I used to build this snowman craft:
Snowlady:
- Small parmesan shaker with lid
- lantern jar (I replaced the sugar jar above)
- round glass jar (removed the lid) from the dollar store.
Snowman:
- candle holder in a top hat shape
- small parmesan shaker without lid
- sugar bowl
- small crystal bowl

Try stacking or screwing together the glass when possible
3. Stack / outfit / screw items together without glue where possible if you’d like to reuse the items later.
When I chose a small lantern jar with a screw top, I was able to screw it into the opening of a crystal bowl without using glue! Then the head stacked on top, nice and sturdy, so no glue was needed. However, I have already dropped it, watching it roll in sections all over the floor! Luckily, the glass was tough enough to not break. So, using glue is better.
How to glue the glass together
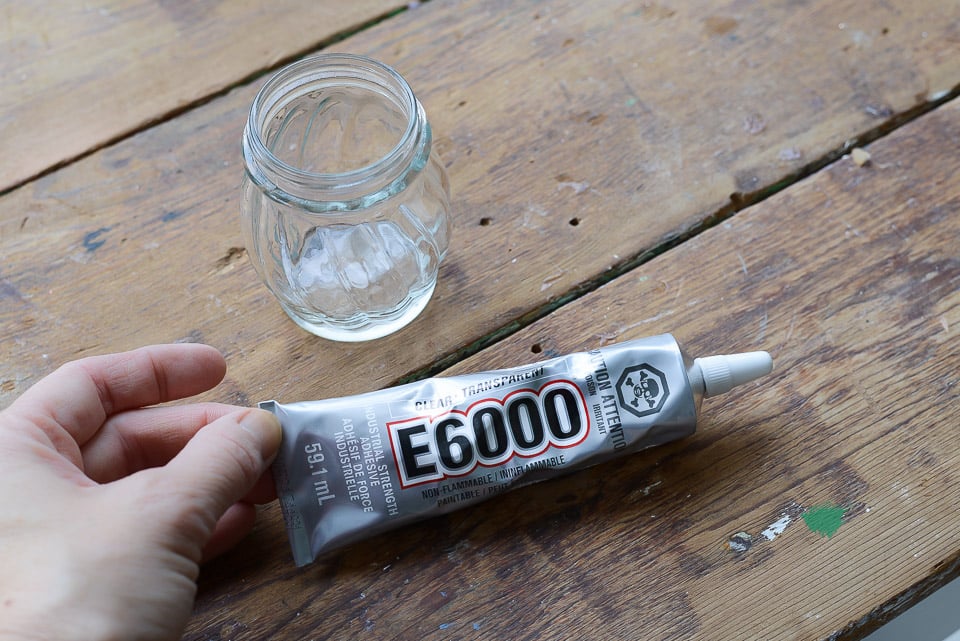
4. Glue glass bowls together where needed with E6000 clear glue.
With some of the other pieces, glue was necessary. So I reached for clear E6000 glue which did the trick easily and quickly with little mess! The glue took about 20 minutes to soft-set, so you do have a little open time to reposition, and overnight to set firmly in place.
This glue is easy to use. Simply turn off the cap and squeeze the tube. No mixing required.

How I glued the glass together:
- Study how the two glass items will touch.
- Squeeze a small thread of glue around any open rims so it creates a clean and minimal look.
Cleaning up the glue drips
- Position the glass pieces on cardstock or construction paper. (not shown)
- Set the glass piece in place, then mark location with pieces of masking tape for reference.
- Gently lower the glued jar rim on top of another, then reposition until it’s perfectly level by spinning the paper around.
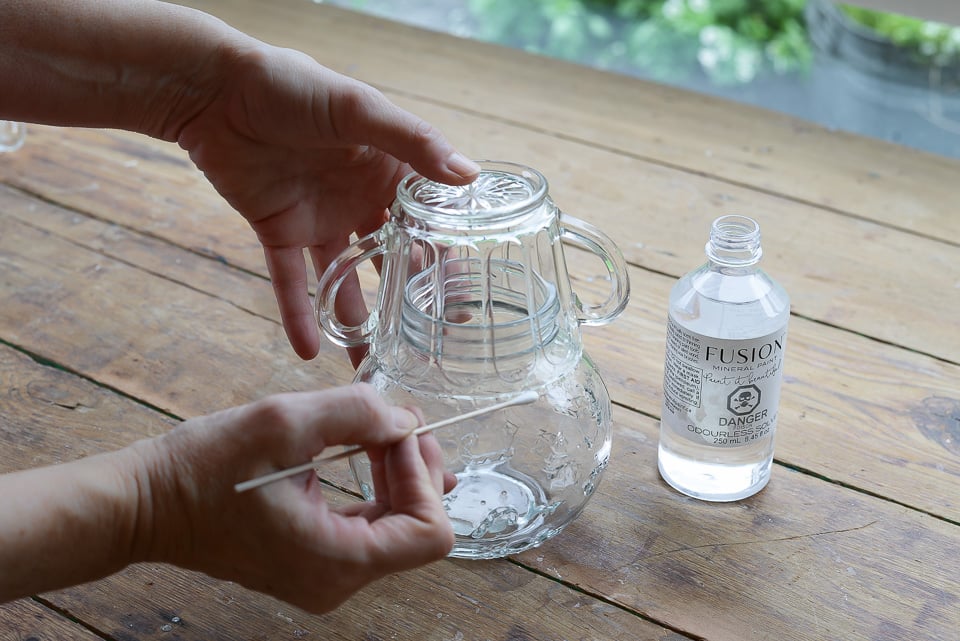
- Use cleaning q-tips to remove any drips right away.
- Follow up with Fusion’s Odourless Solvent or similar to clean up any glue smudges right away.

Embellishing the snowmen with festive ribbon
5. Add ribbon to embellish if desired.
To further emphasise the man and lady look:
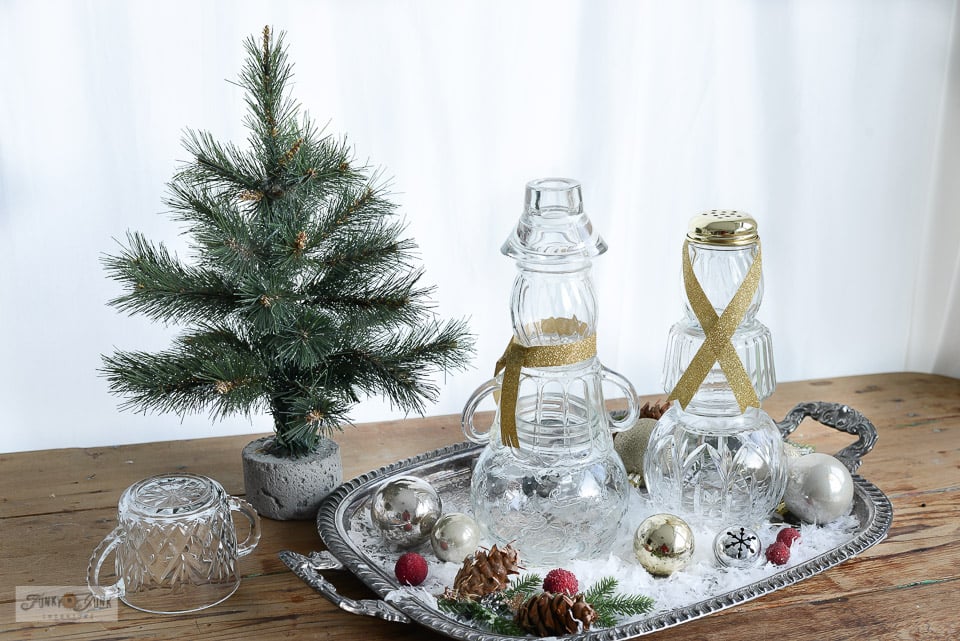
Lady: I cut 2 lengths of gold fleck ribbon from the dollar store, placed it under the parmesan lid angling the ribbon forward, crossing at the front and held together with a dab of hot glue, then trimmed the ends.
Man: I cut a longer length of ribbon, tying a half knot around the neck to create a scarf, with a dot of hot glue to hold it in place. I then added straight cuts into both ends of the ribbon to create a scarf tassel effect.
I think the neutral gold ribbon is just enough to tell more of the story while adding a little extra festive bling to the mix! Imagine all the different variations you could use… even costume jewelry… or just go without!

Staging on a tray with lights and faux snow
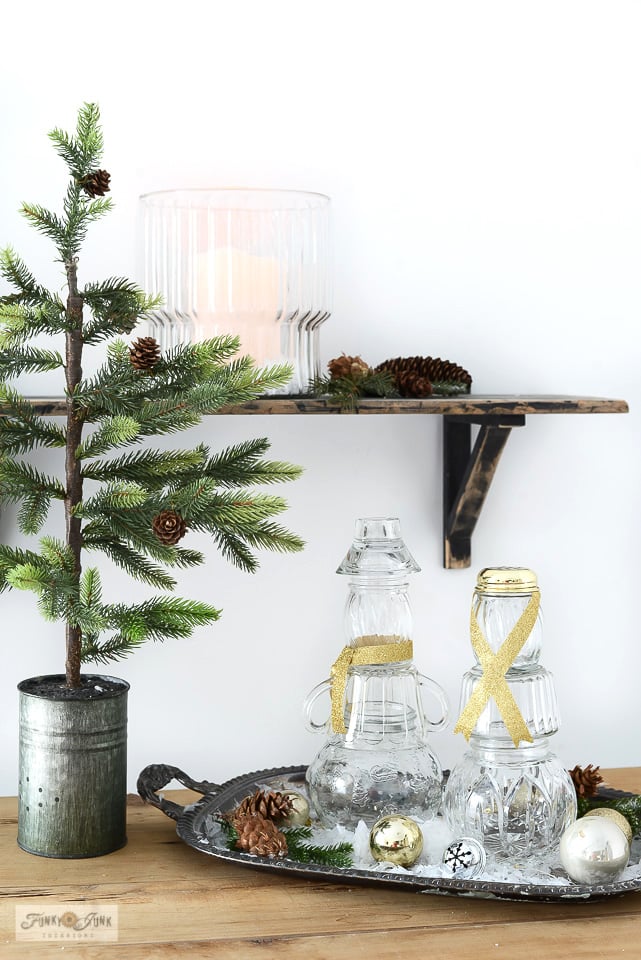
6. To get this glass bowl snowman look, stage the snow couple onto an antique brass or silver tray, then add fairy lights, faux snow, and gold and silver tarnished ornaments as desired.
I placed both glass bowl snowmen onto an antique serving tray, then placed down some fairly lights taping them into place.
A little faux snow, ornaments and faux cranberries finished off the look! Now the tray is easy to move while still getting the full throttle snow effect.
A few other embellishments that could be fun:
- buttons
- cotton balls for snow
- adding a carrot nose with folded orange paper and glue stick

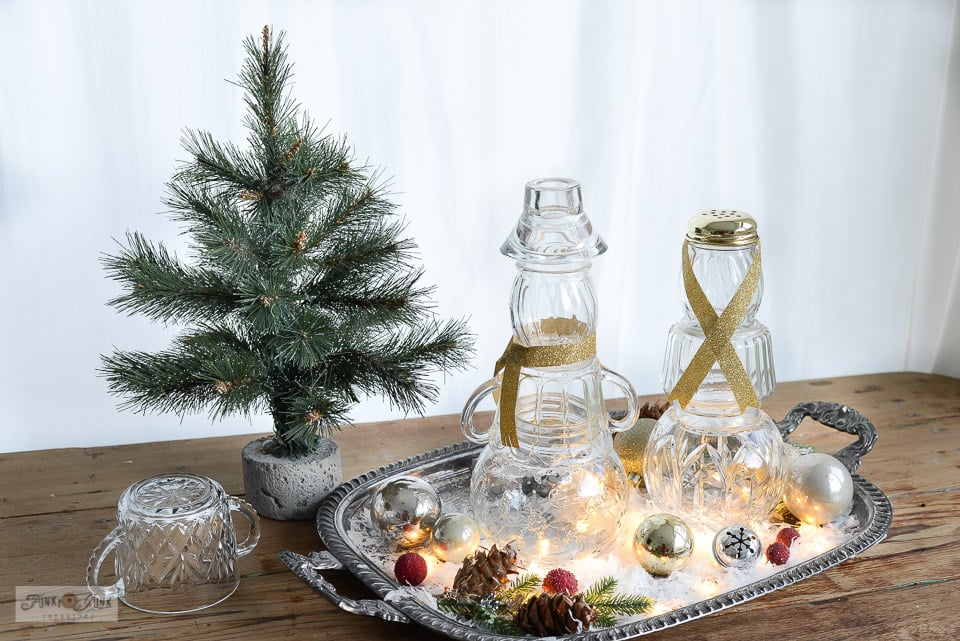
Then with a flick of a switch, you get the moody evening glow look!
I honestly love it both ways, but my favorite is without lights by day, and of course, those lights on are a must in the evening!

And oh my goodness… I get to enjoy this pretty glass bowl snowman duo all winter long!
The glass is really perfect for this project, since it lends itself to resemble ice.
And with the added faux snow on the tray, it’s a frosty mix that looks cute wherever you stage it!

I love the various glass components stacked together! To mix it up a little, I used a sugar jar for the man and a jar without handles for the lady. I think it’s cute both ways, so why not one of both?

And there’s certainly no denying how pretty the lights look, shining up into each glass bowl snowman, further illuminating the snowmen. It’s a great look!
The hardest part to this project is trying to decide where to place your glass bowl snowman craft, because honestly, it looks charming everywhere… so make more than you think you’ll want. You’ll need them! I think it’s a fun project to make with kids too!
Think you’ll give a couple of your own snowmen a try?
Other unique winter projects to make:
Create gorgeous and easy paper doily snowflakes
DIY wooden skis for winter decor
View all Christmas and winter projects from one page HERE

Thrifted glass bowl snowman craft for winter decor
Supplies:
Building the glass bowl snowmen
- Various round and hat shaped glass bowls, jars, etc.
- E6000 glue
- Cleaning q-tips
- Fusion Odourless Solvent
Embellishments (optional)
Instructions:
- Gather round and hat shaped bowls, jars, candle holders, etc.
- Stack until you like what you see.
- Clean the bowls spotless, then stack or glue the glass jars together using E6000 clear glue.
- Use cut ribbon to create scarves, hat wraps, or whatever you wish hot glued into place.
- Stage on a tray with faux snow, fairy lights, ornaments, pinecones, etc.
Aren’t they just the cutest. I love the way the light bounces off their bottoms (that sounds so wrong but you know what I mean 🫣)