Enhance plain windows by building farmhouse window trim using stock lumber! NO fancy miter cuts nor expensive boards are required. This tutorial is easy and looks authentic, dramatically changing the entire vibe of your space into one of utter farmhouse charm!
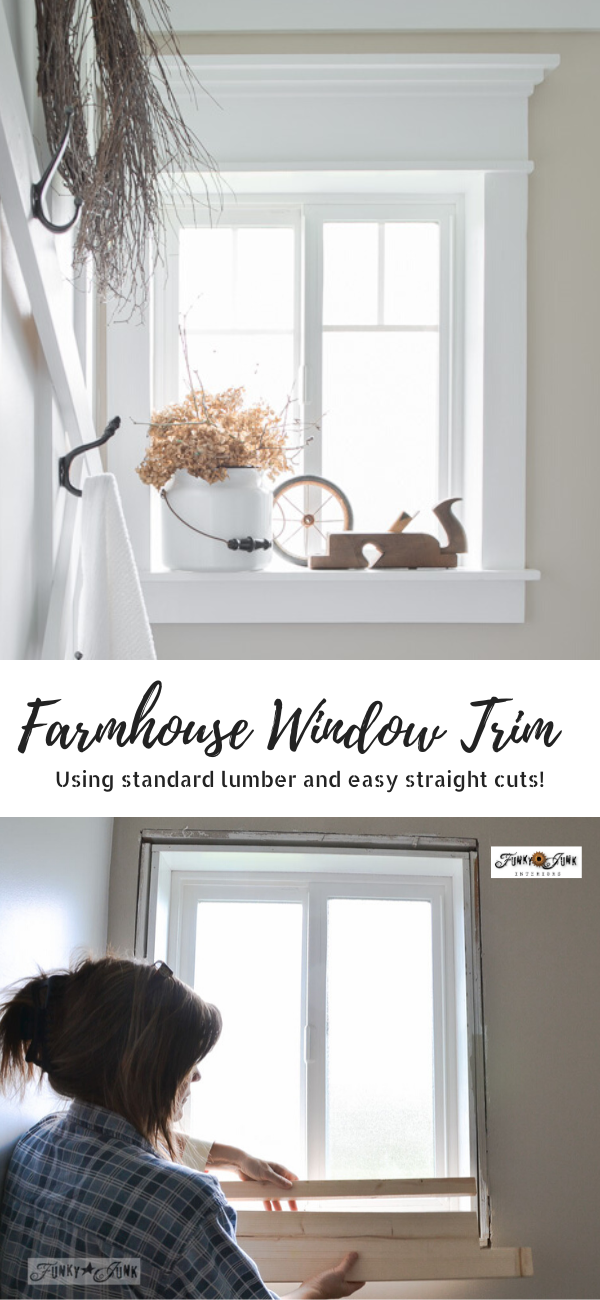
I cannot believe this vintage farmhouse window resides in my now Salvaged Farmhouse Bathroom!

It’s the first farmhouse window trim I’ve ever played with, so I’m pretty pumped!
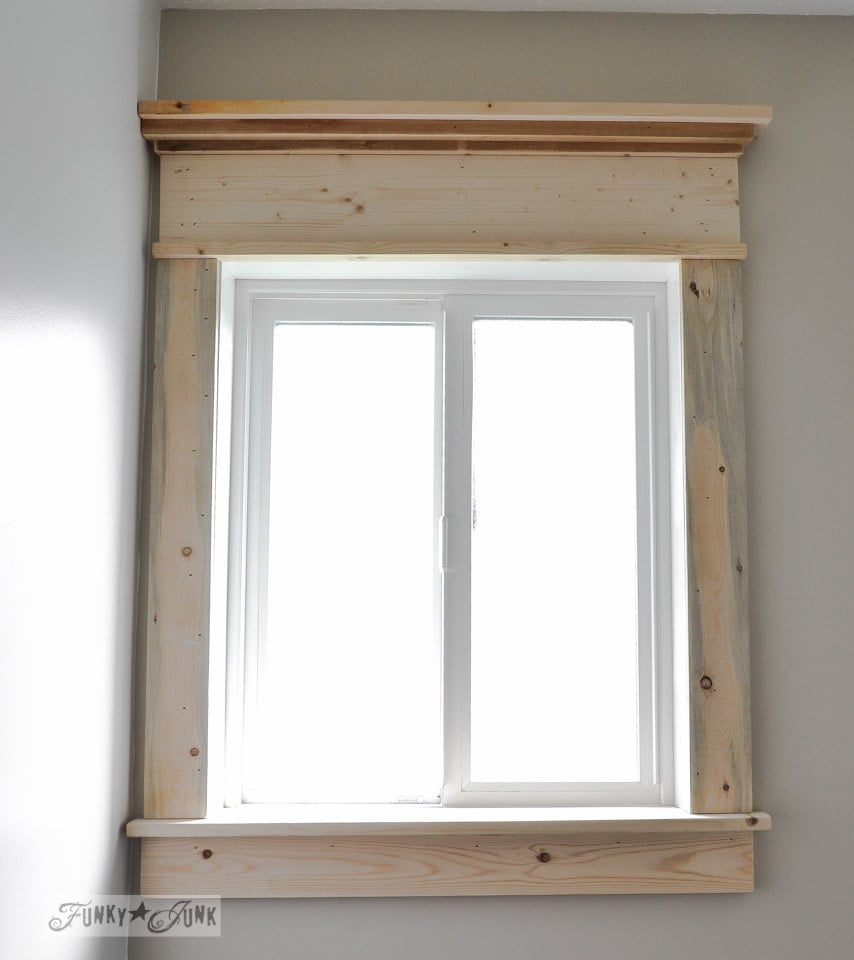
But it sure didn’t look like this just a short time ago…
By the way, I do not live in a farmhouse! I live in a typical suburban home that has every builder grade window standard in sight.
But there’s a secret to making this farmhouse window trim transformation so easy….
This farmhouse moulding was created with standard lumber with no fancy miter cuts!
The inexpensive upgrade of this beautiful farmhouse look outcome is simply outstanding, dramatically changing the entire room vibe into one of vintage farmhouse charm.
So if your own windows are currently wearing traditional builder grade molding, and your preference is more charm, here’s how to create a huge difference with charming farmhouse style window trim with simple cuts of stock lumber… yourself!
This post contains some Amazon affiliate links in which I earn a small percentage from qualifying purchases through these links, at no extra cost to you. Thank-you for helping to support my blog!
How to make farmhouse window trim
Why farmhouse window trim?
I grew up in an old, rambling farmhouse with massive old vintage window trim mouldings. It’s a classic style I’ve missed ever since.
After searching online, I came across plenty of farmhouse window trim ideas, but most revealed complicated tutorials requiring miter cuts and and expensive trim boards. There just had to be an easier way!
Then I came across a variation that showed how to achieve the look using standard wood layers with straight cuts. BINGO!
Combining the concept with my own twist, here’s my version of simple DIY farmhouse window trim with clean lines that’s so simple, even a non-builder can create this look using simple stock lumber!
Ever dream of a farmhouse kitchen? Or living room? You can achieve the look and feel of old farmhouses with just a few simple boards!
Supplies I used for the farmhouse window trim:
standard real wood solid pine lumber in sizes as shown above (I suggest pre-primed)
(also works well with primed MDF board although the trim will not be quite as durable)
brad nails
nails for nail gun or brad nailer (I used 1 ¾”)
pry bar if you have to remove existing moulding
wood filler for nail holes
paintable caulk and caulking gun
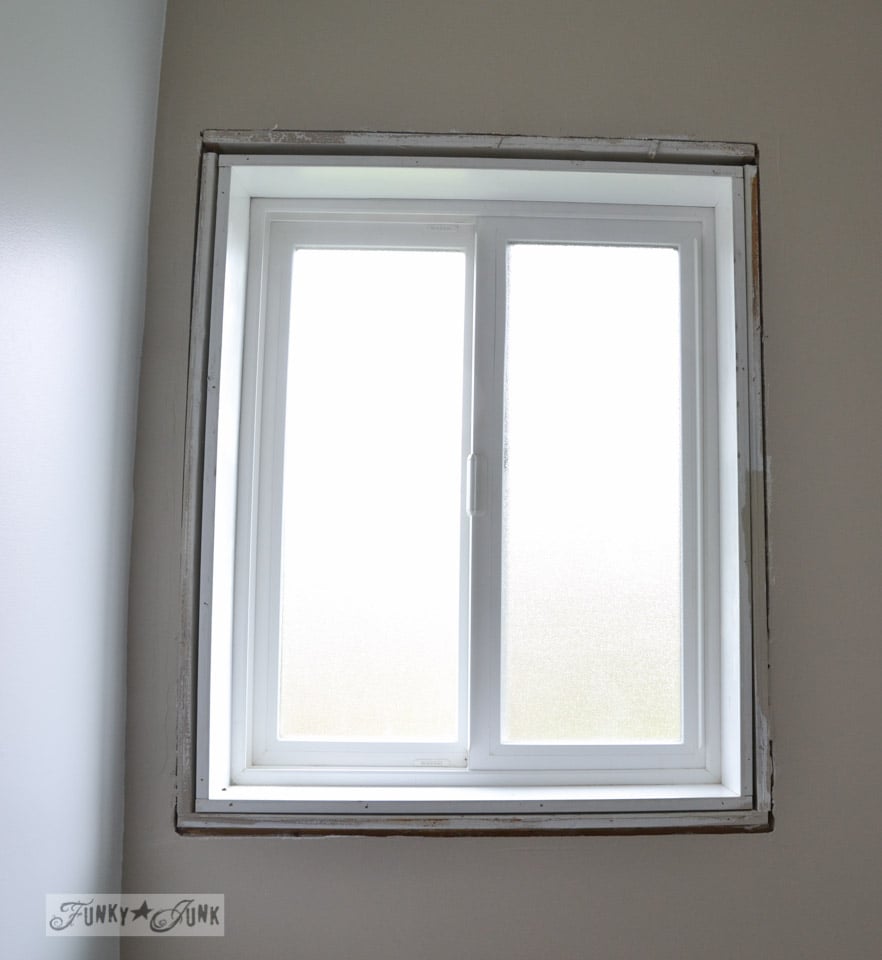
Remove original window trim
1. Remove existing window trim with a pry bar, leaving all the inner window wood intact as shown above.
Removal is so easy! Gently ease the pry bar between the wood moulding and wall, then pry the moulding off. You can avoid damage to the walls by placing a board behind the pry bar.
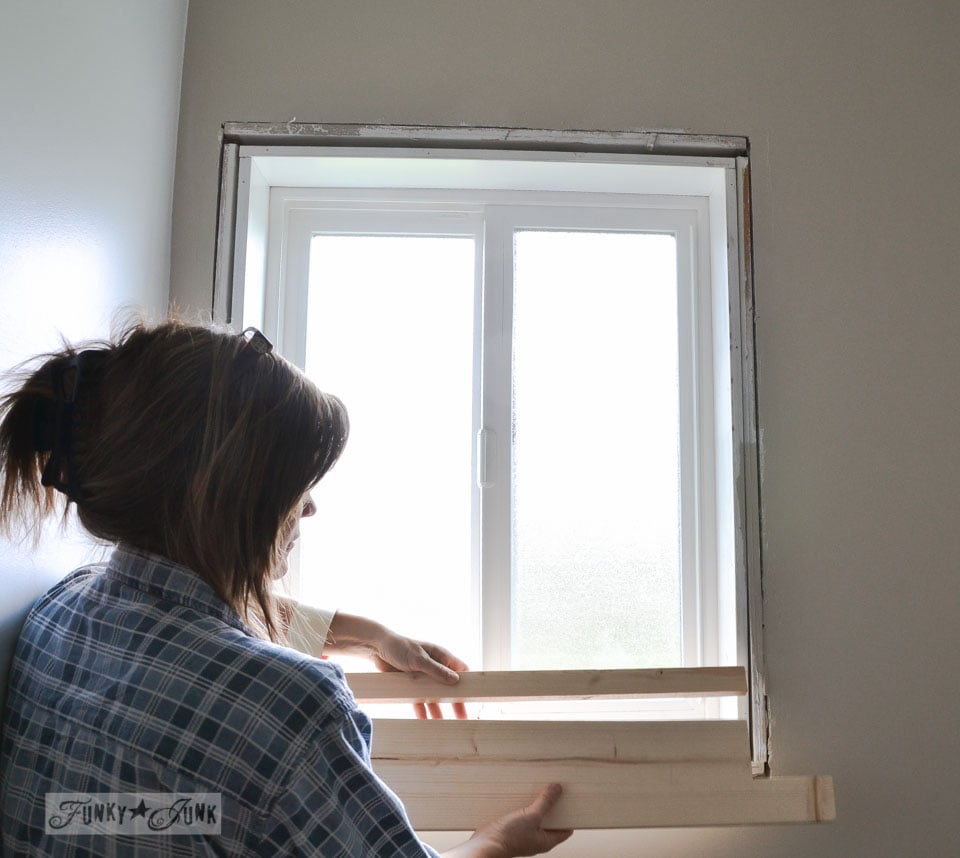
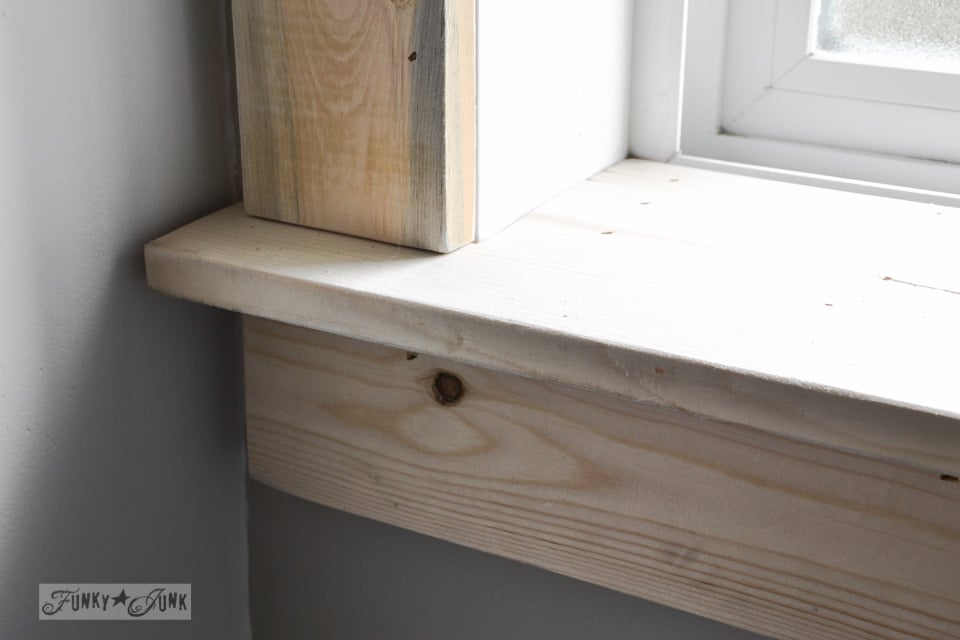
Create a window sill
2. Create a window sill (or window stool) / one 1×2 and one 1×6
- Cut a window sill with trimmed edges out of a 1×6
- Add another board such as a 1×2 if you need more depth to reach the back of the window.
- Place both boards on top of existing window sill, then nail into place from the top.
What’s up with these new windows having no decent window sills? Well,I wanted one. So after removing all the outside window trim, I left everything inside the wall and worked over top.
I determined how wide (left to right) to make the window sill by measuring the two side casings in place. The sill was made slightly longer.
Depth (front to back) was determined by how much I wanted the sill to stick out in front of each side casing.
Since I didn’t have a board that was deep enough, I doubled up.
This sounds complicated but it’s really not. It was just like building with blocks.
You can do this all in one piece if you can find a piece of wood deep enough to do the job.
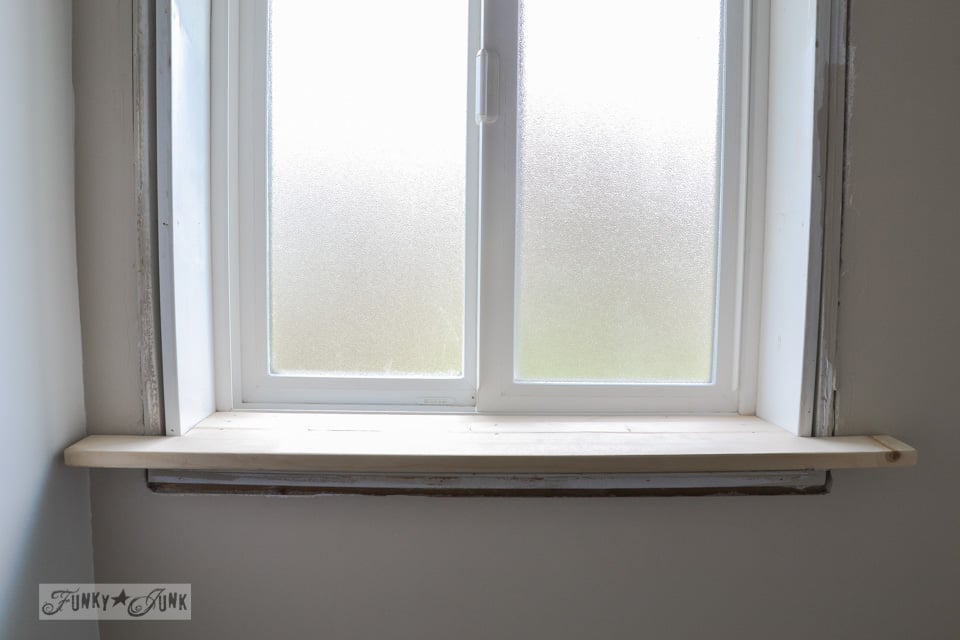
The 1×2 is in the back and the 1 x 6 is in the front.

Add side trim pieces
2. Once window sill is in place, measure and cut two side casings. / two 1 x 4s
The 1 x 4s were cut to fit from the top of the window opening to sitting on the window sill.
Adding that small 1 x 2 to the window sill pushed the sill out beyond the side casings.

Building the window header
3. Dry fit and nail together a window header / one 1×6 / three 1x2s / one 1×1 / one 1×4
- Measure the width of the window plus the two side casings. Make the main header piece (1×6) that exact measurement.
- Make the two touching boards above and below the main header piece slightly longer.
- Lengthen the final two top boards slightly wider than what’s under them.
- (note: my top two boards are flush on the left side because I ran out of wall space. If you have room, make the top board the widest.
- After dry fitting all the cuts, the header was nailed together before installing to the wall.

Nail together before installing
Stack all the wood, then nail together all the header components before installing on the wall if desired. I found this easier.
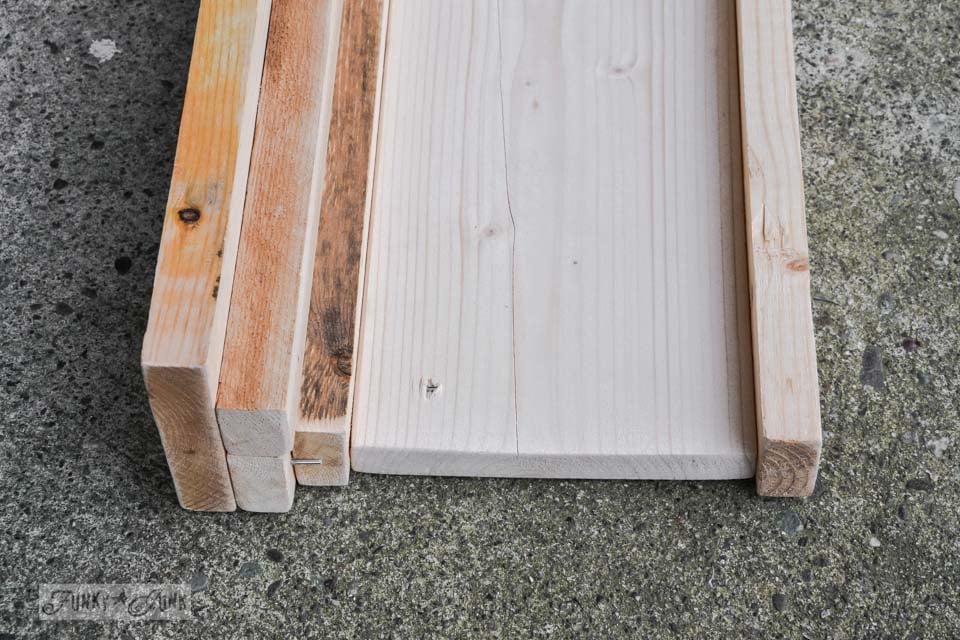
Choose kiln dried wood to avoid warping
And just to prove how much of a true newbie I am to this, you can see one exposed nail plus one slightly warped board… proud moment here.
The 1×6 warped, but I didn’t notice until after the build. Neither of these little window trim glitches showed once the header was installed.
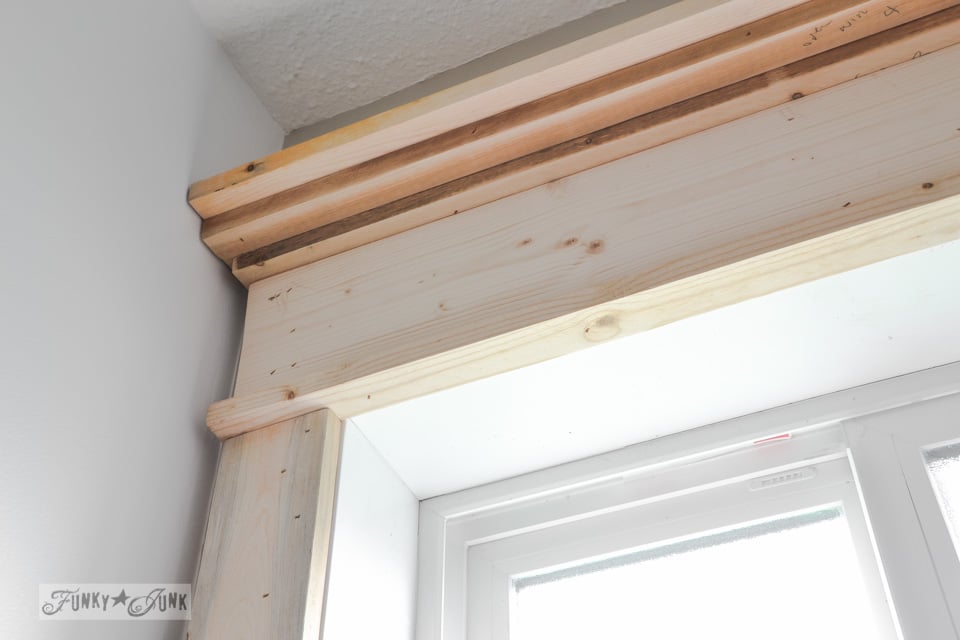
Installing the window header to the wall
4. Install the header by holding it into place, then nailing it to the wall.
The window header was held into place, then the center nailed, rotated straight, then further stabilized with more nails. Be sure to nail through any wall studs where possible.
This farmhouse window trim is really coming to life now!
Add a window apron
5. Add an apron underneath the window sill. / one 1×4
- To determine the correct apron length, cut a 1×4 board the same width as both of the window side pieces (casings) combined.
- Attach the board underneath the window sill to create the window apron.
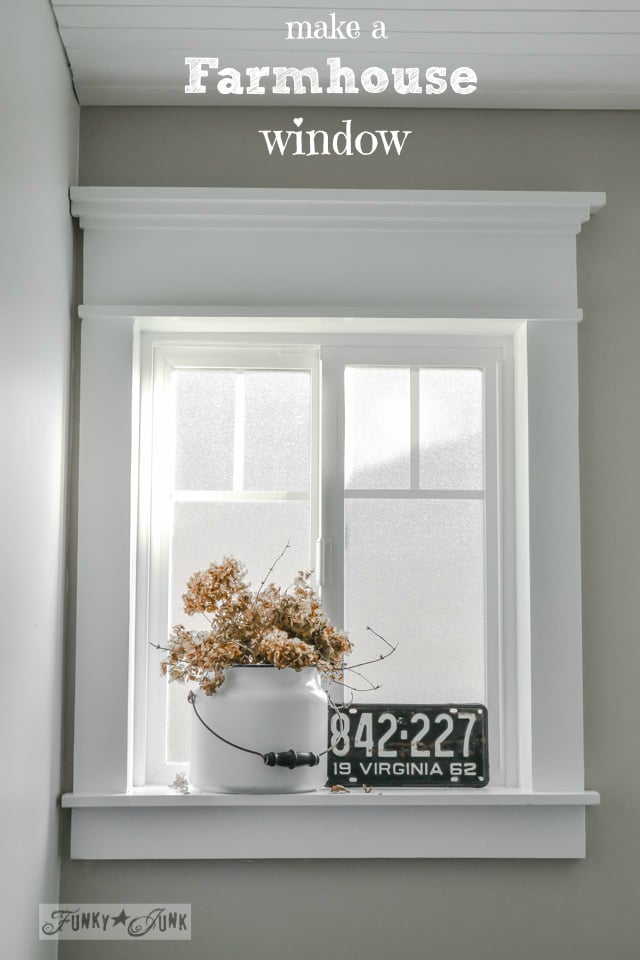
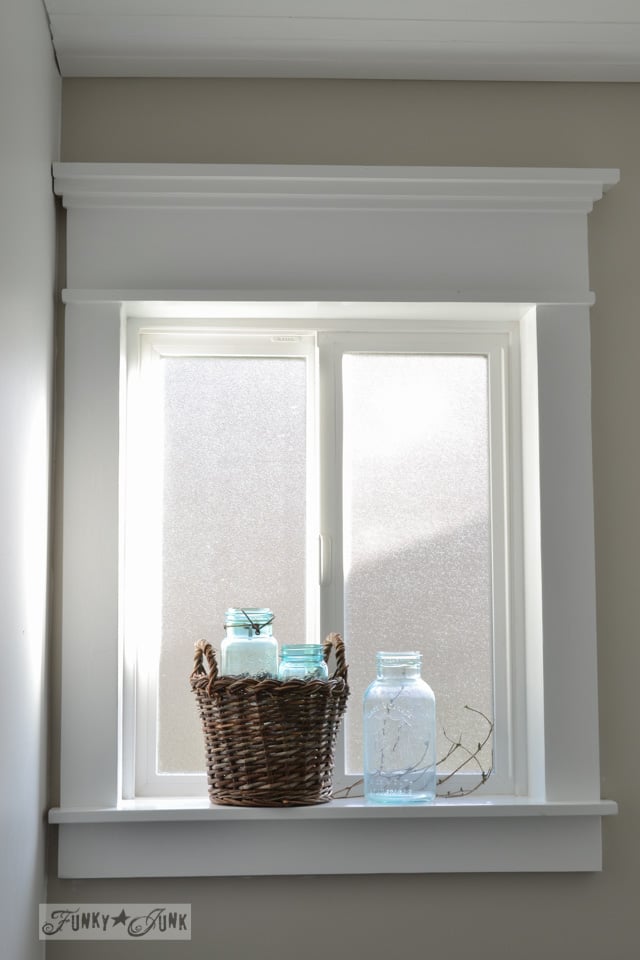
The finished farmhouse window trim results!
And here is the farmhouse window trim result! Isn’t it amazing what a few layered plain boards can do?!
Now let’s turn that wood into beautiful white trim!
Finishing window trim details
6. Sand, prime, caulk, then paint the window moulding with 2 coats of semi gloss white paint.
The finishing details ended up being a fair amount of work but you will save money.
To cut the workload way down, choose primed stock lumber instead. I have since used primed trim to create an interior farmhouse trim doorway and it turned out amazing!

Adding faux window mullions with vinyl
7. Add faux window mullions with cut white sign-grade vinyl.
- Cut strips of white sign-grade vinyl into long strips at the desired width.
- Stick onto window where desired, and trim excess with an exacto blade.
What a difference the window mullions made! Don’t they look totally authentic?
Going faux window mullion bars using vinyl makes cleaning the windows effortless and the outcome is instant!
Questions and answers:
What kind of trim is farmhouse style?
I like to describe Farmhouse style trim as thicker window moulding offering more character and charm to windows. There are many different styles one can choose. This style shown in this guide is a combination of several combined, using my own twist.
What trim to use for modern farmhouse?
I would personally beef up any builder grade window with thicker trim similar to what this guide shares. The finished results are completely dependent on the look you yourself desires.
What is the best material for window trim?
I have found the most durable window trim is solid lumber. However MDF boards also do the trick, however they will not be quite as durable. It’s no different than baseboard moldings. You can choose one or the other.
Summary
I LOVE my new farmhouse window trim and you can bet now I am working on the rest of the interior builder grade windows and doorways to emulate this authentic vintage charming farmhouse look!
Think you’ll give your builder-grade windows an instant old window farmhouse trim makeover with this easy method?

How to make farmhouse window trim with stock lumber! (with photos)
Supplies:
- Wood trim boards in various sizes. Primed is less work. Works with both MDF or solid wood.
Header boards: - width of window
- 1 piece 1 x 6
- 3 pieces 1 x 2
- 1 piece 1 x 1
- 1 piece 1 x 4
Side casing boards: - height of window
- 2 pieces 1 x 4 (one for each side)
Window sill or stool - width of window
- 1 piece 1 x 6 and 1 x 2 or to fit (make deeper than original window sill)
Apron: width of window
- 1 piece 1 x 4
Instructions:
- Remove original outer window molding gently with a pry bar. Leave all other wood intact, including the window sill if flush with wall.

Window sill:
- Create a window sill to place on top of existing. Determine how wide (left to right) to make the sill by measuring with two side casings dry-fit into place. Cut the sill an inch longer (on each side) past the side casings. Trim inside of sill with a jigsaw to shape. Nail into place.

Side casings:
- Cut two side casings: measure from window sill to top of window. Nail into place.

Header:
- Cut header boards to the full width of the window measuring the width of both side casings.
- Stack header wood, then assemble with a nail gun before installing. 1 1x6, 1 1x2, 1 1x1, 1 1x4 - or install one board at a time on top of the window.
- Install intact header on the top of the window.

Apron: 1x4
- Add an apron under window sill. Cut board same width as both window side casings width.
Finishing:
- Sand, prime, caulk, then paint the window trim with 2 coats of semi gloss paint.

- Add faux mullions to bare windows by using sign grade vinyl cut into strips. (use color of your window frames)
Notes
Tour the rest of this farmhouse bathroom

Take the full farmhouse bathroom tour HERE

View the bathroom window in this Christmas home tour HERE
How to plank a popcorn ceiling HERE
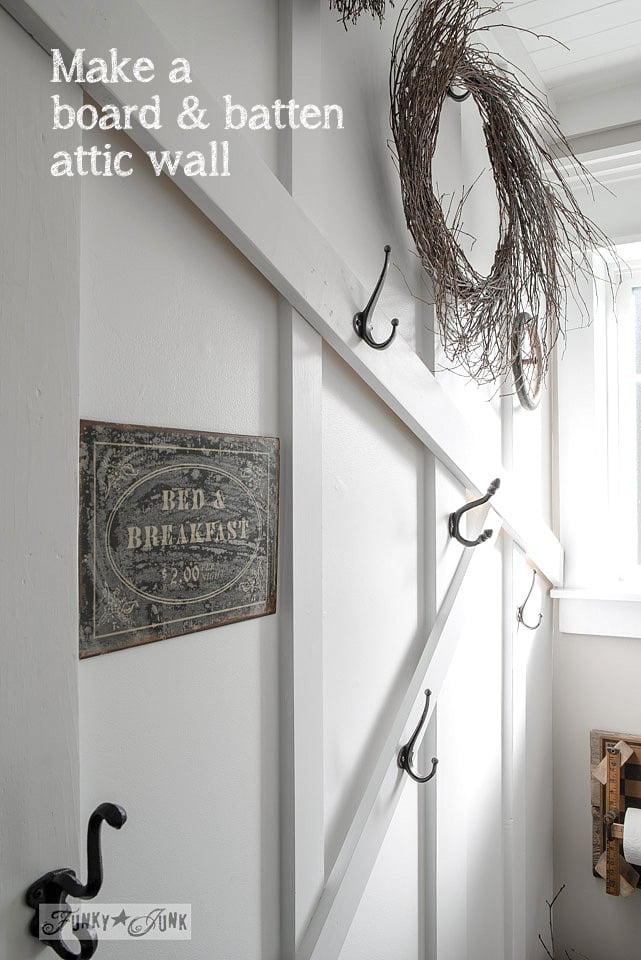
Create a board and batten attic wall HERE
Visit all primary bathroom posts HERE
Check out sign stencils suitable to add farmhouse charm HERE
BRILLIANT- excellent way to make this effective window moulding without mitre cuts- stack the wood!!!
Love it!
The window just looks superb!
Job well done, Donna!
It is fantastic. You have such an eye for creating beautiful vignettes.
Love all Frenchified stuff out there, your window is just PERFECT!
Thank you for this GREAT tutorial Donna. I’ve been wanting to do this but none of the blogs I saw gave so much detail and I just didn’t “get” exactly how to do it. Plus those darn miters. This will look awesome in my home. Wish I had more time!
OMG the BEST tutorial!!!… I can do this too! This window looks A+ perfect Donna! Thanks for showing the world that they can do this too!
Susan
This is gorgeous! I can’t wait to show this to my husband. He might want it for his office.
Well done!
Looks awesome…!!
What a great project, will have to keep this in mind for sure! Thanks for sharing, have a great day. 🙂
Nice job! I love it and what a thrilling feeling to do something you’ve never done before and have it be a) exactly what you wanted, and b) absolutely beautiful! You are amazing.
Very nice, and you made it simple too! I think I noticed a change to the ceiling too?
Yes! The reveal to that will be next week, this is part of my bathroom renovation I’ve been working on! 🙂
Great job Donna! Simple isn’t it? If people only realized how super easy it is to do this kind of work!!
Have a great day!
ps Can you email me more details about the vinyl you used for the mullions? that’s on my list for this summer and I’d love to know your technique.
Hi Anne! Sign grade vinyl is the kind of vinyl you can purchase from any sign shop in your area. It’s also the same material you get with any craft type cutter that makes decals. Even white contact sticky paper shelf liner whatever it is would work. Nothing fancy!
Wow! you are an inspiration to me! I love this project!
Donna, your window is absolutely beautiful!!! Louise
Excellent job and tutorial, as usual!! Beautiful addition to your bathroom.
Love it and love the vinyl mullions!
This is unbelievable…I think I could actually do this! It’s beautiful! Thanks for sharing, you’re so amazing!
Love your new window! It looks fabulous!
This is absolutely fantastic. And you did it yourself which ups the ante. Excellent job.
Thanks Bliss! I have a thing… if I don’t do it myself, that means maybe someone else can’t either.
So please… if I hear any of you saying you need to hollar for the husband, you may get a message from me! haha
Wowee–I absolutely adore this! We are working on a total house renovation for a 1910 house and this would work. I just found your amazing blog and I am so happy you are out there.
Thank you thank you thank you!!
Gosh I want to do this so bad…. any pointers on how to do it with an arch? Am really starting to hate the arches…. ;oP
Yikes! None. Maybe just go up as far as the arch? Sounds like you’d have to get something specially made.
How high is the arch? If it’s a shallow arch, maybe you could ‘cover’ it with the header.
Rachel may be onto something! Great idea!
You can do exactly what Donna did on the sides and bottom, with a shaped arch on the top, made from a few pieces of wood. A picture is worth a thousand words, so I would need to post a photo to show it, please email me and I will make up a drawing that might help explain it better.
Julie
follow.your.heart@live.ca
Well, now that’s just brilliant!
Absolutely brilliant, Donna! And so easy!!! Thank you, thank you! I live in an old farmhouse I am restoring and the windows are trimmed in 1×4’s. I’ve been wanting to dress them up at the top especially and was dreading dealing with crown molding, etc. This is much cheaper and easier and looks fantastic!!!
The trim around the window in my bathroom has bugged me since I bought the house. It has a lot of mitered cuts that look like they were done by small children with hacksaws. I kid not! It is all pieced together, caulked and then painted…and looks horrid. I have been wanting to put up beadboard in the bath with a nice fat trim board on top. I have put it off because the window is in the way and I didn’t know how to deal with the window trim. Your tutorial is excellent. I think I can do this. I will probably not attempt until spring but definitely will do it. If all works well, I will do the trim around the door. Hmmm…maybe I should START with the door!
Looks fabulous! Be proud, well done 🙂
I did something very similar two years ago and this was your comment, Donna, on my post “Gorgeous! What a difference! My dream would be to have every window similar to this in my own home. One day… :)”
http://followyourheartwoodworking.blogspot.ca/2012/02/workshop-window-trim.html
You done good, girl!
Ohhhh I totally forgot about yours Julie! Isn’t getting old grand?! 🙂 Thanks for including your link for others!
Absolutely beautiful. Job well done. But, we knew you could do it. Thanks for sharing. Can’t wait to see the other windows & doors!
Really hadn’t even given my windows a though, with covering them up or drawing the attention to the drapes… Your just simply a design artist with flair, thank you for opening my eyes and pointing out how easy this could be for the novice. I have hopes to do an entire bedroom worth of windows like this. Thanks again…
That is amazing. I LOVE the transformation and the whole new feeling you get gazing through it. I have old windows in my everyday house, but I am filing this away for my cabin. Don’t tell my husband. I want it to be a surprise. 🙂
I love it. It came out beautiful! I also like the old container pictured. I have been looking for something to put my homemade laundry soap in and love old enamelware. I may have to find something like that to put it in.
So love this!! Great tutorial and YAY to no miter cuts!!! 🙂
Great job, Donna! It inspires me to try more woodworking.
This is really cute! I could do this! Just getting the hang of straight cuts, not ready to graduate to miter cuts!
Donna: There is a whole lot to love about those moldings. Beautiful!
Thanks! you laid it all out in a way I (a novice with tools and wood, but willing to learn)can understand and believe I can really do that! I’m remodeling a mobile home and need all the helpful hints I can get.
It’s beeeeeeautiful! I love, love, love it. Congrats on crossing the finish line. 🙂
This looks fantastic! I love the moulding and the detail on the window with vinyl looks so good!
Amazing!! It is BEAUTIFUL!!
Ok! I am impressed!
I love it! And adding ‘mullions’ with vinyl is brilliant. It REALLY adds to the look.
Bravo! Really looks great. Love your can-do attitude and see why you needed the nail gun working!
YES I am going to try this on a window or two. Love your farmhouse window 🙂
Donna–
YES! I’d love for my all my windows to look like that.
such “old house charm”
You did a great job.
Pat
Wow! Gorgeous! This window much change the whole character of the bathroom!!! Are you going to match up some door and floor moulding as well? It truly gives the window a farmhouse look so you got what you were going for, bigtime! Just love it. Brenda
This window sill is awesome!! I love this!!!!
Love that window! Took it from drab to fab! Also love the color of your wall, what brand and color is it?
Hey Dj! It’s by Cloverdale Paint in Canada, Bamboo Beach, cut in half. Full details of the entire new bathroom redo will be up at the end of next week! Stay tuned!
Great Job! I’m going to try it!
Thanks for sharing the how-to. I love your window, it’s beautiful!!
Love this! You did an awesome job!
!!! SIMPLY GORGEOUS!!!
Donna, it turned out fantastic! I went with simple farmhouse (no miter cuts) around my basement windows and I love them!
hugs,
Jann
Hi Donna, Love the look of the window! Lisa @ Sweet Tea N’ Salty Air
Wow!! Great job, I love it. Such a talented lady.
Your window is absolutely gorgeous! I love how it turned out and you make it look so easy to do. I may have to try this with my bathroom redo that’s currently a work in progress!
Thanks for sharing!
Jennifer @ Decorated Chaos
I have plans to do all of the windows in my generally uninspiring mid 60’s raised bungalow. I think that may take a lot of time, but as my grandparents lived in a house with the same mouldings you had growing up, I want them too. To me, that’s what a house is supposed to be, and I would love to do my best to recreate it here.
Good for you! It will dramatically change the entire theme of your home! I just want to hang out in my bathroom all day long now! hahah
GORGEOUS….you always impress me! Christine from Little Brags
This is beautiful! And so simply done I might be able to do it too!
Beautiful, Donna! You made it sound so simple. I want to do this on all our windows AND doorways. Dang it, what have you done?!
Beware! It is a lot of work but not so bad if it’s one at a time. Lemme know when you start so I can leave town… 🙂
Donna…love the molding and the grid in vinyl. Great tutorial!
I love this look. I was just commenting to my husband that I wanted to make a beefy trim over our patio doors that haven’t had any trim for over 2 years. Once we replace the doors I’m going to do this! Thanks so much.
Wow…so beautiful! Love that there are no miter cuts! I can see why you want every window in your house to look like this!
Fabulous! It is absolutely beautiful!
I’ve really missed being able to put my flower pots in windows because of the teeny tiny sills. NOW I have a solution. Next step, a jig saw and nail gun- watch out!
Penny
Love this!!! You always do such a great job on the DIY’s. I want to do this for sure.
These are gorgeous! We live in an old farmhouse and these would really look nice…if I could get the husband on board. He likes the simpler projects. 🙂 Fantastic job!
Wow! I never would have guessed that you window didn’t start out looking this awesome. You make doing this type of work look so easy!
This turned out amazing, thanks for the step-by-step tutorial, very easy to understand! Now I’m going to hunt for a window to try this on!
Wow, that is a huge difference. Thanks for the tutorial Donna, pinning it. Maybe some day I’ll drum up the courage to do it.
WOW it looks amazing. You are so talented!!
What a fabulous update, it is gorgeous!
Wow Donna, you did an amazing job. I love how you made it so simple. Thanks for the tutorial, I may need it someday.
I absolutely eat these molding posts up. What’s been particularly helpful to me is the side view of the header. That’s the first time I’ve seen that and it makes a lot clear.
I have 12 exterior doors and windows, and 15 pocket doors to trim. The $$ I’m going to have to spend on trim makes me want to do it right the 1st time! 🙂
Thanks for taking the time to walk through your work.
So glad the visual helped, Christine! I agree, you have a chance to do what you will actually like rather than just getting it done. Go for it!
I love this! My washroom window looks just like yours. I think you’ve given me the courage to give this a go. Thanks for the inspiration! Your window looks beautiful.
This is BRILLIANT DONNA ! Congratulations!!!
This window molding is exactly what I have been looking for. I also ran into all the complicated miter cuts and details when I was looking. Then out of pure luck I found this site while looking at cheap window treatments on HGTV website. I LOVE THIS. I have been wanting to do something like this on the interior and exterior of my French doors, as well as all my windows. It may take me a while, but this is a definite TO DO top of the list. By the way, I think your way looks fabulous and just as professional as all the pro detailed moldings I have looked at.
Thanks Linda! It’s totally do-able for those miter challenged. 🙂
Hi Donna! I just stumbled across your blog and love all your fun projects. What a transformation the new molding makes. You did a great job and it looks amazing! I will definitely be following along from now on 🙂
Wow! It looks great! What a perfect way to add character to a standard window. And you’re right, what’s up with the puny window sills nowadays!? Thank you so much for sharing this tutorial. I’ll definitely be using it.
Thank you! Thank you! Thank you! I have been searching for a tutorial on how to add trim to my windows and a couple of entryways. I, like you, didn’t want all the miter cuts. I love this look and can’t wait to get started!
I have a farmhouse window that looks exactly like your naked “before” photo. Been waiting on hubs to do something with it. Now I’m inspired to do it myself!! Thanks. Beautiful job!
YES!! That’s what I love to hear! You totally can do it Dixie!
what size nail gun did you used?and do you think I can used a brad nail gun instead and did you use any glue? can’t wait to start.look so good.
Hey Sharon, sorry I forgot to add those details in the post, I will edit! My nail gun is a Craftsman 16 gauge finish nailer. Nails were 1 ¾”. No glue! But lots of caulk and wood filler to finish things off nice before finishing paint.
And thank-you! 🙂
Amazing, wonderful, talented and oh so homey!!!!
I just had this idea – no miters & was wondering how it would look. Yours is better than what I was thinking so far. Thanks soooo much
I like your ideas and would like to add a tip when using knotty wood for painted projects. Pre-prime knots with Kilz or shellac prior to prime and finish coats of paint. This will prevent the knot from bleeding through.
Wow! This is very clever. Also thanks for the book reference. Going to check it out.
Yes, that is lovely! I want to try doing these myself for my next DIY project. If you got time, I post up my own home tips on my blog at http://mouldmen.com – Thanks!
Thanks so much for a great idea. We are doing a small bath remodel and this just might work!
The mullions that you’ve ‘stuck into place’… is it on there with sheer tension or did you use something to apply it? I have 72″+ windows that have ZERO panes so they are very dull. want to add something to make it pop!
Hi Morgan! I used sticky vinyl material, that signmakers use for lettering up vehicles. It has self adhesive on the back.
Beautiful! I’ve been wanting to add fake mullions to my front windows for a bit of character, but didn’t know how “stickers” would look. . . so thanks for doing the experimenting for me. I think I’ll go for it!
I LOVE THIS! I’m thinking of making a mantle myself and think that this approach would be awesome!!
Hello!
I would love to hire you to do this to my bathroom window, if you’re interested! I live in Chilliwack. Not sure if you do this sort of work for others or if you’d have time. Along with paying you, I’d be happy to bribe you with homemade, delicious chocolate cake!
We’ve recently been renovating our bathroom, but now my husband has gone to work out of town and there are a couple things that he didn’t have time to finish (install the new light fixtures and trim the window!). He used your tutorial to install wooden planks on the ceiling. It looks awesome!!
Thank you so much for not only sharing your ideas, but also how to do them. I just wish I were more handy with power tools and less of a chicken!
Cindy
hi. just framed my french doors using your farmhouse window instructions. looks great! love your site.
I love how the casing is flush without a reveal. I would also like to do that in my windows but I have been told the reveal on the casing helps if the wood shifts over time. Have you had any shifting or cracking?
Thanks for your input!
Hi Maggie, none at all! And if I do, I’ll just add a little more caulk. 🙂
Builder-grade in my area have absolutely no trim at all. I think I will follow your example to change my nondescript windows in my master bath into something special. Since it is a bathroom I will be sure to prime all the wood (all sides) before nailing into place. I want to protect the wood from the moisture.
How did you stick the vinyl on the glass? I love this idea!!
Hi Karen! I hand cut the vinyl right on the sheet using a ruler, then lifted it and did it by eye. It was easy!
I’m in love with this. Can you tell me what the cost was to do this (Not including tools?
Thank you.
Hey Carrie! It all depends if you purchase your wood already primed and the size of your window. My best guess may be $25ish for what you see here.
I came across this post on Pinterest while in the middle of our kitchen reno. I had promised my contractor I wouldn’t make any changes to the plan after he got started but I couldn’t resist! The window absolutely makes the kitchen! You can see it here: http://www.whitetulipdesigns.com/kitchen-tour-part-2/
Oh my gosh Jennifer… it’s like my window walked into your house! It’s so amazing! haha I’d love to feature your window along with mine on either my blog or FB with a link and a picture of yours, are you ok with that? I’m seriously thrilled about this!
You’re so sweet! I would love that, thank you so much!
Wow what a beautiful difference.
This looks amazing, and your tutorial is so helpful, thank you! I just might get brave and try this in my own home!
Jesse, just remember, filler is your best friend. 😉 You’ll love the result!
Sharp! I’ve mitered. I won’t ever do that again! Thank you for the tutorial!
I love this molding! We’re trying to update our builder grade house to get it ready for selling. I have a rather dumb question but I’m going to ask anyways. What is the measurements increments on the three top boards above the header? Are each board 1/2″ longer as they go up? I hope I’m making my self clear. LOL
Hi Sabrina, sorry for my delay in answering your question! I layered the overhang… ¼”, ½”, ¾” on each side. But seriously? I’d just do it by eye. I didn’t use any special math to accomplish the look.
Hallo Donna,
my name is Erika and my house is in the middle of germany. I`m so happy to found your verry, verry pretty side.
Ijust make a guest-room and your projekts are so beautiful and I love it too so much. The project how to make a easy window has my heard to make bumm bumm.
On easter I will look more from your side, and I am happy about this.
Please excuse my very bad English. I learnd it ia school about 35 jears ago.
Very lovely greatings from germany sends
Erika
Aww, thanks for the lovely message Erika! I truly hope you make the window, because I know how much you will LOVE it!
Thanks for the kind words!
The before and after picture of the window makes it hard to believe it was the same window. I love the big moldings, and the shelf that you created for the vase and license plate. I would love to do this for all of the windows in my living room, and I’m so happy that you found the easy way out of it. Doing all of those complicated cuts, and getting those fancy boards just isn’t doable for me.
Absolutely perfect! I want this on every window in my house. My husband is against the idea because he is concerned that if I paint the window (currently stained wood) to match the trim, they will stick and be hard/impossible to open. Any tips on painting windows to avoid sticking?
Hi Erin! Try waxing the window with the side of a candle. Bet that would work!
THANK YOU SO MUCH!! This has transformed my awful bathroom window, and we haven’t even painted it yet–I adore it now and want to go through our entire house window by window! We bought a place with very small windows and somehow this trim makes it seem bigger which is SUCH good news for me. Plus, it being an 80s ranch, and me having wanted a 1880’s farmhouse, well…it’s probably as close as I’ll get for a while.
with deepest gratitude!
Lacey
Kudos to you on the bathroom window re-do! It is so simple and simply beautiful. Just goes to show that something does not have to be complicated to be enjoyable. Thanks for posting this.
Thanks Richard! I’m still rather surprised I did this myself! haha Yes, it’s that easy!
Your window is beautiful, It looks like it’s right out of a farmhouse. I love what you did to the glass also!
I’m doing all the windows in my house. They had very cheap and skinny moulding and hardly any sill. So I got two really long windows and two doors done yesterday. What a difference. I left off the top boards that made the crown for a simpler look. I got the nailer that you suggested and it was great. Thank you for inspiring me.
I am so happy to hear this Jayne! I just did a doorway too (tutorial coming soon!) and it’s gorgeous! Thrilled for your new, improved farmhouse look!
Thanks for the newsletters, merry Christmas to you. Many blessings. Sincerity Donny
very nice, im building a storage building
ill use this idea using pallet wood.
thank you.
My husband and I purchased all of the wood to do this for 2 windows in our family room. It looks like you painted the trim after installing it. Would you suggest that, or painting before the installation? I was planning on using my purdy brushes. Did you do anything special so it didn’t drip? Thank you for your help; I love you window trim and tutorial!
Hi Chelsea, for my first window, I indeed primed and painted after installing. But I believe I wrote in my post I’d suggest to purchase preprimed wood next round. It has a completely smooth texture to it, which results in a very different finish. It just appears more professional. I’ve since done this treatment to a door with preprimed and love it so much more! BUT it’s more expensive… ouch. 🙂
To avoid drips, I just don’t load the brush too much. A little at a time.
Glad you like the window! It is SO EASY to do, and changes the feel for your entire room dramatically!
Hi Donna:
I’m trying to do my first window and I was wondering what kind of saw you used to get the angled cut in the window sill. I’m having a hard time with that and getting the measurements just perfect. I was thinking of making a template with a big piece of cardboard.
Any tips would be appreciated and thank you!
Hi Carrie, a template is a great idea! I just used a jig saw and made two cuts. Very easy!
Hi Donna:
Well, I built my windows last week and they turned out AMAZING!!!!! I bought a new jig saw and it made everything soooo much easier than trying to cut the sills with a miter saw.
Then, I got home and was looking at the websites (this is a second home of ours) and realized that I put a 1×6 for the apron instead of a 1×4. I also have the 1×6 for the header along with all the other trim pieces. Whoops. Do you think this is going to be okay or should I remove the 1×6 and put a 1×4 on the apron.?
Hi Carrie, first off, good for you! I’m so glad you’re going for it and it’s working!
As for the apron, if you like the look, why not leave it? As long as it doesn’t make the window too ‘bottom heavy’… it may be a personal preference thing.
You could prime and paint the wood before installing. After installation touch up nail holes and apply final coat of paint. Much easier to paint boards while flat and saves time on painting.
Great idea, Dinah! Although caulking is still mandatory, which then leads to a last coat of paint. I honestly found using preprimed boards the easiest way, the finish on the boards was much smoother than starting from scratch. More expensive though.
Thank you for your post. I recently did our bathroom window using your instructions, with just a couple of size modifications, and it looks fantastic! Many, many thanks.
Oh, my goodness! I do hope you monitor your site so you can know how much I appreciate having found it! I have been scouring the web looking for instructions to case a window tastefully but something that I can do, something that shows specifically, step by step what I need to do. Here you are and I’m very grateful. Thank you!
I sure do monitor Bonnie, and so glad you found this! It’s been copied MANY times over, all with huge success! I hope you’ll update me with your own progress! 🙂
Thanks so much for all the great pictures! It really helps me to visualize the project.
You are most welcome Bethany! I’m sure your windows will turn out super successful! This is one of my most copied projects to date, and every one looks so good!
Very beefy looking !!!!!!!!
I will do this in every room in my home.
Tutorial is very detailed,and easy to follow.
One of the better ones.
You will LOVE the outcome! My fav tip is to use pre primed lumber if you can. More costly, however the pro outcome is so worth it!
I’m still not sure how you put the white bars in the farm house window.
Thank You 🙂
Hi Rene!
I hand cut some white sign making vinyl material into strips and stuck it on. You could achieve the same thing with white contact shelving material.
Love this look and am copying it for my home as it is the perfect look that I have been searching for. Not finding 1×1 wood though so may have to improvise. Thank you so much for this post and the great instructions as well as good photos.
So glad you found this wood trim inspiring Carla! You are going to LOVE the results!
Thank you for this wonderful inspiration! I love the square layered look and the stock pine used! It takes a lot of creativity to build the look you want with a simpler method using cost effective and readily available wood!!
Thank you so much for this tutorial. I just finished my farmhouse window and absolutely LOVE it. I could not have done it without your instructions.
Nice work, just a point you might consider. The sill instead of using 2 pieces just use a 1×8 it will measure 71/2″ just about the same but you won’t have a seam to deal with. Second on the header instead of doubling the second tear you can go with first a 1×2, second a 1×3 and the top a 1×4 that gives you an even 3/4 inch step on all three. You did great for a first timer. Keep up the good work and you have the home of your dreams!
I did this to my master bath window and it became the focal point of the entire bathroom renovation. The only power saw I own is a jig saw and it worked just fine for this project. Thanks so much for the tutorial.
Nice, Love this project, The detail to the sanding and rounding the corners AAA+++.
Wow! What a difference. The window looks beautiful.
Thank you so much. I did the window trim how you did it, but I added a 1×2 piece on the bottom. Added plantation shutters and I am so in love with the end product. I am so glad I found your tutorial. I wish I could share the pics here
So glad it worked out for you Jacob! This simple trim makes such a big impact!