Looking for a creative way to decorate for fall? Build your own two-sided wooden crate box from reclaimed wood showcasing two themes! This versatile DIY project displays Flower Farm on one side, and Apple Farm on the other. However it can also be used for holding pumpkins, displaying autumn leaves, and so much more year around!

As a Fusion and Amazon Influencer, this post contains affiliate links in which I earn a small percentage from qualifying purchases at no extra cost to you. If you shop Fusion Mineral Paint products through this post, you will get 10% off. Thank-you for helping to support my blog!
My all time favorite coffee spot is on a comfy pallet sofa located on the patio, which happens to face my garden, the cute rustic shed, plus a gorgeous mountain view beyond that. How fortunate am I?
And it so happens to be hydrangea clipping season too! So I’m always searching for ways to display those abundant blooms, which need some serious space.
My coffee spot view…
While enjoying my coffee, I noticed that my present cut flowers had long expired. Tucked inside a decadent plastic jug no less. Goodness. I felt I deserved to look at something a lot prettier than that to start my day off right!
So I decided to capitalize on hydrangeas… what could I make to display fresh cut hydrangeas with enough storage to proudly showcase those abundant blooms?
Then it came to me… I’ll whip up a DIY wooden crate box, but with a twist! This one would spin around, offering 2 fall looks! Flowers on one side, and fruit on the other!
And the result? Not only was this SO easy to make, it turned out positively adorable and loaded with fall charm!
Want a fun and easy fall crate loaded with character you can display things in too? Here’s how!
Build A Rotating DIY Wooden Crate Box:
2 Creative Ways To Decorate For Fall!
Supplies you’ll need:
.
reclaimed wood to suit
Funky Junk’s Old Sign Stencils used:
- Apple Farm
- Flower from Market Extensions
- Open 10-4 from Bakery
- Tours from Potting Shed
mitre saw (read this post about mine HERE)
measuring tape / pencil
cordless drill (here’s my fav) with pilot hole, screw bits and screws
paint of choice – I love using Fusion Mineral Paint (get 10% off)

Designing the size of the crate
1. Decide on the size of your crate by positioning the desired stencil sayings on reclaimed wood strips, to ensure they will fit.
I plan to make two messages stacked, so I’m creating Apple Farm and Flower Farm using 2 stencils that can be interchangeable.

Cutting the boards to size:
.
- (left) 4 boards for the sides – 12″ long
- (middle) 4 longer boards for the front and back – 20″ long
- (right) 4 inside chunky corner supports – 1.2 x 2 3/4″
Wooden crate box exterior dimensions
- 20″ wide (left to right)
- 12″ deep (front to back)
- 11.5″ tall (top to bottom)

How to make the most accurate board cuts
2. Cut each board to length with a miter saw, then sand all edges and surfaces with an orbital sander.
To make more accurate cuts on duplicate pieces of the same length, I like to cut one board first, then use the cut board to measure the next board. You could also stack the wood and cut more than one piece at a time.

How to make the corner supports
Stack two front boards together with a gap in between as shown.
Place a support board up against to determine the exact size needed.
Tip: Add 1/2″ more to the corner supports IF you wish to leave a gap in the bottom of your crate too. I forgot to do this!

3. I painted the corner supports in a black/brown. (this was my house trim colour I had on hand).
However if building this today, I’d use Fusion Mineral Paint in Coal Black.

Assembling the sides of the crate first
4. Build the two sides first. Here’s how to build one:
- Lay two support boards wider side down.
- Position two side boards on top, allowing for a gap at the bottom of your crate and in-between the two boards.

- Mark and drill 2 pilot holes first on each board end.
Reclaimed wood easily splits if you don’t pre-drill holes first.

- Position the boards on top of the corner supports, then assemble with screws using short, gentle pumps from the drill.

Closing in the rest of the crate
5. Once the two sides are complete, attach the front and back boards to the sides.
6. To make a (for show only) crate bottom:
- Flip the crate upside down, then lay a plank along two ‘legs’. Attach with screws. Repeat on the other leg.
- The bottom done this way is not a sturdy fix for carrying things, but worked great for a stationary display.

Stenciling fall sayings on the crate
7. Stencil the desired sayings on each side of the wooden crate box.
I used a variation of several stencils:
Apple Farm
Flower from Market Extensions (sold separately)
Open 10-4 from Bakery
Tours from Potting Shed
Find all the various Funky Junk’s Old Sign Stencils HERE
Learn how to stencil HERE
While I did not take pictures of the stencilling process this round, I DO share it in a quick video as well as the building steps! Located at the bottom of this post.
And here are the fabulous fun fall results!

Apple Farm fall crate
Well, hello there ready-for-fall cute apple crate filled with all kinds of tree leaves and honeysuckle vines with tall grass… you certainly look very fall-ish and totally cute to look at while I enjoy my coffee!
The story I wanted this side of the crate to tell was a fun day of picking apples at the ‘ol farm. No need for any fancy greens for this look!
I placed water containers inside, then filled them with tall grass, and branches from a honeysuckle bush (that were in red berry mode) as well as another tree.
Instant pretend apple tree orchard at your service!
Stencils used:
-
- Apple Farm
- Open 10-4 from Bakery

Added crate details:
Two wood slats were screwed into place on the front of the crate, then rusty junk added for a little more detail.
Open 10-4 was stenciled into another piece of wood, then held to the crate with a couple of rusty junk hinges… or something.

Other rusty junk was hung here and there to help offer the crate a little old time authenticity.
I did not stain the solid wood boards, as I found the raw wood to be perfection as-is!

And now I’m ready for fall!
Sure beats looking at dead flowers, huh?


And… while I sure didn’t desire to dismount this fresh, cute look, I did desire to try my hand out with another look on the other side of the crate, to chime in with my beloved hydrangeas…

Hydrangea-filled Flower Farm fall crate
.
Welcome to the Flower Farm! We have plenty of hydrangeas to offer up as part of the tour, so help yourself so you can bring some home to fill up a crate of your own too!
Stencils used:
- Apple Farm
- Flower from Market Extensions
- Tours from Potting Shed
Added crate details:
After stenciling on Flower Farm Tours, I decided to add a little more detail…
- Two wood strips were added to the front of this side of the crate too, then painted in a distressed black.
- A flower pot and stem was stenciled at the bottom of the F, then a vintage tap handle was screwed on to resemble a junk flower.
Such a fun, unexpected raised detail with a rustic aesthetic appeal I adore!

And just in time. My hydrangea blooms are going crazy and are pretty much ready to dry already!
Learn how I dry hydrangeas with wilt-free petals HERE

Although I did have late summer / early fall hydrangeas in mind for this side of the crate, this saying is perfect all summer long too!

And don’t those hydrangeas look spectacular in this sized wooden crate box?! I like to arrange them so they ‘bounce’ at different heights. What pretty eye candy!
How to arrange hydrangeas “to bounce”
- Place some jugs of water inside the crate
- Cut hydrangea stems with long stems
- Start placing the hydrangeas in the jugs of water, with some higher and some lower in heigh until they look varied and interesting
- Tuck in a few leaves between the flowers to vary the look
Read many more tips on how to dry and arrange hydrangeas from THIS POST
Video tutorial: Apple and Flower Farm Crate for fall decor
View above for a short video of the crate making process! Music: Summer by Bendsound.com
Other ways to use this wooden crate box:
While I used this wooden crate box for fall decorating, it could be used for so many other things!
- to store toys
- as drawer storage like this pallet TV stand idea
- for open shelving displays like on this farmhouse shelving
- add castors to the bottom, with a top to use as an ottoman
NOW it’s coffee time! In fine fall style I might add.
Which side of the crate is your favorite?
Other unique fall project ideas to make:
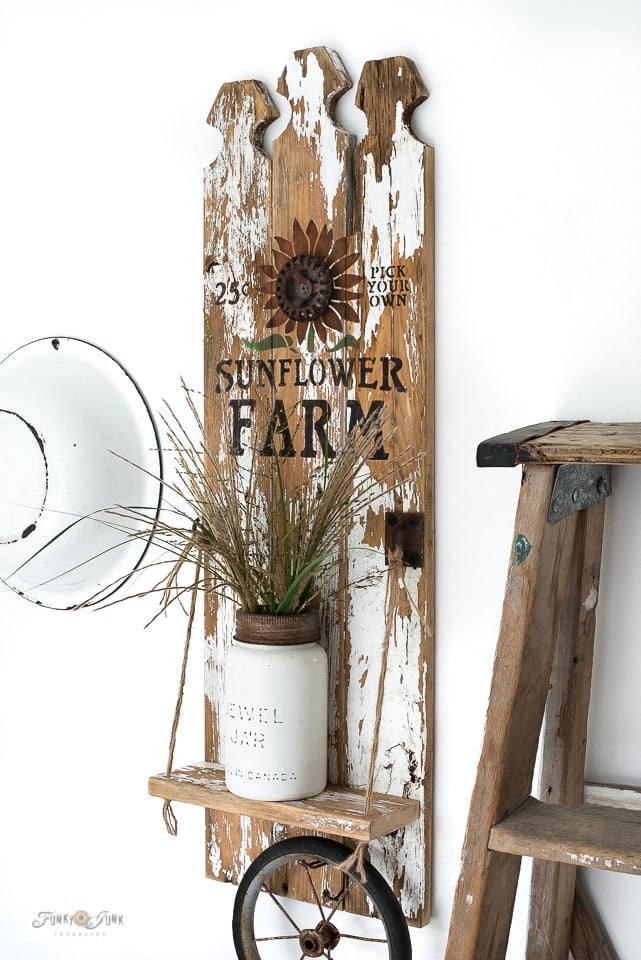
Sunflower shelf for displaying cut flowers
Rustic wooden pumpkins with wood blocks
Flower Market stepladder holding outdoor flowers
Visit our entire collection of fall projects HERE
Check out other fun ways to decorate with or build crates HERE
Thank you for the video! I love that your projects are easy and don’t require tools I don’t have ?. You are Soo creative and talented! Keep em coming please! Always look forward to your posts! ❤️
Ohhhhh, I’m so glad you find the projects easy enough to copy! That’s always my goal! Thanks for the kudos!
Wow, so fabulous. I love this project
Where is the link for the video?
Hi Melissa! What device / method are you viewing from?
I see it in the blog post and on my phone. It’s the darkened square with the triangle in the middle right above the mention of video, right after the Flower Farm crate picture that shows it straight on.
If you are viewing from the bhome app, you may need to go through a browser view instead.
Thanks Ivory! It was fun to build again after my summer hiatus!
It looks fun-tabulous Donna. Love the way you just add a few rusty junkin’ pieces and it takes the ordinary to a whole new level. Hope those fires don’t get out of hand. It’s very sad when that happens but I suppose it’s Mother Nature’s way of cleaning her house and everything does come back greener and more beautiful than before. Perhaps we should take a lesson from her books and “burn” our old bad habits so we can come back stronger <3
Yes yes yes… junk always wins doesn’t it? 😀
Fire season is tough to live through here, however you certainly have a massive appreciation for a ‘simple blue sky’ afterwards! Also love your analogy. Very, VERY true!
Oh I love it!! And thank you for the video- so helpful! I’m so glad to see you making stuff again… I’m following your journey and happy to see you back.. everything will be ok!!!
Thanks Olga! Feels good to be back and building again! I’m looking forward to building a few new things I haven’t yet tried… the challenge is on!
What great idea! I love how you always with a little bit of rusty junk too.
Perfect!
Thanks Kim! Those rusty junk bins come in handy! haha