Looking for a fun and inexpensive way to decorate with Valentine’s Day crafts? Learn how to make adorable heart decorations for free, using items you already have at home! These charming hearts are so easy to customize to suit your own style, and can be gifted or used in so many ways. Here’s how!
This post contains some Amazon affiliate links in which I earn a small percentage from qualifying purchases through these links, at no extra cost to you. Thank-you for helping to support this blog!
Buying decorations for every season can get pricey. So when I desired a simple craft of some DIY rustic hearts to decorate with for Valentine’s Day, I decided to do one better… to use things I already had at home so these valentine’s day crafts would be absolutely free!
Not only were these Valentine’s Day crafts successful, these hearts turned out so much more adorable than I ever anticipated!
By using your creativity through craft supplies you already have at home, these hearts are fun and easy to customize so they suit your home and style, and of course, the price is certainly right!
So no need to stick to just pink… here’s how I created neutral rustic hearts for valentine’s day to suit any decor year around!
Budget Friendly Valentine’s Day Crafts: Make free rustic hearts!
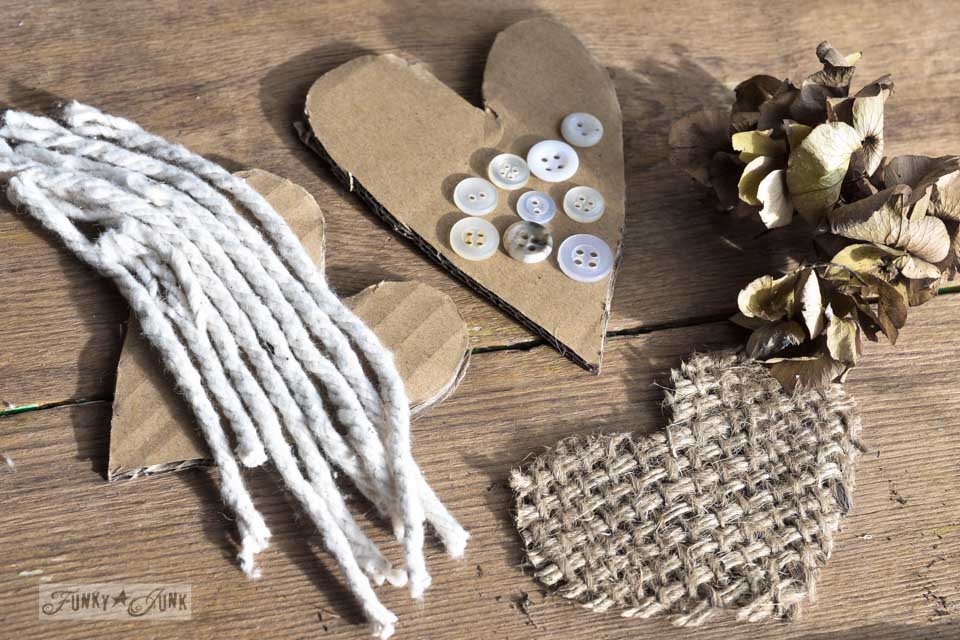
Supplies you’ll need:
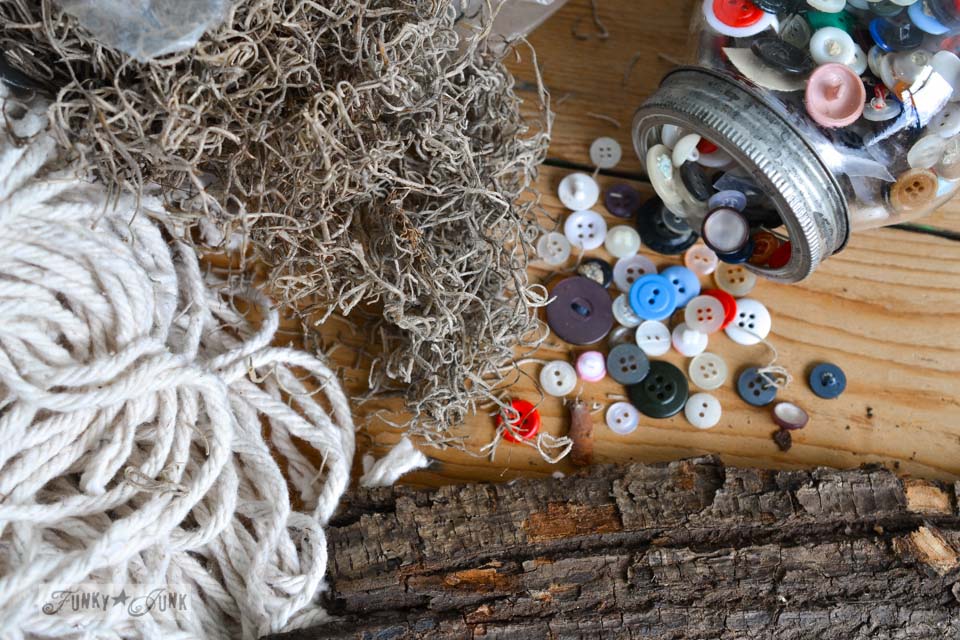
Craft supplies such as buttons, twine, mop head, burlap, pom poms, burlap fabric, etc.
Any element from nature such as craft bark, spanish moss, dried hydrangeas, dried flowers, small twigs, etc.
Gathering craft supplies
1. Gather up any smaller-sized craft supplies you love the look of that can be glued down.
Think of colours and textures you like.
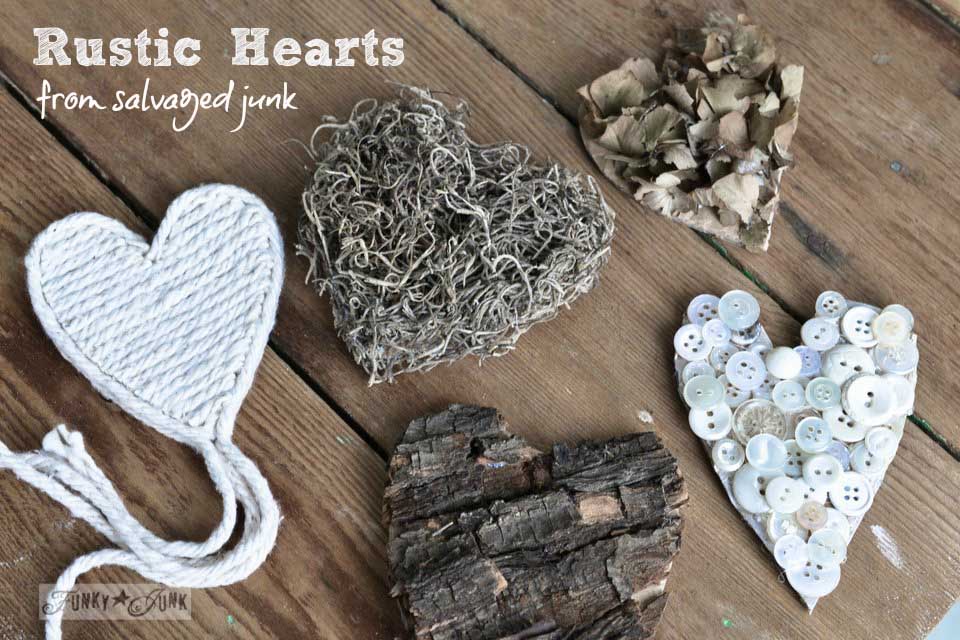
I chose a neutral look and gathered up white buttons, twine, spanish moss, craft bark, mop head, burlap, fabric scraps, and burlap fabric.
Cutting cardboard into heart shapes
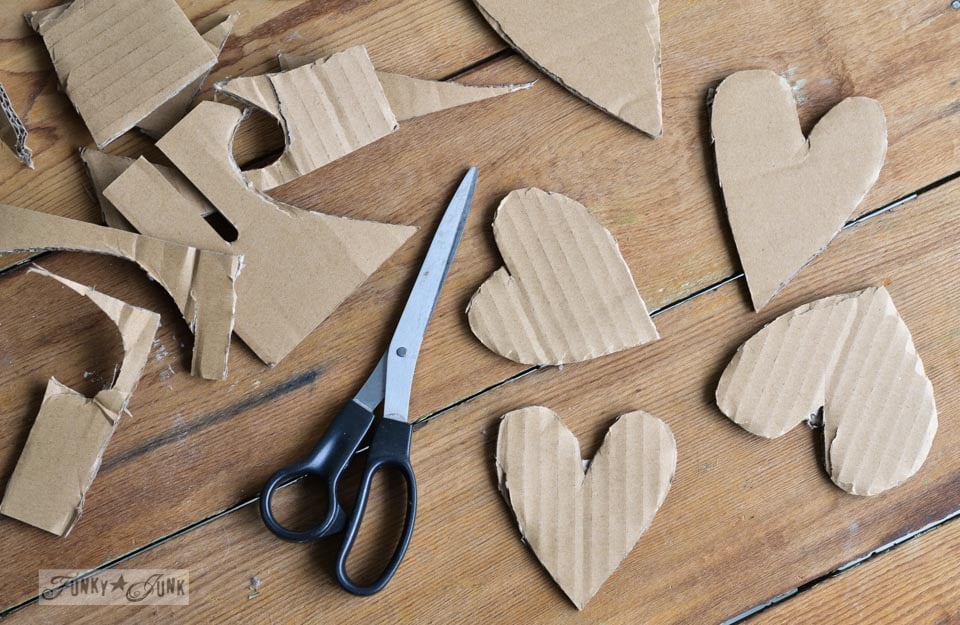
2. Draw free-hand heart shapes onto corrugated cardboard, then cut them out with strong craft scissors.
I hand drew each heart onto cardboard, then cut them out, not worrying about perfection. However you could certainly cut one and trace the image out for the rest if desired.
Each heart looked slightly different, ending up with some super quirky shapes which I favoured!
Use strong craft scissors like THESE.
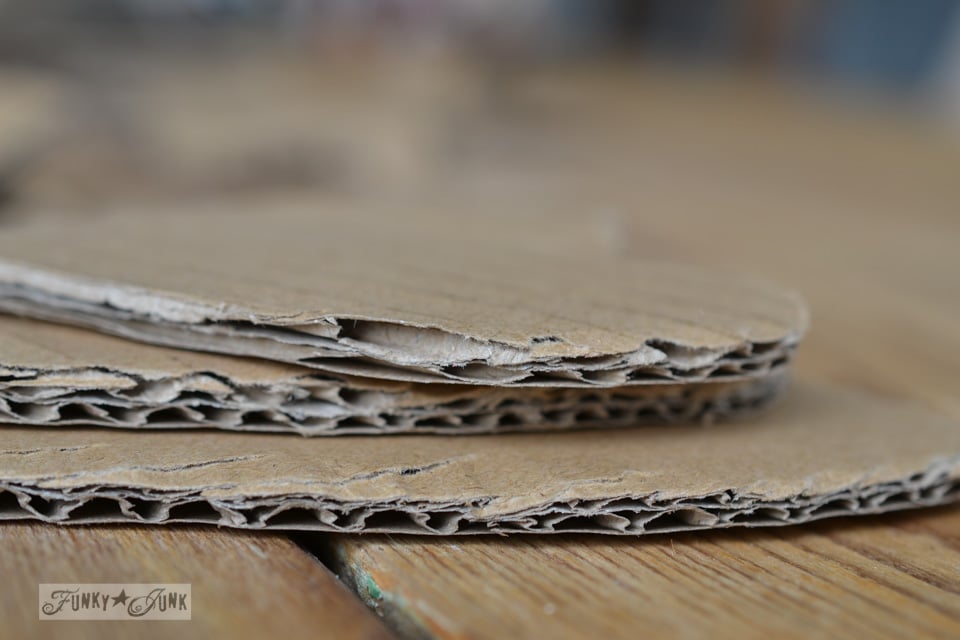
The nice thing about heart-shaped cardboard is that it’s light yet sturdy. And in most cases, completely free if you cut up old boxes you may have sitting around!
Your chosen added embellishments will bulk up your hearts, so you want something stable enough to do the job without adding more weight if possible. This does the trick beautifully.
Locate some craft corrugated cardboard HERE.
Dry-fitting the craft supplies onto the hearts
3. Dry-fit your chosen craft supplies onto each heart.
Burlap fabric or otherwise: trace your heart onto the fabric then, cut so it fits.
Twine or string: cut to the full width of the heart, then line up one against the other until the heart is covered.
White buttons: choose a mix of colors or all the same tone, then completely fill the button surface. THESE pastel pink buttons would also look adorable!
Craft bark: gather up thin bark, then place across heart until covered.

Gluing craft supplies to hearts
4. Using hot glue, attach all all the craft supplies to the cardboard hearts.

Trimming around each heart
5. After the craft supplies are glued in place and allowed to cool, trim edges around hearts where needed.
For a better experience with cutting thicker supplies such as craft bark, use garden hand pruners or heavy duty craft scissors like THESE.

Gluing buttons to hearts
Random buttons grouped together look so charming! You can choose a mix of colors or cover the whole heart with all white and cream buttons to create a neutral heart like I did.
In hindsight, before adding buttons to your hearts, I would recommend to paint the cardboard heart first with a color that blends in with your buttons best so you don’t see parts of the cardboard peeking through.
In my case, I continued to layer the buttons until the cardboard disappeared. But painting prior would have been easier.
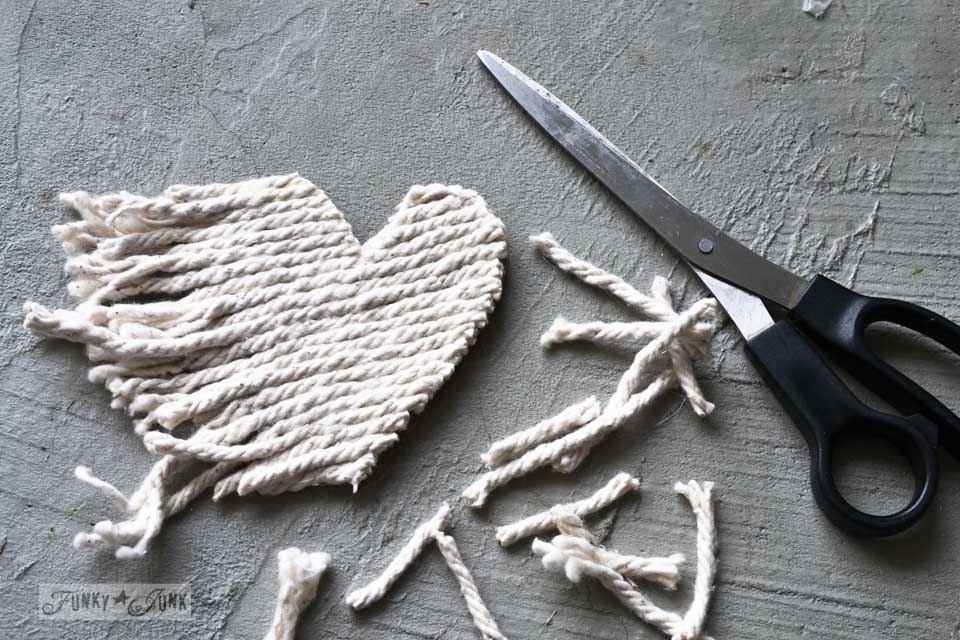
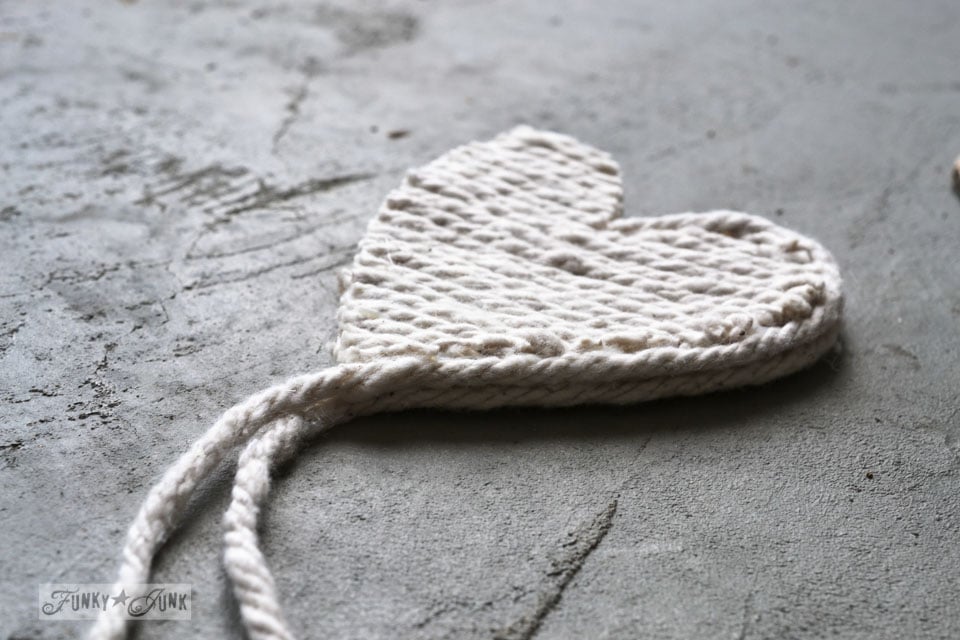
Adding twine or string
Adding thicker string to the hearts was fun and easy!
- hot glue the string across the entire heart until it’s covered
- trim the twine around the outside of the heart
- cover the raw edges by gluing on one or two layers of longer string
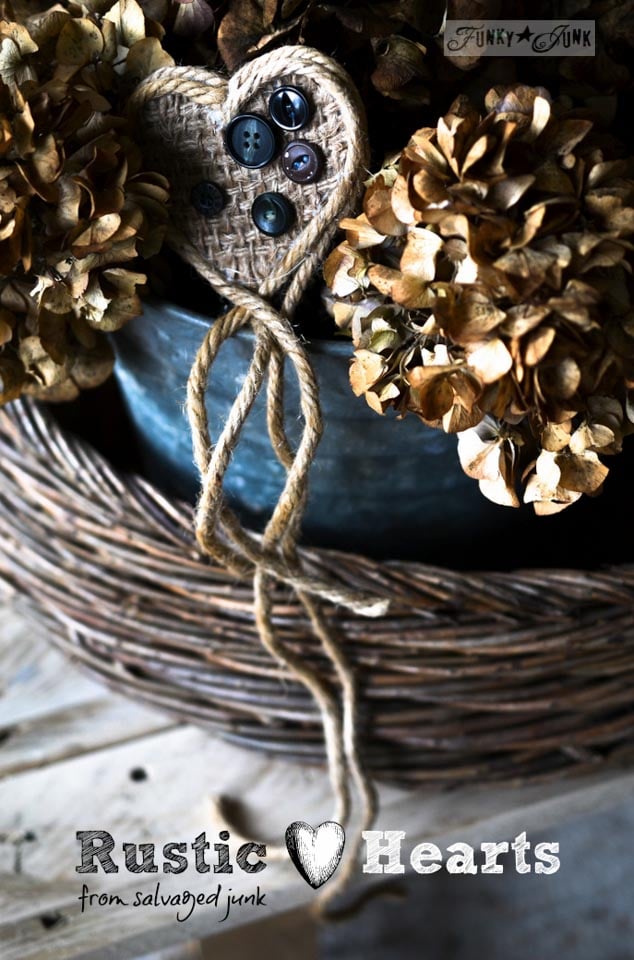
Any guesses what kind of string I used? It’s a mop head!
For an added detail, I allowed some string to hang below the heart which resembles a tassel. Fun!
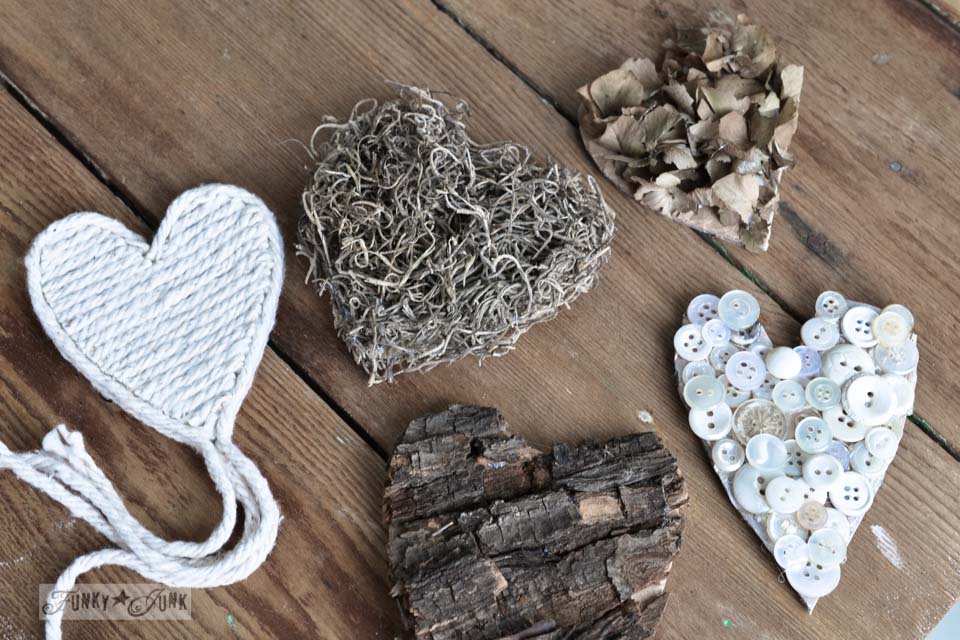
The finished product – rustic hearts
And here’s all the rustic hearts grouped together. Aren’t they the cutest?! Themed in a tone-on-tone blend of colours, they all chime in so well with each other, and are neutral enough to leave out all year around if desired.


Each craft supply gives a different depth making the rustic hearts even more unique and beautiful!
Super quirky, but so much fun! So let’s do a little decorating with them next!

Decorate a vintage typewriter
Placing hearts decorated with dried hydrangeas, string and buttons into the paper carriage of a vintage typewriter along with a precious photo of my parents made a pretty sweet Valentine’s display!
I also added a couple of vintage Bingo cards, however even old Valentine’s Day cards would be precious and add even more meaning!

Heart shelf sitter
Setting a mossy heart beside a vintage photo of my mom, along with her pearls makes a sweet moment for certain.
These hearts look adorable grouped and by themselves!

Adding hearts to a bucket of flowers
I think this burlap Valentine heart is my favorite, with coordinating brown buttons! It’s placed inside a galvanized bucket filled with dried hydrangeas.

Heart bulletin board pins
And these little rustic Valentine hearts look very cute pinned onto this rustic bulletin board (tutorial here) too!
Quite honestly, these little rustic Valentine hearts were just an excuse to make something seasonal and not have to take it down anytime soon! And I’m so glad I did. I just love looking at them no matter where they are tucked!
These would make such fun crafts for little hands as well during February! What kid wouldn’t love to create to their own heart to their heart’s content? I mean, who wouldn’t love to receive a handmade craft from a loved one for Valentine’s Day, especially if decorated by their kiddo?
Other ways to decorate with these Valentine’s Day crafts:
- give as Valentine’s day gifts
- decorate your home
- add magnets or push pins to the back
- use as Valentine’s Day party decorations
- string together to create a Valentine’s Day banner like THIS or garland
- attach string then hang inside a window frame
- hang from door handles or hooks
- glue to a wreath form to create a heart wreath
- create craft kits for kids or workshops
- add charm to the front of a Valentine’s card
- attach to a little bundle of candy
- stitch x and o’s with yarn on them
- attach a collage of different things to the hearts (ie: mixed up custom jewelry)
Well that was certainly a fun and easy idea for Valentine’s Day crafts! Think you’ll make a few rustic Valentine hearts of your own? What will you add to your own Valentine’s Day hearts to make them uniquely yours?
Other unique rustic Valentine’s Day art projects to make:

Reclaimed wood coffee mug hanger

Reclaimed wood LOVE heart used 3 ways

Tic Tac Toe board game tray from a Valentine’s Day stencil


Craft a wooden banner for Valentine’s Day
View ALL my rustic Valentine’s Day projects HERE
Those hearts are fantastic and you just gave me some ideas. Thank you and Happy Valentine’s Day to you dear Donna.
FlowerLady
….love the bark one!
Great idea!!!! I can’t wait to try that with all the junk I have. Love ’em!
Donna I love these! All of them – I keep thinking ‘oh the bark one is my fav’ and then I think ‘no the mop string one is my fav’ and then I think ‘no wait…’!!!! You did a great job of hearts that look great with junque and rust!
Ditto, what Donna said!!
Love these darling little hearts, so creative! And your rustic bulletin board is awesome!
Happy Valentine’s to you
Cindy 😉
Such wonderful ideas….I needed some neutral inspiration. Pink and red just don’t always work…thanks!
Love all the hearts. Instead of painting the cardboard white, just use white cardboard. (I save everything) White is not too common though.
Thank you for sharing this great idea! I am definitely going to explore my stash with your idea.
These are so clever! I love them so much I’m going to share them on my ‘Weekly Wonders’ post tomorrow morning. I hope you’ll stop by! Thank you for sharing! ~Lisa
With the button one, you could just glue on a page from a book first, instead of painting it. I hate to wait for the paint to dry before I get to the fun part!
I love these,they are so much better than all the ruffles with lace and red and pink. Thanks for sharing, I’m inspired.
These look amazing Donna- I can’t even pick a favourite. So creative and thrifty- I love the cardboard as the background! Thanks for sharing – pinned:)
Ok I don’t know who ever told you that you weren’t crafty…. These are flipping adorable Donna… and oh so crafty lady!
Haha, well, you sure made me smile today! Signed, kinda crafty junker now that Susan says so. 🙂
You have given me some great ideas. I think I may try a heart with cut up pink and red scrapbook paper in small pieces and make a collage. Thanks.
I love hearts all year long not just for Valentines Day. These ones you made are very cool and I like that they can be used all year too.
So beautiful!! Great and lovely idea; thank you very much for sharing.
Donna your little hearts are darling ideas! Thanx for the inspiration. Jo
These are so unique!! And you created them out of practically nothing! Great use of everyday objects!!