Create a unique way to say I love you with Valentine’s Day sayings like this easy love rope sign! It’s easy to customize with any word desired, and any material such as rope twine or string! Use it to decorate your home or gift a loved one!
This post may contain Amazon plus other affiliate links in which I earn a small percentage from qualifying purchases at no extra cost to you. Thank-you for helping to support this blog!
It’s been awhile since I’ve handed out a Valentine’s Day card, but that certainly doesn’t stop me from creating a unique Valentine’s day gift!
These rustic salvaged junk hearts are the perfect example. It’s a unique way to gift a fun valentine that someone can actually keep out and enjoy year around!
You can check out other rustic and unique Valentine’s Day projects HERE.
Since my decorating style is pretty neutral and rustic, this round I desired to make a project that not only chimed in with my style, it could also be easily adapted to create any Valentines Day sayings you desire…
Grabbing a few reclaimed wood fence planks from my stash and a little bit of thinner rope, here’s what I did!
Create easy easy valentine’s day sayings like this love rope sign

.
Supplies you’ll need:
heavy twine – identical to what I used!
cordless drill – my fav kind

Sketch out your word
.
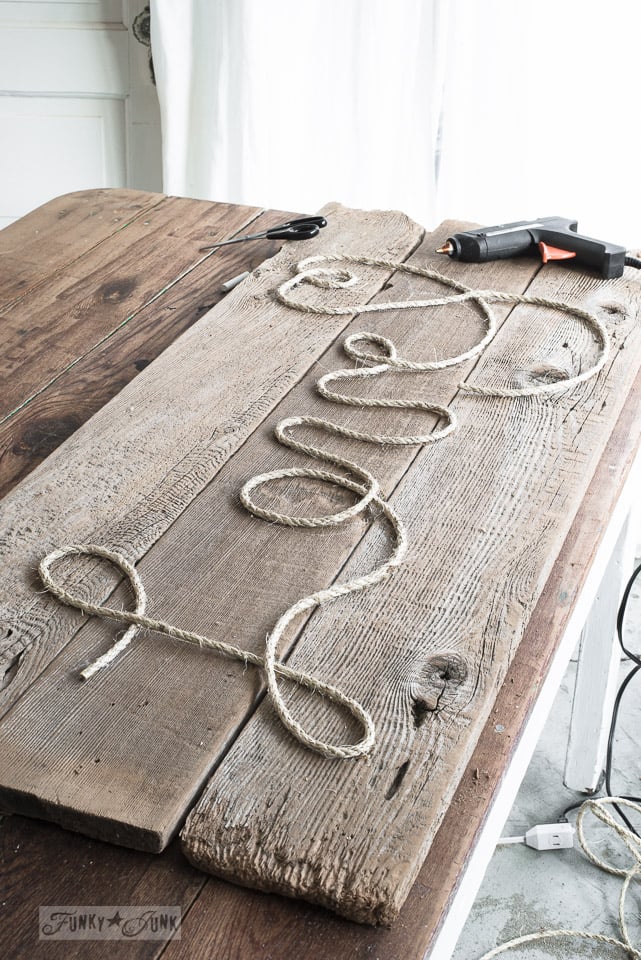
1. Roughly sketch a cute sayings on paper first in a writing script that continues without breaks.
I chose to sketch the word Love ending with a heart in a continuous motion that is possible by bending rope only (no sharp corners) however you can also cut the rope as you move along as well. So really, any word or anything is possible.
Some other Valentine’s Day sayings to consider:
- Friendship
- Boyfriend or Girlfriend
- So Much Love
- Love you more
- I love you
- Be mine
- I’m yours
- Yours forever
- a short valentine’s quote
- unique valentine’s day puns
2. Write your saying in chalk on your chosen platform.
For my base, I chose three loose reclaimed wood planks that hadn’t even been attached to each other yet. However you can attach them with two smaller support boards on both sides from on top or underneath.

Attaching the rope with hot glue
3. Apply hot glue along the chalk line, then place your twine along the glue line to create your word.
Because the hot glue cools nearly instantly, laying glue down a few inches at a time, then quickly pressing the rope down against it works well.
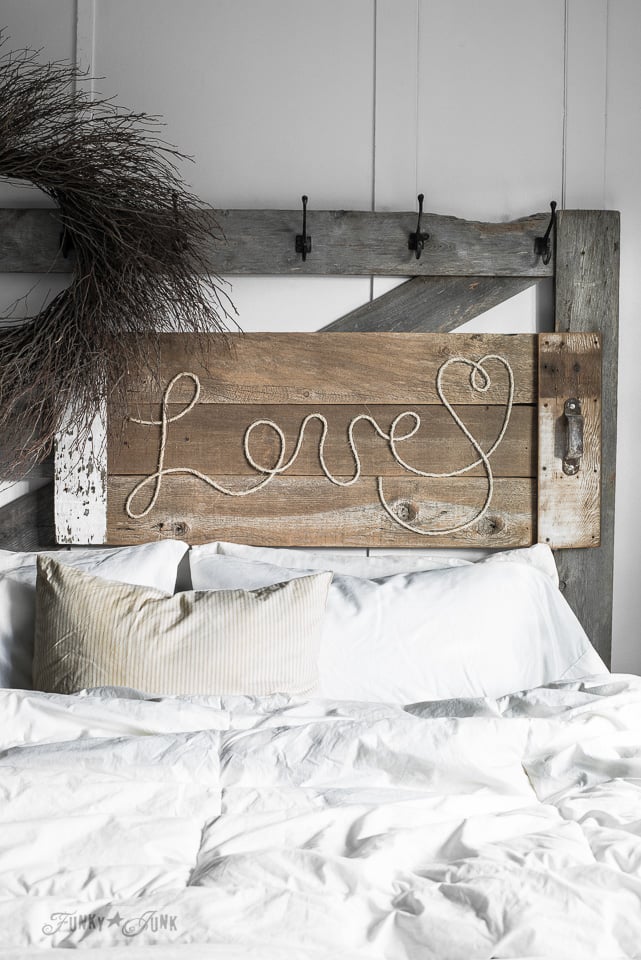
Ending the word with a heart shape
My Love word ended with a big ‘ol twisty heart to further tell the story as an added treat!
And since I don’t have a ton of spare wall space (read that as none) in my home, here’s where I put the Love sign!
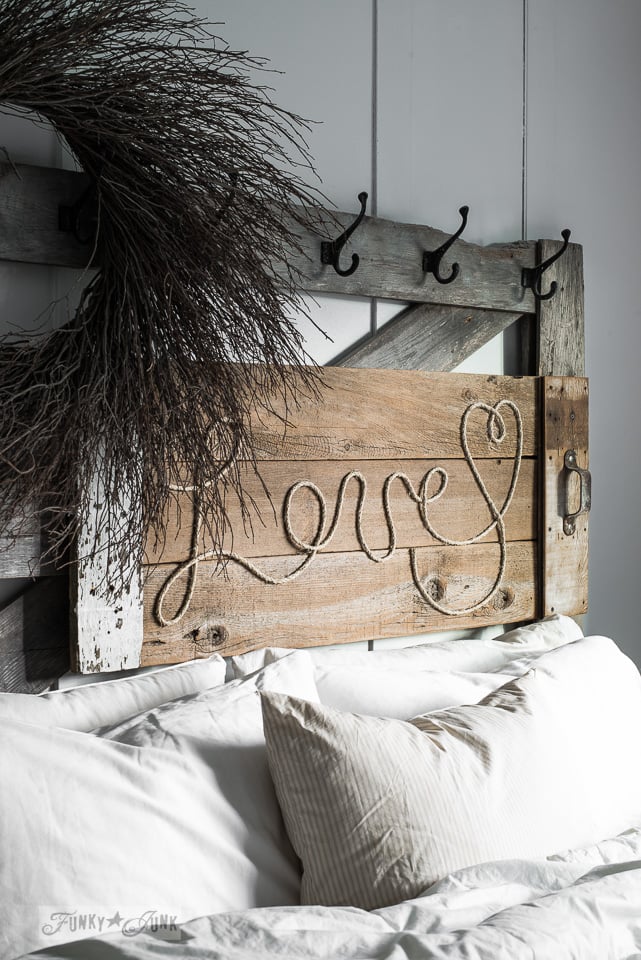
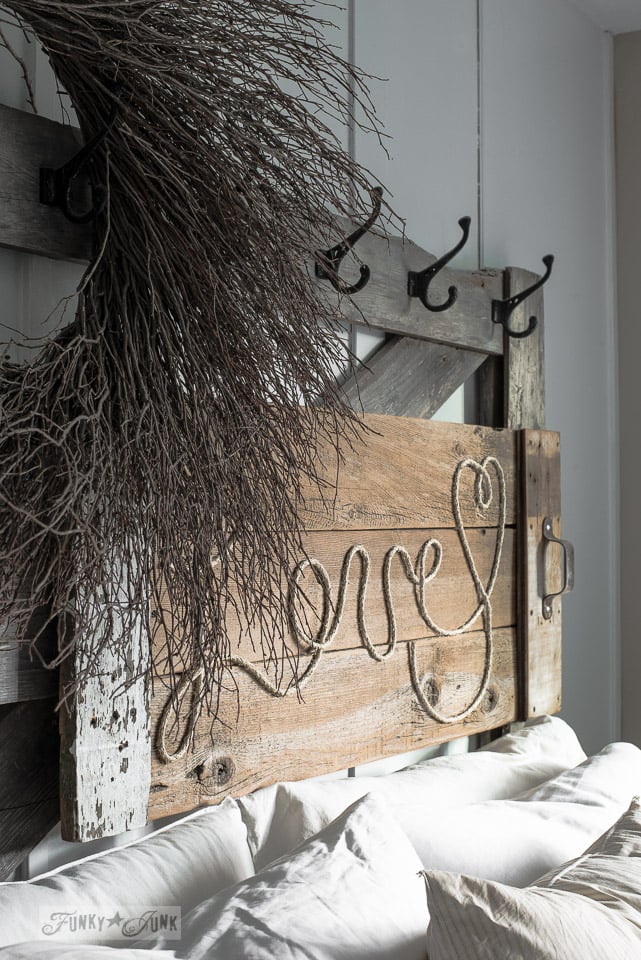
I mounted it right to my bedroom headboard! (which is an old horse gate)
Mounting the Valentine’s Day sign
The 3 reclaimed wood planks were joined together by screwing on two support boards on each side on the top. This created a natural border adding more detail which I loved!
Then the entire sign was screwed right onto the headboard. This makes it very easy to remove whenever desired.

Isn’t it sweet? It sure makes a nice way to celebrate a special person in your life!
One could also add some further details such as:
Other ideas to add to your Valentine’s Day sayings:
- Hang a new or past Valentine’s day cards on the sign
- Attach small bags of Valentine’s day candy or a little chocolate treat or 3 to the sign
- Add rustic black hooks to hang anything desired
- Attach funny Valentine’s Day quotes you can have your loved one read
- Include some movie tickets or a dinner out option


This natural wood and rope Love sign also works well with neutrals, so a mix of white pillows and a white quilt complete this look.
Trace this image
Here’s a straight on shot so you have the ability to better trace the Love sign I made. Or perhaps this inspiration will help you create your own look!
I LOVE it! 🙂
Another way to use this idea would be to use thin string to create greetings on Valentine’s Day cards or gift tags. This would also make a fun homemade Valentine’s Day card made by a kid (with hot glue guidance of course)
Now just add a fun movie and a few chocolates and that’s a Happy Valentines’ Day that works for me this fine February!
What Happy Valentine’s Day message would you use for your rope, twine or string sign?
Other unique and rustic Valentine’s Day projects to make:

Rustic wood heart coffee mug hooks

Make a salvaged Love sign on a wooden heart

Salvaged junk hearts, made with anything you have on hand!

Tic Tac Toe Valentine’s Day stencil into a board tray game
See all my other rustic Valentine’s Day projects HERE
Find my favorite Valentine’s Day stencils HERE
Hi friends, I’m aware of the comment box issue. Let’s hope it’s fixed soon!
I was wondering if you recall where you had gotten the wreath at?
Im always looking for one that resembles that and its hard to tell online the size and how thick they are.
Thank you,
Jennifer
Hi Jennifer, if you’re referring to the large twig one, it was purchased from Luckett’s (spring vintage market) in Virginia several years ago. I hope you can find one!
Love this, I’d love to find the time to create something like this
When I first saw the picture until i read the directions, I thought that after you had put it all together that u then painted the entire thing white. But it’s totally awesome as is but painting it to match could be an option I think, painting and then antiquing.
I LOVE the painted idea Erica! I hope you share it if you try one!
Hi Donna, I love your project and wanted to share it with our followers as part of my favorite reclaimed wood projects. You can see the post here: http://www.craftcuts.com/community/home-decor/7-reclaimed-wood-projects/ Thanks for the awesome how-to!
Wow.. Good idea.. Well said erica.. it will look awesome with painting
Love your site! You have given me so many ideas and now I would like to actually make something. Thank you for sharing the diy on your love rope sign. I am going to make it for my niece and her fiancé’. Could you tell me what the dimensions are for the sign you made? I did get some old barn wood but I am wondering if it may be too thick- about 1 and 1/2 inch. What do you think?
Thank you so much!
Corlyn Miller
Hi Corlyn, sorry, I’m not home at the moment to check. But honestly, any board will do! I generally create with just whatever I find. 🙂 I think thicker wood would make a super nice statement, although it may be a little trickier to mount on a wall. Just use longer screws.
I was wondering if you top it off by adding poly or something to hold the rope in place after gluing?
I personally didn’t do anything more than glue the rope on, Stephanie. I guess the rope was tight enough to just hold. Worked great!
Hello! I was wondering… could you do this on a much smaller sign with thick burlap string? It would be like a small version. Just wondering what you think 🙂
Hey Sarah, I can’t see why this wouldn’t work! I think you should try it!
How did you attach the three boards together? Or is just by the end boards?
Hi Pam! Yes, the entire sign was held together by the two side planks. I’ll change out my post to better reflect that! Thanks!
Hi Donna!
love your website and all the great crafts you have on here!…I was wondering if you had a tutorial or any such thing on how you made your headboard for your bed. I absolutely LOVE it!
Hi Amber, thanks for the kudos! The headboard shown in this picture is actually an authentic horse gate I didn’t have to make. Sometimes I do get lucky it seems! haha
Super cute! Oh the possibilities! I love, love, love your junk heart with the wheel on it. My fav 🙂
Hmmm… i think I’d paint that rustic ‘Love’ sign with a white background so the rope stands out better. Having said that, what a unique way to use a rope on a sign. Was looking for something similar. Hard to find signs with rope words.
Love that idea Will! I hope you give your vision a go!
I love it! ♥