Turn scrap wood into the easiest and cutest wooden snowmen, perfect for Christmas or winter decorating! Complete with rusty junk features, rope scarves and more!
Someone asked me in passing if I could make a handmade wooden snowman for winter decorating.
Why yes, I think I will!
I LOVE creating winter decorating. Not only does it cover Christmas decorating as well, everything is still in season long after the Christmas trees come down.
I’ve been meaning to create some kind of DIY wood snowman project forever! Give me a challenge with scrap wood and I am SO in.
And I honestly couldn’t wait to get started. I’ve envisioned this DIY winter craft in my head for a while, but then I decided to add a few surprise elements at the end so I’d even pleasantly surprise myself!
The final outcome are adorable wooden snowmen, making the perfect Christmas decorations. They’d make affordable and unique gifts too!
But little did I know what divas these snowmen were about to become, as they simply could not make up their minds on which choice of scarf to wear…
I think I’ll let them chat it up this round… it’s all yours, divas snowmen.
Snowmen: “YES!! K guys… it’s story time… and put away your fancy wood slices this round, all you need are real wood handmade pieces of square chunks in whatever size!”
This post contains some Amazon affiliate links in which I earn a small percentage from qualifying purchases through these links, at no extra cost to you. Thank-you for helping to support my blog!
The easiest DIY Wooden Snowmen

Craft supplies you’ll need:
Snowflake stencil – Winter Graphics from HERE
Square wood posts (bonus if they are chippy white!) or wood blocks
Rusty junk hinges and random bolts
Fusion Mineral Paint’s Coal Black paint
(find a local merchant HERE)
Once upon a time before we DIY Wooden Snowmen were born, we were reclaimed scrap wood posts.
Various sizes you know… and if the wood had some chippy white paint on it and they were all different sizes and sorda squarish, that was all fair game.

Preparing the wood
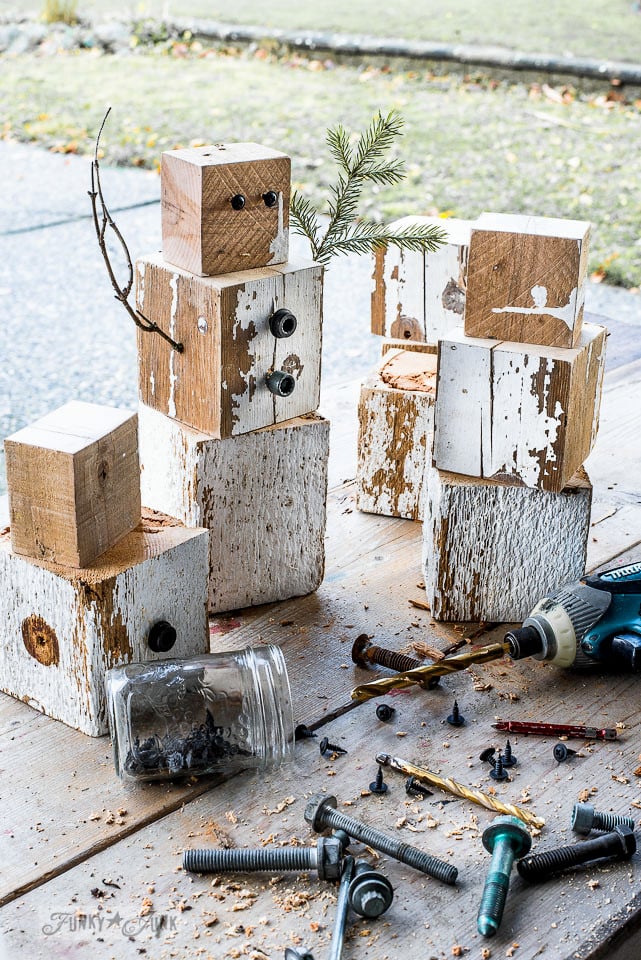
1. Gather up some squarish wood posts in different sizes.
They don’t have to be perfectly square, approximate sizes will do. However you may achieve a better experience if using same kind items, like if the wood comes from the same post.
And bonus points if the wood is already chippy white weathered wood that will mimic snow!
However you can also get this look by painting raw wood, then distressing it once dry with an orbital sander.
2. Cut down the posts into square cubes to create various sized blocks of wood that are stackable.

3. Lightly sand, leaving plenty of patina behind if they are already distressed white wood.
4. Stack the wood 2 or 3 blocks high, with the small blocks being the snowmen heads, and the larger blocks, their bodies.
Adding snowmen details
Creating buttons with bolts
5. Team up the right drill bit with big bolts that will become snowmen buttons.
Drill holes in the bodies where you desire the buttons to go, then insert the bolts.
I placed 2 bolts in a block of wood if they were small, and only 1 bolt if it was larger.
The bolts could also be attached using a hot glue gun, however I didn’t find that step required.
And while I used big ‘ol bolts, make sure you shop your own vintage treasures to see what you can come up with!
Use screws for eyes
4. To create snowmen eyes, screw in short black screws.
Add small branches for arms
5. For snowmen arms, gather up thin branches.
Team up a small drill to the branch size, then drill a small hole straight-on into the middle body block, remove drill bit, then drill once again on a sharp upwards angle.
Double drilling helps create a hole first so the drill bit doesn’t slip while on an angle.
6. Insert the branches into the drilled arm holes.
For the branches, a mix of evergreen branches and bare twigs made the snowmen arms extra unique!

Adding scarves 3 ways:
And here come the extra details! I came up with several different ways to add scarves…
Rusty hinge scarves
7. Attach old rusty hinges to the backs of the heads to create rusty junk scarves.
They turned out so cute! Especially when using different shaped and colored hinges.


And we DIY Wooden Snowmen were ready for the great outdoors! Look at us with scarves flapping away on a beautiful crisp windy winter day!
But then the wee one got chilly… ok, we ALL got chilly.
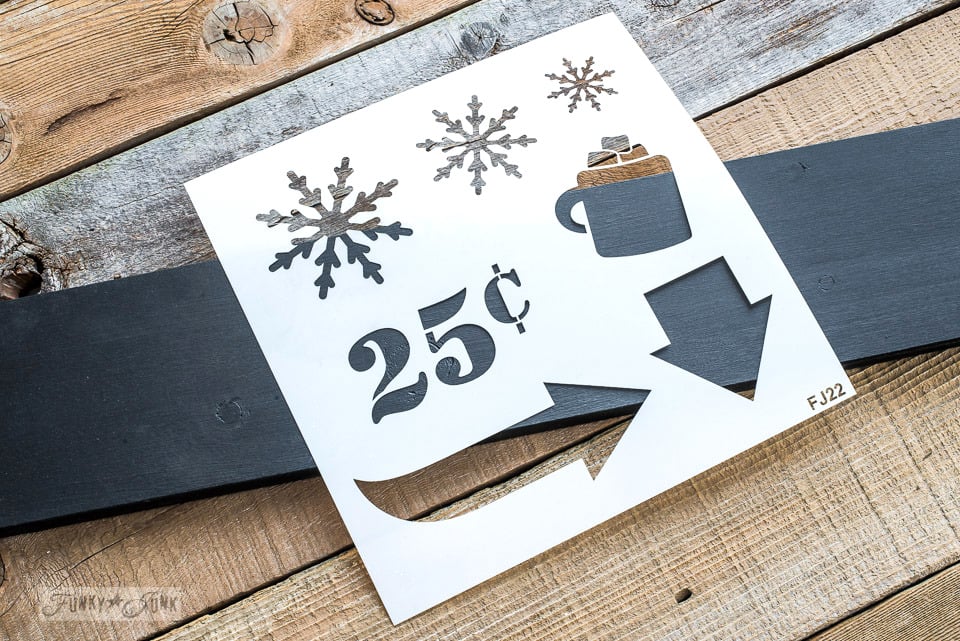
View Winter Graphics stencil HERE / Other Christmas stencils HERE
Using a winter stencil for snowflake details
Winter Graphics to the rescue!
Winter Graphics is a winter-themed stencil with 3 different sized snowflakes, a cup of hot cocoa, two arrows and 25 cents.
The snowflakes were perfect to use for these scarves! Here’s how:

View burlap ribbon options HERE
Burlap ribbon scarves
- Cut strips of thick burlap ribbon to desired length. (leave extra so you can trim down)
- Position the Winter Graphics stencil in random areas, then stencil in black.
- Tie around the snowmen’s necks, then trim the length as desired.
Stencil – Winter Graphics from HERE
Paint – Fusion Mineral Paint’s Coal Black
Learn how to stencil HERE

Rope scarves
And then we were outfitted with cozy full-on burlap scarves!
But some of us chose rope instead. Because, why not?
- Cut some cotton heavy rope into lengths desired.
- Tie rope around necks, knot, then trim the length.
- Slightly fray the ends to create tassels.
I actually think any kind of scarf would look cute on them! Think of black and red Buffalo Checked scarves too!
Other recommendations to decorate with:
- Add glitter or metallic paint to add a little shimmer to mimic white snow
- Stage with faux snow
- Drill holes in the heads and insert real or faux votives to become candles
- Stain raw wood instead of paint for different effects
- Add hats made out of baby socks as toques or sew your own
- Insert mini smoking pipe into a drilled hole for the mouth
- Craft black top hats by cutting the heads longer then paint top part black with a small horizontal plank added for a hat rim
- Add a tiny string of fairy lights around the bases
Allow your own creativity to make these DIY Wooden Snowmen yours!
See ready-made wooden snowmen on Amazon HERE
View lots of mini snowmen decorations on Amazon HERE

“Ya know, I love these rope scarves, but…”
“I know. I’m with ya. Ok, SHUFFLE everyone!”

And boy did we! We became a taller dad, a cute mom, and a wee one!
How’s that for unique gift ideas that are not only adorable, but affordable too?
Snowmen video how-to:
Click above to watch how the drilling step worked! It was rather tricky to explain.

The finished snowmen!
We are now so ready to adventure to all these unknown destinations! Wherever will we land as Christmas or winter decorating?
Consider placing them on window sills, a fireplace mantel, on an outdoor patio or front porch! Craft them for a gift or keep them for yourself!
Oh, and we will totally live happily ever after because we will never melt either!
Until we are needed to make something else of course…
The End.
.
Back to the designer…
K, thanks guys! Great job! I may hire you again at some point…
Think you’ll make a few?
Other wood scrap Christmas projects to make:

Scrap wood Christmas trees in present bases

Industrial gear Christmas trees

Scrap wood Christmas and winter trees
Oh my gosh they are the cutest things ever! You have so much great reclaimed wood! I love love the Christmas tree sign with the lights too …. brilliant!
Oh my gosh, you outdid yourself with these! So cute!!!
These turned out so great….thank you!
Thank YOU for the idea, Cindy! What shall I make next? 😀
I’m in love with these snowmen!
Donna,
Those are adorable! I love snowmen and always have. Many around the house and you can keep them up all winter. Thank you for sharing.
How totally adorable! Love the commentary to!! So much fun❄️❄️
How about your buffalo check stencil for scarves or plaid flannel (torn, of course, for that rustic look)?
Love the snowmen!
I love them all! I think the rope is my favorite scarf. Must be the day for making snowmen, I was just up looking thru my embroidery hoops to see what I could make.
Ann
These are just adorable, I love them!
Tania
Wood slices seem really popular right now…do you have any cute ideas with your style?
Snowmen melt my ❤. How about some cute reindeer or snowflakes? More rustic the better.
Adorbs 🙂
What a blockhead I am! HaHa! Snowmen made from blocks. Sometimes I am slow to look outside the box. I have lots of wooden blocks. I could do this.These guys are adorable. Ingenious! Thanks for ‘aha’ moment and inspiration!
You make the best junk‼️ Love these. I love my rusty bits and pieces too
What a cute little snowman family! Loved the creativity and the storytime;)
Perfect decor for me since here in SD my snowmen stay up until the Easter decor comes out. Love the touches you added like the hinges & scarves.
Thanks Luane! It’s one of the easiest creations to date that I’ve made… and ended up being a fav! Hope you give it a go!