Can’t find a bug screen for that wacky window? Learn how to build a custom DIY window screen with wood frame yourself! Easy, works great and looks professional!
.I’ve wanted a window screen on this goofy two-handled window type for over 10 years. TEN YEARS.

The problem:
.
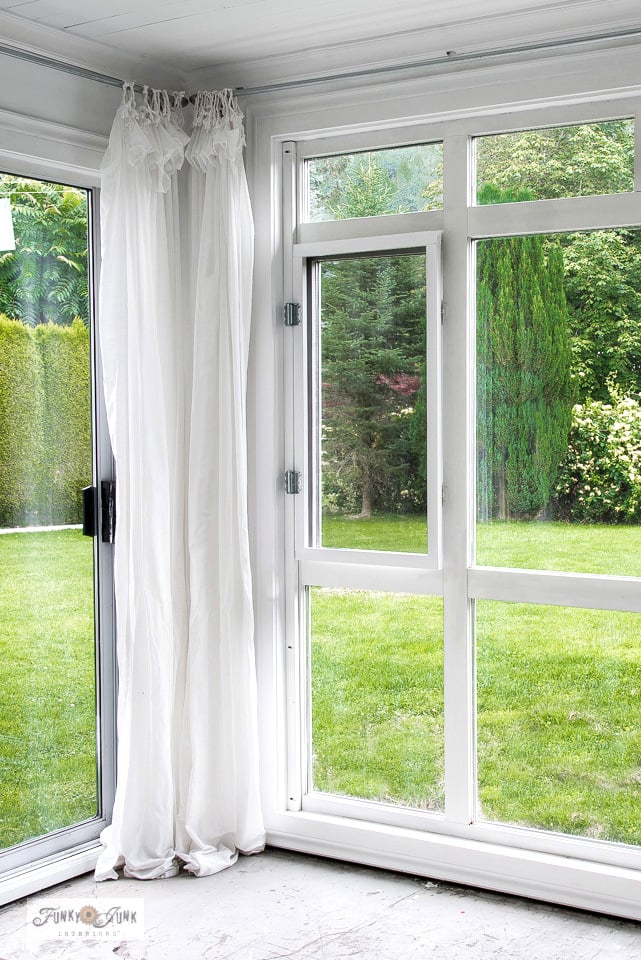
This big, massive picture window is in my photo studio. It’s a room filled with lots of floor-to -ceiling windows giving the space excellent lighting. However in the summer, the room temperature can really get hot due to no window screens on the windows or door.
The reason for no window screen is due to the two-handled window. A window screen made from a kit was a consideration, but couldn’t find all the right parts nor an effective way to screen this type of window.
I really wasn’t even certain a window screen could even be added to this type of plastic window frame. It’s really weird with no obvious visible framework to hold a screen in place.
Then I tried a screen door kit for the door, however it didn’t fit, so back it went. Sigh.
My last attempt was to hire a window company to see if they could create a custom window and door screen, but when they didn’t show up, forget it! I was done.
But everything changed once I made my first screen door for the front of the house. With my now larger arsenal of having a Kreg Jig on hand (here’s how to build with one), and added window screen tools, the possibility of building my own window screen suddenly became a thing!
I had no idea if my little DIY window screen brainstorm would work, but here was my thought process…

A possible solution:
.
I’d create a custom window screen frame that was easy to make for any diyer (ahem.. me) to make for this two-handled window.
Since the entire window framing is plastic, I didn’t want to drill into that.
So what if I:
- added a strip of wood along the left side
- attach it to the window frame via pocket holes
- then create a wood frame window screen and hinge it to the board
- then paint it all out white?
I honestly thought it was worth a shot!
Giddy, I started within minutes!
As for the outcome? I’m writing this post for a reason! Not only did this quirky DIY wood window screen idea work, I love the look and functionality of it WAY better than the purchased-type!
So first, I’m going to share how I made the DIY window screen out of wood, then show how it functions in a video! Also included is a video on how to use a Kreg Jig.
Have a tricky window you’d like to screen? Put away the rubber spline and aluminum framing this round. Grab some scrap wood instead and try this simple DIY installation instead for your own insect free environment and cooler space!
Here’s how I did it:
This post contains some affiliate links in which I earn a small percentage if you purchase anything through these links, at no extra cost to you. Read full disclosure HERE. Thank-you for helping to support my blog!

DIY window screen with a wood frame
Supplies I used:
1 x 2 lumber cut to fit – for side-support board and custom shape window screen frame
(you may require thicker lumber for extra large windows)
Kreg Jig (I have the K4 model)
Cordless drill , pre-drill bit and screws
Scissors

Adding a side support board:
1. Create a support board by cutting a 1″ x 2″ to the height measurements of your window frame size. (to at least the height of your screen frame).
I decided to treat my support board as part of the window moulding, so I cut mine the entire height of the overall picture window, measuring 81″ long.
Tip: use the best quality lumber you can find. The wood is much less likely to split when you screw it.
2. Add a few pocket holes using a Kreg Jig pocket hole maker along one side of the support board.
Pocket hole placement tip:
You have the ability to hide some pocket holes with the wood window screen hinges if you pre-measure where you will be installing the hinges.


Window screen frame how-to:
3. Measure the size window screen desired, ensuring the top and bottom boards overlap the sides.
Strength tip:
Screwing into the sides of wood grain will create much stronger joins than if you screw into the front of wood grain.
Size tip:
Decide if you wish the screen frame to bypass any window handles or lay on top of them when closed. I chose to have the frame lay on top of the handles.
4. Cut 1″ x 2″s to desired length that slightly over laps the window opening so the frame rests on the sides of frame.
My screen frame measured:
- Top / bottom boards – 21.5″
- Sideboards – 35″

5. Add two pocket holes to each top and bottom of the 2 side boards. Insert screws.
I started by adding one pocket hole, but found adding two pocket holes made the frame much more sturdy..
Video – how to use a Kreg Jig
.
.
Click above to learn how to use a Kreg K4 pocket hole jig. It’s really easy!
Visit how I used a Kreg Jig to make a screen door HERE

Paint the boards
6. Paint (or stain) the support board and wood window screen frame as desired, including inside the pocket holes if you think you’ll will leave them open.
I wanted these boards to seamlessly disappear against the rest of the window, so I used my fav semi-gloss white trim paint.


Installing the support board
7. Position the support board to the side of the window frame, then attach with screws through the pocket holes.
8. Fill pocket holes if desired, then paint over them.
I personally left my pocket holes open so I can easily remove this frame at a later date if desired.


Adding screen mesh to the frame
9. Position the wood window screen frame on a flat work surface with back-side facing up.
10. Covering beyond the surface of your window frame up to all four frame corners, cut standard or pet window screen to desired size, ensuring there’s overlap on all 4 sides.
Where to buy window screen material
Most window screen kits or bulk window screen rolls can be purchased at any hardware store. I found my window screen at my local hardware store and was so surprised to find them selling several different sizes, all in bulk rolls!
How to buy window screen
- decide on the window screen type you wish to have
- determine how much you will require (or want for the future too)
- if building a wood frame, you will only need screen, not a full screen kit
- getting a window screen kit may be more affordable if you are replacing screen inside aluminum window frames
To repair window screens that have aluminum frame pieces, you’d normally require DIY window screen kits that come with screen and a spline roller tool. However for this DIY, all you need is your own screen material from a bulk roll.
You can also purchase all kinds of screen materials well beyond the standard insect mesh type, from light duty, heavy-duty, high quality screen all the way to a very durable pet mesh screen with a heavier, tighter weave like I used on my screen door post HERE.
However this round, I just chose a standard fly screen weight you’d get in a typical screen frame kit.
11. Use an electric staple gun to attach screen to the frame.
Find various window screens on Amazon HERE


12. Using sufficient pressure, trim excess screen material in one continuous strip by running a utility knife cutting blade along a metal ruler.
Cover the staples (along with the pocket holes) with some kind of trim work if desired. I left mine as shown above.

Simple install instructions
.
13. Hold the window screen frame into place, then dry-fit 2 spring hinges, one at a time, penciling-in the screw placements.
The hinges were positioned over 2 of the pocket holes to hide them.
Find the spring hinges I used on Amazon HERE
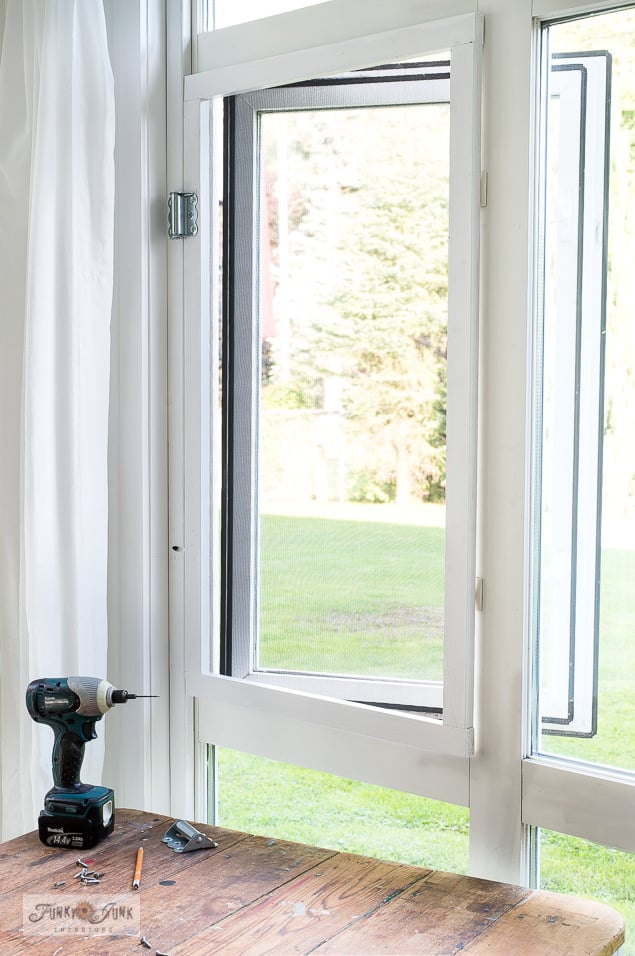
14. Pre-drill pilot holes into the screw markings.
Pre-drilling holes makes inserting the screws easier, plus removes the possibility of the wood splitting on the finer screen frame.
Use a smaller drill bit than the size of the screw, to ensure of a tight hold.
15. Attach hinges with screws, and you are done!

The benefit of spring hinges
.
If you can make it work, I personally think spring hinges are a great choice!
They help keep a window screen closed without doing any further drilling into the original window frame nor leading to possible glass damage.
There are two types of spring hinges… you can also get adjusting ones so you have the ability to tighten the springs up over time.
Find the hinges on Amazon I used on this project on HERE
Learn how to use adjusting spring hinges in this French Door Screen Door post HERE
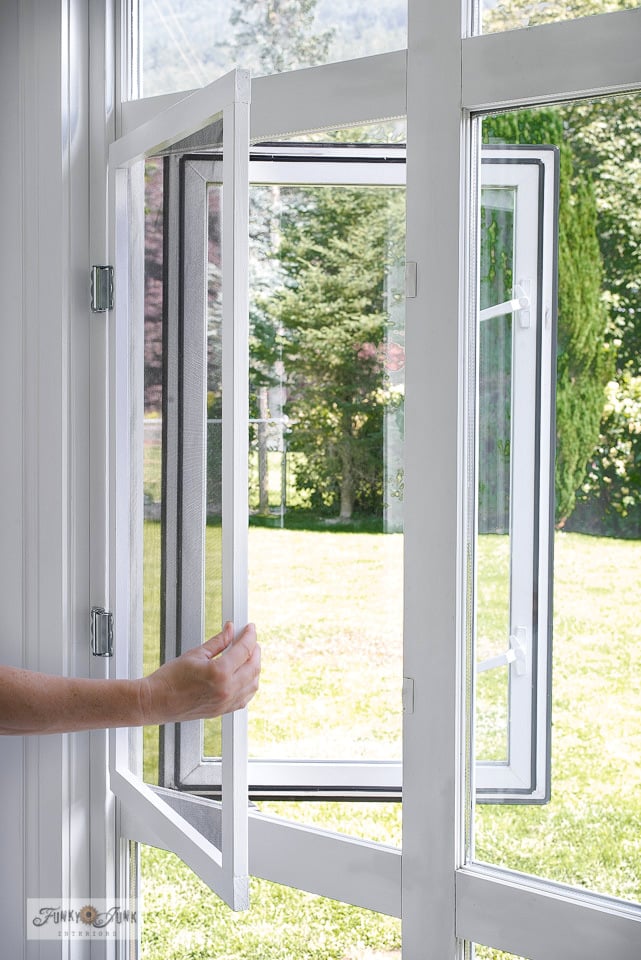
The finished DIY window screen!
.
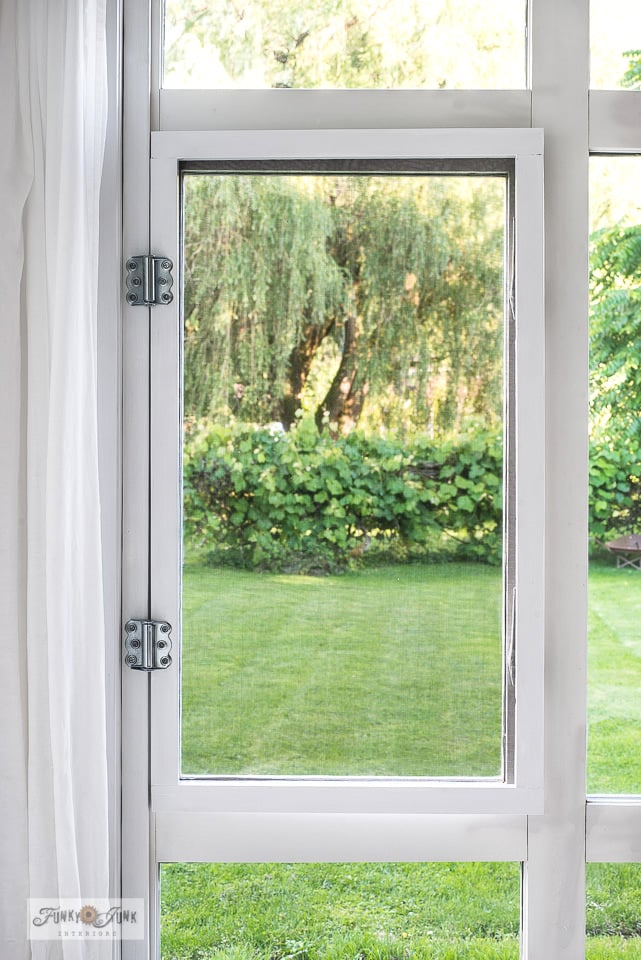
And there you have it! A wooden-framed DIY window screen that fits perfectly, works and looks super slick, and does the job of letting in that fresh air flawlessly!
One thing I love about this style of window screen is that it stays indoors! So it stays cleaner and will last longer.
Above is how the window screen looks with the window closed…

And above is with the window open.
Isn’t it pretty? It’s so fresh and seamless with the rest of the window!

With window closed, here’s how the screen frame lays on top of the handles. This does leave a small gap along the side, which I don’t mind. The window is closed at this point anyway, requiring no hook or additional hardware to keep it closed.
You could of course build your frame to bypass the handles if desired.
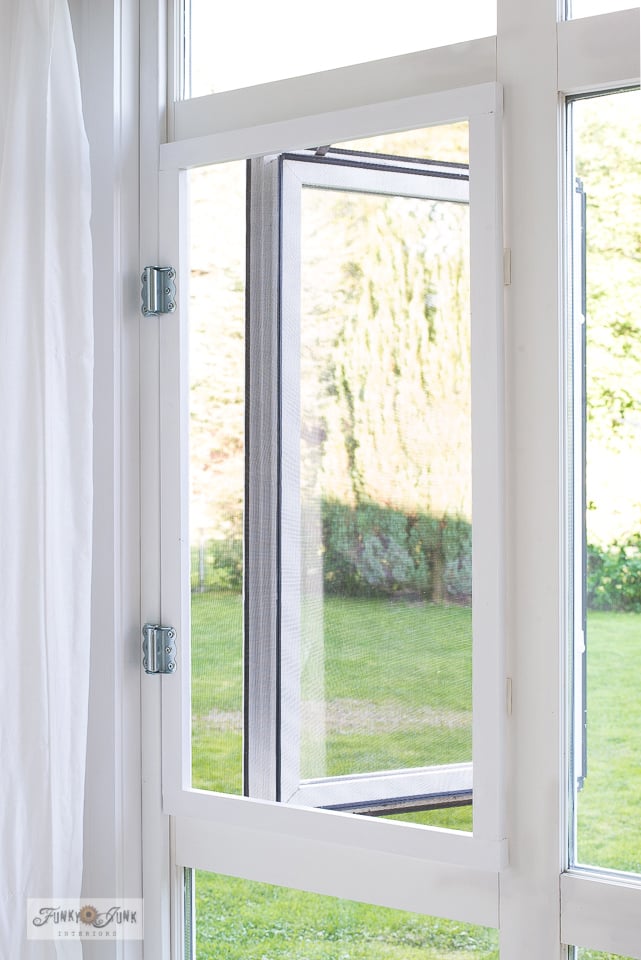
And when the screen is open, the frame rests on the metal handle plates. I think it’s perfect!
Thanks to the spring hinges, it works as slick as can be, opening with ease and stays closed all on its own!
Plus…. that squeaky screen door sound is absolutely EPIC.
Video – how the window screen operates
.
.
Click above to view a short video on how the screen operates!
Music: Journey to the Dream by TakeTones.com

The photo studio is NOW officially ready for summer! And it works fabulous!
I personally think this was a cheaper solution to screening this challenging window. And its discreet appearance blends right into the room!
Looks smart, doesn’t it? Who knew the most cost effective window screen solution available entailed a few pieces of stock lumber and bulk screen? This could potentially work for any square window!
I personally think it looks like it’s professionally done… which shocked me a little. Not to mention it resulted in an ideal cheap flyscreen solution as well.
Oh! And HERE is how I upgraded the sheet curtains to work even better than the curtains you see in this post.
And next up? That slider door to the left needs a fabulous new look too that I’m gonna try myself without pro tradesmen nor fancy tradesman tools. You just wait!
All I know is, I’m currently enjoying the new non-humid conditions along with no flies or mosquitos in this room during summer. The one window screen did make a big impact, and I’m looking forward to coming up with a clever solution for that sliding patio door next.
Pretty neat trick, huh?! Do you have a problematic window these diy adjustable window screens could work with?
More DIY screen project inspiration:

Learn how I made pipe curtain rods with sheet curtain and mop ties

How to make a screen door from scratch

Learn how to replace window screens inside aluminum screen frames yourself

How to install screen doors for french doors… cheap!

Make light and airy easy sheet curtains for any room!

DIY a farmhouse window frame from stock lumber and no fancy miter cuts!
Visit more screen projects HERE
And many other window treatment ideas HERE
Donna – you are on a roll!!!
Hi! I think this is so cool! ???. Will one window be enough? Ok my question …how tough will it be to withstand curious cats from trying to paw open the screen? If they can do cabinet doors…they’re pretty smart to paw open this..so how is it firmly closed,or did I miss something? And they are going to love it! Good job!
Thanks Bernice! This is the only window that opens so 1 will have to be enough! haha But I also plan to screen the sliding door which will help. More on that soon!
My cats can’t reach the window as it’s too high but that’s a valid thought if there’s a table pushed up under the window… I suppose if it’s an issue I’ll figure out how to latch it shut. Currently the spring hinges close the screen, much like a screen door. If you watch the video, you’ll see how it works.
Wow Donna! It looks amazing. So happy you found a solution, and can’t help but point out that your persistence with your DIY screen door, sure paid off. Giving you the confidence to tackle this project.
Oh! And your view and yard is beautiful!
I was browsing favorite blogs with screens in the back of my mind.
I have finished installing the last of 32 Andersen casement windows, and 4 French doors. Since every single one of these came from Craig’s list, reuse and architectural salvage centers, and other 2nd hand places, most didn’t come with screens.
I haven’t dealt with ventilation on my now-glassed in sunporch, so screens have become more of a priority. A 24×72′ window screen from Andersen is $100s. Let alone 32 or so, PLUS the fact I want screen doors on my French doors, too!
Thanks for this tutorial. It’s encouraging. I have all the tools, and even the screen to do it with. Now I have a winter project. Ironically, I expect this porch to be hot enough to work in even during the winter.
Since I have doors to strip and refinish, this could be a bonus.
I enjoy your blog. Thanks for the care and time you put into it.