Learn how to use a pocket hole jig to create strong woodworking joins, leaving professional results to all your projects! This is a must-stock DIY tool that you will end up using much more than you think once it’s sitting in your workshop! Includes helpful video.
Not that long ago, I was browsing the aisles of a hardware store, and walked past the pocket hole jig isle. And I knew this was the day a jig would finally come home with me at long last!
Why a pocket hole jig?
.
I’ve been building with reclaimed wood for a long time. And for the most part, I got by, joining wood with either wood supports behind projects, or with lots of screws showing. It works, but I found some builds ended up just too bulky.
And some builds I avoided doing because I didn’t know how else to create wood joins.
So I had been visualizing what a Kreg Jig in particular could do to help with cleaner wood joins resulting in more professional looking project outcomes.
One day browsing through the hardware isles, BOOM. There they were. I spontaneously grabbed one, with visions of all the projects I had been waiting to build! I couldn’t wait to rip open this package!
With the perfect, first challenging project in mind! I had been wanting a front screen door on my home for at least 15 years. But what pushed me forward was a heat wave. That front door needed to be open while still keeping my cats in.
Would building a screen door be a little too challenging for a beginner though? I was about to find out.

Learn how to make a DIY screen door from scratch
Visit ALL my Kreg Jig projects HERE
My first jig project
.
Yes. Building a screen door from scratch was challenging for a first time pocket hole jig user, but I learned SO much! I ended up with my dream screen door but only after building it twice! But that’s ok. The first round was all about learning, and the next, doing it right. There is just no better way to learn than by doing. And I’m positively thrilled with the result!
Today, the pocket hole jig projects list continues to grow. I find I’m always picking up the jig even when I don’t expect to. So be prepared. If you have one on hand, make sure it’s super accessible at all times!
All I know is, I’m completely smitten with this tool. And felt it was time to write a dedicated post on how to use my own Kreg Jig, so it’s super easy to learn from.
So here’s how to use a pocket hole jig, with some project ideas to make including a short video so you can visually watch how it’s done!
This post contains some Amazon affiliate links in which I earn a small percentage from qualifying purchases through these links, at no extra cost to you. Thank-you for helping to support my blog!
How to use a Pocket Hole Jig

What does a pocket hole jig do?
.
A Kreg Pocket Hole Jig is a special tool that helps creates angled pocket holes, making wood joins strong and super easy with a professional looking outcome.
I also find my builds are a lot less bulky without extra support boards, and look more professional without all the screws showing. Very cool!
Here’s what my Kreg Jig came with:

View Kreg Jig 4L HERE
What comes with a Kreg Jig?
.
There are lots of Kreg Jig packages that come with different pieces that do different things.
My suggestion would be to pick the jig that will service most of your types of projects. You can always collect more pieces or jigs that work with thicker wood as needed.
I own a Kreg Jig 4K which come many different ways.
A K4r is geared to join wood ½” to 1.5″ thick. It also has an adjustable clamp that holds the wood in place while you drill pocket holes, making it very easy to use.
Here’s what came with my own Kreg Jig K4:
- The blue jig
- allen wrench
- long pocket hole drill bit
- pocket hole screw bit with adjustable washer
- pocket hole screws in different sizes (not shown)

Supplies you’ll need:
.
Cordless drill and fully charged battery
Pocket hole screws (I like to use drywall screws for indoor projects myself)
Construction wood clamps (optional)
Longer Phillips drill bit if using drywall screws

Attaching the jig to a wood base
The first thing I did was screw the jig to a board base. I found it helps stabilize the jig when I work on larger projects.
I also attached a plastic bucket to the other end of the board, which holds all the loose jig pieces so they are easy to find.

Screws you’ll need
A Kreg Jig will come with a sampling of pocket hole screws which you’ll likely quickly run out of. So I’d suggest to try them out, then stock up on the sizes you’ll most likely use often.
My own personal preference is to use drywall screws for indoor projects and outdoor wood screws. I found them slimmer in size which helped reduce wood splitting.
I also picked up a longer Phillips drill bit for the drywall screws to accommodate the deep pocket holes.
You can also print out a screw guide online which shares what length of screw is best for different thicknesses of wood. I printed out a google preview, however you can find the right pocket size screw info on Kreg Jig’s website HERE.

How to set up a pocket hole jig
Pocket hole jig settings are based on the thickness of boards being used. So if you use several different sized boards for one project, your jig will need to be re-adjusted for each board you plan to drill pocket holes into.
The jig comes with really easy to understand instructions, however here’s how in a nutshell:
- Measure the thickness of the board.
- Adjust the blue jig slider (where you do the drilling) to match the wood thickness, using the measurement guide on the side.
- Place the pocket-hole drill bit into one of the slots in the base of the jig and adjust the bit bump-out to the right measurement.
- Slide the metal washer into position, then tighten with the allen wrench.
Your Kreg Jig is now ready to use!
Be sure to watch the short video at the bottom of this post to see how easy it is to make these adjustments.
Where to create pocket holes
.
It’s important to understand which boards to add the pocket holes to. The strongest wood joins will be achieved if you join the wood by inserting screws into horizontal wood grain, vs. head on into wood grain ends.
Think of wood grain as loose straws. There’s more strength and holding power if drilling into the sides of them vs. straight into them.
Here’s how:

How to drill strong pocket holes
.
1. Dry-fit your project, then decide where the pocket holes will go.
Note that the pocket holes are drilled in the same direction as the wood grain, thus, the screws will be driven into horizontal wood grain to create the strongest joins possible.
2. Clamp the board into the jig with the backside of the board facing you.
Turn the clamp to adjust the tightness.
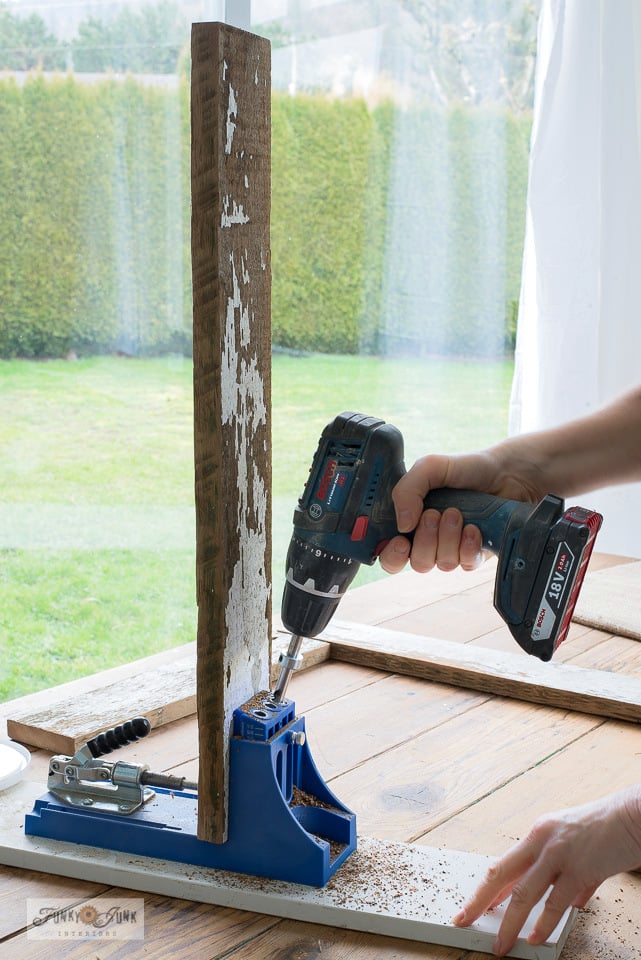
3. Drill into the holes to create pocket holes where desired.
- For narrow boards, two holes may be enough. On wider boards, 3 or more may be needed.
- I like to start the drilling slow, then pick up speed once I know it’s got a good hold.
How to join wood
- Insert screw into a pocket hole.
- Drill the screw into the wood using short slow drill bursts.
- Stop once the screw is secure. Be careful not to overdrill or the wood may split.
To help create perfectly square joins, you may wish to use wood clamps prior to assembling.

Above: pre drilling a hole inside the pocket hole
How to avoid splitting wood
.
When I first built the screen door, I found lots of the wood split. The 2nd time around, I did all of these additional tips which greatly reduced wood splitting:
- Buy high quality wood whenever possible. It makes a difference.
- Make all your drill adjustments to just under the actual wood thickness.
- Pre-drill a hole inside the pocket hole right through to the 2nd board before inserting screws.
- If pocket hole screws keep splitting the wood no matter what, switch to thinner drywall screws. I actually prefer using drywall screws vs. pocket hole screws.
Video tutorial on how to use a pocket hole jig
.
.
Click above to watch a short video on how to set up and use a Kreg Jig! It’s very easy to use!
Since getting the jig, I’m finding I grab for it more that I even realized I would! I can’t live without it now.
Here’s a few projects I’ve made with the Kreg Jig thus far…
Projects to make with a pocket hole jig
How to build a screen door from scratch
This DIy screen door was my very first Kreg Jig project! And it really did turn out great, although I built several areas twice since I was still learning how to use the jig.

Building a wood framed window screen
If you have quirky windows that are hard to fit, such as this two-handled window, this wood framed screen window on screen door hinges turned out perfect!

How to build a simple garden gate
This little garden-themed gate started out as a simple frame. Once I saw how cute it was as-is, I decided to leave it as is, instead of cover it up!

Create a compact coffee station shelf
This little shelf was so easy and affordable to make, thanks to using triangle supports!

Garden-themed outdoor serving tray
Creating this little garden-themed tray was a breeze, thanks to the jig joins!

Organic Coffee sign with mug hooks
Creating a wider sign is effortless! And in this case, the boards don’t even have to match!

Rustic Organic Coffee sack cabinet and bulletin board
A simple framed bulletin board became a super productive storage cabinet! It’s really 2 projects in one!
Am I glad I got a pocket hole jig?
.
BIG yes! A Kreg Jig really helped me build all these DIy projects, making them much easier, stronger and more professional-looking! I feel I now have the ability to build so much more than ever before.
I highly recommend adding a jig to your tool collection so you can up your own DIY game as well!
Think you’ll consider getting a jig after seeing how easy it is to use?
Visit ALL my other Kreg Jig projects to date HERE

Check out my own list of DIY Tool must-gets HERE
Check out all my other DIY projects HERE