What spells fall more than a charming and rustic Sunflower Farm sign on white chippy pickets more? How about turning it into a one-of-a-kind wall shelf to create the perfect place to display fall foliage? Unique and easy, this sunflower fall wood sign with a shelf will give you plenty of fall vibes!

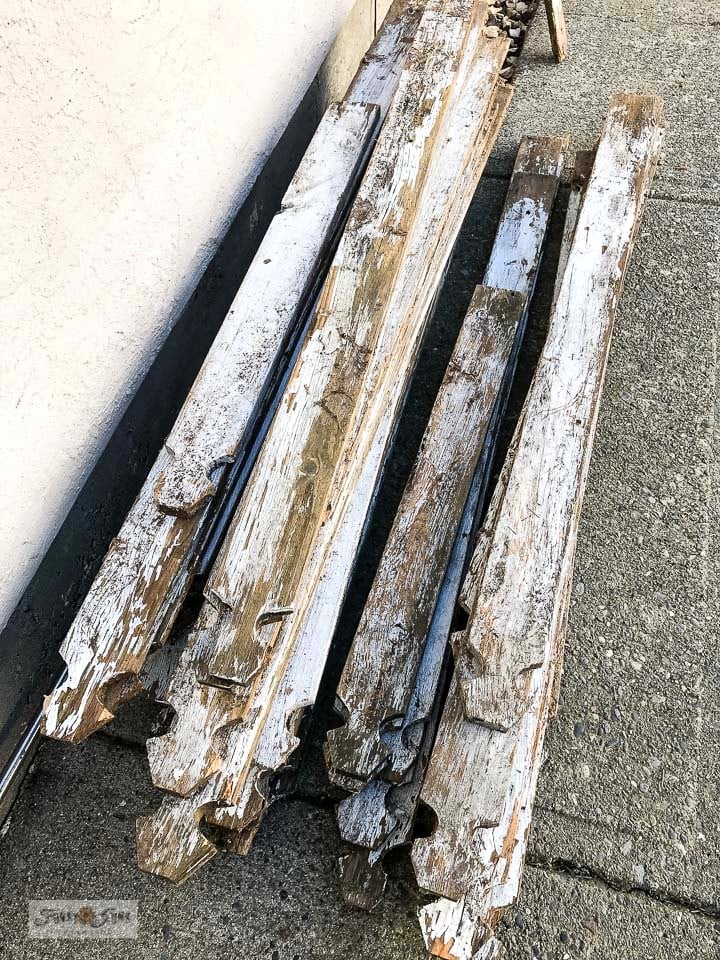
Once upon a time, I got a call from a generous neighbour. Apparently there was a pile of old reclaimed wood they wanted to get rid of… pronto! Doh!
Check out this short TikTok video when I found the wood!
I was roaring down the road within 10 minutes. And upon lifting a tarp, a lottery win of picket fence wood that had been buried for years finally saw the light of day. Into the back of my truck it went before my neighbour had a change of heart!
So when this cutie-pie Sunflower Farm stencil perfect to make fall signs became a thing this fall, I pulled out that beloved picket wood fence because I had just the project to make for fall decorating…
And of course, true to my typical projects, it turned into much, much more than just a fall sign. And I’m so glad I took the time to play further because this stenciled sunflower wood fall sign shelf turned out pretty adorable!
It’s cute, slim, can fit most anywhere including by a front door, and boy does it add fall decor to the hilt! No need for pumpkins this round. This one’s about crafting with sunflowers for the fall season!
So grab some wood scraps or wood boards and make the cutest sunflower fall wood sign with shelf!
This post contains some Amazon affiliate links in which I earn a small percentage from qualifying purchases through these links, at no extra cost to you. Thank-you for helping to support my blog!
How to build a rustic fall wood sign with shelf
Supplies used:
.
3 reclaimed picket wood planks or other wood board
Sunflower Farm – small stencil from HERE
Dome tipped stencil brushes (my favs!)
Fusion Mineral Paint in Chocolate / Park Bench / Raw Silk
Various acrylic craft paints in orange and yellow
Miter Saw (mine is a Bosch which I love!)
Palm sander (I really love my Bosch variable speed!)
Cordless drill (my ultimate fav is a Makita)
Kreg Jig pocket hole maker (my model is a Kreg Jig 4K)

Wood prep for the planks
1. Place 3 pickets side-by-side, making the middle plank slightly taller. Draw, then cut all the planks along the bottom so they align.
2. Create a shelf by cutting an additional plank the same width as the 3 picket planks.

Designing the sign
3. Once pieces are all cut, decide where the shelf will sit by dry-fitting the planks along with a chosen stencil, jar, etc to determine where to position everything.
I ultimately decided to move the shelf much lower than shown above, so the foliage that was to go in the jar wouldn’t cover the sign. It sure helps to plan ahead!
Note: the red Sunflower sheet is a vinyl proof of the original stencil yet to arrive.

View Kreg Jigs on Amazon HERE (mine is a 4K)
Drilling pocket holes
4. Flip the main 3 planks good side down, then draw horizontal lines across the back where you wish to drill pocket holes. Drill approx 4 pocket holes on 2 of the planks.
5. Add pocket holes to the underside of the shelf along one side as well.
6. Turn the main 3 planks good-side-down. Assemble with screws through the pocket holes.
7. Next, turn the 3 planks face-up, and assemble the shelf with screws through the pocket holes.
How to use a Kreg Jig 4K
- Decide where you want to join the wood.
- Adjust the jig for the thickness of the wood you are using.
- Insert wood into the jig, wrong-side facing you.
- Drill hole with a cordless drill.
- Assemble the wood together through the pocket holes with screws.
If you don’t yet have a Kreg Jig, it’s such a worthwhile and affordable investment. Pocket Holes make joining wood very easy and the finished results totally pro looking.
Kreg Jig Video
.
Click above to watch a short video on how to use a Kreg Jig!
Learn more on How to use a Kreg Jig from THIS POST.

Adding twine shelf supports
8. Drill two small holes on each corner.
9. Cut some thicker jute twine (I separated mine) to desired length, then wrap one end tightly with masking tape.
10. Thread the twine through the drilled holes, then tie a knot under the shelf to hold the twine in place.

11. Decide how you will mount the string shelf supports to the board.
So many variations with this one. I nearly used long rusty hooks with eyes, but I decided to use a couple of rusted brackets with twine instead this round so the shelf supports would be longer. Love how this turned out!
Since the shelf is so small and not meant for lots of weight, the pocket holes were sturdy enough to hold it up. The string supports offer a little extra support too, but are more decorative in this case than anything.
Hole strap U-brackets (pipe strap clamps) would also work! They are easy to source and price efficient too.
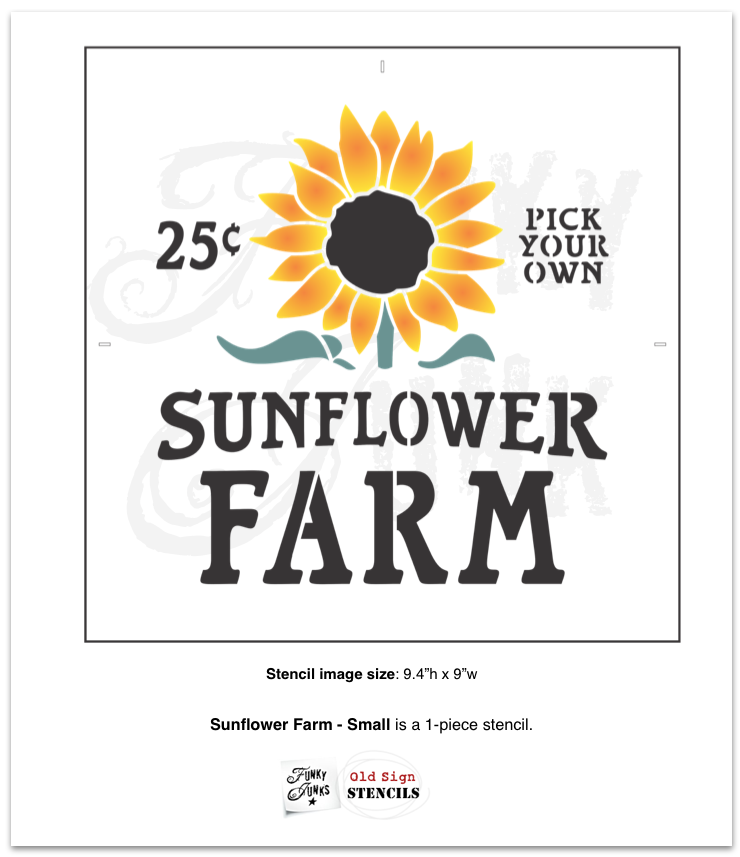

Visit Sunflower Farm – small stencil HERE / all other Fall Stencils HERE
Where to get a Sunflower Farm stencil
Sunflower Farm – Small is a super durable stencil made from a hefty 10 mil mylar, and comes in 2 sizes so you can make a tall porch sign too!

Get all Fusion MIneral Paint for 10% off HERE
How to stencil like a pro
12. Stencil the design in the colours you desire!
Stenciling is actually very easy! The key is using a super dry brush to avoid paint bleed.
- Position stencil with masking tape along the sides.
- Load stencil brush with paint.
- Remove most paint off of brush until it feels dry.
- Tap or swirl brush to leave desired effect.
Learn more tips about how to stencil HERE
Paint colour details
.
Isn’t this Sunflower Farm design the cutest?! I decided to use super neutral colours. Here’s what I did:
Flower center:
- Stencil with Fusion Mineral Paint’s Chocolate.
- Add a light dusting of Raw Silk on top for added texture using a very dry brush.
Flower petals:
- Stencil in Chocolate first.
- Highlight the center of the petals in a mix of chocolate, orange and yellow and stencil with a very dry brush.
Flower stems:
- Mix a tiny bit of Chocolate to Park Bench to ‘muddy’ up the green.
Sunflower Farm and all other lettering:
- Stencil with straight Chocolate for a lovely rich yet warm lettering effect!

The stenciled sunflower sign truly turned out as cute as can be! However there was one more surprise addition I decided to add which is totally optional…

Adding a vintage spigot handle
To make the flower pop a little more, I screwed on a rusty-toned vintage spigot handle into the center of the flower.
My goodness… the perfect colour and size! What a team.
So here’s how all turned out! Ready for the most charming stenciled sunflower fall wood sign shelf in the land?!

The finished rustic fall sunflower sign with shelf!
How darling is this?! A tall skinny fall wood sign that’s also the cutest fall sign! Then add hooks along the bottom to hang up anything you wish! Would be a fabulous to organize keys in a front entry or kitchen, wouldn’t it? And without the shelf, perhaps on a front porch!
How to make this sign out of new wood
This could also be made with new planks if you don’t have chippy pickets on hand like I did!
- Cut 3 new planks to the same length, with the middle plank longer.
- Picket the tops of the planks, or leave them straight.
- Add a shelf and desired shelf supports. Or just add a hook to hang a jar or vase.
- Paint then distress, or paint to look new, or stain the wood.
The options are limitless.

I love how the warmth of the grass and leaves blend in with the shades used on the sunflower sign without taking over.

The white painted mason jar teamed up with a rusty metal rim became the perfect flower vase that was actually filled up with different grasses from the yard.
So that was just the painted version. Here’s how it looks with the rusty junk flower middle!
PS: you can paint your own mason jar with Fusion Mineral Paint in Casement or Raw Silk!
Could that rusty vintage tap handle be any more perfect?!

The flower really pops when you view it from the side. SO cute!

This stenciled sunflower wood fall sign shelf was such a fun and simple project! And really makes a great diy fall sign while telling the fall sunflower story well, don’t you think? Now that’s the way to welcome fall.
How would you paint and display it?
View the Sunflower Farm stencil HERE
Check out many other fall stencil designs HERE
Other fall wood signs to make:

Visit this post that shares 12 unique fall signs made with stencils!

Check out all my other rustic shelving made from reclaimed wood!
View many other unique fall projects HERE
This is gorgeous and that rusty spigot handle is not optional – lol.
Haha! I just might have to agree with you on that one Sara! It was all too perfect. And thank-you! This was one fun project!
Just awesome! Perfect Donna!
Thanks so much Carlene! I’m really diggin’ it! Can’t wait to see what YOU come up with this fine fall season! Your upcycles are among the best!
Wow Donna, this is fabulous. I love the chippy paint on the wood and the rusty round thing in the center of the sunflower and hanging the shelf with jute twine. Awesome.
I love this!!!
Oh, my word this chippy sign is fabulous! Everything from the chippy picket fence boards, to the twine shelf holder, to that awesome sunflower stencil, and rusty tap handle. You’d pay big bucks for a sign like this!
Perfect in every detail, even the weeds!