Add a stylish touch to your home decor with these chic and easy DIY cross-patterned decorative pillows using coordinating stencils! Follow our step-by-step guide to create your own unique and trendy pillows.

I’m a total pushover when it comes to new decorative throw pillows, whether it’s for the living room sofa, or on the patio chairs outdoors. If you ever want to change a room feature, a simple pillow can be all it takes!
In particular, I like a good strong all-season neutral pattern that is sized so it can be used for any project, ranging from small to large.
So it was time to make a new stencil pattern happen that would check all the decor desired boxes!

View all 3 Cross Pattern stencils HERE
3 Cross pattern stencils
Enter… 3 Cross Pattern stencils! I’ve been smitten over this bold yet subtle look for a long time. And I’m now thrilled to say, this easy-to-use repeating stencil pattern is about to be smothered on anything and everything!
For a start, let’s stencil up some fabric pillow covers to create cross pattern decorative pillows in coordinating colors, so I can make some dreamy new pillows for the patio while we also compare the size scales of all 3 stencils…
DIY cross pattern decorative pillows
Supplies I used:
Cross Pattern stencils in small, medium and large
Fusion Mineral Paint in Coal Black and Raw Silk (get 10% off – or use funkyjunkinteriorsfmp at checkout)
I used 20″ pillow covers in neutral tones

Choosing and preparing a pillow cover
1. Choose your pillow covers and paint to compliment your seating area.
When choosing covers, consider hues for both paint and fabric to create a cohesive color palette for your chosen living space. I’m using neutral and black pillow covers along with neutral and black paint.
I’ve been using plain pillow covers from IKEA called Gurli. The nubby pillow cover in this tutorial is no longer available.
View other 20″ plain pillow cover or cushion cover options HERE
2. Iron wrinkles out of a pillow cover.
How to stencil a fabric cushion cover
3. Position something waterproof inside the pillow so the paint doesn’t bleed through both sides.
I used a stencil package, and shifted it around to different positions while I stenciled. However anything waterproof will do, such as plastic wrap or a bag. As long as the surface is smooth and waterproof, you’re good to go.
4. Position the cross stencil where you wish to start on the pillow cover.
Stenciling a pattern onto a project is a little like tiling. It’s best to predetermine where you want the design to start and end. Here’s what I found to work best with these cross pattern stencils on 20″ covers for accent pillows.
Position tips on a 20″ pillow cover:
- Small and Medium – center the stencil in the middle of the pillow cover.
- Large – center the stencil by positioning the top right cross in the middle of your project.
5. Stencil the image by:
- Loading the stencil brush into your paint.
- Remove most paint onto a scrap wood piece or rag.
- Tap paint through stencil for desired effect.
6. Extend the pattern by repositioning the stencil, then overlapping like-minded pattern along the 4 edges until your project is complete.

It’s really that easy!
Rather than photograph every single step, I decided to do one better and video the process, so you can visually see just how easy it is to use these stencils!
Be sure to view the short video at the end of this post to see the stenciling in action.
So let’s now compare each pillow so you can see how cute these cross pattern pillows turned out, and how nicely they coordinate with each other!

Cross Pattern – Small pillow
This pillow is using Cross Pattern in small stenciled in Fusion’s Coal Black. Crisp, clean, and this look would be so cool on any small project!
This nubby pillow cover was from IKEA which is no longer available, however HERE is a plain linen cushion cover that gives the same esthetic!

Cross Pattern – Medium pillow
This next pillow is done on a white pillow cover using Cross Pattern in Medium stenciled in Fusion’s Coal Black. The crosses are a little larger, making this stencil suitable for mid-sized projects.

Cross Pattern – Large pillow
And finally, this pillow is stenciled in Fusion’s Raw Silk on a black pillow cover with Cross Pattern Large. The crosses have a lot more strength measuring at 2″ each, which would look so good on curtains, floors, carpets, furniture and more! I also love it on this pillow!
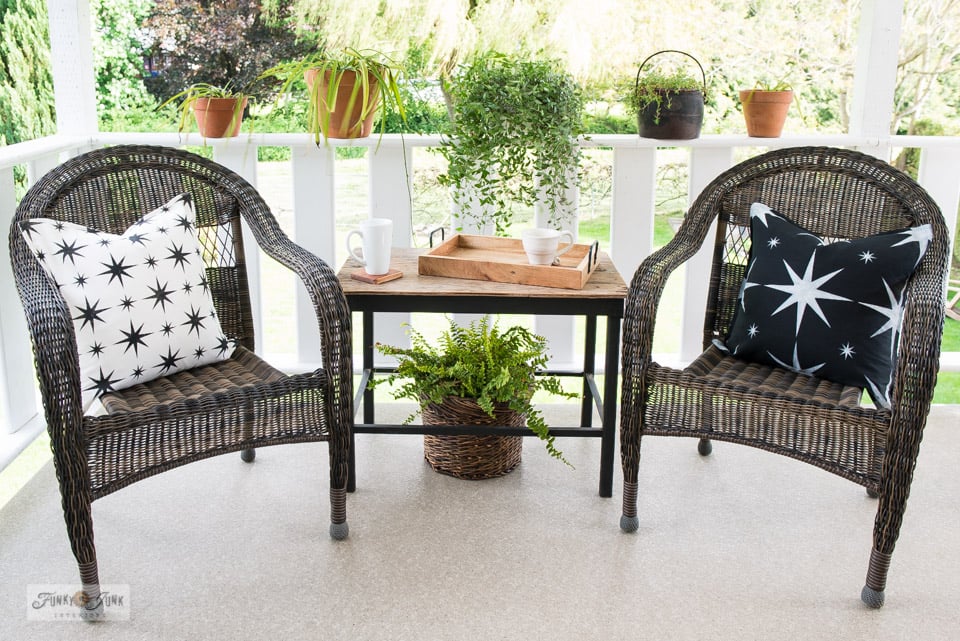
Find these exact resin wicker chairs HERE
And because opposites attract, here’s the black and white pillows perfectly coordinating with each other. Aren’t they cute together?
I love this cohesive look that looks fantastic on either wicker patio chairs, (along with my crate side table of course…) or on an indoor IKEA white slipcovered neutral sofa or two.
Then add a cozy throw in solids for added comfort to enhance a seasonal style during both warmer or colder months. This pattern just works with anything! Couches will never look so good.

And think of other tones too. Here’s a sample of Raw Silk on the white pillow, creating a very subtle effect. Could you imagine how pretty curtains, or even bedsheets would look? I think I’m going to be on the lookout for some off-white PJ pants!
All I know is, these coordinating stencil patterns certainly carved out a new look for the patio this summer!
As for the patio, I loaded up on outdoor hanging ferns again for the back patio and along the front of the house, so we are well on our way! I’ll also be picking up a plain blanket or painter’s drop cloth (like I did on this patio chair and sofa) for the pallet sofa and will pattern that up too… coming soon!
And now I want a new doormat, an accent wall, and likely more. Run cats run… I’ve officially given myself consent to cross pattern anything desired! Nearly.
Other ideas to use this cross pattern on:
- plain cocoa doormat
- area carpets
- feature wall
- floors
- kitchen backsplash
- sheets
- plain shower curtains
- window curtains
- towels
- clothing
- fabric or linens
- furniture
- plain placemats
Video tutorial: how to use the Cross Pattern Stencils
Visit above to watch a short and sweet video on the pillow stenciling process using Cross Pattern small.
Well that was easy! Think some fresh new decorative pillows may be in your near future?
Check out how Susan from Homeroad used this pattern on her placemats HERE!
Chic and easy DIY cross pattern decorative pillows
Tools:
Supplies:
Instructions:
- Iron your chosen pillow covers.
- Slip something waterproof inside to avoid paint bleeding through the fabric.
- Position a cross pattern stencil then use masking tape to hold it in place.
- Dip a dome-tipped stencil brush into paint, then remove most until brush feels dry.
- Tap or swirl paint through stencil for desired coverage.
- Reposition stencil by aligning like-minded pattern along all four edges, then stencil until pillow cover is complete.
- Once paint is dry, stuff a feather pillow insert inside the cover.
Notes
Check out many other unique pillow designs to make HERE
View more patio decorating ideas HERE
Visit all stencil patterns HERE
They’re gorgeous, Donna, and you’re right, they do make quite the statement. So classy without being snobbish, if that makes any sense.