This unique wood crates snack box is not only super festive, it’s the perfect solution for serving all your favorite snacks hidden from view, and separated to perfection! Easy to customize to any size desired!

Raise your hand if you too love to eat plenty of snacks over the Christmas season or everyday for that matter!
I’m attempting to gravitate towards healthy nuts for snacking, so I’ve been collecting bags of fresh nuts over the past while. However, my preference is to have a few different varieties of nuts for snacking, which means the nut bags land all over the place, or I forget to close them… you know the drill.
So I decided to come up with a way to store and access nuts for snacking easily while separating my favorite choices.
And that’s when the idea of this DIY wooden crates snack box for serving nuts came to mind, all too perfect for Christmas or year around enjoyment!
My vision was a rustic vintage crate with a Christmas vibe, but could be left out year around. And it would be deep enough to provide storage for a decent supply of nuts and snacks, along with a decorative lid to close it all up again.
Tall order, huh?
But I do believe I nailed this challenge, because this wood creation turned out as cute as can be, is super productive to store anything desired, and is rustically beautiful left out as a display piece in the room!
So if you too would love to figure out a way to hide some of your favorite snacks or perhaps TV or gaming remotes, maybe this how to build a wood crate DIY project tutorial will be helpful for you!
This post contains some Amazon affiliate links in which I earn a small percentage from qualifying purchases through these links, at no extra cost to you. Thank-you for helping to support my blog!
DIY wood crates snack box for serving nuts
Craft supplies I used:
Reclaimed wood (pallet wood, fence planks, etc)
Fusion Mineral Paint in Coal Black, Chocolate, Bayberry, Algonquin
Homestead House or Fusion’s Furniture Wax (or stain of choice)
HH Milk Paint in Sherwood Brown
Screws or nails. I used drywall screws.

How to build DIY wood crates
Cutting the boards
Since I wanted to make this wooden crate look vintage, I personally used all reclaimed wood, that offers an instant rustic farmhouse vibe.
1. Decide how large you wish your crate to be.
My overall crate measures:
17.5″ left to right, 10.75″ front to back, 6″ tall (without lid)
2. Cut:
Side pieces x 2 – 10.75″ x 5.5″
Front and back boards x 2 – 16″ x 5.5″
Bottom pieces x 2 – 17.5″ x 5.5″
Lid boards x 2 – 17.5″ x 5.5″
I decided on these measurements by working with the board’s width, so I could use two full boards for the bottom and top. This will save you from ripping boards to a super custom size.

Dry-fitting the crate
2. Dry-fit your crate boards to ensure everything fits.
Note: the front and back boards are tucked inside the side boards.

Assembling the crate sides
3. Prepare the two short end boards by pre-drilling holes in all 4 corners, then inserting screws partially through the holes.
Reclaimed wood splits easily, so it’s always best to drill pilot holes before using screws. Just make sure the bit is around the same size as the screw thickness, or the wood may split if the drill hole is too small. Which happened to me!
You can also assemble this crate with a nail gun. I like the look of screws so I went with it.

4. Screw together the end boards to the side boards.
Attaching the bottom of the crate
5. Pre-drill then insert screws into the bottom boards, then place on the crate to attach as the bottom of the box.

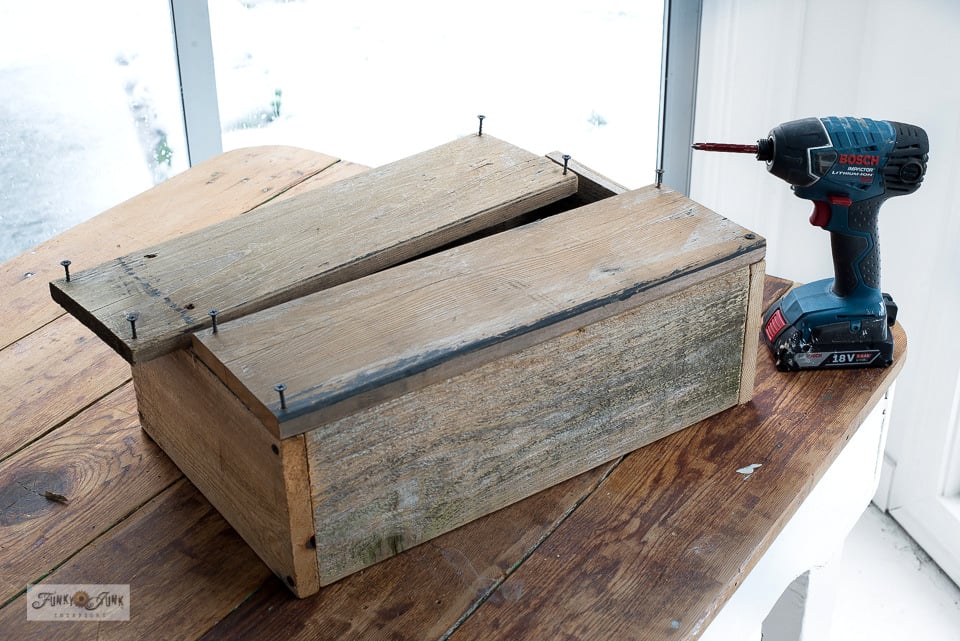
How to build a wood crates lid
6. To build a lid, place the two lid boards side-by-side, then cut two small support boards and attach them with screws so the lid boards stay together.
Ensure the support boards are short enough to fit INSIDE the crate when the lid is closed.
This support board will also help keep the lid in place.
7. Screw on two door pulls as handles on each end of the crate.

How to age wood edges freshly cut with paint
Because reclaimed wood generally has a lovely aged patina, fresh end cuts can make the wood look newer. Here’s one method of aging the new wood cuts instantly using Homestead House Milk Paint.
8. Mix a wash of watered down paint to darken the edges of the fresh board cuts. I used Homestead House Milk Paint in Sherwood Brown, however any brown milk paint colors close to your wood tone will work.
- Pour milk paint powder into a container
- Add water
- Stir with a whisk

- Brush the watery paint on any reclaimed wood cut ends with a small paint brush
- Wipe it back with a rag

Once dry, you can’t even tell it this was a fresh cut!
So let’s make the crate lid pretty enough to want to display it!

Stenciling the lid
How to find stencils for wood
Using stencils for painting is an instant way to achieve pro results on your projects!
Find many 10″ x 10″ stencil designs HERE that would fit this crate lid size.
Here are a couple of nut themed stencils: Chestnuts / Acorns
Find all the Christmas stencils HERE
9. Position the Chestnuts stencil into the center of the crate lid.
10. Stencil the image with various paint colors of choice.
I used Fusion Mineral Paint’s Bayberry, Chocolate, Coal Black, and Algonquin.

How to stencil for flawless results
- Position stencil with masking tape.
- Load a dome-tipped stencil brush with paint.
- Remove most paint onto a rag unil the brush feels dry.
- Tap or swirl brush through stencil for desired effect.
Learn more about how to stencil from THIS post.

The rustic crate lid stenciled in a Chestnuts theme is as cute as can be! So let’s protect it a little more.
Video – How to stencil a detailed image
.
Click above to view a short video of how to stencil a similar multi-colored image!
View the full Acorns tray tutorial HERE

How to apply furniture wax to protect wood
I added a layer of Homestead House’s Furniture wax to the top of the crate, for increased durability, as I desire to use the top to hold my coffee cup.
- Once stenciled image is dry, lightly sand with a high grit sandpaper or steel wool.
- Smooth on wax with a rag, then remove excess, and buff.
- Apply a 2nd coat if desired.

Adding snack containers
I happened to land these little galvanized pots for free from a neighbour! They were wrapped in twine along the edges which I loved, however the thin twine was coming off in some areas. So I decided to do a slight upgrade while getting the same look.
Some heavier twine was cut to size, then hot glued with a glue gun around each snack cup rim. I love the rustic added detail that chimes in with the snack bin!
Locate some similar tin cups HERE
Pick up some thick twine to decorate yours with HERE
Shop for all your favorite fresh nuts HERE

The snack containers were washed, then filled with different types of nuts such as walnuts, pistachios, almonds, and gluten-free pretzels until I get some peanuts! One container was left empty for a nutcracker and shells.
Just ensure whatever containers you use, your crate sides clear them so you are able to close the lid.
Now where to put this nut crate…

How to paint furniture
Since the nut crate was relatively large, I desired to find a way to uses it where I didn’t have to pull it out of hiding each time.
A few weeks ago, I came across this wood bench on the curb, so I decided to stack the crate on the bench since the top would land at the perfect side table height!
So let’s make it a little prettier first!

I chose this lovely shade of Bayberry by Fusion Mineral Paint. It’s a really nice natural shade of green that looks exactly like nature, and it chimed in so well with the little nut crate! Fusion is a very durable premixed furniture paint with a built in primer and top coat, making it very easy to use.
See how I painted my front door in Bayberry in THIS POST.
How to prep furniture for painting
- Clean with Fusion’s TSP alternative.
- Lightly sand with an orbital sander to add ‘tooth’ to the surface.
- Clean one more time to remove all the dust, then you are ready to paint.
- If distressing is desired, sand and wax the edges really well so they are easier to distress after the paint is dry, as Fusion bonds very well.

How to hand-paint furniture leaving few brush strokes
My paint brush of choice was the size 75 Staalmeester One series brush. This is a very thin, high quality 100% synthetic brush that allows the smoothest finish possible.
- Apply paint to a given area quickly.
- Do a final brush-swipe in a given area from end to end, leaving no stop and go marks.
- Once the paint is on, leave it be. Do not overbrush or you will get brush strokes.
- If a 2nd coat is desired, allow paint to dry, then do a light sand with high grit sandpaper first.
- Add a top coat such as hemp oil or wax if desired, although I didn’t as Fusion already has a built in top coat.
The bench was painted in 2 coats.
The finished wood crates snack box
And there my friends, is the most fabulous nut crate snack box you ever did see! Isn’t it beautiful?!

The Chestnuts theme works SO well for Christmas, however the design isn’t too Christmasy so it can be used all year around as well.
So let’s try it out on that cute bench!

What a perfect fit! The top of the crate on the bench is the perfect side table height for my cup of coffee.
And the bench offers different surface levels for a lamp and TV remotes. And even a place to store my journal or magazines.
I really ended up with an end table perfectly suited for the height of wood crates! This wooden boxes DIY is so easy to customize. Just work with the wood you already have!

Then simply open up the lid and have a snack anytime you wish!
This could be a good or bad thing I suppose… I’ve yet to decide…
However DIY wood crates could be used to house anything you wish!
Other ideas to store inside wood crates
- sewing, embroidery or knitting supplies
- art supplies
- office supplies
- to store and hide TV remotes
- store and hide gaming controllers
- to serve cookies
- theme the crate for coffee and fill it with mugs, coffee and coasters
HERE are plenty of 10″ x 10″ stencils that would fit this crate lid!

So scrap the oodles of baskets and containers for endless snacks. I sure love the fact that all my nuts are now in one place with plenty of them! And making wood crates in various sizes to suit would come easy.
This faux wooden shipping crate filled with nuts and snacks would also make a wonderful gift idea too, don’t you think? Far from standard crates this round!
What would you store in wood crates like this?
Other wood crates to make:


Build an Apple Farm Crate with a reversible design including Hydrangeas!
Visit many other unique crate projects HERE
Find other crate-styled stencils HERE
Visit many other unique Christmas project ideas HERE
Donna,
A great idea! Enjoy the holidays!
This is such a fun idea. It would be such an awesome gift to give as well!
Love it!
Thank-you Kim! I am enjoying it a ‘little’ too much I think… LOL
Love it! And the green bench too. Always enjoy your creativity!