Learn how to enhance your garden with whimsical vine-covered garden arbors. Get tips, tricks, and design ideas for creating charming garden portals in your own yard spaces!

Welcome to Part 1 in the garden arbor series!
Read Part 2 – Growing Virginia Creeper on Garden Arches HERE
This past week, two incredible metal garden arbors WITH full grown vines landed in my yard, one in the front, and one in the back! So here’s part 1 on how I installed the full grown arbors, with much more to follow!
This post contains affiliate links. As a Fusion and Amazon Influencer, I earn from qualifying purchases at no extra cost to you. Thank-you for helping to support my blog!
Installing Vine-Covered Garden Arbors: Tips And Design Ideas
For a few years, I’ve been watching two incredible garden arbors spring to life each summer in a friend’s yard. The vines on both are exquisite and one even blooms so I’m told! I’ve always dreamed of taking cuttings from each to hopefully grow one or two of my own one day.
What’s special about arbors?
I just love the look of arched arbors as part of a yard landscape! They are a great addition to any yard, creating such nice focal points of height and interest, while leading you through portal-like entries into other areas of the yard. I even had plans to build my own cedar arbor in the backyard this summer, but then again I say that every spring and haven’t yet! Something more important always seems to come up.
Then recently glancing through a Facebook group, I noticed the very two garden arbors I had coveted for so long were up for grabs for FREE! I couldn’t message back fast enough.
In no time at all, I asked (bribed) my son to help me get both arbors with his truck. Luckily we had some help digging them up and propping them onto the back because were these guys heavy! Oh, but it was quite a sight! Two saggy arbors bouncing up and down the road with vines a-blaze in the wind! But they were tied down safe and sound so all was well.
We were so busy I didn’t take the time to snap a picture which I will always regret! Where are my before-moment blogging manners?!
View the adventure in stories
However, I did share some Instagram stories on the arbour adventure you can view on Instagram HERE!

After getting the arbors home, I basically collapsed for a day or two before having the will power to prop them into their new outdoor space. Since the vines were full grown, they each came with quite the root ball which added to the workload and weight. But worth it…. SO worth it!
Then install day arrived. Since my son was busy, I braced myself to install them on my own a little at a time as I could.

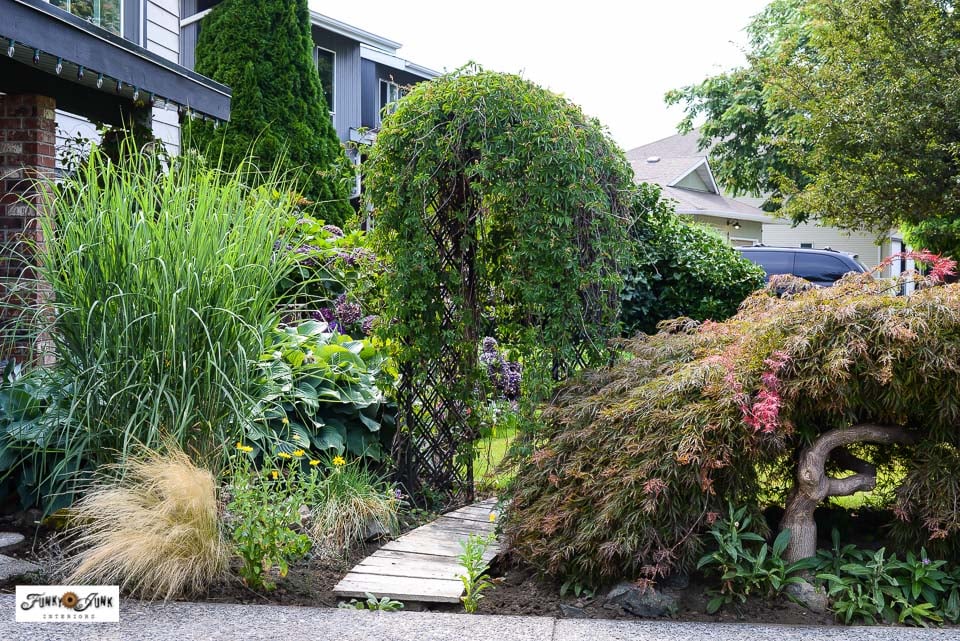
Garden arbor in the front yard
This is arbor #1. The arbor is made out of lightweight black aluminum with some painted white plastic lattice attached, in need of a repaint.
This spot offers an entrance into the yard from the driveway, while the sides of the arbor will soon blend in with the other garden surroundings. The width is perfect for walking through without taking up too much space.
Plus I love that the arbor is metal and plastic which is more weather resistant and has more durability than wooden arbors over the long-term. No rot to follow here!

I really love the interesting height it ads to this area, providing a little privacy for the front door from certain angles, so I think this spot is going to be perfect!
While I was positioning the arbor, I moved the wood garden path (see it HERE) out of the way, thinking it may have to go. But after I slipped it into place, it’s the perfect size for this entryway… see more below!
Here’s how I installed it…
Supplies you’ll need:
flat edged shovel to level ground

How to install a free-standing garden arbor
- Dry-fit where you wish the arbor to be placed.
- With arbor in place, use a half moon edger to cut shape around arbor.
- Move arbor, then remove the sod.
- Level the soil with a rake.
- Position arbor in desired location.
- Pound sturdy posts into the ground – 12 inches should be buried with at least 12 inches above ground.
- Attach the arbor to the posts with heavy-duty zip ties.
- Dig a hole for the vine roots.
- Bury the roots, cover with soil and water well. Amend the soil if needed.
First came digging a large hole for the vine roots. So I shoved the arbor into the position desired, then moved the roots aside and started to dig.
Then the arbor and roots were shoved back into place, and the roots covered in soil. Whew! Big job.
To further stabilize this arbor, I pounded a metal rebar post into the ground positioned against one leg of the arbor, then used large zip ties to attach the arbor to the post. I may add another post to the other side, but it may not be needed, because…
Garden arbor teamed up with wood walkway
… after I slipped the heavy wooden walkway back into place through the arbor, I was pleased to see it fit!
Since this arbor is completely joined together as a large rectangle along the bottom, the wooden walkway’s weight helps stabilize it into place. What an added bonus!
The design of this wooden walkway appears to be even better than I imagined!

How to make this wooden garden walkway HERE
Talk about a perfect fit! Natural beauty teamed with a sense of enclosure is the vibe this arbor is giving me, even at this early state.
I plan to pressure wash the walkway boards to see if there’s still enough life left in them, and if not, I’ll just replace the top boards for a fresh, new look! However this round, I will weatherproof them since my collected reclaimed boards are not treated wood.

Paint test on the arbor plastic lattice
I also did a paint test to the plastic lattice in need of a repaint. The black spray paint held really well so I’ll be completing the painting as soon as the sun returns later this week. The black will make that lattice disappear nicely to allow the beautiful green vines to completely steal the show!
The paint will either be black or perhaps a warm black / deep brown to match the trim colour of my home. This will depend what spray paint is available as I think this task would be too labour intensive painting with a brush.

Garden arbor with full grown vine
The vine covered arbor is pretty magical already, while walking through the vines as if it was a beaded curtain to get through to the other side. I can’t wait to see it fill in with the gorgeous leaves and blooms alongside other favorite climbing plants, planters and the other garden beds in full swing serving as a lovely backdrop to this special event!

Garden arbor with vines in the backyard
And here’s garden arbor #2, which is positioned in the backyard!
This vine covered arbor is a complete stunner! The arbor is a heavier duty black metal that has weathered over time, with an open bottom. Once filled out, the leaves resemble tiny maple leaves and apparently bloom mid summer as well. I cannot wait to see it in action!
This arbor is positioned along the chain link gate that connects to a chain link fence that runs the entire length of the backyard. The arbor height offers a really nice added yard interest, as well as framing a special way to enter the back park.
This area is exactly where I had wanted to build a wood arbor. So excited to see this little dream come to fruition in an even easier way!

Installing the metal garden arbor
In order to install this much heavier metal arbor, (thanks to those chunky feet!) the height needed to come down abit.
I placed the arbor into my desired position, cut around the feet outline with a half moon edger, moved the arbor, cut out the soil, then positioned everything back in place, filling the feet up with soil.
The arbor was then pushed against the fence as close as possible, and attached to the fence with large zip ties. It’s not going anywhere!

Planting the vine root ball
The massive vine root ball proved somewhat challenging. I dug a large enough hole in the soil to plant it, but it appeared too high.

Not wanting the arbor lower since it has functional gates, I came up with a solution…

Vines planted in open-bottomed wood barrel
I shoved a wooden barrel with no bottom into place, and filled it with the vine roots. A perfect fit!
Since the barrel has no bottom, the vine will continue to grow into the ground so they won’t get rootbound.
View wood barrel planters HERE

View branch covered chain link fence HERE
The garden barrel adds more planting opportunities too since I can now plant something pretty spilling over the sides. And gives your eyes another place to rest! Love it.
Don’t you just adore how one vine carries onto the next? From honeysuckle, to the branch covered chain link fence (see how it was done HERE), to the vine covered arbor, joining to the grapevines, it’s a total infusion of all things vines!

What chain link fence? It’s nearly completely hidden now!

See that goofy crooked chain link gate? It can now be removed!

Arbor gated entry
This arbor gate will replace it.
View metal arbor with attached gates HERE

I also plan to paint the chain link posts black so it further disappears since the posts need to remain in place. Once that vine takes over, you won’t even notice them!

I have desired an arbor positioned over this backyard gate FOREVER, I had even planning to attempt to build one this summer complete with a gate.
Thankfully, I no longer have to! I’m so grateful for both arbors complete with full grown vines no less, to add more visual garden interest, along with a zillion other outdoor projects to help enhance them and the yard even more!
Progress in my yard can come rather slow at times. But I’ve always said, what I work on next depends on what I land. This is a BIG ONE. And a huge motivator to continue to beautify the yard and share how I do it!
So consider this Part 1 of the garden arch arbor series, because there’s most certainly a LOT more to come.
Do you have any arbors in your yard? What do you grow on yours?
Be sure to read Part 2 – Growing Virginia Creeper on garden arches HERE! What a stunner!

Other related unique outdoor projects to make:
How to build a shed deck / patio
Building a reclaimed wood garden fence
Create charming outdoor signs with garden stencils
See many more outdoor garden projects HERE
Installing Vine Covered Garden Arbors: Tips, Tricks, And Design Ideas
Tools:
- half moon edger to cut shapes
- rebar posts to mount to
- hammer to pound in posts
- metal garden rake to smooth surface
- flat edged shovel to scoop away mounds
Supplies:
- metal garden arbor
- garden vines of choice
- vine fertilizer
- enriched soil additives
Instructions:
How to install a free-standing arbor
- Decide where to place the arbor, styled as a whimsical portal into another garden area. Consider the view while glancing through it.
- Dry-fit the arbor where you'd like it to be.
- Use the garden arbor as a template, then cut the sod around the arbor.
- Move the arbor, then smooth and rake soil until level.
- Position a garden arbor in desired location.
- Pound in support rebar posts - 1 or 2 on each side. Posts should be 12 inches in the ground and 12+ inches above ground.
- Zip-tie arbor to posts.
- Plant a vine near the base of the arbor or into an oversized barrel or pot.
- Keep soil moist and fertile until the vine starts to thrive.
Good Morning, Just wanted to say that I am so happy for you to find these arbors. I look forward to pictures once the vines start blooming. What type of vines will you plant?
Also wanted to mention that I admire the work you do. It is an inspiration and I love to read your Blog every week.
One last question, I’m wondering where you live. The view you have of the mountains is gorgeous.
God Bless You!
Aren’t they such a wonderful find?! I have renewed enthusiasm for the yard this year thanks to their arrival!
The arbors don’t need more vines as they are fully grown. I’m not sure what else I will plant around them quite yet as our growing season hasn’t even started. Coming soon!
I’m on the West coast of British Columbia, an hour east of Vancouver. Yes, we are so fortunate to get to enjoy a mountain view out our back door. Trust me, it’s never overlooked! It’s the sole reason I purchased this place 20 years ago!
The arbors are great! Can’t wait to see them spring to life.
Donna – O.M.G. you have a mountain view in your backyard!!! (I’m so jealous!) How awesome! The arbors look great & I can’t wait to see the vines when they “green up”. 🙂
Wow Donna, those are amazing! I can’t wait to see them in full bloom.
I am so thrilled for and proud of you for checking TWO of your ‘big projects’ off of your wish list, my friend! I truly believe that “Once you make a decision, the Universe conspires to make it happen.” – just as Ralph Waldo Emerson did, and you are proof positive!
WOW!!! So much work, but definitely worth it! The arbors are gorgeous!! What a find!! I can’t wait to see them when they green up!! Beautiful!! So happy for you, Donna!
Now you’ve got me wanting one too. How lovely! And we have a spot in the garden that’s just perfect for something like this. I’ll make sure to find some willing hands to help with the installation, though. It must have been hard work tackling that on your own.