Learn how to build a beautiful, affordable rustic wood fence for your yard using reclaimed wood! This easy step-by-step guide outlines the materials and process for creating an easy and unique look for your yard!

Updated: Aug 2025 As a Fusion and Amazon Influencer, this post contains affiliate links in which I earn a small percentage from qualifying purchases at no extra cost to you. If you shop Fusion Mineral Paint products through this post, you will get 10% off. Thank-you for helping to support my blog!
How I Built A Rustic, Reclaimed Wood Fence – this is Part 4
Part 5 – See the finished fence HERE
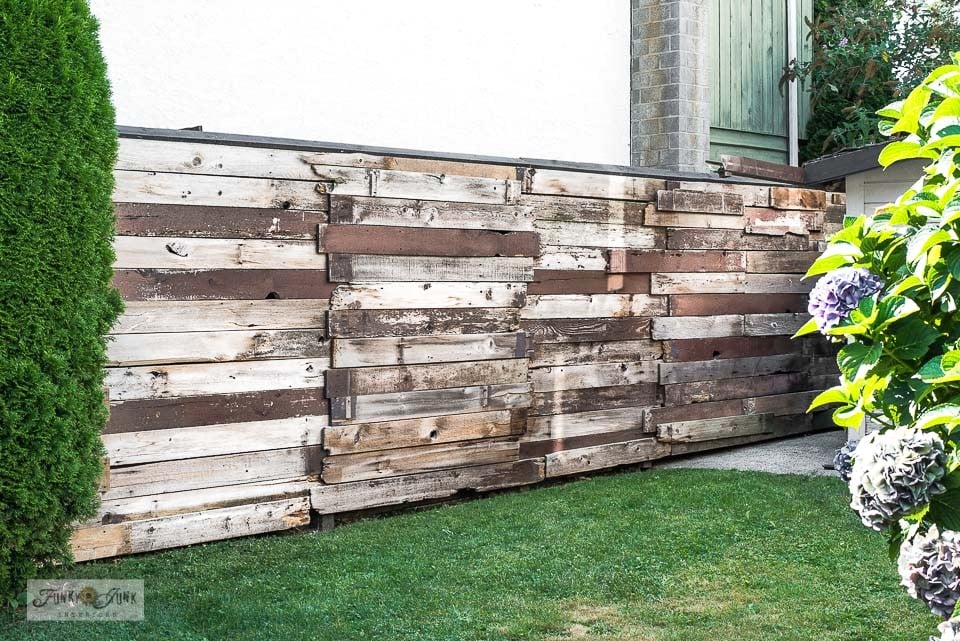
This backyard fence looks nothing like it use to, thanks to the installation of a little free reclaimed wood!
I’m taking you waaaay back to the garden shed and fence project that was started last summer.
As a refresher…
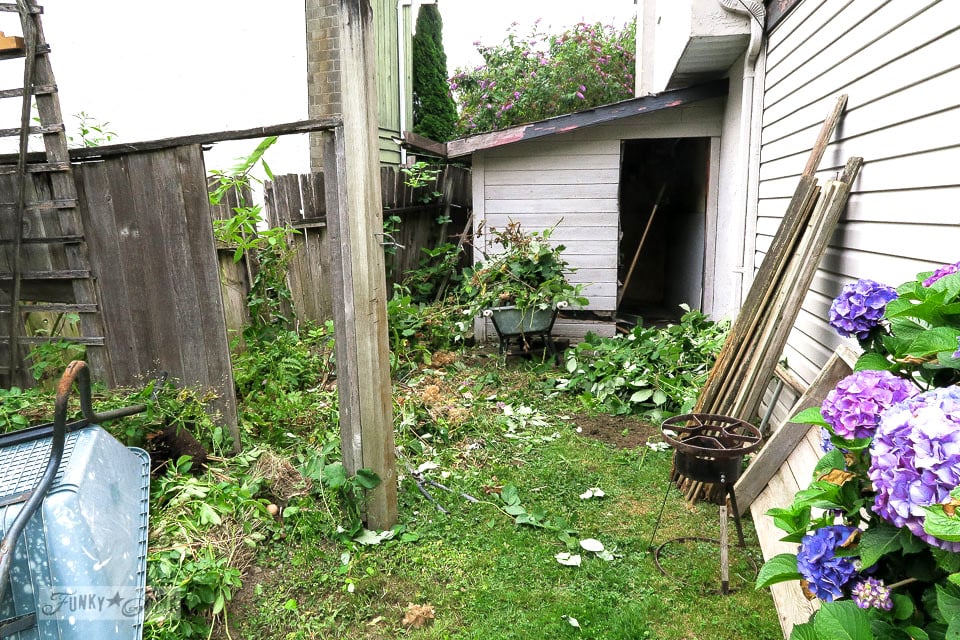
Part 1 – The fence area before
.
Here’s Part 1 where we first cleaned up.
Welcome to the boneyard. You know the area, right? A special place reserved for stashing garden junk no one sees. Well, I saw it everyday and it finally bothered me enough to do something about it, with the help of a neighbour.
When I first moved in, this area housed a compost behind a partial wooden fence with lattice and such. When I noticed rats, I removed the compost, leaving me with instant access to rambling blackberries and weeds. And of course, a fence falling down as well. I desperately needed a new fence.
So this area needed a complete clean out in order to start over.
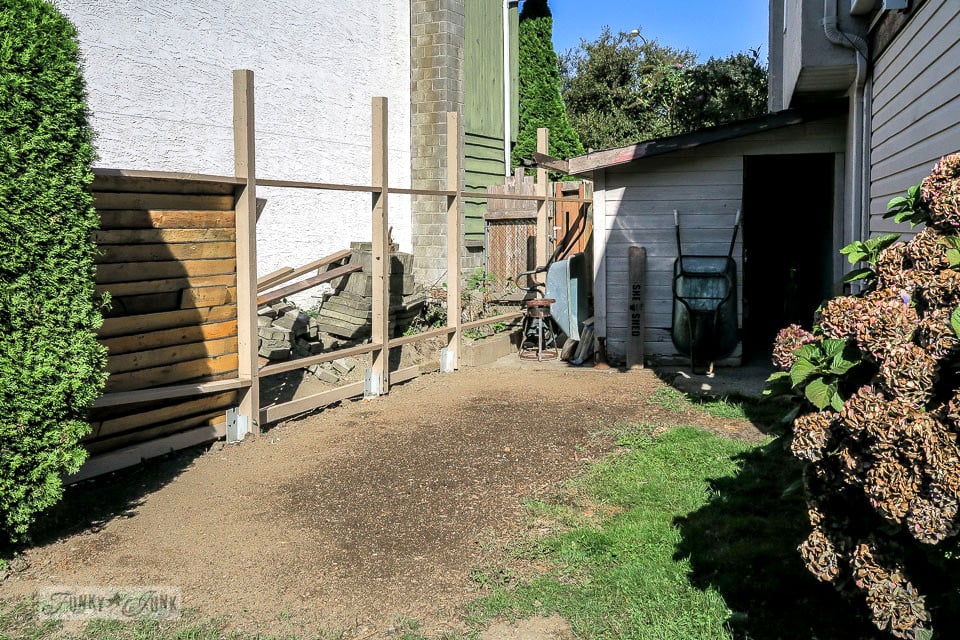
But then my neighbour Hank also surprised me one day by replacing all the fence posts between us. Oh my goodness! Now I was really motivated to keep going! But before he tossed the old fence pickets / boards, I asked if I could have the wood that was at least from my side.. just in case. He was more than happy to hand it over. So I stored it for a rainy day.
So please note, this tutorial covers how I added boards to already-installed fence posts.
Part 2 – removing all the flower beds
.
Here’s Part 2, where I decided to remove the back yard flower beds.
This post was hard on quite a few of you… and me, because we remember what my back yard USE to look like when I went all out.
Because I wasn’t keeping up with my yard like I should have been, I decided to have all my flowerbeds removed in the backyard for a total reset. A good rule of thumb is, if you can’t keep up with the yard, pull it back to just lawn because at least mowing is relatively easy! So that’s what I did.
Loads of backyard areas were gutted, then smoothed over and reseeded to grow fresh grass again. It really made a difference and provided minimal upkeep which is what I needed at that time.

Part 3 – the lawn grows back
.
And here’s Part 3, once the grass started to fill in.
Since the areas were looking so much nicer, it was a good time to focus on the fence again.
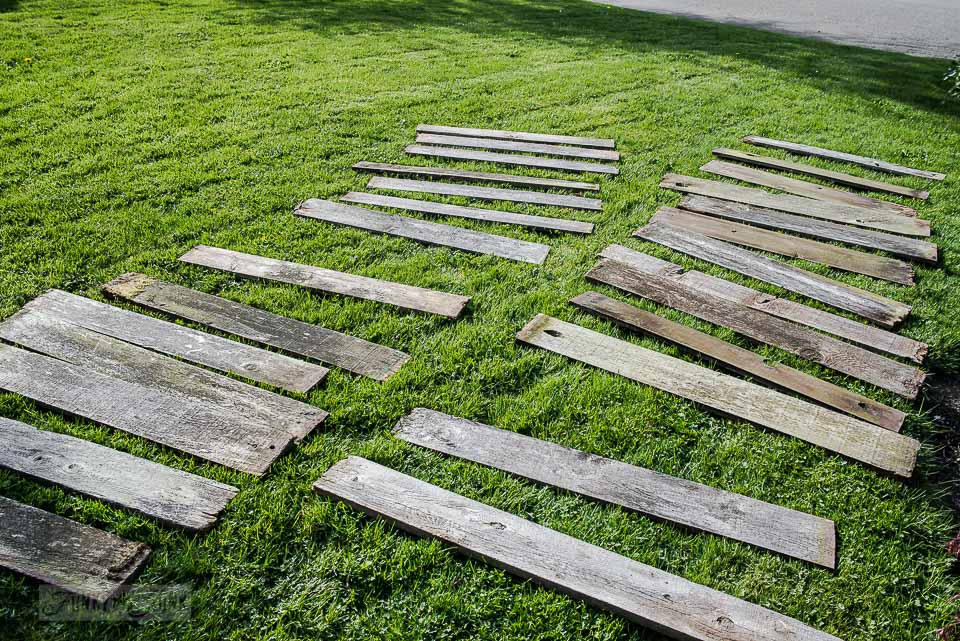
Remember all that original stored wood? I decided to pull it out of storage, then pressure wash it over a weekend to see what I was actually left with.
With the clean wood scattered all over the lawn, I had a choice. I could either stack it to dry and move on to pressure wash the front of the house…
Or just put that wood up on that fence, wet and all and gitter done! So rather than overthink it, I just did it.
So let’s continue with Part 4, because I built myself a reclaimed wood fence using the original old cedar panels that turned out super cool! Here’s how…
Note: it’s a good idea for homeowners to check with your local contractor or bylaw building codes to ensure your property lines, and taller fence dimensions for your rail fences work with code.
How I Built A Rustic, Reclaimed Wood Fence:
Materials And Steps

Supplies I used:
Orbital sander (I like Bosch variable speed)
Outdoor durable paint
Pressure washing the boards
1. Each original reclaimed wood board was placed on the lawn, then lightly pressure washed on both sides.
Normally this is when I lean the boards against the house on the sidewalk to dry, so they don’t warp. However, this round, I attached the boards wet right onto the fence posts to dry instead!

Installing boards to posts
2. With a construction level on top, random planks were horizontally positioned across two posts, then attached with screws.
More boards were added until the panel area was full, while jogging the left and right placements so the edges wouldn’t be perfectly aligned.
3. Every other post section was completely filled in first.

Boarding every other panel at a time to create the layers
4. To fill in the remaining sections, boards were placed into position horizontally, overlapping the board edges behind them, then screwed into place through to the posts.
Luckily, nearly every board happened to be the right length in between those posts! So just take note that the post placements will work with your choice of cedar boards to fit your outdoor space.

I mean, look at those board joins! The random placement looks so cool and unique! But above all, this fence style was indeed working, and provided the perfect solution to using up all those saved original cedar boards!


The wood fence completely boarded up
Then I kept adding boards until the side was complete!
“So, what did you do today?”
“Oh, nothing. Drank coffee. Built a fence. You know… the usual.”
Well, this newly built wood privacy fence was a HUGE deal around here thankyouverymuch!

What a clean up from the original before! Plus now I can better focus on doing something fun with that shed too.

And this is when I started to dream. How could I decorate it up after it was 100% complete? So I brought out some old antique garden tools and started to play around.

Until Hank announced, now that my side of the fence was completely glad, it was time to finish the tops.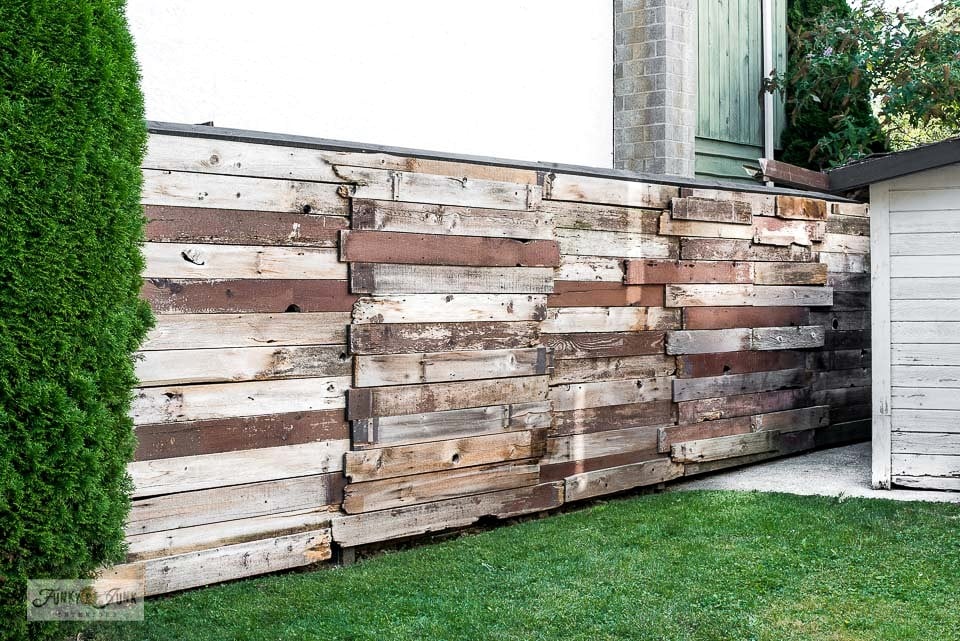
Capped fence top
Wow, right?!
Hank finished the top of the fence on both our sides with a unique little cap that resembled a peaked roofline.
Then I followed up and painted it black, along with the trim on the shed as well. Things were really looking up!
So that’s how I basically built a reclaimed wood fence!
However now that it was complete, it was time to decorate it up to the hilt!
Visit Part 5 – the decorated garden fence with antique tools HERE
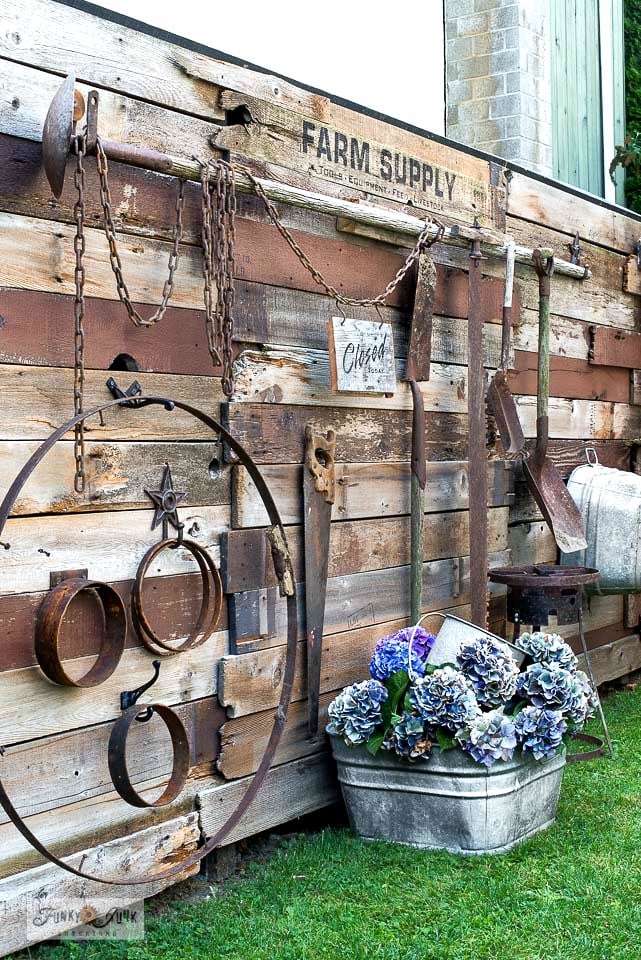
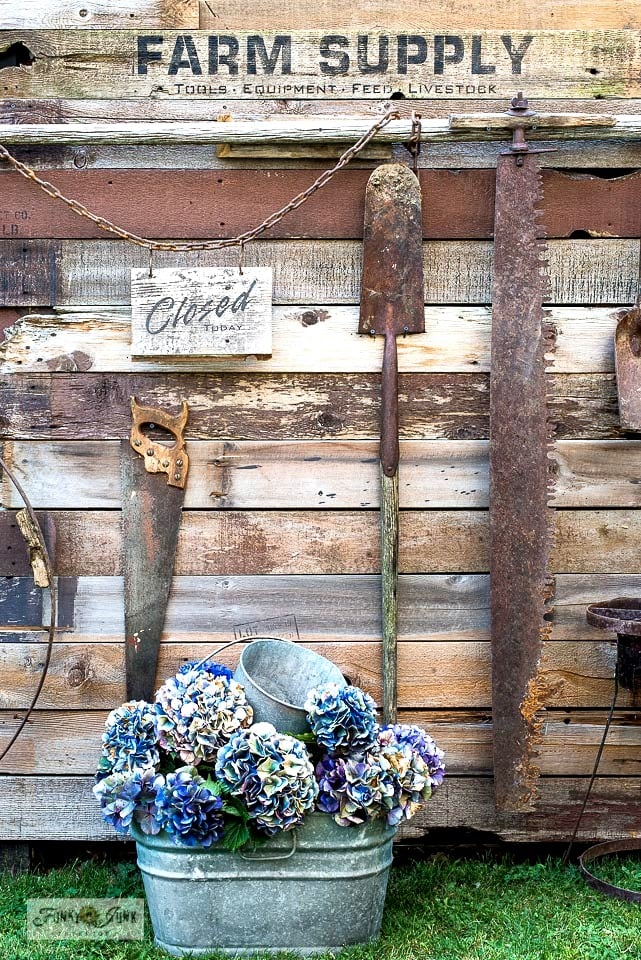
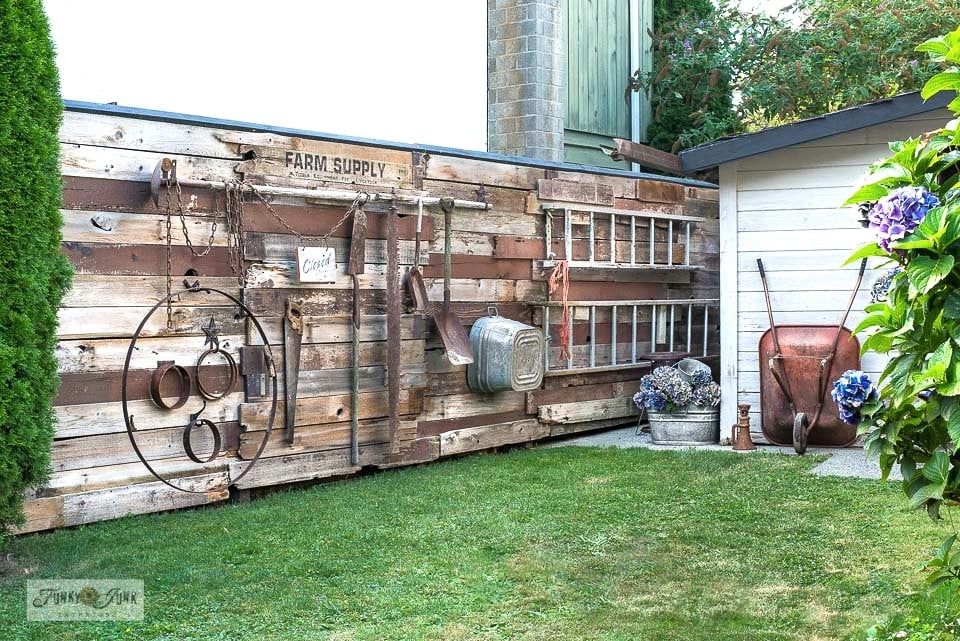
Decorating the fence with antique garden tools
With antique garden tools hung all over the fence, I now had not only a super cool garden fence, but one loaded with garden art as well!
Check out the Farm Supply stencil used from HERE
Visit Part 5 – the decorated garden fence with antique tools HERE
The garden fence is filled with all kinds of hidden gems… such as a few random rustic stencils utilizing pallet stamp designs, a couple of old signs made with stencils, and so much more!
Before… goodness I love this picture.
Visit Part 5 – the decorated garden fence with antique tools HERE
And after! Neat, tidy, and super fun to look at too! And a blast to decorate as desired!
Now that it’s been a few years, I’ve redecorated the wood fence many times over. It’s been a fantastic backdrop for so many different looks, and they all look so fantastic against that rustic wood fence!
Here’s a few of my favorites:
Other looks the fence has taken on over the years:


Create a potting bench with a wood cable reel
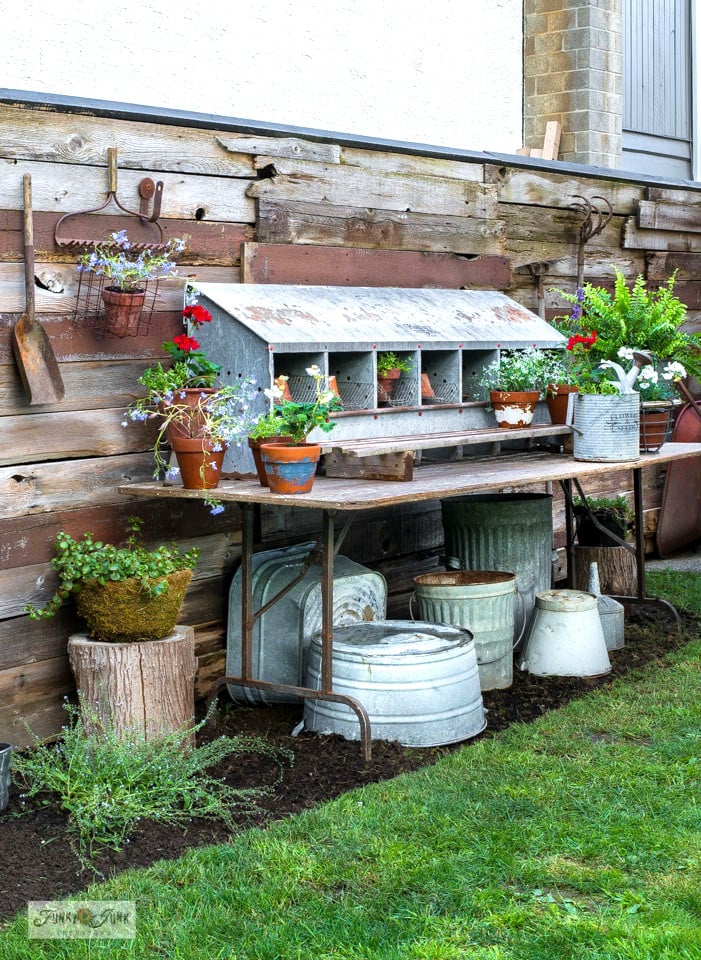
Chicken coop nesting box potting bench

DIY cold frame made from an old window

Herb garden on a fence, using coffee cans
And so much more!
How are the reclaimed boards holding up?
For the most part, I’ve found the board fence to be relatively low maintenance. As the boards begin to weather a little more from moisture, I go over the fence every spring, tighten up any loose boards, then give the entire fence a light pressure wash to start things off fresh again. If some boards fail, I simply replace them which are easy to switch out since all the boards were just screwed in. Just a little regular maintenance is really all that’s needed.
Would you build a fence the same way again?
I would indeed build the same fence again the same way! Although if my budget allowed, I would consider using new cedar panels for added longevity. And perhaps adding outdoor wood sealants to increase the durability.
But I do love the type of wood used, and the variety of wood types and styles one could plank a fence as desired. It’s a great privacy fence, that also keeps pets and kids safely inside the yard.
And building with screws vs using a nail construction is a total win, making the panels very easy to replace when desired.
View the shed with the front porch addition HERE
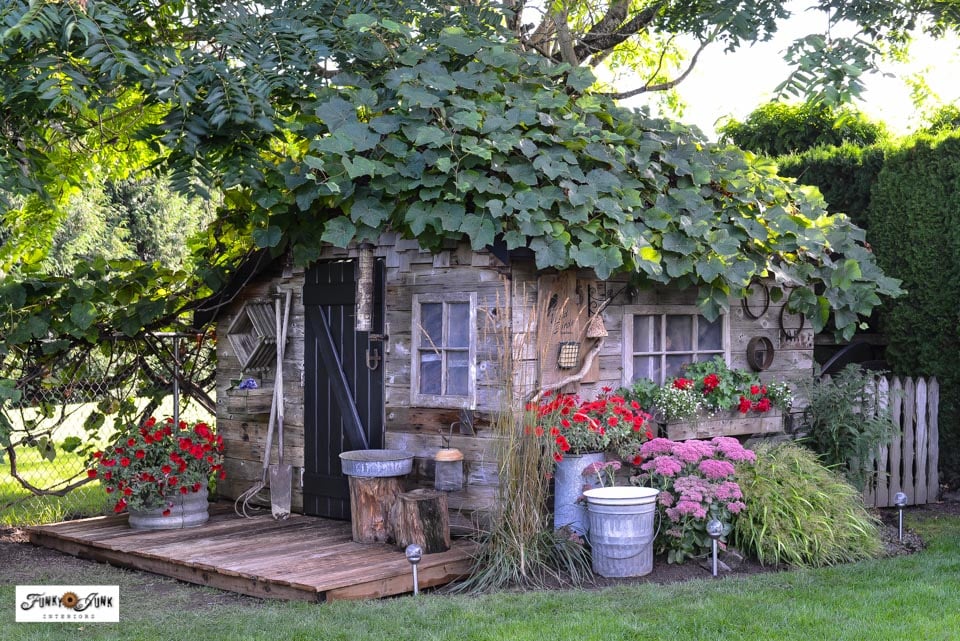
Garden shed made with reclaimed wood
Visit the entire Save The Shed series HERE when it started to fall apart and I saved it!
There are so many wood fence styles to consider. But I do love the reclaimed wood look so much!
It really chimes in with other rustic yard features I have going on as well such as my garden shed which is also clad in reclaimed wood. This use to be an old greenhouse!
And just for fun, here’s a little video that shares the building experience…
.All in all, this reclaimed wood fence has been an epic build and adds so much character to the backyard! Plus it’s been quite low m
Think you may give your own fence a little makeover after seeing how cool this one turned out?
Visit Part 5 – the decorated garden fence with antique tools HERE
Visit the entire fence series HERE
Check out many other unique outdoor DIY projects HERE
How I Built A Rustic, Reclaimed Wood Fence: Materials And Steps - part 4 duplicate copy
Supplies:
- reclaimed wood planks
- Outdoor durable paint
- Outdoor wood sealer if desired
- installed fence posts
Instructions:
- Install fence posts to just under the width of the new or used wood planks you will be using.
- Pressure wash and remove all nails if using reclaimed wood planks. Cut off rotted edges of any planks if they are split or need a fresh start. Leave live edges where possible in order to get this rustic look.
- Install the planks to the posts horizontally, filling in every other section, with random edge placements so they are not perfectly aligned.
- Fill in the remaining sections by placing top boards over the previous board edges to close up the sections completely.
- Finish the top of the fence by creating a top edge cap in a V shape to create a roof-look. Paint it black.
Love, love, love your “new” fence!!! I’m all about reuse and upcycle!
That fence is so cool I wouldn’t do anything else to it or by it…..let it speak for itself!
Ann
Thanks Ann! It is so fun to look at as is! I think once something is added to that shed, it may be enough. Best get working on that shed and find out…
I like the finished fence and yard as is. I too am wanting things a little more easier to keep up, but yet want my yard to look nice. And I love the smooth, finished look, not to mention the reclaimed wood. Ah, reclaimed wood one of my favorites. Enjoyed your description of the process. Your way of building is right up my alley. Impulsive and making it work. Thanks for showing us!
Ohhh VERY impulsive! I think that’s the part that infuses enthusiasm. Otherwise I overthink it and it’s already done before I even start. haha
I will admit, the loss of the flowerbeds in the backyard aren’t quite doing it for me. Less work, neat and tidy, big time! However I’m already wondering what I can add here and there for interest. Maybe a mess was the best way to inspire me off my chair after all… more on this soon, count on that!
OH how I remember the first photo. I am thinking ….. she has got her work cut out for her. Well you did it and it looks great. As for what to do with it….use it as an art gallery or object gallery. It is changeable also. Just a thought.
It is the PERFECT backdrop for all kinds of yard junk garden art! Great idea!
Oh Donna the fence is just awesome. I love the overlap and variations!
Thanks Carlene! I could only imagine how you’d enhance this one! Gonna put my OC garden junk thinking cap on… 😀
ooooooh! i love that fence. i would put some funky yard art on the fence to dress it up. great job, i love your projects and i think this is one of my favorites. i want that in my yard.
Thanks Mary! Yeah, I think it needs a little something… already rounding up some garden junk to see what becomes…
Donna,
Love your fence!
Thanks! If nothing else, it sure is a nice photo backdrop! 😀
I would paint sort of like a mural on it of flowers.Then you don’t have to keep up with those. Plus it will add color & the color of the boards are a great backdrop to look like woods in behind it. Lol. Love old lumber – love to paint & love all your projects. Love Ruthie
I love the easy-care way you think Ruthie! My mind is working overtime now thanks to your suggestion!
That looks AWESOME! Who would have thought? Congrats!
WOW!!! I absolutely love it! I’m going to pin this for later!
Bless all the people on the big island of Hawaii!! Will this affect your vacations?
Love the new fence, it is so you!
Hey Maggie! I don’t visit the big island when I go, so it wouldn’t affect me. So sad to see all that happen!
Thanks for the fence kudos!
Love love love the fence with the overlapping planks!!!! Trusted your gut intuition girl!!
WOW that came out awesome! Now the fence needs some rusty decorating! LOL! What a great project, low cost (or no cost), fairly easy, using recycled materials and it looks GREAT – that’s a winner to me 🙂
Love it!!
Dear Creative Inspiring Donna
Your fence is just super! Having loved your shed from the moment I first saw it, of course I would love this fence, which has the same “flavor.”
You outdid yourself, AGAIN!
Super.
Brenda
Just became aware this week that there was even such a thing as “thatching” a yard. We have a creeping charlie nightmare in ours and I’m excited to think that there might be hope for our yard yet, lol.
Your new fence is so creative, unique and rustic. It looks absolutely amazing!! Have a Happy Mother’s Day, Donna.
Now that’s a FENCE and it totally makes sense. So keen to see what you’re going to do along the fence. It’s a beautiful blank canvas with built in attitude. I would love to add a whole bunch of crazy signs to create a story that leads you up the garden path, erhm I mean the garden shed
OMG!!! Your fence, like everything else you do, is AMAZING!! Love it!! It’s simply wonderful just like it is!
Being a junker and a gardener, I would add a couple of funky birdhouses.
I love the fence. However, I would also put some wood preserver on it, so it will last a while without rotting too soon. Some spray preserver would be a quick job.
We have been building fence or should I say rebuilding. We had some one else’s trailer for years in our backyard (extremely long story) anyway it finally got taken down the road. The problem was now hoard of lumber(junk) was now exposed to all sundry! Ahhhhh! Since my hubby hates my “dirty secret” hoard he was on board to hide it right away because in no way was I getting rid of it. We lost a third of the back yard to increase the parking. The old fencing is still covered in flooded water yuck. Sorry I buried the lead. In 2011 the property had 13′ of water on it. Most of the yuckiness was removed! Literally gutted! But not the fencing! Now I’ll be pressure washing the remaining “newly reinstalled” fence that had been stack up for all this time waiting for the removal of the trailer. ……what this long rambling comment is leading up to is the color choice because my fencing wasn’t as cute as yours……and didn’t want boring old mud covered fencing. ….. I’m going with black…black stain…. I’ve already painted some of it …..I love it! My flowers look fantastic!
That is a great fence! how fun and inspiring. I wish i had a yard for a fence. Someday!!