
Remember the boy’s room project HERE?! It’s been a good long while since I’ve done an update!
I decided to tackle this room once again to carry it through to completion this time for 3 reasons…
I found a headboard and footboard for free!
A headboard and footboard listed for free in a local Facebook group caught my attention. After learning it was still available, I hightailed it over there to pick it up! It had a pretty shape and I knew it would be perfect for the bedroom once painted.
A place to sew is desired.
You heard that right. I haven’t sewn much in the past few years. But I recently got the hankering to make some custom pillow cases and I didn’t have a good spot to leave the sewing machine up. Revamping the bed-less part of the room would take care of that.
I desire to create a desk/table that looks good in a spare room that would double as a useful spot to sew. I regard a sewing machine as yet another DIY tool so may as well go dig mine out of storage and start playing again!
This room needed finishing once and for all!
Half the room became a dumping ground, and when my son came overnight, I felt like I was putting him up in a storage room! I want it nice in case other guests decide to stay as well.
So lemme show you the newest find, and how I revamped it!
I’m also going to share my favorite furniture painting tips on how I achieved a beautiful brush stroke-free finish.

How-to achieve a brush stroke-free finish
.
When I picked up the headboard and footboard, I was so happy to learn they were both handmade locally out of solid wood! That is always such a perk these days.
What you’ll need:
A piece to work on – my preference are pieces made from solid wood
A good quality paint brush – I prefer all synthetic for the smoothest finish
Quality furniture paint – I used Fusion Mineral Paint’s Coal Black
(find a local Fusion merchant HERE)
Cleaning supplies – I used Fusion’s non-toxic TSP and a soft rag
Fine grit sand paper such as 320 (optional)

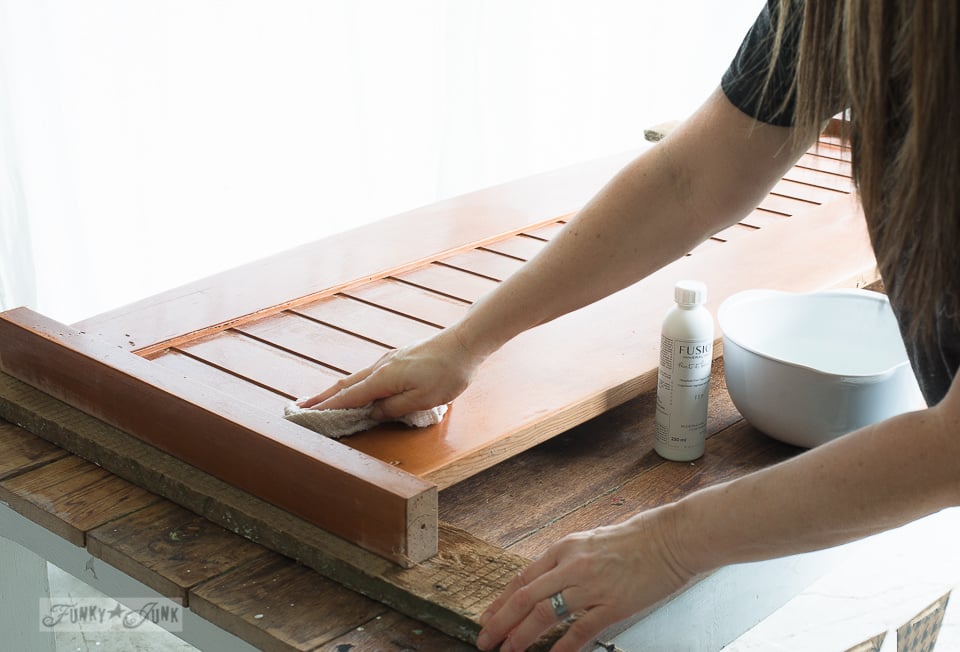
1. Clean your piece. I used Fusion Mineral Paint’s non-toxic TSP.
Cleaning any piece properly is just really important for any excellent paint adhesion, and this step definitely gives me peace of mind that I’ve done all I can.
I cleaned the dust and grit off with Fusion’s non-toxic TSP. It’s concentrated, so you mix it with water, wipe down your piece and allow it to dry. No rinsing required! I love that.
I also used the TSP after I sanded.
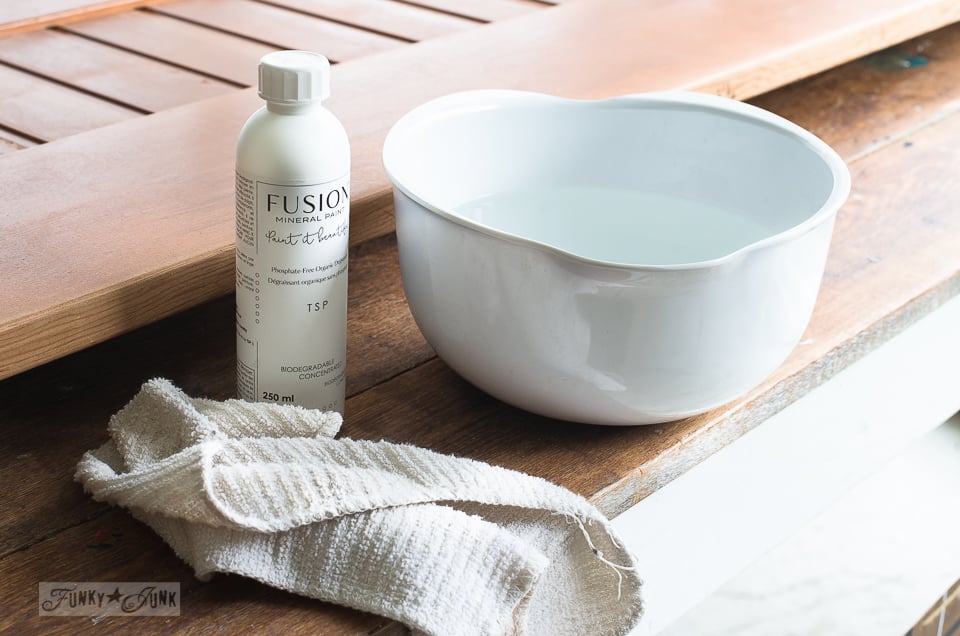
What I love most about this non-toxic TSP is that you can touch it! Such a nice perk vs. having to snap on gloves before using.
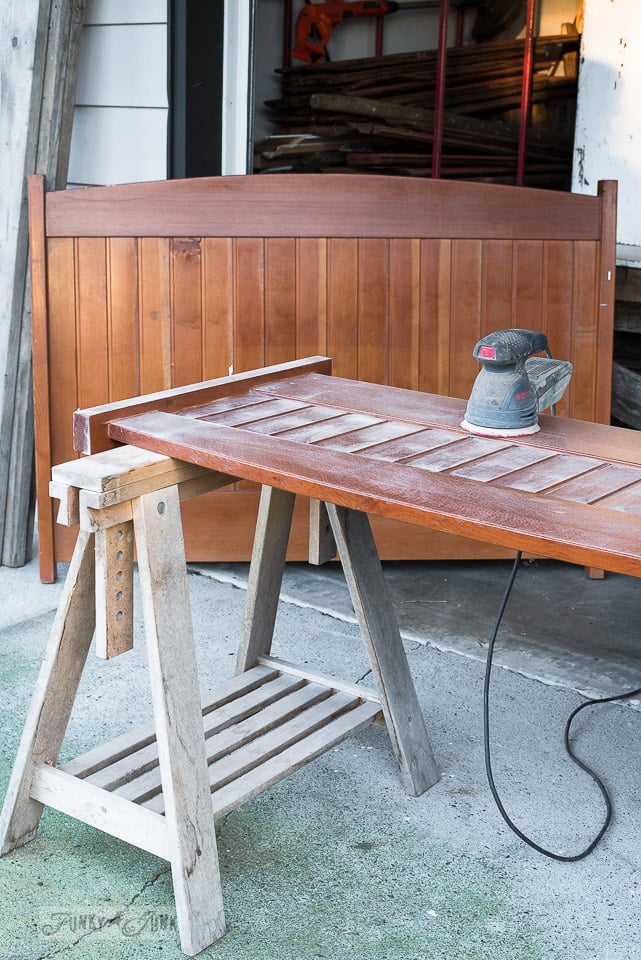
2. Lightly sand the original finish to give the surface some ‘tooth’ for the new paint to grab onto. Then remove dust with a tack cloth.
While I like woodsy pieces, this finish was too orangey for my desires. I visioned it painted black which I figured would suit the room it was going in.
I used a palm sander and the lightest grit sandpaper I had, then went over the surface just enough to dull it up a little.
I then used a tack cloth to remove as much dust as possible.

3. Using a synthetic brush, I brushed on Fusion’s Coal Black.
Isn’t that black stunning?!
So… I’m fussy about smooth finishes, especially on super smooth pieces like this one where brush strokes would really show up.
Here are a few of my best tips on how to achieve a brush stroke-free finish when painting furniture:
.
My best tips:
.
- Get the best brush you can afford, and take really good care of it.
.
.A brush should be soft to the touch with no hardness to the bristles which can leave visible brush strokes. Go for quality brushes every time and you’ll be rewarded with a better finish.
.
Using a brush cleaner (I use Fusion’s HERE) will also condition a brush if used regularly.
. - Try a 100% synthetic brush.
.
If you’re after a super smooth finish, try all synthetic. The softer the bristles feel, they are more likely to leave a smoother result.
. - Choose a brush shape that you like working with.
.
Some brushes are meant to get into nooks and crannies, while others are meant to spread on the paint in large areas.
.
I personally like flatter, wider, rectangle-shaped brushes if I wish to cover lots of flat area fast.
. - Don’t double-brush.
.
Some paints dry quickly, which means the open time to work with is short. If you brush over drying paint, you will create a texture and ‘drag’, which creates visible brush strokes.
.
So it’s important to get paint on the piece as quick as possible, smooth it out from end to end so you don’t see any visible starts and stops, then call it done.
. - Wet the brush prior to painting.
.
Try wetting the brush bristles, then dry very well, then load with paint. The wetness in the brush helps the paint to glide off the brush more smoothly.
. - Try a sponge brush if you desire a really super smooth finish.
.
Back in the day when I use to paint with melamine paint (it’s like liquid countertop, crazy hard to work with), I used the best quality foam brushes I could find. While they don’t hold a lot of paint, they do smooth out paint really nicely due to no brush bristles. I’d roll the paint on first, then glide a sponge brush over the surface.
. - Paint with a microfibre roller.
.
If you’re covering a large area, a microfibre roller will carry enough paint to get it on and allow for a brush-free finish. You may be left with a slight texture from the roller, so you can either leave it be or glide a brush across your surface to remove the texture.
. - Work in areas that are weather protected.
.
The better controlled your painting space is, the better your outcome will be. No wind, not too hot, not too cold… a comfortable, dust-free naturally-lit area is your best friend.
.
If you’re working in conditions where there is sun or wind involved, I suggest to work in small sections, however always working against a wet edge so your project blends in well from start to finish.
. - Practice is your best friend.
.
Your finish will be a direct result of your brush, the paint, the piece you work on, the room conditions, and the amount of hours you’ve put into practicing. While painting is easy, just like anything done right, it takes practice. Everything done well does.
.
I suggest to start with a small, affordable piece first, then work your way up. You’ll be more likely to paint with no holds barred if you know you won’t waste a small fortune if it doesn’t turn out. And if it doesn’t, that’s ok too! Sand the piece back smooth, and paint again. It’s only paint! 🙂
. - View Fusion on YouTube for how-to videosFusion has a TON of professional, high quality videos for nearly any painting technique. I encourage you to visit their YouTube channel HERE
.
And a specific video on how to avoid brush strokes is HERE

Didn’t they turn out gorgeous? It’s like these pieces were meant to be black. Especially for the room they were going in.
With headboard and footboard complete, it was time to get it into the room and play!
Oh, I was so excited. This find was just the ticket to get me motivated to work on this room to completion!
So here’s how the bed was without a headboard…
And how it is with!
I love the more finished and upscale look the room has now. I’ve never owned a footboard and I really love how it finishes the end of the bed off rather than seeing the blankets hanging over the edge. Especially how this bed is positioned with a head-on look.
The footboard isn’t attached to anything yet as I need an upgrade on the bed frame (which is broken anyway!) so that’s coming soon.
Now I want to make a footboard for MY bed out of the same barn wood as the headboard… hmmm… that would be a fun challenge.
(since I’m being asked… the bedding sources are: neutral from Ikea, Buffalo Plaid from Superstore, in BC Canada about a year ago)

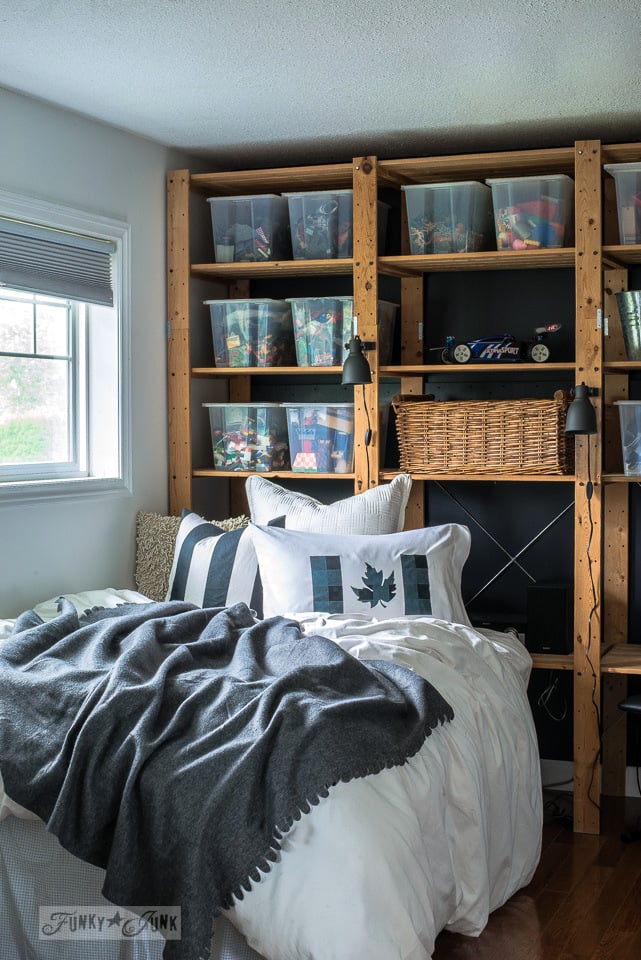
The headboard is actually meant to sit lower than shown here. Since I desired more height, it’s attached to the shelving behind the bed at the height desired. Easy fix!
The shelving is from the Ikea Gorm series you can read about HERE

It sure feels good to get this area looking finished!
And of course, 5 minutes after this pretty photo shoot, I was so inspired to keep going in the room, I ended up with…

… THIS.
But we’ll save this excitement for the next room update coming your way soon!
I just hope my sewing machine even works after all this…
Have any fav furniture painting tips of your own to share?
Read the rest of this series at:
It looks great Donna! I just love the way you have the Ikea shelf in the background ! It is such a great layering effect that can be used for storage and end tables! Great idea! I also love the addition of the buffalo check! It’s perfect!
Thanks Susan! The positioning of the shelving really is such a great space saver, I did the same method in my blogging office and adore it!
https://www.funkyjunkinteriors.net/2018/03/pallet-wood-office-desk-with-large-sign-and-rustic-benches.html
Really terrific result! Idea – -Have you thought about sliding paper/fabric into exposed end of the bins to mimic your tri color Buffalo coverlet? More appealing to visual of room. (Less colors to distract- yet sides of bins are within quick visual access to find stuff. Congrats on well done project!
Love your projects!
Hey Marti, neat idea!
I actually attempted to find different basket-type bins to replace the plastic however have come up empty handed so far.
Still uncertain on the fate of those bins… I think I need to get rid of some and store some where they are out of sight… but with limited room, it’s getting tricky!
This is absolutely lovely. I love the black!
Love how you positioned it against the shelving, and the lamps above the headboard. What a TOTAL success.
The sweet bench with the fur at the end of the bed is delightful, as well.
Amazing.
Thanks Brenda! The wall until behind the headboard does save a ton of physical and visual space! I see this area evolving but I think this was a decent ‘mature’ step. LOL
The headboard looks great Donna. And the color is perfect giving the bed a commanding presence!
Thanks Mary! I can see now why my room makeovers take so long to do… if you WAIT to find your gear, well… you wait! haha Glad this opportunity knocked.
Very nice Donna.
Thanks Nancy! Although I came across a woodsy antique headboard and footboard I am completely smitten with now… egads! If I get them (buyer is still considering selling) you may see a whole new look coming yet again! 😀
Really like what you do and how it comes out! The combo of old and modern is really fresh and exciting! Thanks for sharing your tips, tricks and outcomes!
It looks great! I like the idea of inserting fabric or paper within the bins to help disguised them a bit. Or maybe even a roll up fabric or bamboo shade on the shelf to cover the bins?
Where did you find the buffalo plaid comforter ?
Can’t wait to see what you are doing with the doorway etc and what’s next.
Dr
Hey DonnaRae! The buffalo plaid is a quilt cover that was found at Superstore in BC Canada last spring. I’m uncertain if they still carry it.
The rest of the room is really coming along! I’m excited! We ended up with a snowstorm which has paused the remainder of the moulding I needed so hopefully I can get going again soon before I lose interest again! haha
Thanks for your tips on the bins! I’m stumped…. I’d love to hide them completely out of sight but there’s a LOT…
Thanks so much for the painting tips Donna. I always struggle to get that super smooth finish. Seems I’m going to have to invest in some high-quality brushes instead of just grabbing those bulk packs. The bedroom looks gorgeous BTW
Thanks Michelle! High quality brushes come in packs too so don’t bypass that option! They do make all the difference in the world if you’re a ‘picky painter’ like me. haha
Love your new bed in black, it looks great. Throwing an idea out there regarding your bins – Fusion paint sticks to anything I think, so, what about painting the front of each bin in black and then stenciling (your fave!)a number or letter on each one. Just a thought.
Oh my gosh… I wouldn’t have thought of painting the bins! I’m going to consider that!
I’m honestly thinking of getting rid of some stuff then storing the bins in a closet (after I get rid of stuff in the closet… hahaha! it never ever ends!)
I’d love to see pretty baskets and displays up there instead! At some point…