
How to build your own barnwood window shutter
If you have a window that needs some extra love and don’t desire traditional window treatments, here’s how to build your own barn wood shutter!

This is a really great solution if you have a little window that needs some extra love and you don’t desire your traditional window treatments.
How to build your own barnwood window shutter
.
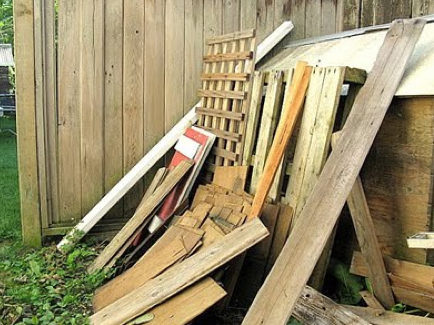
1. Trek off to your backyard wood pile.
Please tell me you have one of these. They are musts! I collect old fence boards, shake shingles etc. Just remember to remove the nails before storing it for safety’s sake. This, my friends, is called STOCK.

2. Select the lucky chosen dream boards.
These are old fencing boards that I got from a neighbor out of their own backyard wood pile.

TIP: This wood is notched with tongue and groove so they can scooch up nice and tight.

3. Mark the measurement you desire on your wood.
Measure your window from top to bottom including your moldings, and also figure out a good width.

4. Just cut it.

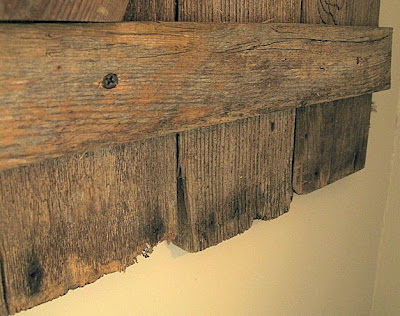
5. Attach your Z on top of your base.
a) Look for more wood to create your Z frame. Start with a small piece that runs across the top. Screw it in. I like how that cross piece has a stamped word. Incorporating oddities like that simply makes your little shutter all the more uniquely yours.

b) Under that first cross piece, lay out your next piece on an angle. Loosely position your bottom cross piece but don’t attach yet. Mark the angle for your angled piece and cut, upper and lower. Note how I figure out angles. No fancy whatevers here. Ruler on top, draw, done.

c) Attach the angle first, THEN your last piece so the fit is perfect.

6. Screw your cute little rustic shutter to the wall.
My cheat sheet method? I used really long screws, and when I screwed the shutter components together, I didn’t go all the way. So once I held the shutter against the wall, I simply continued and screwed them right into the wall. No extra screws to litter up my lovely wood with! Add hardware too if you have it. I just had a little hook on hand but you can bet I’ll be searching for more!
TIP: When I cut the wood to size, I ensured the cut pieces were on top so I could hold onto that natural wear right where you’ll see it. And now the fun part…
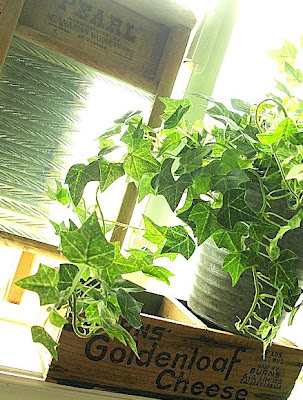
Decorate!

What was once a poor sad lonely little window at the far end of a room…

…. now wears loads of character and rustic charm.

UPDATE!
I found some old fabulous hardware!


Update! See more on the toilet paper crate in THIS post.
The toilet paper crate got dressed up too!
Gotta love progress, huh?
The barn wood shutter is perfect for this bathroom and chimes in well with the old crate toilet paper holder for sure!
Have you done anything out of the norm for a window treatment?
OOOOOH, I LOVE THAT. THANKS FOR THE TUTORIAL.
From sad little window, to fabulous enough to be a magazine cover window! Love the hook, it’s the cherry on the sunday!!
That looks great! I like the accessorizing in the window, too.
I love old barnwood and, boy, did you put it to good use. What a great idea. I have a junk pile like that as well, which includes windows and doors as well. Thanks for following my blog and I am definitely doing the same.
You should get your artist brushes out again! I can’t wait to be inspired by you in the future!
STUNNING!!!!! Still catching my breath,thanks! Chrissy
Now that is adorable!
Oooooo…I want to come over and play in your wood pile! Our neighbors down the street did a new fence and were throwing out all the old wood planks. My husband said NO. WAY. is that stuff coming home 🙁
p.s. Your window doesn’t look sad anymore. Downright perky, I’d say.
GORGEOUS!
OH I love, love, love it… I dream about one of those saws… and yes it is on my Christmas list… I want to make shutters for the front of my house… thanks for the tutorial… I love how you do the angles… that was an obstacle I was fretting about… great job…
I LOVE your blog…. seriously want to copy every single project! I can’t believe you don’t have 37433465 followers:)!!
~Whitney
Aaaaagghhhhh, I am SO loving it!!!
I’m new to your blog today and can’t wait to poke around & see what other great ideas you have! Hugs, Leslie
I love that shutter. It turned out amazing and I love where you put it. Thanks for sharing how to make one. Time to get out the saw.
Love it!
*hugs*deb
Simply GORGEOUS!!! Thanks for the tutorial!! I have a little nondescript window that could use a little freshening. Stop by my blog…I’m having a GIVEAWAY!
Toni
well, isnt’ that just charming?! 😉
This is very cute…Thanks for sharing.
ooo-I love that–thanks for sharing!
adorable! I have a shed full of old barn wood..it’s bursting at the seams. Thanks for a great idea.
I love the old washboards you added to the vignette…it totally rocks!
Simply awesome. Can I come and play in your wood stash?
MAn – you are so creative! I love it. Thanks!~
This is fabulous! Thanks for the great tutorial.
I have to share something funny: when I first read the title of the post, I read it wrong and was expecting a tutorial about building a barnwood SHELTER. Sounded intriguing too, in an extreme wilderness survival way, but the shutter is cuter 🙂
looks great!!
SMiles!
Michelle
I love it! But best of all I now have a reason for that pile of wood in the back yard.
this is beautiful! thanks for the tutorial
Oh I love this idea! Great tutorial too. Just found your blog today and I am really enjoying all your fab ideas!
K
You need to need write a book sistah! Martha and Rachal… a new girl is in town and she can work power tools, and create as beautiful a home as the two of you!!!
Bravo!!
What a creative window treatment! I use my husbands hand-held circular saw and was pretty proud of myself until I saw your “big daddy” saw! Great job! ~Ashley
i love it, as always do with your stuff!
Adoration. Total. Complete. Adoration.
I have already sent a link of this post to my carpenter….because I suck and cannot do it myself.
I love this,, and I just happen to have a pile of wood (thanks to my dad) that i’ve been wanting to do something with. I’m always anxious to see what you’re gonna do next.
Oh Man that is AWESOME…..I love what you did and how it dressed that window up. I just love your blog.
Have a wonderful day.
Gail
This is just charming. So rugged, yet so beautiful. Thanks for sharing the how to.
Wow! I am in awe of your creativity and talent! love it!
Wow! That is just too cool! I love using vintage pieces and recycled stuff to create new treasures. My friend Holly at 504 Main sent me over. Looks like I have a new favorite inspiration point!
Best regards, Jenn @ rookno17.blogspot.com
Wow. That made such an impact on that window. That is amazing. Your blog is really great!
Hmmm… I stopped by tonight to look at some of your past posts that I’ve missed. I was so suprised to see that you also made these shutters!
When we reconfigured our fence four yeas ago I saved the wood. I hung a set of shutters in my husbands office… and also made some picture frames. I had wanted to make some shelves but Hubby tossed out the old fence pieces 🙁
I made two of these this past weekend with old barn wood (from a our barn that has finally collapsed)and they turned out great! Just wanted to thank you for the great post and there is a picture at my blog (oldbatt.blogspot.com) thanks again, Lisa
this so,so beautiful! thanks for the tutorial.
At an addiction center you can expect treatment with a an addiction medicine specialist, drug and alcohol therapist and group counseling based on a 12 step treatment model.
that looks nice i like your blog
Different approach for making Plantation shutters.
It look complex but isn’t it….steps make it easy to follow..fantastic.
window shutters clayton, ca
Better quality of shutter information is there on this page and I appreciate the efforts of the writer for providing such information to us
Fantastic idea …. as always …. you are an inspiration, TRULY!!!
Thanks – this is perfect for the little window in my laundry room!
I found your post on these shutters a couple of years ago. It inspired me to try my own back then. I painted mine funky colors and I loved the way they looked! There was one problem. I made them from some old fence wood I picked up on the side of the road. I washed them with bleach beforehand, but they still had a musty smell that I just could not live with. I was so disappointed, but on the bright side, I used the same wood to create some art for my front porch. Since the wood is now outside I no longer notice the odor. I love the way it turned out as well, so it all good in the end. Thanks for your inspiration!
I am always intrigued by your funky creations. I am going to add that window to my bedroom..I have some barnwood planks to make a shutter too…thanks for the directions on how to piece that moulding together..I honestly think I can handle this project and looking forward to it. I’ll send a pix when completed.. love your projects!
I love these.
I am wondering if there is a way to cut the shutter in half to allow partial privacy and part of the light to come into the room. ?????
Just a thought.
Love that idea Cheryl! I haven’t tried, although there’s always a way for anything. Thanks for a new challenge idea! 🙂
Just the inspiration I needed! And yes, I have a wood pile. Time to make the basement window a little more interesting.
Was wondering if you have any advice how to incorporate a mirror or 2 pieces of mirror on the inside of the shutters as my sink has to be located right under my window and he prefers to see his face while shaving – LOL! Was thinking of making it double so mirror(s) could be used by opening up the 2nd layer of shutter. Would love to hear your thoughts. Thanks!
Hi Loretta! I’m having a tough time visualizing this. Could you perhaps post it to my Facebook page requesting suggestions from others? From there I can chime in if I think of anything. Thanks! 🙂
https://www.facebook.com/FunkyJunkInteriors/