
Faux farmhouse clock with sign
Have you noticed the reclaimed wood farmhouse clock craze yet? I’ve been watching over it for awhile now, and knew I wanted to make one. Somehow. Someday.
But.. it didn’t happen. Until a farmhouse book landed on my lap…
This post contains some Amazon affiliate links in which I earn a small percentage from qualifying purchases through these links, at no extra cost to you. Thank-you for helping to support my blog!

About this farmhouse book

Liz Fourez is a blogging buddy of mine, and if you have never visited her blog, Love Grows Wild, it’s time that you do… if you adore charming, realistic, affordable DIY farmhouse decor that is.
In my eyes, it was a given that this book would… SHOULD happen. You’ll know why after your blog visit.
So when Liz asked if I would review her new book, A Touch of Farmhouse Charm (affiliate link), I couldn’t get it in my hands fast enough! I knew it would be wonderful.
You can find it on Amazon HERE (affiliate link) with a cool preview option!

What’s inside this book
.
And I was right.
But I want to say a little more than the book is just good.
This is one of the VERY BEST DIY PROJECT BOOKS I’ve ever laid my hands on.
I LOVE how it’s set up. You have your beautiful photos of the completed project, then the full how-to right beside it. It is a fantastic resource book for rustically beautiful simple things you will want to make for your home.
And the projects are SIMPLE. Some don’t even require tools. I could safely say, every one of them would suit my own rustic home, fitting right in.
Now… what to make…
As I was leafing through the book, my eyes spotted the first kick in the right direction.

Ah. Yes. There you are, you farmhouse clock you…
But what completely sold me?

… was this photo. See the cage around that little clock on the wall?
THAT. That was the enticement I was after.
If you are fortunate enough to have this stunning book in your own hands one day, I want to suggest one thing.
Look through the pages, but STUDY the non project staging as well. They will have you creating just as much as the projects themselves.
And then it all began to fall into place.

Hello there wire flower basket, you are my chosen wire cage! I cut the scrolls off, then it was time to crank this industrial faux farmhouse clock out!
Here’s what I did:
Faux Farmhouse clock and sign
Supplies I used:
.
reclaimed wood – I used fence planks
random rusty junk
house numbers
wonky star stencil – I used Christmas Graphics HERE
paint of choice – I used Fusion Mineral Paint’s Coal Black & Casement (website link)
stencil brush
Farmhouse – small stencil
cordless drill
jigsaw
palm sander
cordless drill
pencil, string, safety pin
wire cage thing – flower basket?


How to draw a perfect custom-sized circle
.
1. Draw a perfect circle one of two ways:
a) Lay a piece of large packing paper over top of a round shape, and rub a pencil along the edges to create your impression. Cut the template, and fold in half, then quarter, to find the centre.
b) Insert a screw into the middle of lined up planks of wood. Attach a safety pin to the screw. Tie string to the pin and onto a pencil. Lengthen the string to the desired size for your circle, then draw onto the wood.
Note: I first planned to have this clock become the top of a small side table, however changed my mind mid stream. So some things you see in the pictures won’t be needed for a wall clock.

Shaping the wood with a jigsaw
.
2. Cut along each circle drawing, using a jigsaw.

3. Sand the edges of each board before mounting together, if you wish for slightly rounded edges, or to clean between the boards.

Add supports behind the circle
.
4. Drive yourself crazy and do this.
So, if this was going on my table top, mounting the boards together like this would have worked well! You can still do this if you want. But I think you could get by with 4 or 5 heavier weight support boards screwed into the back.
I used cedar strips. Each one was predrilled with pilot holes, then short screws were inserted.

Finishing tips
.
5. Re-trim any edges with a jigsaw if needed, then follow with sanding all the edges and surface.

Adding clock details
.
6. Add house numbers, the cage, hinges, rusty junk, whatever you wish to decorate your farmhouse clock!
Since I didn’t have a clock kit on hand, I decided to just turn mine into a faux farmhouse clock to get the look! But you most certainly could outfit a real clock kit with this design if desired.
Start dry fitting all kinds of neat junky hinges or hooks or anything as the clock components. Then attach with screws.


Stencils used: Christmas Graphics / Bingo – Star Large
7. After all the junk components were screwed into place, I added some stars in between the 3, 6, 9, and 12.
I used ‘wonky stars’ (not drawn perfectly) from Christmas Graphics HERE.
Rotating black and white, and tilting the stencil in different directions and backwards gave the stars a more random appearance.
The 3 was created from Bingo – Star (large) HERE.

8. For the clock arms, I used a hook hanging straight down, and a vintage styled bottle opener.
All the junk was mounted with screws.
Now… let’s make a cool farmhouse sign to further enhance that farmhouse decorating vibe!
How to make a Farmhouse Sign

This rustic Farmhouse sign is so easy to make, thanks to an easy-to-use Farmhouse stencil!

How-to:
.
1. A plank of wood was coated out in black. One coat did the trick!
Paint used – Fusion Mineral Paint’s Coal Black (website link)

View Farmhouse – small stencil HERE
About this stencil
.
This Farmhouse – small stencil is a bold, clean and timeless stencil sign design, offered in both small and large. It comes with registration marks so it’s effortless to position!

2. Center the farmhouse stencil on top of the painted plank, and use masking tape to secure.
Covering the registration marks is also a good idea.
3. Stencil the words with Fusion Mineral Paint’s Casement.
How to stencil:
.
- Load your stencil brush with paint.
- Off-load most paint onto a rag until your brush feels dry.
- Tap or swirl paint through the stencil for desired effect.
Learn more tips about how to stencil HERE
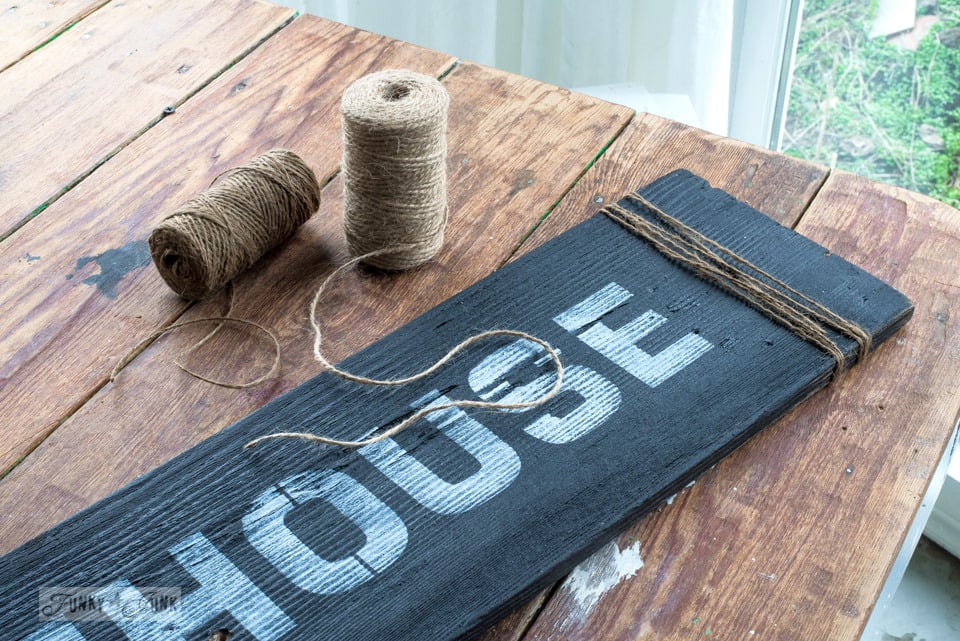
3. Two tones of twine were wrapped around both ends of the sign for some rustic detailing.
Let’s now hang this farmhouse sign up with that salvaged wood clock!

The finished faux farmhouse clock with sign!
.
Welcome to MY farmhouse!
Regardless of what time it is…
Cute outcome, isn’t it?!
Think you’ll whip up a rustic farmhouse clock of your own?
.
Other related projects you may enjoy:


Interchangeable Farmhouse kitchen signs
Visit many more rustic farmhouse vibe projects HERE
Absolutely love the clock, what a fun project!
Once again, awesome and timely information. I always look forward to having my morning coffee while,reading your blog. I ordered the book from Amazon. Hey, they should cut you a commission check ! ?
Have the best day ever,
Christine Barone
Haha! Just helping a friend, Christine! I do receive a small commission through the Amazon affiliate link if it’s used, so there is that. Thank you if you used it!
Thank you for your kind words and continued visits! So appreciated!
This is pure fun! Just love the clock idea.
I love this idea, D!! You totally need to make this functional. Get a clock get. Do it!! 😉
xo Michael
Haha, thanks! And yeah… I was wishing I had a kit when I was making it, but made it happen anyway. There could be a part 2 in this clock’s future! Thanks for the added push!
I am so getting this book. Just the kind of info I need for a beginner. Thanks for sharing. I love your clock! Where did you get the large metal numbers?
Hey Maggie! They are just random house numbers I found at the thrift store. I grab anything I can find when visiting! 🙂
The book has already turned out to be a best seller! I KNOW you will adore it. I have NEVER run into a book where I have actually loved every single project. Outstanding! Now I never have to write one myself… it’s already been done! haha
P.S. ENJOY!
No, never stop writing, I love reading everything you write about. If you were to write a book, I would purchase for sure! Thanks for info. I will keep an eye out for numbers in my flea market travels!
Donna,
Love your clock!
Great job Donna. I see you use Fusion mineral paint for stencills. I won some chalk paint, will that work just as well??? Enjoy your site so much.??
Hey Rhonda, thank you!
I have never used chalk paint before, so I can’t comment from experience, but I know many that do and stencil successfully. You may have to test out to ensure certain colours are opaque enough, and of course, a top coat of wax or ? is generally added.
I say go for it! I’d love to hear about your experience!
Wow, what a fablous job you did, I love it
you are sooo creative..to notice that clock in the photo! love this one like I love the heart you made!
I purchased this gorgeous book awhile back and completely agree with you…I still think you need to do a book 😉
Donna, I love this clock of yours! The different hardware, shapes and stencils make it unique and beautiful. I also like how you wrapped twine around the ends of the sign, very cool!
This clock is super cool. Have you thought of a clock face stencil?
Hi Carlene, yes, about 2 years ago. Not sure why it never happened! Perhaps one day. 🙂
I Love the description and the style of the farmhouse design!!The instructions are simple to make!
How do I order this book?
Love you no-time clock! Always think your projects are very cool.
I really would like this clock. I have a log house and am redoing the kitchen.