Upcycle an old TV tray from the thrift store by stenciling on a classic and beautiful penny tile design! With easy-to-use stencil kit of patterns and borders.
I personally rate a good day shopping at the thrift store if I land a solid wood TV tray!
TV trays are cheap to come by, are incredibly handy and are so fun and easy to transform! Where else can you take chances on a perfectly flat surface with any kind of design thought in mind?
Other TV tray makeovers
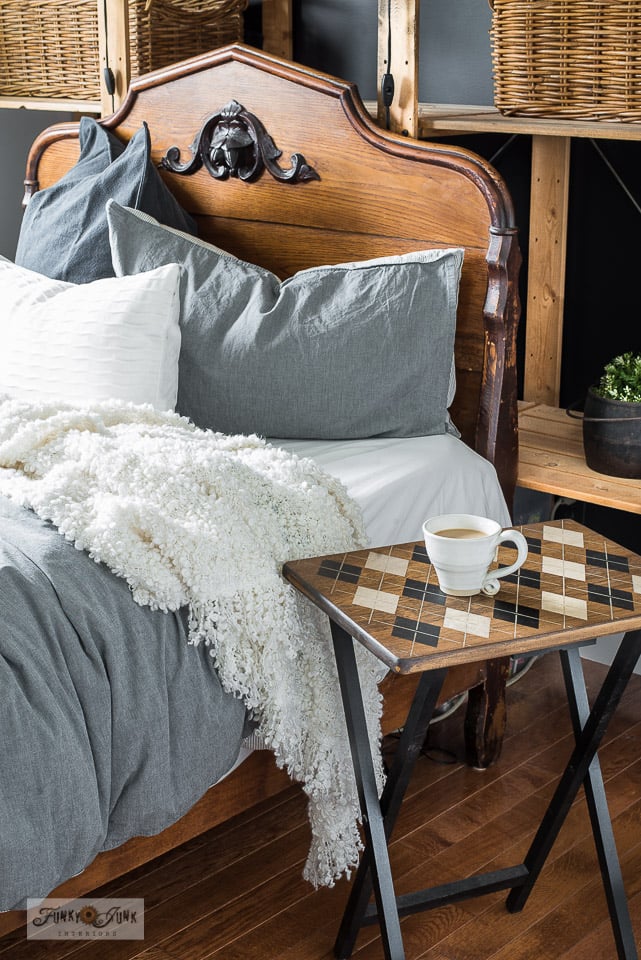
Not being a stranger to TV tray makeovers, here’s a couple of my favs:
Argyle pattern TV tray makeover
Buffalo Checked Fresh Coffee TV tray
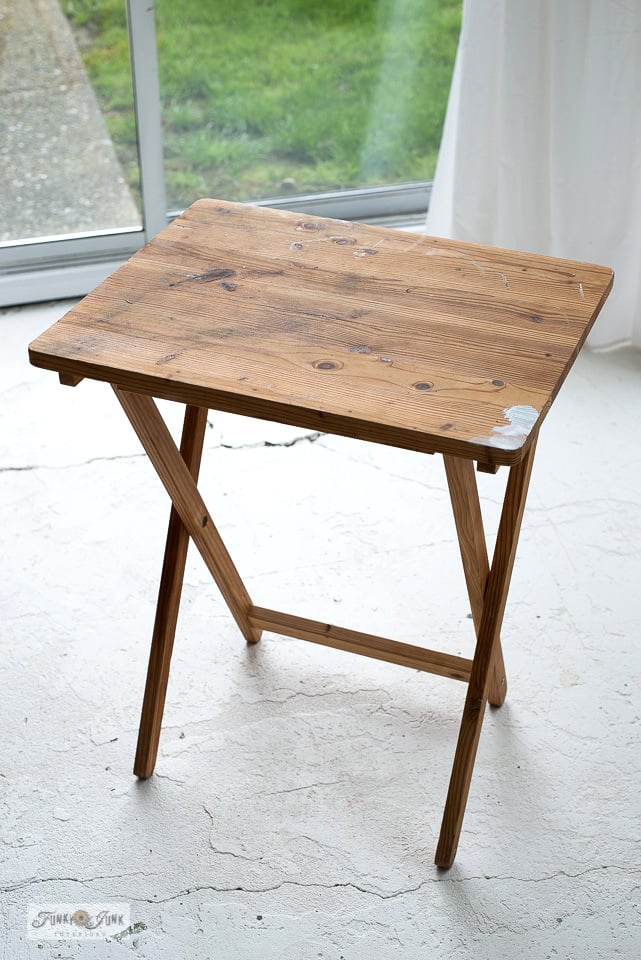
I mean, this TV tray can’t get worse than this, right?!
So when I landed this solid wood tray that’s seen much better days, I scooped it right up and had it sitting in my stash until a new brainstorm hit.
And today was that day. I’ve been enjoying morning coffees in my photo studio lately and using a similar TV tray as-is.
Not good enough! It’s time to make my morning rituals much more pretty and enjoyable… with a fresh new look!
Since I adore designing stencil patterns for Funky Junk’s Old Sign Stencils, I have wanted to add a classic retro Penny Tile Pattern stencil to the mix for some time now… and this seemed like a good time to do it.
Why Penny Tile?
Penny round tiles (also known as penny rounds) are traditionally small porcelain round tiles the size of actual pennies. They’re typically white tiles set in a medium toned grout, with black tile designs and borders added in a tasteful way that resembles mosaics.
Different combinations of penny tiles are traditionally used for a shower surround, or to tile a bathroom floor. But today, that look has well expanded. If you do a google search, you’ll find penny tiles with words, styled like floor mats, and so much more. They have made a huge come-back.
And can be as neutral as I’m sharing today, all the way to very colorful designs. The best part is, you get to choose!
I’ve always found black and white penny tile designs so striking and timeless. And very old school. According to this article, they date back to the early 1900’s.
The fact that these beautiful tiles date way back yet are still such a popular floor tile choice today tells me this look is here to stay. And styles that never tend to date make the best choice for a vintage lover like me.
So imagine placing your piping hot cup of fresh brew on a beautiful and decadent penny tiled tray top… without the price or fuss of tile installation. Stenciling to get the look sounded like a great plan!
And the final outcome? Oh my gosh. Talk about a fresh look! And it was SO easy to do! But it does take a little planning to get the design just right, so I’ll share how to do all that too!
Here’s how…
This post contains some affiliate links in which I earn a small percentage from qualifying purchases through these links, at no extra cost to you. Thank-you for helping to support my blog!
DIY stenciled penny tile TV tray

Preparing the TV tray for paint
Since the top of the TV tray was so stained, it was the perfect candidate to paint the top. So I felt no remorse for covering up the woodgrain this round!
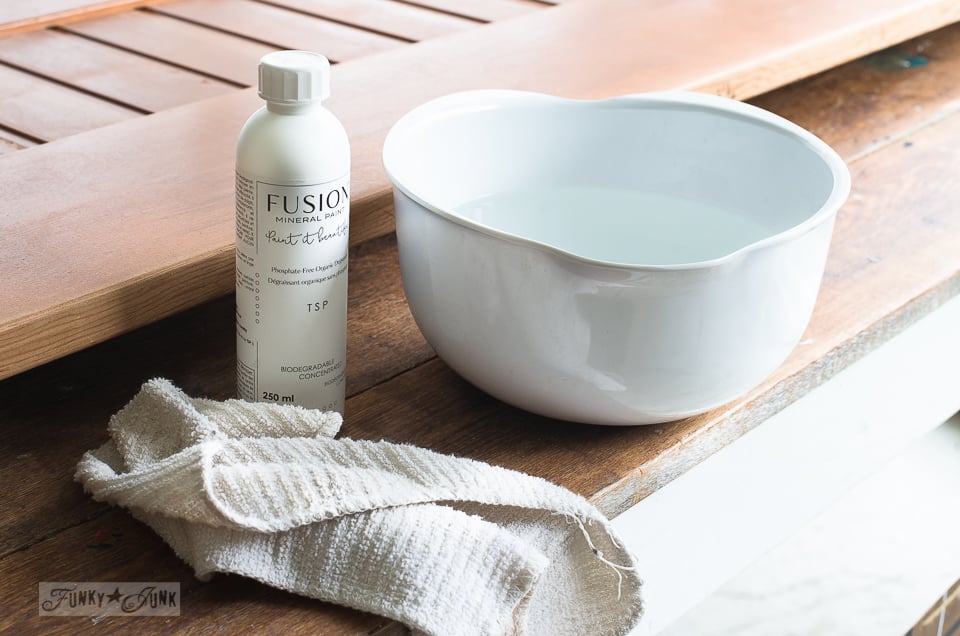
The TV tray was first cleaned with Fusion Mineral Paint’s phosphate-free TSP (safe to use!).
Once dry, the top was sanded down to bare clean wood using a Bosch variable speed orbital sander.
I started with a mid-grit sandpaper, and worked my way down to a finer grit to create a clean, smooth finish.

Above: Homestead House Milk Paint in Grey Silk
Painting the top with Milk Paint
With the wood clean and sanded, it looked so much better already! But still stained. Paint would fix that!
Since the TV tray was down to bare wood, I grabbed a bag of milk paint for the first coat.
About Milk Paint
Milk Paint has superior binding properties when painting bare wood especially, as the paint sinks into the wood pores, rather than just sitting on top.
It’s incredibly durable for both indoors or out, and being that Milk Paint doesn’t contain any resin, you never get brush strokes. EVER. You can’t even make any if you try.

Any Fusion and Homestead House products shared in this post will give you 10% off!
New to Milk Paint? I highly recommend THIS FAB STARTER KIT!

Creating the tile grout with paint
For the tile base which will mimic tile grout, the TV tray was painted with Homestead House’s Milk Paint in Grey Silk. It’s a lovely warm grey tone with a touch of taupe which I loved.
I was going for a tone-on-one look, however other grout color options such as black grout, white grout or even colors would really change this look up! It all depends how much you’d like the grout lines to show.
How to mix Milk Paint
- Pour the powder into a clean container.
- Add nearly an equal amount of water.
- Mix well.
- Allow to sit for a couple of minutes.
- Give it one last stir, then paint.
- Once dry, lightly sand with very fine grit sandpaper and give it another coat.
- Sand again, then remove all dust with a tack cloth.
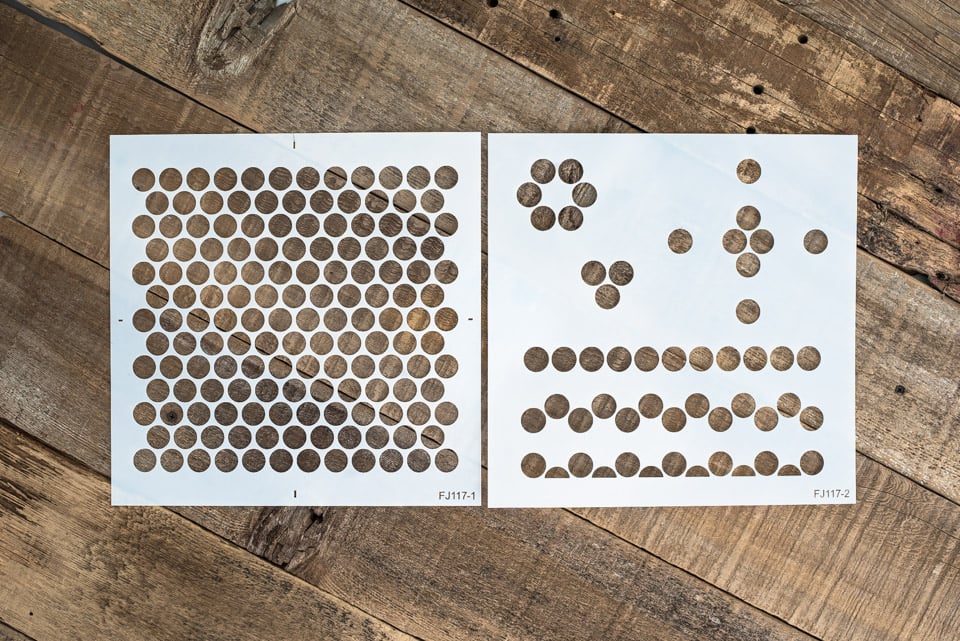
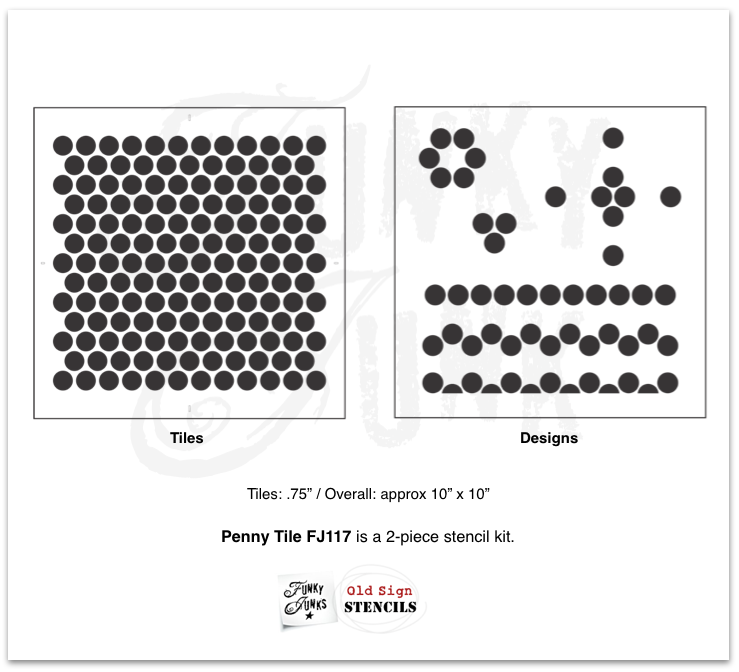
View Penny Tile stencil kit from HERE
Where to find Penny Tile Stencils
The Penny Tile stencil kit comes with two stencils. One for the tile, and the other to easily create designs with contrasting tiles.
Here’s how it works…

Shown above: Fusion Mineral Paint’s Casement
Painting Penny Tiles
Stenciling with Penny Tiles takes a little thought before you start as it’s just like tiling.
1. Decide on the type of design you wish to paint on your tiles before you begin.
The tile can be stenciled by turning the stencil horizontal or vertical. The designs fit and look differently depending which you choose.
Just ensure that if you wish to center a design, that your choices will do that.
2. Center, then masking tape the Penny Tile stencil in the middle of your project.
3. Stencil the tiles in a contrasting color to your grout so the tiles show up. I like the tones subtle, however you can also go for more contrast too if desired.
Keep in mind where you wish the tiles to stop so you don’t stencil too close to the edge of your project.
For the tiles, I chose Fusion Mineral Paint’s Casement for a pure bright white.
How to stencil:
Stenciling itself is very easy! However the key to crisp images is to ensure the stencil brush feels dry before you start to stencil.
- load stencil brush with paint
- remove most paint until brush feels dry
- tap or swirl brush through stencil to achieve desired effect
Learn everything about stenciling from THIS POST.
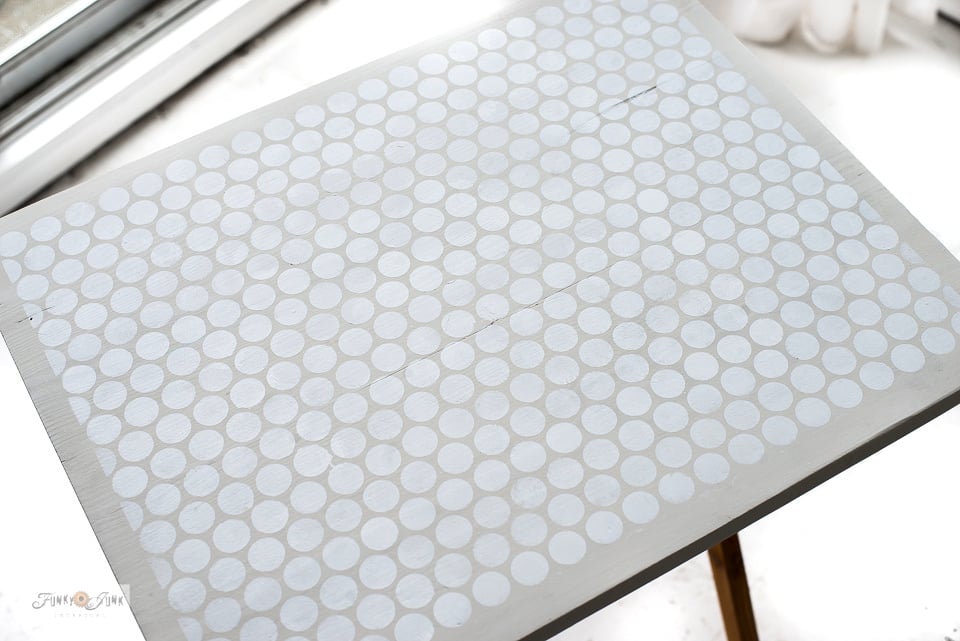
Above: The left and right sides were straightened with a border. (included)
4. To continue the Penny Tile pattern, reposition the stencil until like minded pattern overlaps along the edges, tape down, then continue stenciling until your project surface is completely covered.
5. To square off the 2 jagged tile edges, use one of the borders with the half tiles on the Designs stencil, which will create a perfectly straight edge.
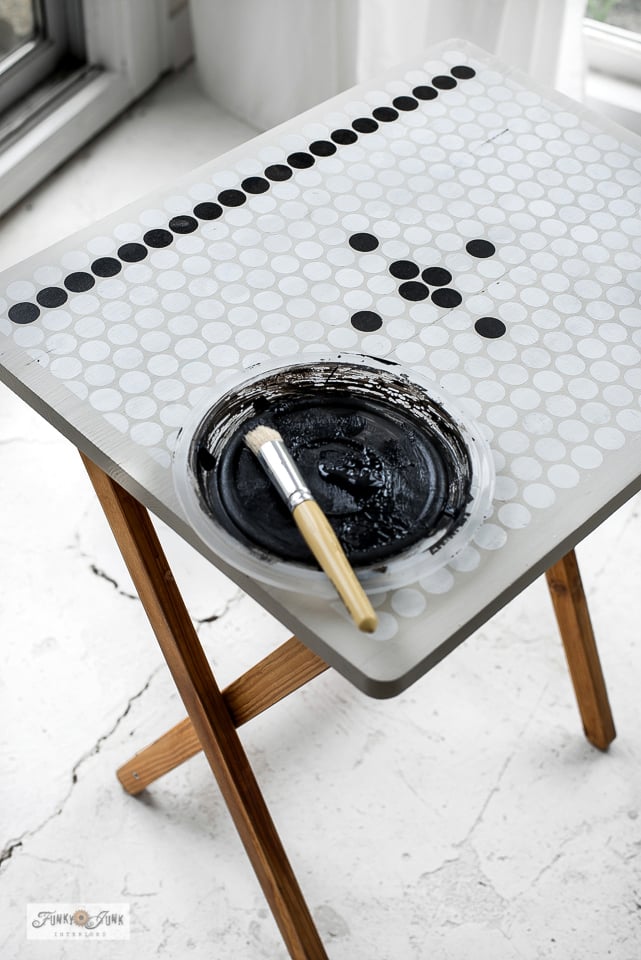
Above: Contrasting tiles were stenciled in Fusion Mineral Paint’s Coal Black
Stenciling black tile designs
Here’s the fun part! Now it’s time to design your penny tile in a contrasting colour. I chose Fusion Mineral Paint’s Coal Black.
- With a pencil, mark the tiles you wish to stencil in black.
- Position the design stencil over top of the white tiles.
- Stencil the designs in black.
It works so slick! You can get even more creative and add more tones to your tiles if you wish! The design options are absolutely limitless.
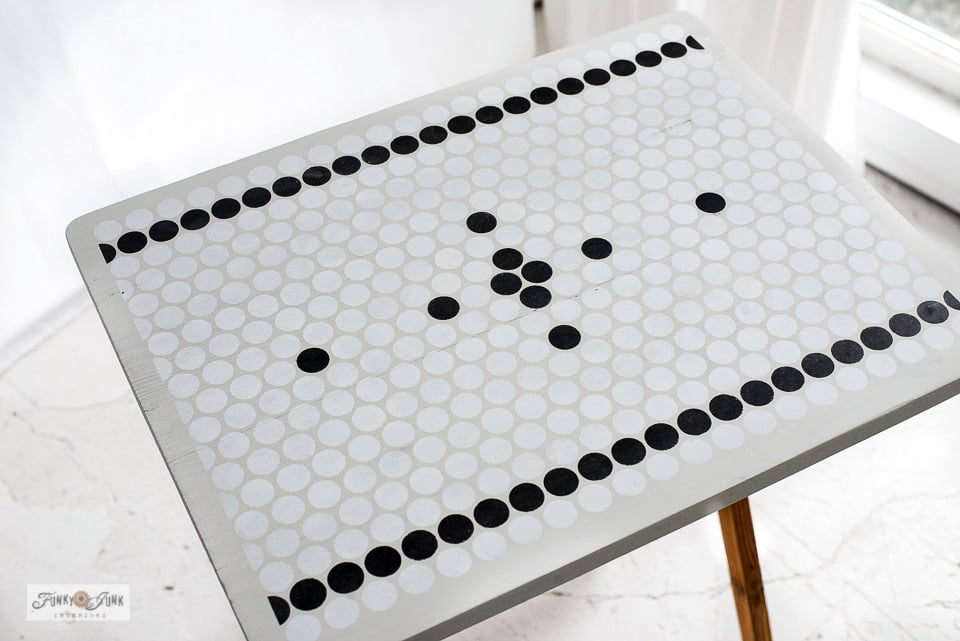
I chose a larger middle design, along with a couple of added dots, and straight borders along on the top and bottom of the tray.
For this TV tray makeover, I felt this was the perfect amount!
So let’s protect the top next.
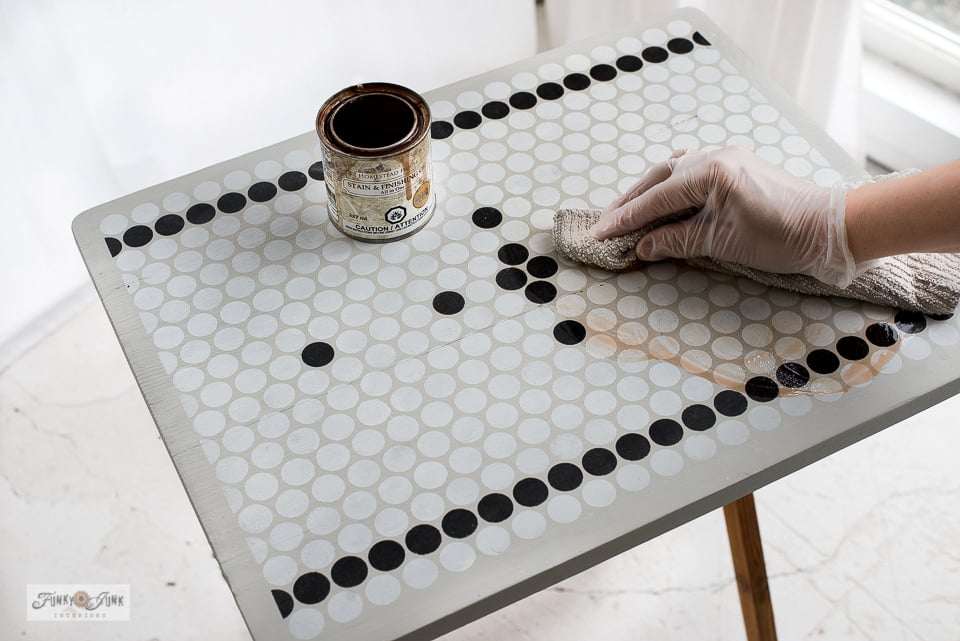
Above: Homestead House Stain and Finishing Oil in Natural HERE
Protecting the top of the TV tray
One of my very favorite products is Fusion’s / Homestead House’s Stain and Finishing Oil.
This stain has a built in top coat which is floor quality, so I already know this power stain will protect the top of this TV tray to perfection! I recommend ALL the tones which I also frequently mix and match to achieve even more colors.
But my very favorite thing about this stain is the fact that it doesn’t smell like most other stains. I don’t mind staining inside my home with this, but won’t with others.
HERE’S a few staining projects I’ve used this wonderful product on.
How to apply the stain
- Give the stain a slow stir to mix. Do not shake or it will create bubbles.
- Pour some stain onto your surface.
- Brush or wipe it on with a cloth.
- Allow to sit for a couple of minutes.
- Wipe off the excess.
- Allow to dry overnight.
- Lightly sand, then give the top another coat of stain if you wish for more protection or to achieve a glossy finish. I stayed with 1 coat.
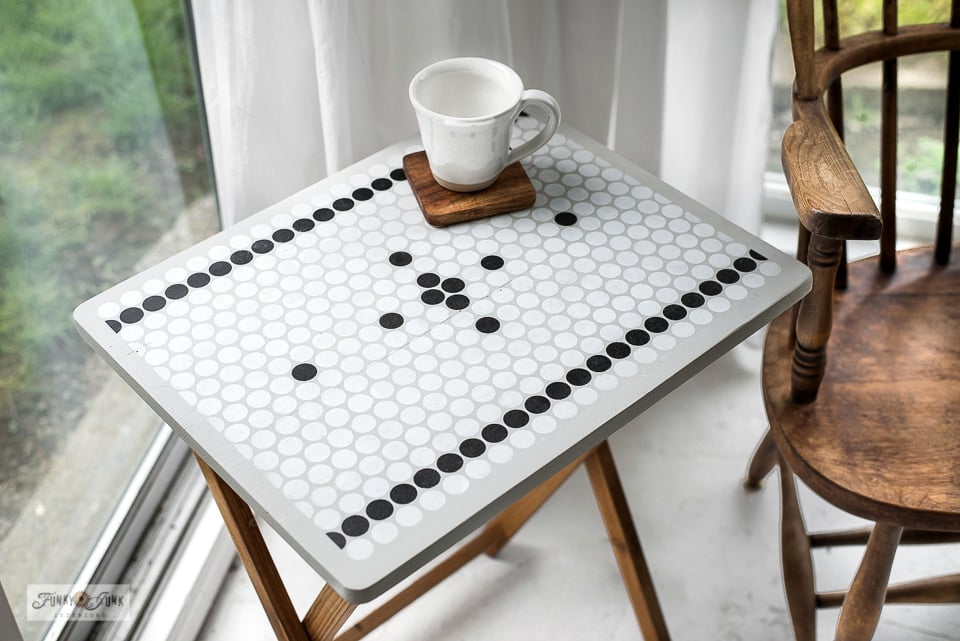
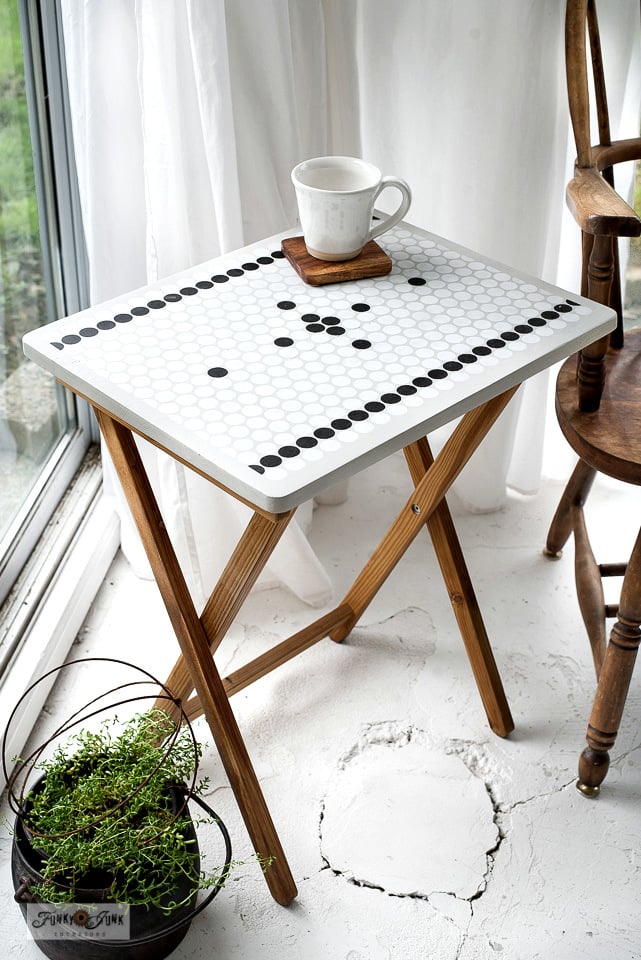
The finished TV tray
And here’s my new and improved TV tray! Isn’t the outcome absolutely gorgeous?!
My plan had been to paint the legs of the TV tray in black which would look equally beautiful. However after seeing how the wood tone bounced against the paint, I thought it was beautiful as-is!
The Penny Tile design fits so nicely on a TV tray top, but what else could you dress up with this stencil?
Other places to stencil Penny Tiles
- Fireplace surround
- Serving trays
- Beverage coasters
- Furniture tops
- Dresser drawer fronts
- Bench tops
- Painted countertops
- Kitchen or laundry room backsplash
- Paint a floor
- Stencil a custom door mat
Video – how to stencil a pattern and mix milk paint
.
Click above to watch a short video on how to stencil with a pattern, as well as mixing milk paint!
Before…
And the glorious after!
NOW it’s coffee time… in fine classic Penny Tile style, no less!
What could you cover in a pretty Penny Tile stenciled design? How would you style yours?
Other easy stenciled makeovers
More TV tray makeovers
Visit other TV Tray Makeovers HERE

More stenciled pattern makeovers
Dresser makeover to mimic fabric patterns
Check out other pattern stencil projects HERE
Well, this is going to be sooooooo much easier than doing the real thing. We tried doing penny tiles in our small kitchenette and I gave up probably a third of the way. Thank goodness I started in the middle and worked my way out so I could cheat and nake a border with big square tiles 😀 The most labor-intensive tiling I’ve ever done in my life.
Love this and especially love the argyle one! Just love your style!
I really like the penny tile stencil! Great idea Donna!
I’ve gotten the wood TV trays at yard sales for $2 each so shop around to save money.
That’s a great deal! And I agree, they are everywhere!
❤️❤️❤️
SIMPLY GOGEOUS! FABULOUS JOB!!
So cute! And I just donated one of these tables a few months ago!
Love it