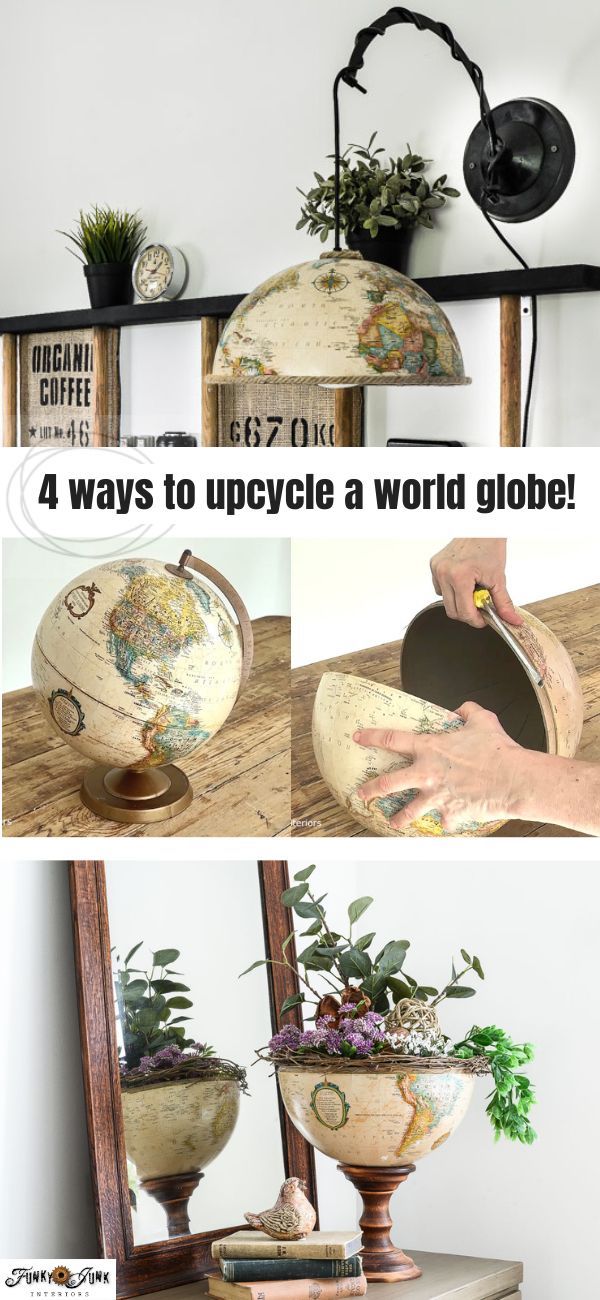
Upcycle a cardboard world globe into a unique and useful upcycled globe light, cloche, pedestal bowl and paper towel stand, to add charm and creativity to any space!

As a Fusion and Amazon Influencer, this post contains affiliate links in which I earn a small percentage from qualifying purchases at no extra cost to you. If you shop Fusion Mineral Paint products through this post, you will get 10% off. Thank-you for helping to support my blog!
I’ve always admired the look of upcycled globe projects! There’s just something about the map graphics that make me dream of grand worldly travel. Or the study geography vibe it gives.
So when I was recently challenged to upcycle an old world globe, I was all over it for the blog and saved these ideas especially for this event!

Today I’m joining a few of my creative friends where we share a brand new thrift store flip! So here’s my project, then below are the rest!
While this isn’t a new DIY project to the world, it is a first for me. However, I couldn’t stop at just one idea… so I kept going! So you’re about to get extra mileage from your visit this round, because I made 4 super cool projects with it!
Ready to see the quirky ideas I made with an upcycled globe? Cool! Let’s start with preparing it first, then onto each individual upcycled globe project! Here’s what I did…
DIY Upcycled Globe Light, Cloche, Pedestal Bowl and Paper Towel Stand
Supplies I used:
Thin black chain with hook on end
Dimmable light bulb that doesn’t get hot
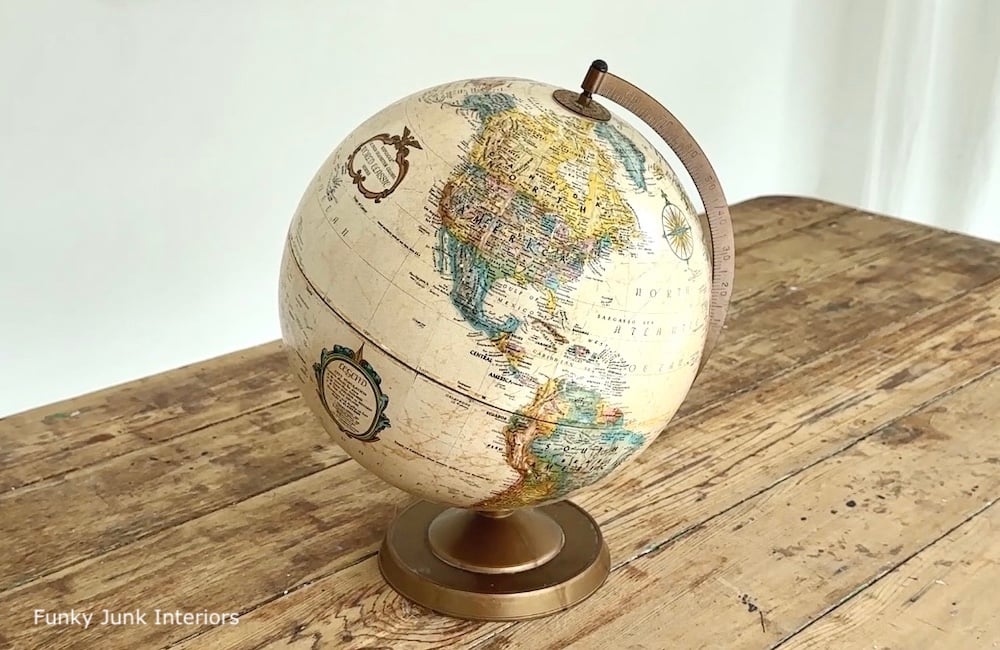
Selecting the right globe.
1. Select a cardboard globe with colours that will compliment your home.
I loved this world globe with the ivory backdrop and somewhat pastel shaded continents. You can easily find cardboard globes in thrift stores, however I did land mine on Facebook Marketplace in great shape and for only $10!
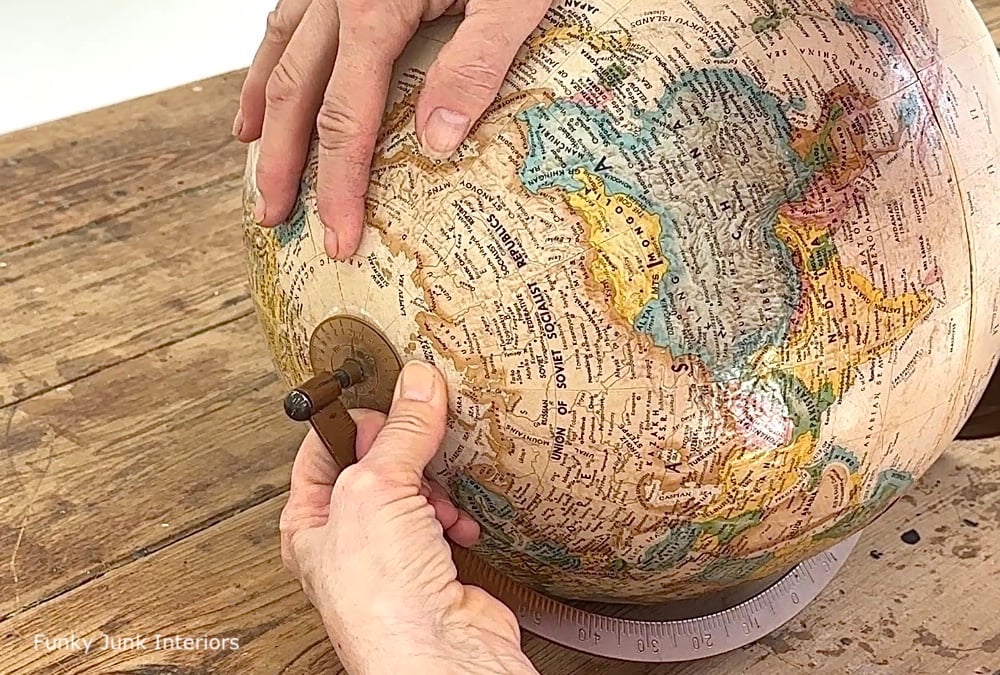
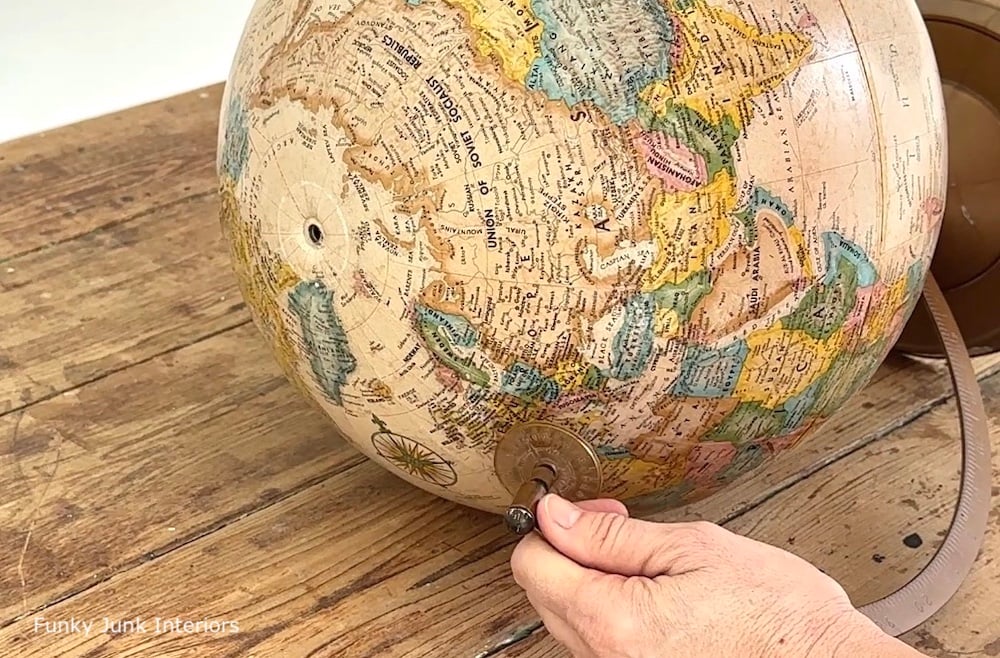
How to take a cardboard globe apart
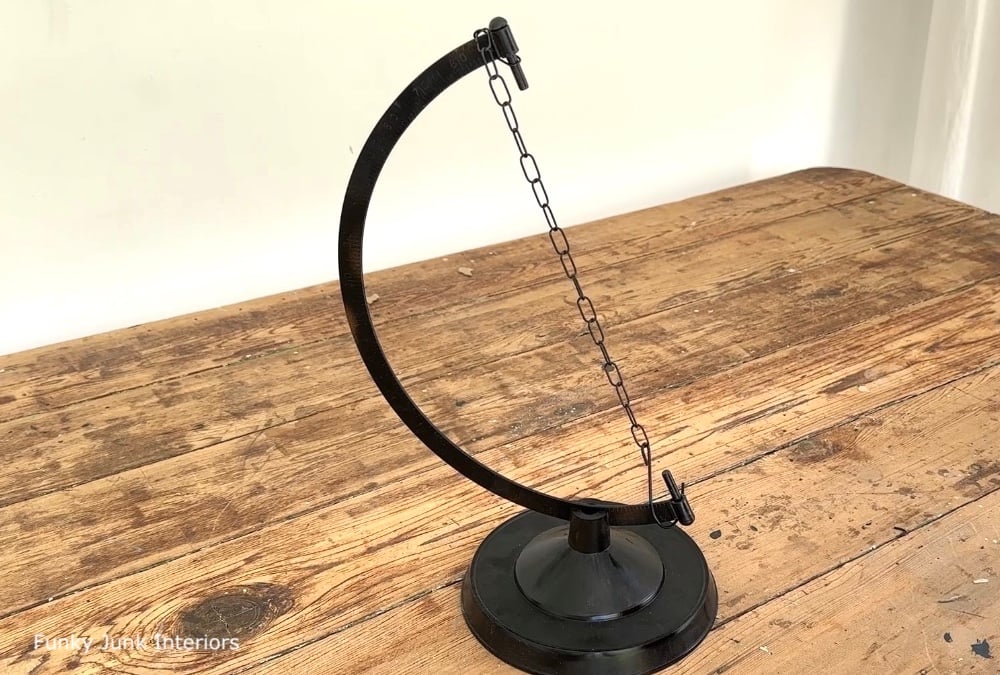
2. Separate the stand from the globe by gently pulling up and away from the top of the stand.
My first attempt was to try and take the top of the stand apart, but there was no need! Using a little force, I bent the stand slightly up and away from the globe to separate the two. I feel like such a globe expert now.
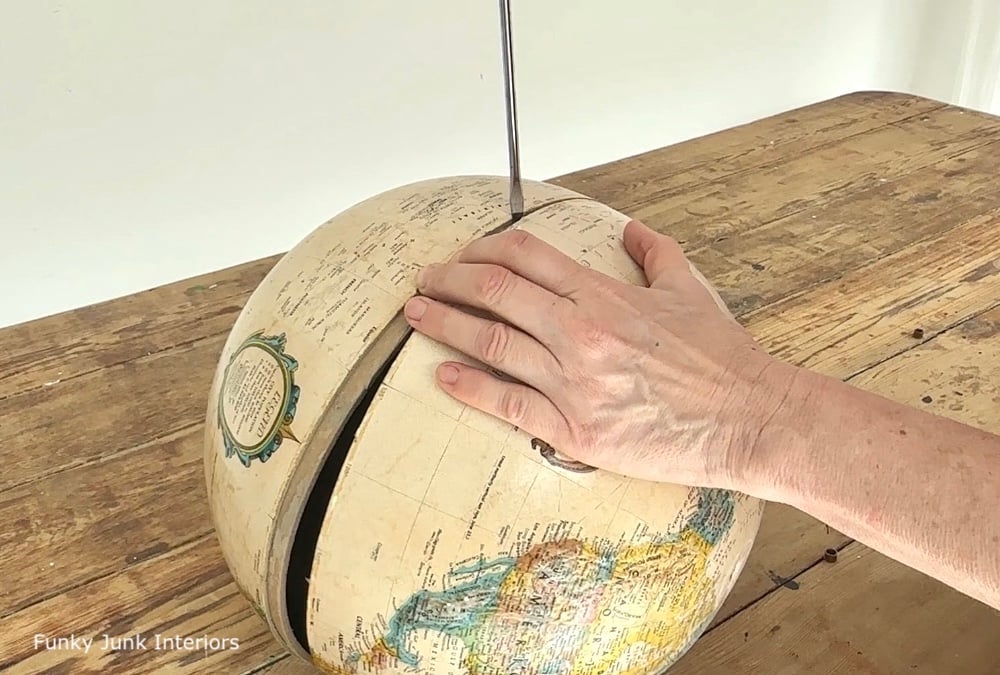
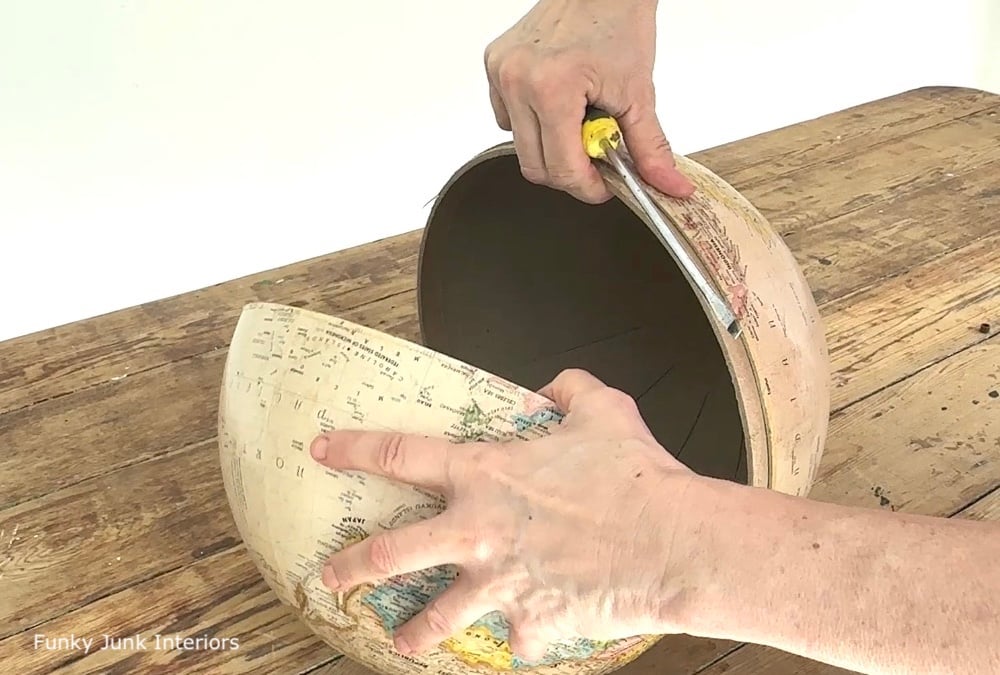
3. Pry apart the globe along the middle join using a dull screwdriver tip.
Since my globe was cardboard, I had NO idea if it would come apart easily. But it separated very cleanly!
I wedged a screwdriver tip into the middle join, then gently turned the tip back and forth while working around the globe perimeter, giving it plenty of time to open slowly so it didn’t tear.
Now you’ll have two globe halves and the stand. So let’s make some cool stuff!
1. Upcycled globe pedestal bowl
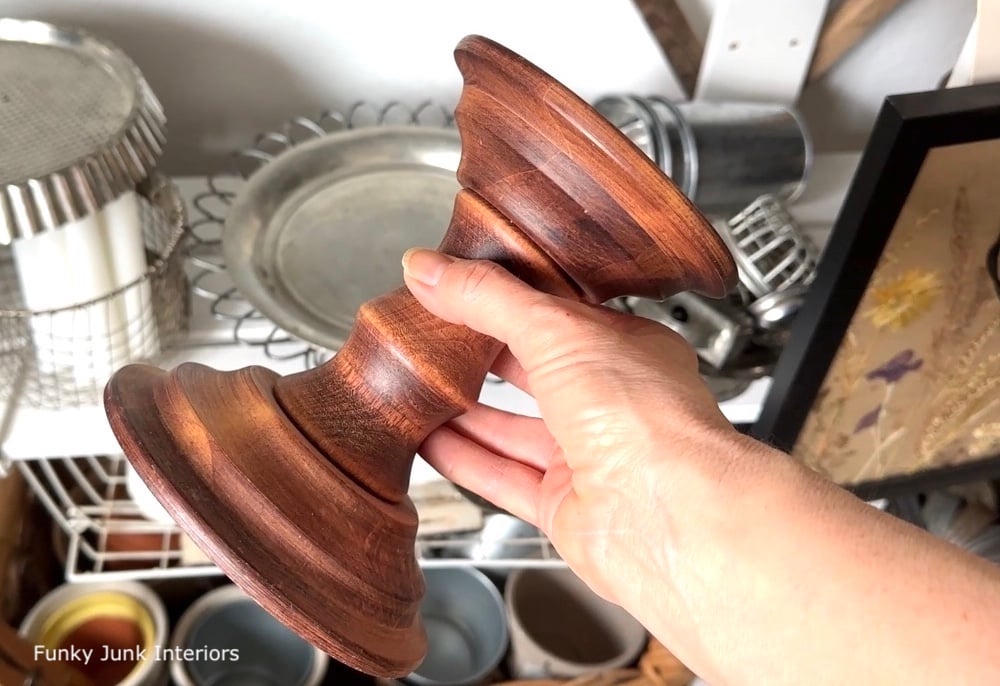
4. Select a base that would work as a stand.
I reached for a wooden candlestick pedestal I had in my stash.
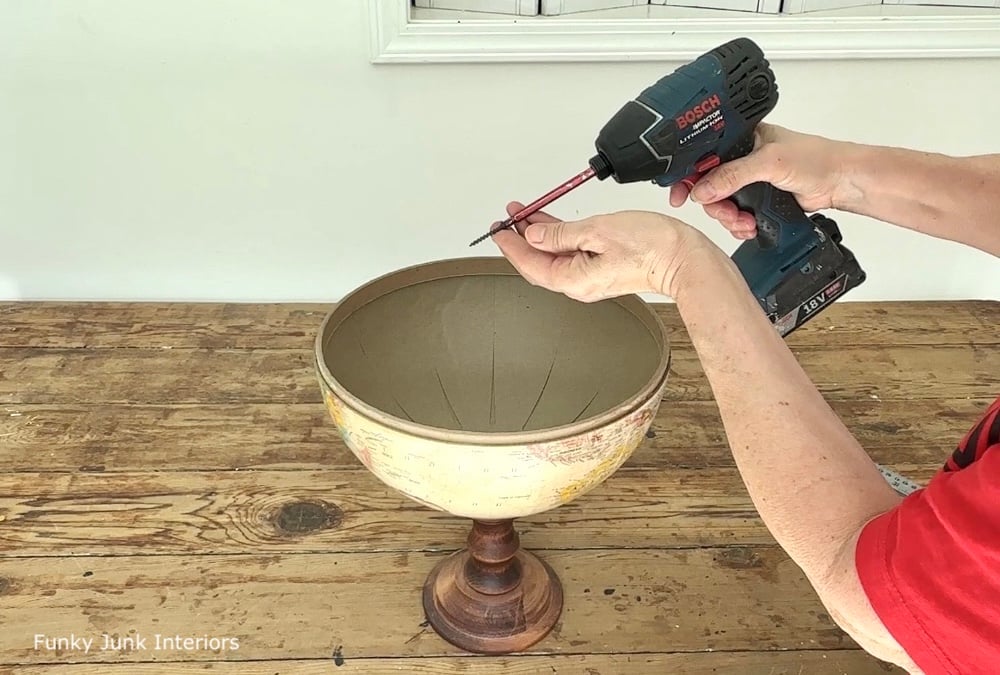
5. Choose the globe half that will have the map positioned upright when you place the rounded side down.
6. Position the globe half on top of the pedestal, then screw them together from the inside of the globe. It’s that easy!
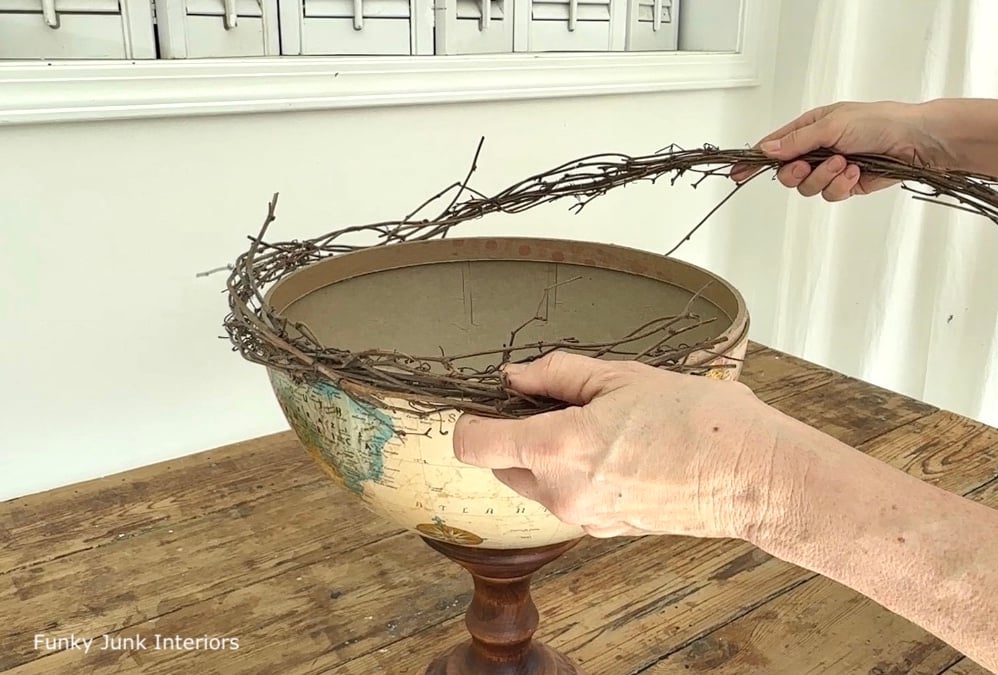
7. Embellish the rim with something to hide the cardboard edges.
For this project, I hot glued some grapevine garland around the entire edge. Love how the grapevine garland tied in with the wood candle holder!
8. Fill the upcycled globe pedestal bowl with whatever you wish!
I filled it with with faux plants, creating a planter look of sorts!
But the sky’s the limit… here’s a few other ways to use it:
- line bowl then serve dinner rolls or other food
- quirky toilet paper holder
- bagged treats
- leftover Halloween candy
- entryway keys
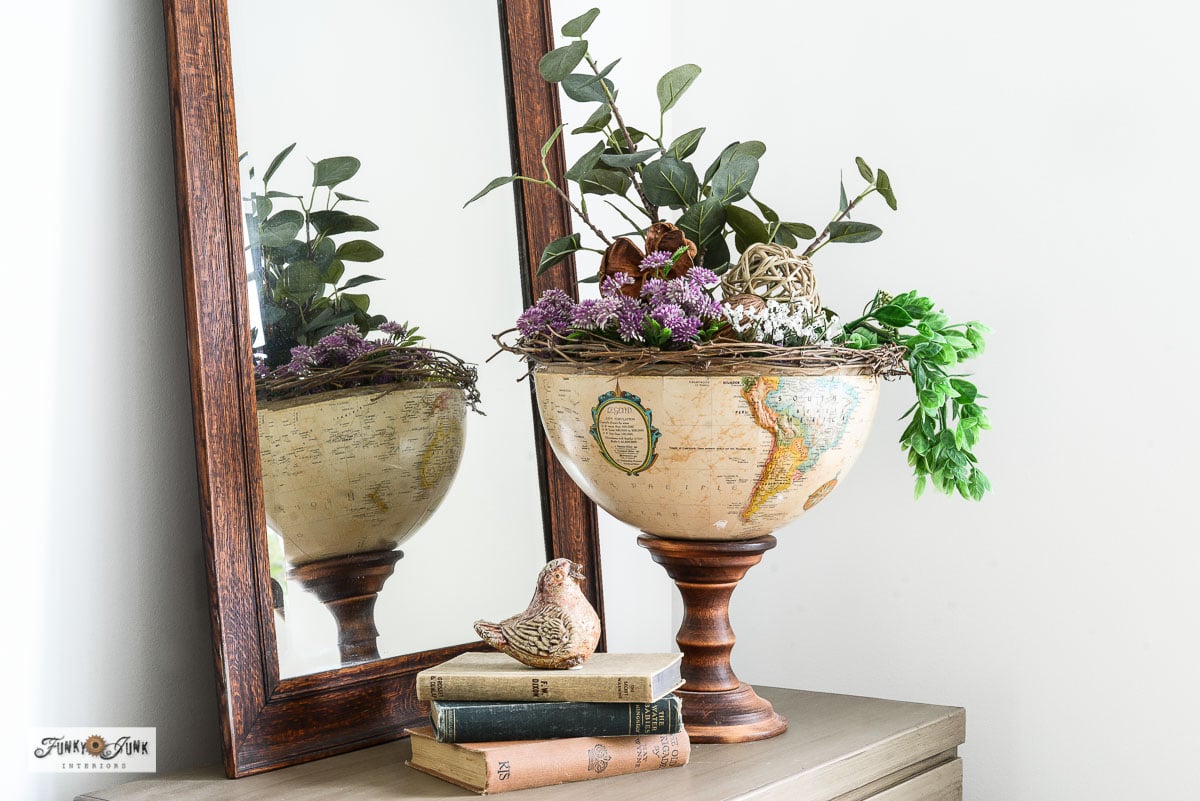
The pedestal gives it a nice height that makes it stand out and look a little more prominent and special! It also looked cute as a centerpiece on my kitchen island. But I also love it on this dresser!
Onto the next!
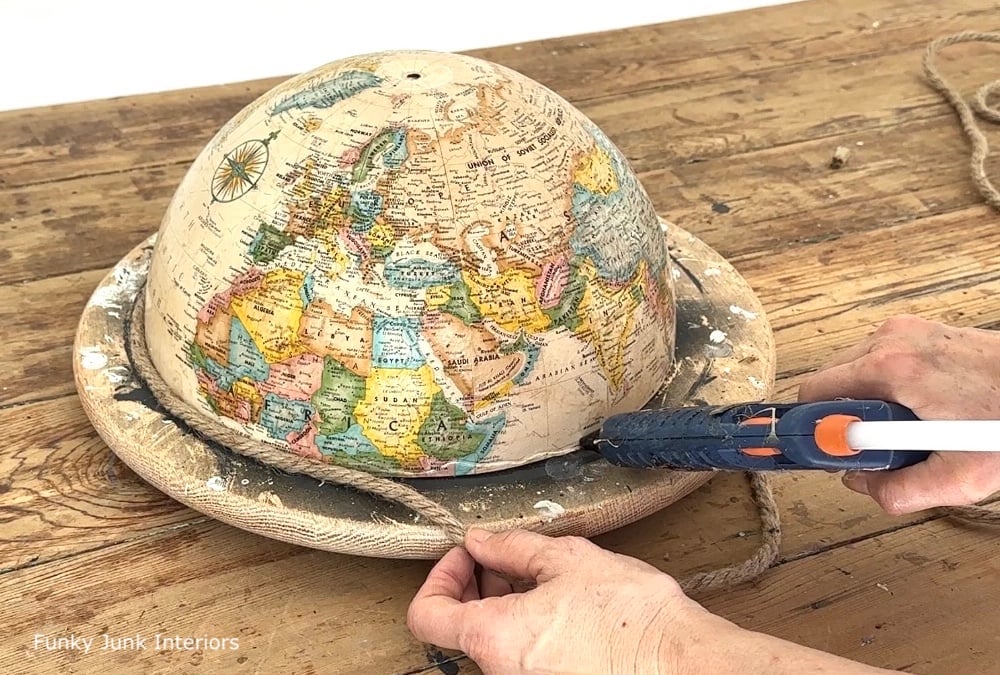
2. Upcycled globe pendant light
This light project is my absolute favorite, as it’s super useful and stylish to boot!
1. Choose the side of the globe with the upright map when you position the open side down.
2. Hot glue heavy twine around the entire perimeter to hide the cardboard edge.
Using a wood lazy susan helps make this part easy!
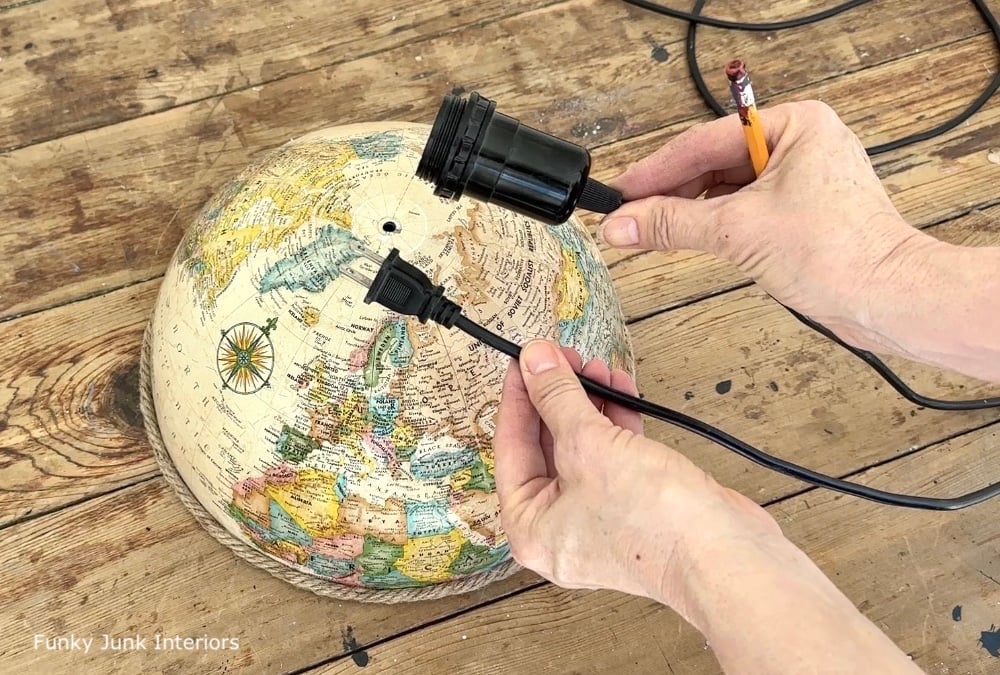
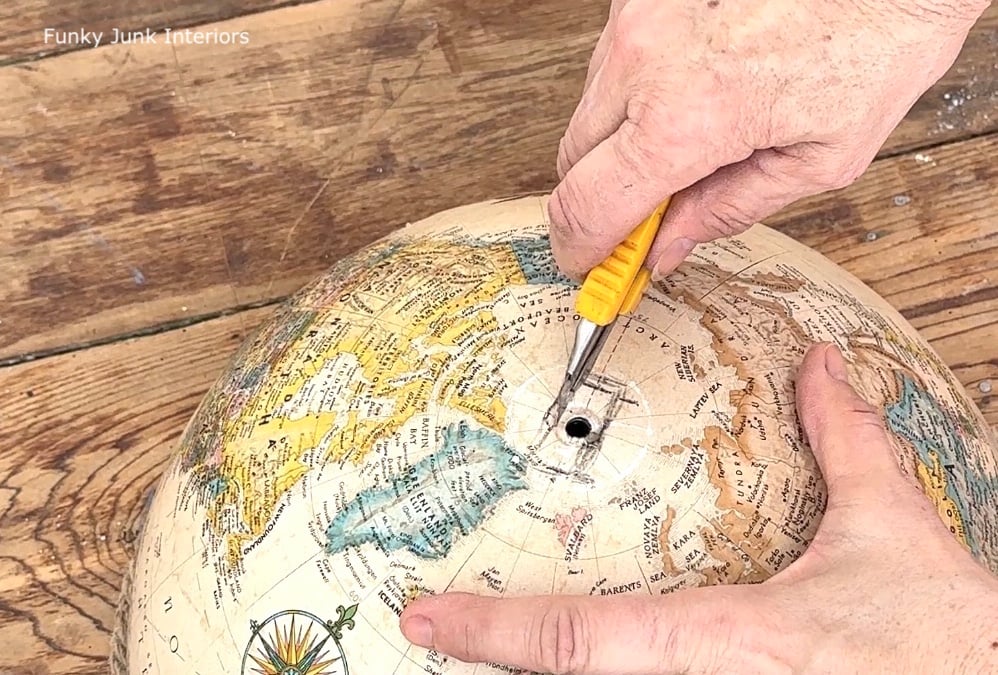
Cutting a plug-sized hole
3. Reaching for a plug in light cord, measure the size of the plug along the top of the globe, then cut the shape out with a heavy duty exacto knife.
If your globe has a metal bracket underneath, gently pry it out with a screwdriver.
Then slip the plug through the hole from the inside of the globe. Cover the cut hole with some glued on twine if desired.
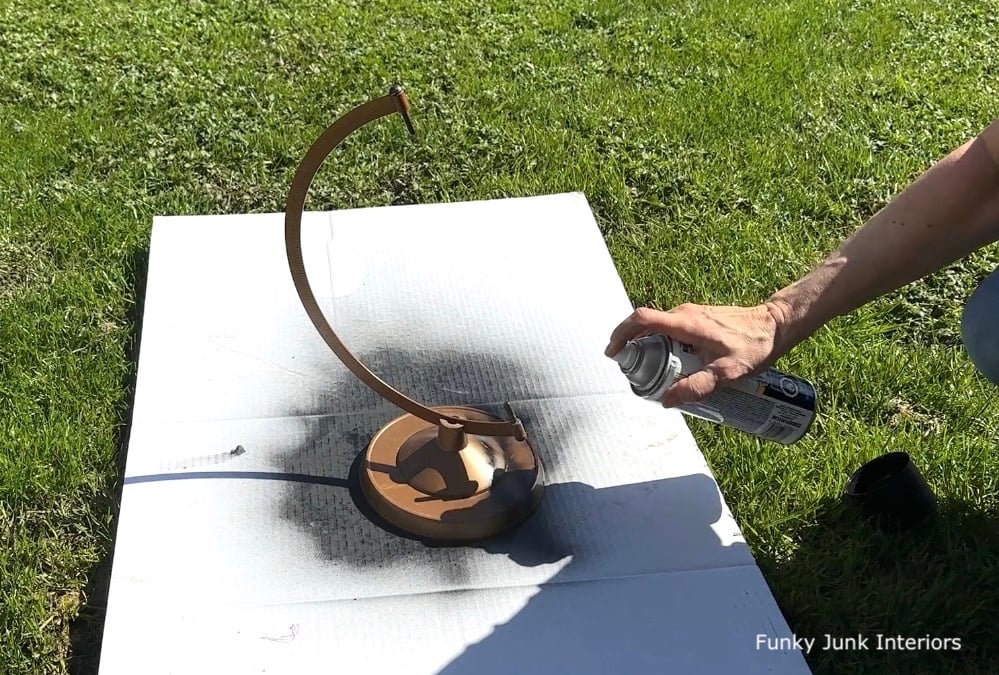
4. Spray the globe stand with black spray paint.
My stand needed two coats.
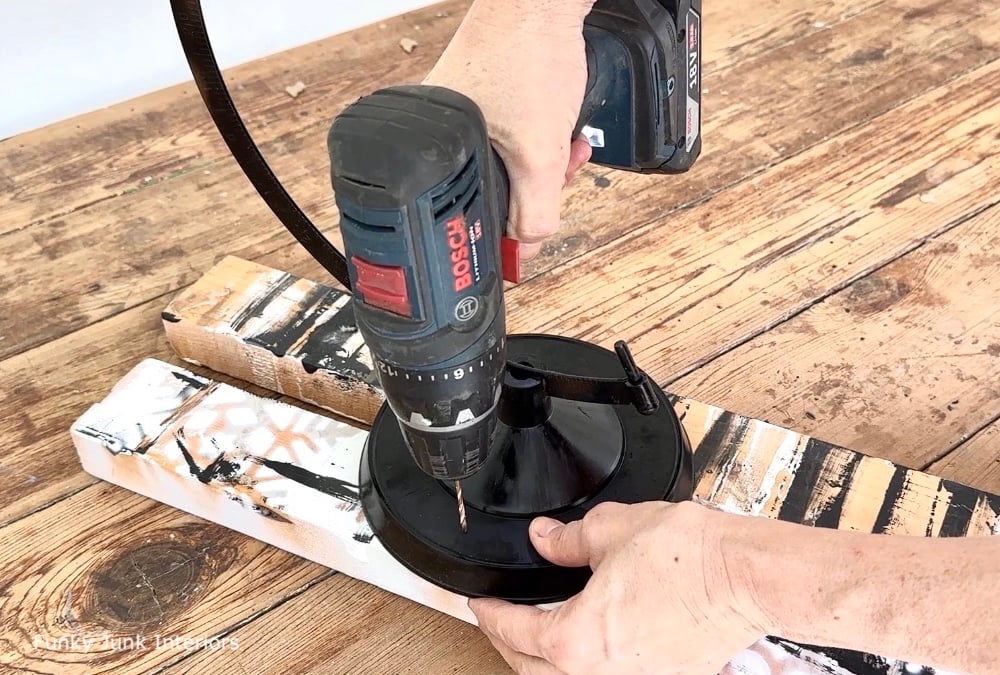
Preparing the globe stand
5. Drill two holes on the left and right side of the globe stand.
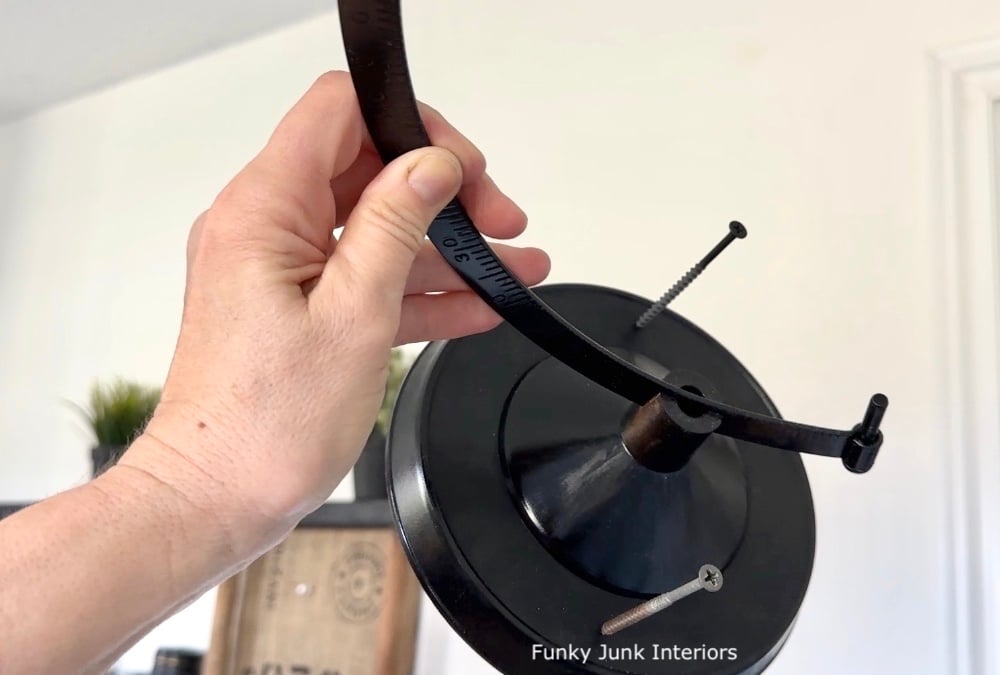
6. Insert two long screws into each hole, then screw it into position on a wall, leaving plenty of room for a pendant light to hang down.
7. Wrap the light cord around the stand until you get your desired look and height! Then screw in a light bulb that doesn’t get hot.
Isn’t that just the coolest pendant light in the land?!
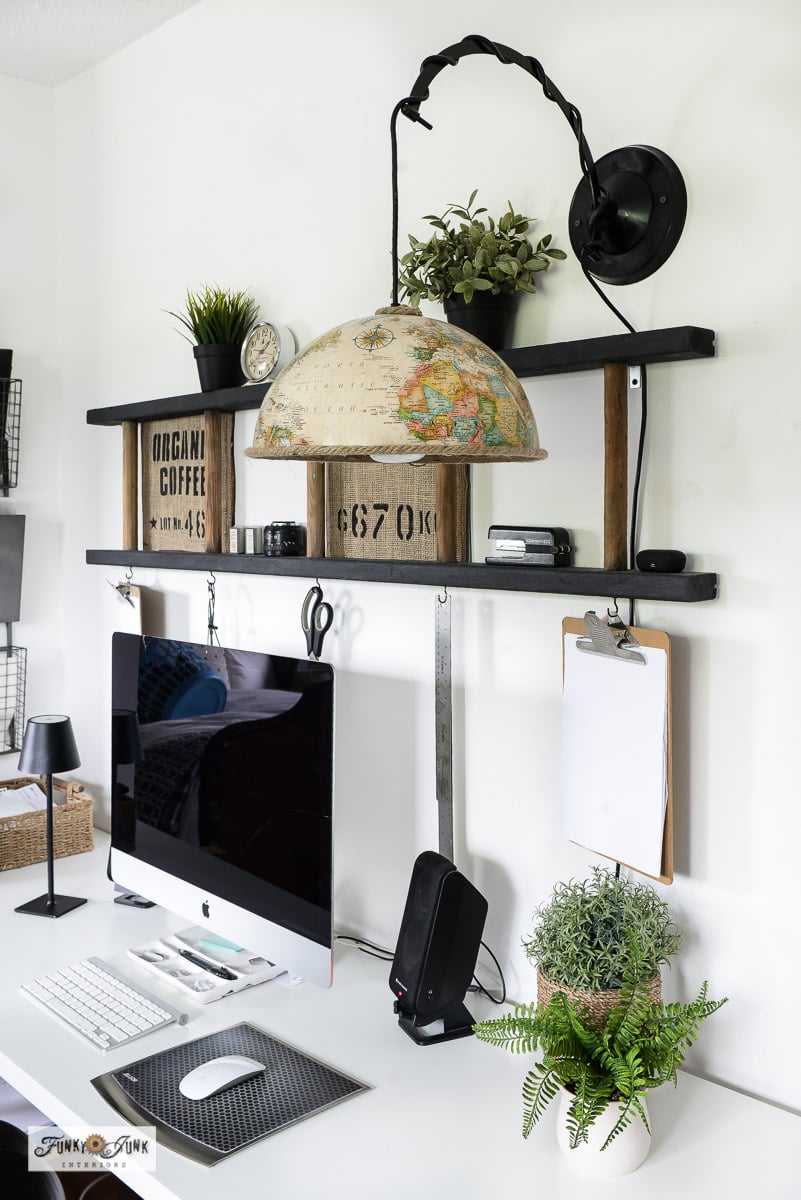
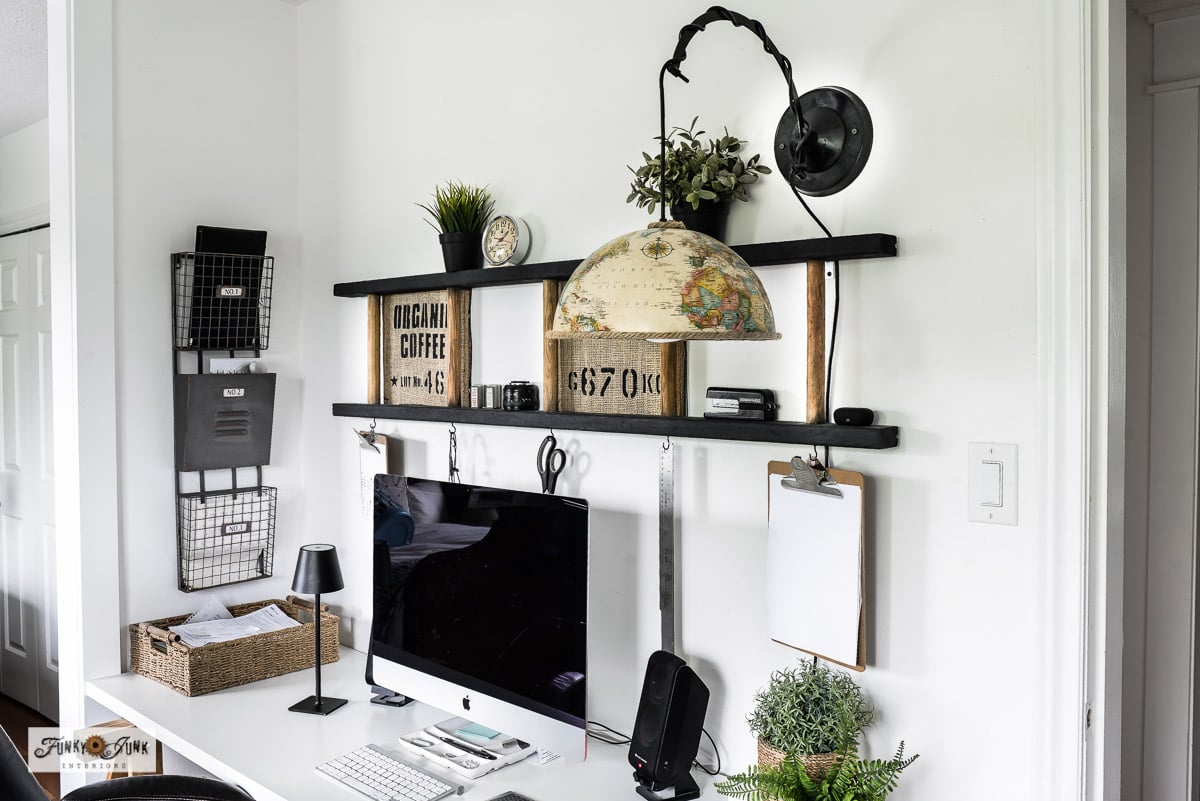
Upcycled globe pendant light in an office
I installed the upcycled globe light in my office for an added quirky vibe. It’s one of the best lights I’ve ever had!
But I got a little fancy and installed a light bulb that dims AND doesn’t get hot. Then plugged it into the wall using a dimmer extension cord so I can dim as desired. It’s SO GOOD!
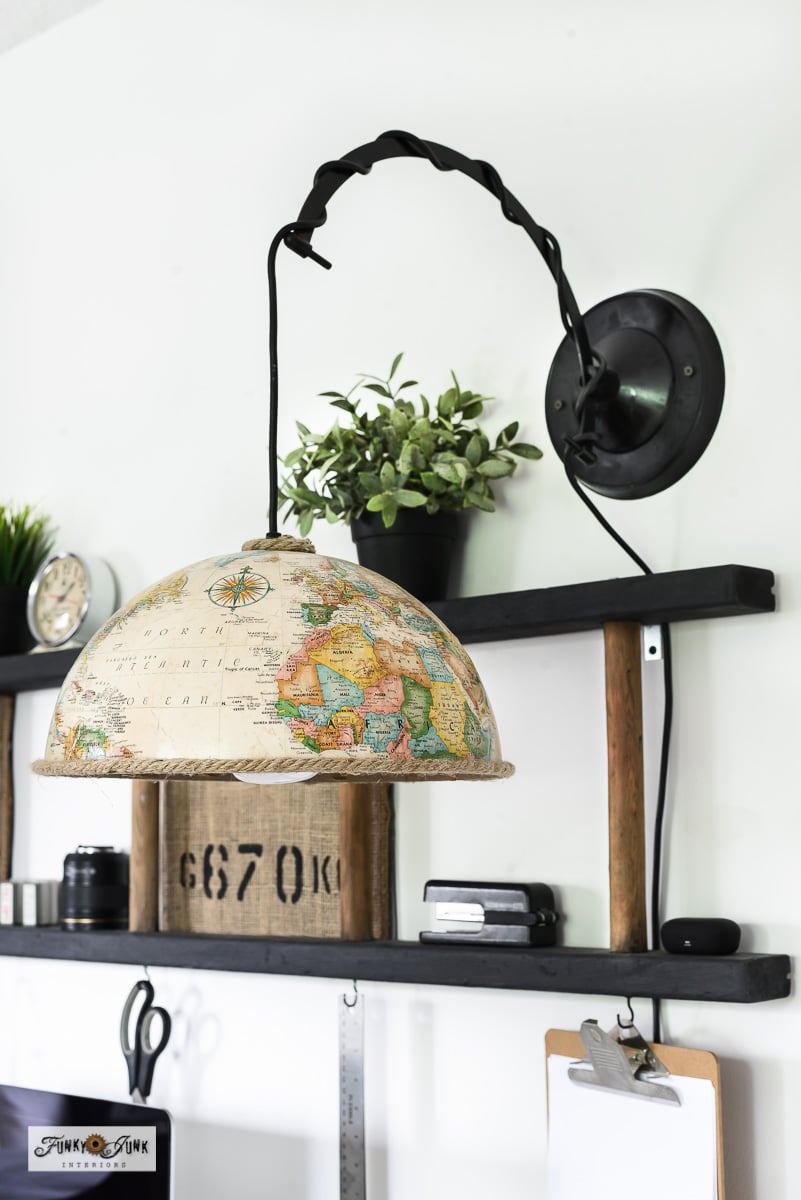
I’m just SO in love with this light! It works so well and adds a super cool vibe for this space! It’s like the globe stand was made to be a light bracket! Why don’t they just make these like this?! haha
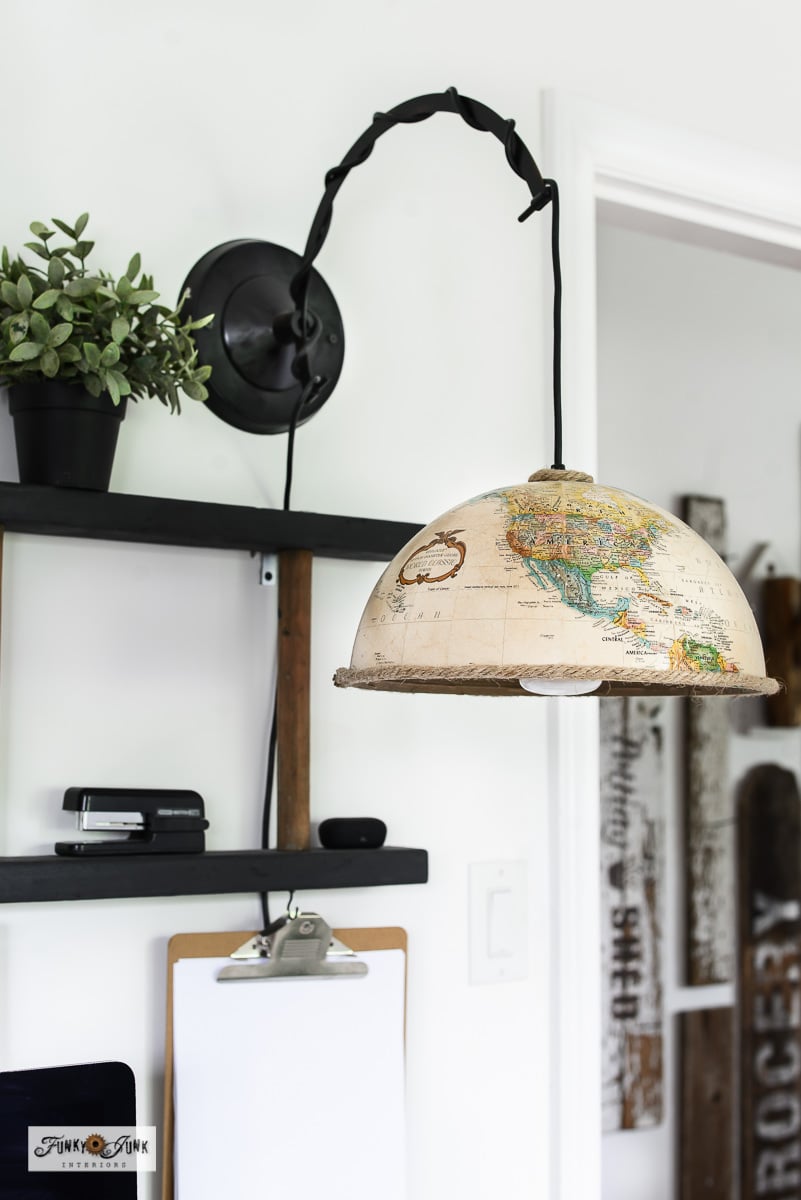
Can you even?! I just love how the light is strong enough to create epic task lighting on the desk, or I can dim it right down for a soothing moody effect in the evenings.
Ready for more? Two to go!
3. Upcycled globe paper towel stand
Don’t need a lamp? Here’s another simple idea using the globe stand.
1. Paint the globe stand in a colour of choice. I used black spray paint.
2. Attach and resize a thin black chain with a hook on the end to the top of the stand.
My chain with hook came off a dollar store hanging basket.
3. Slip on a roll of paper towel.
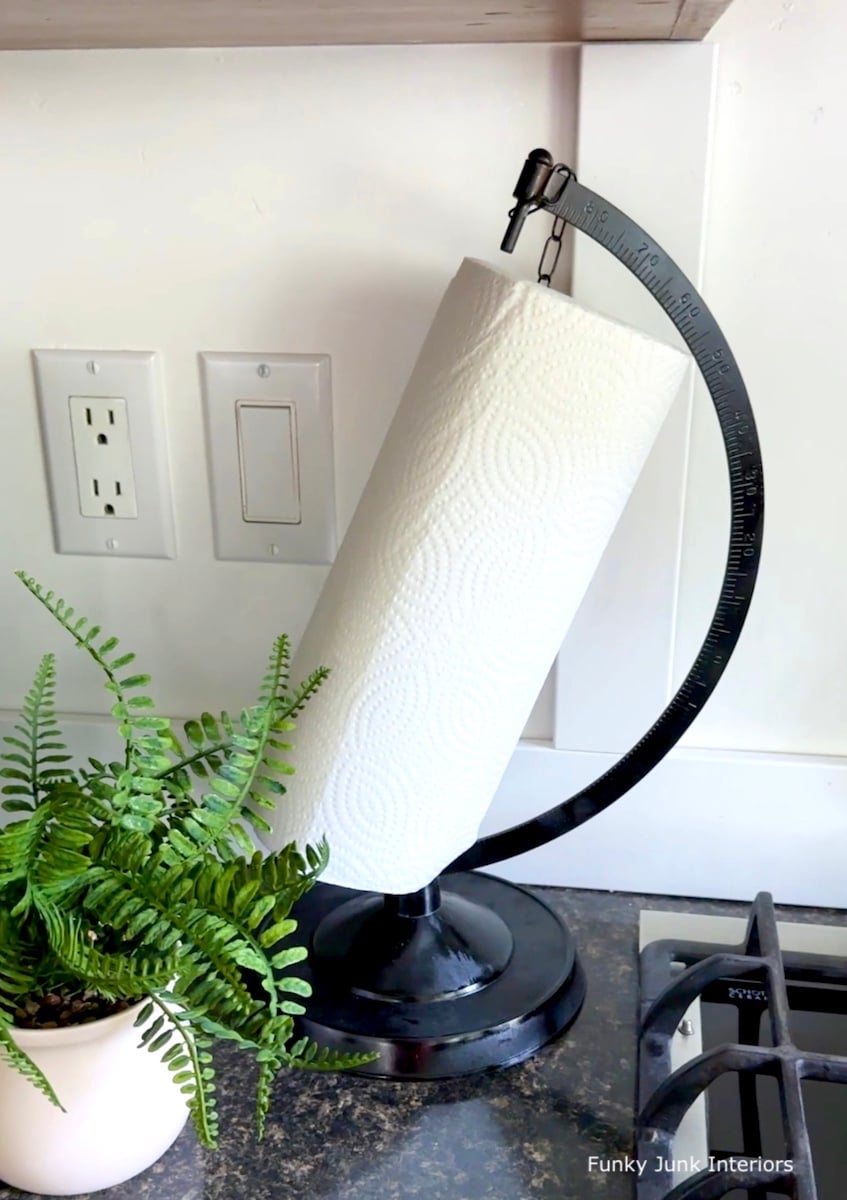
And your paper towel stand is ready to work hard and look cute! Aren’t the angle numbers along the stand edge super cool?! Kind of gives this paper towel stand an industrial edge.
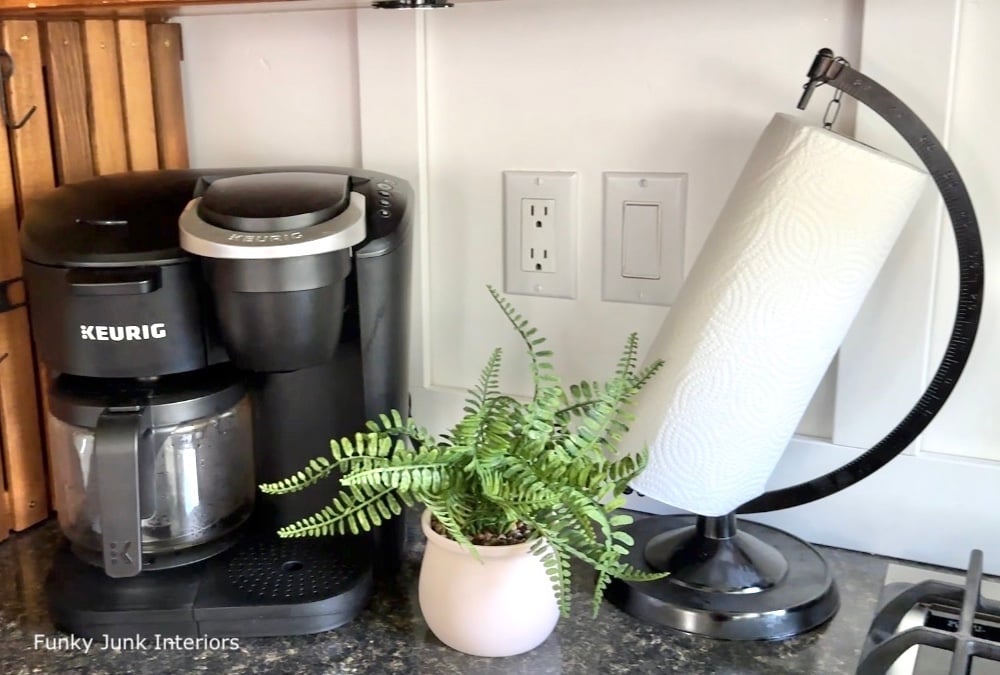
Black works well in my kitchen, however you could paint yours to match yours! This would also be handy in a workshop, or paint studio.
Ok… one more… which will come in super handy this summer!
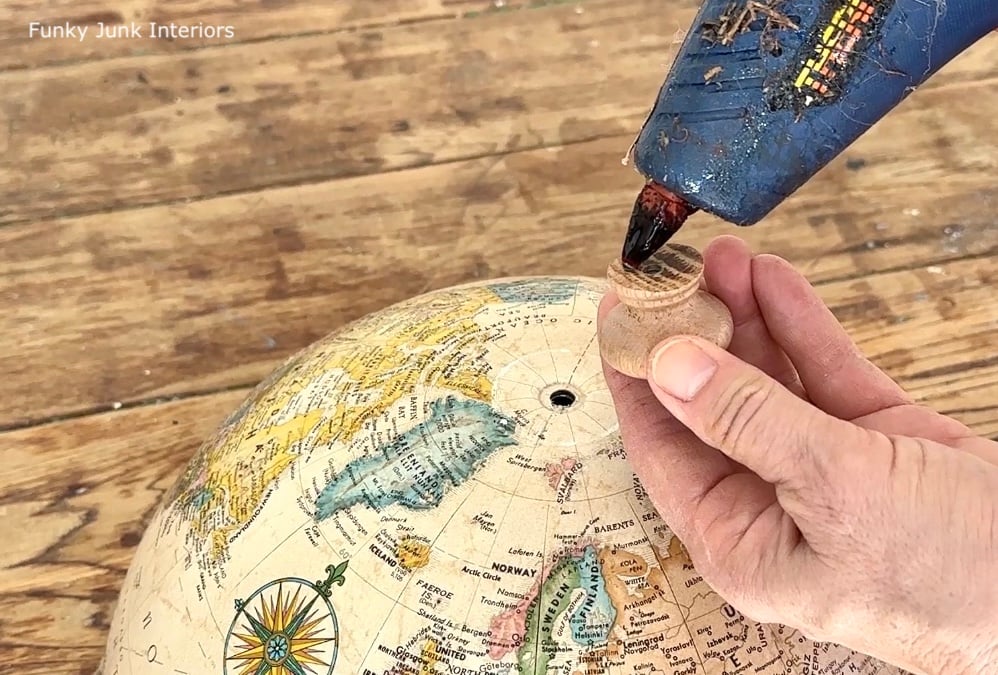
4. Upcycled globe cloche food cover
1. Choose the globe half with graphics right-side-up when sitting open-side-down.
2. Hot glue twine around the open edge, and a wooden knob to the top.
3. Position the globe cloche on top of a surface that fits, such as a cutting board, pizza pan, large plate or serving tray.
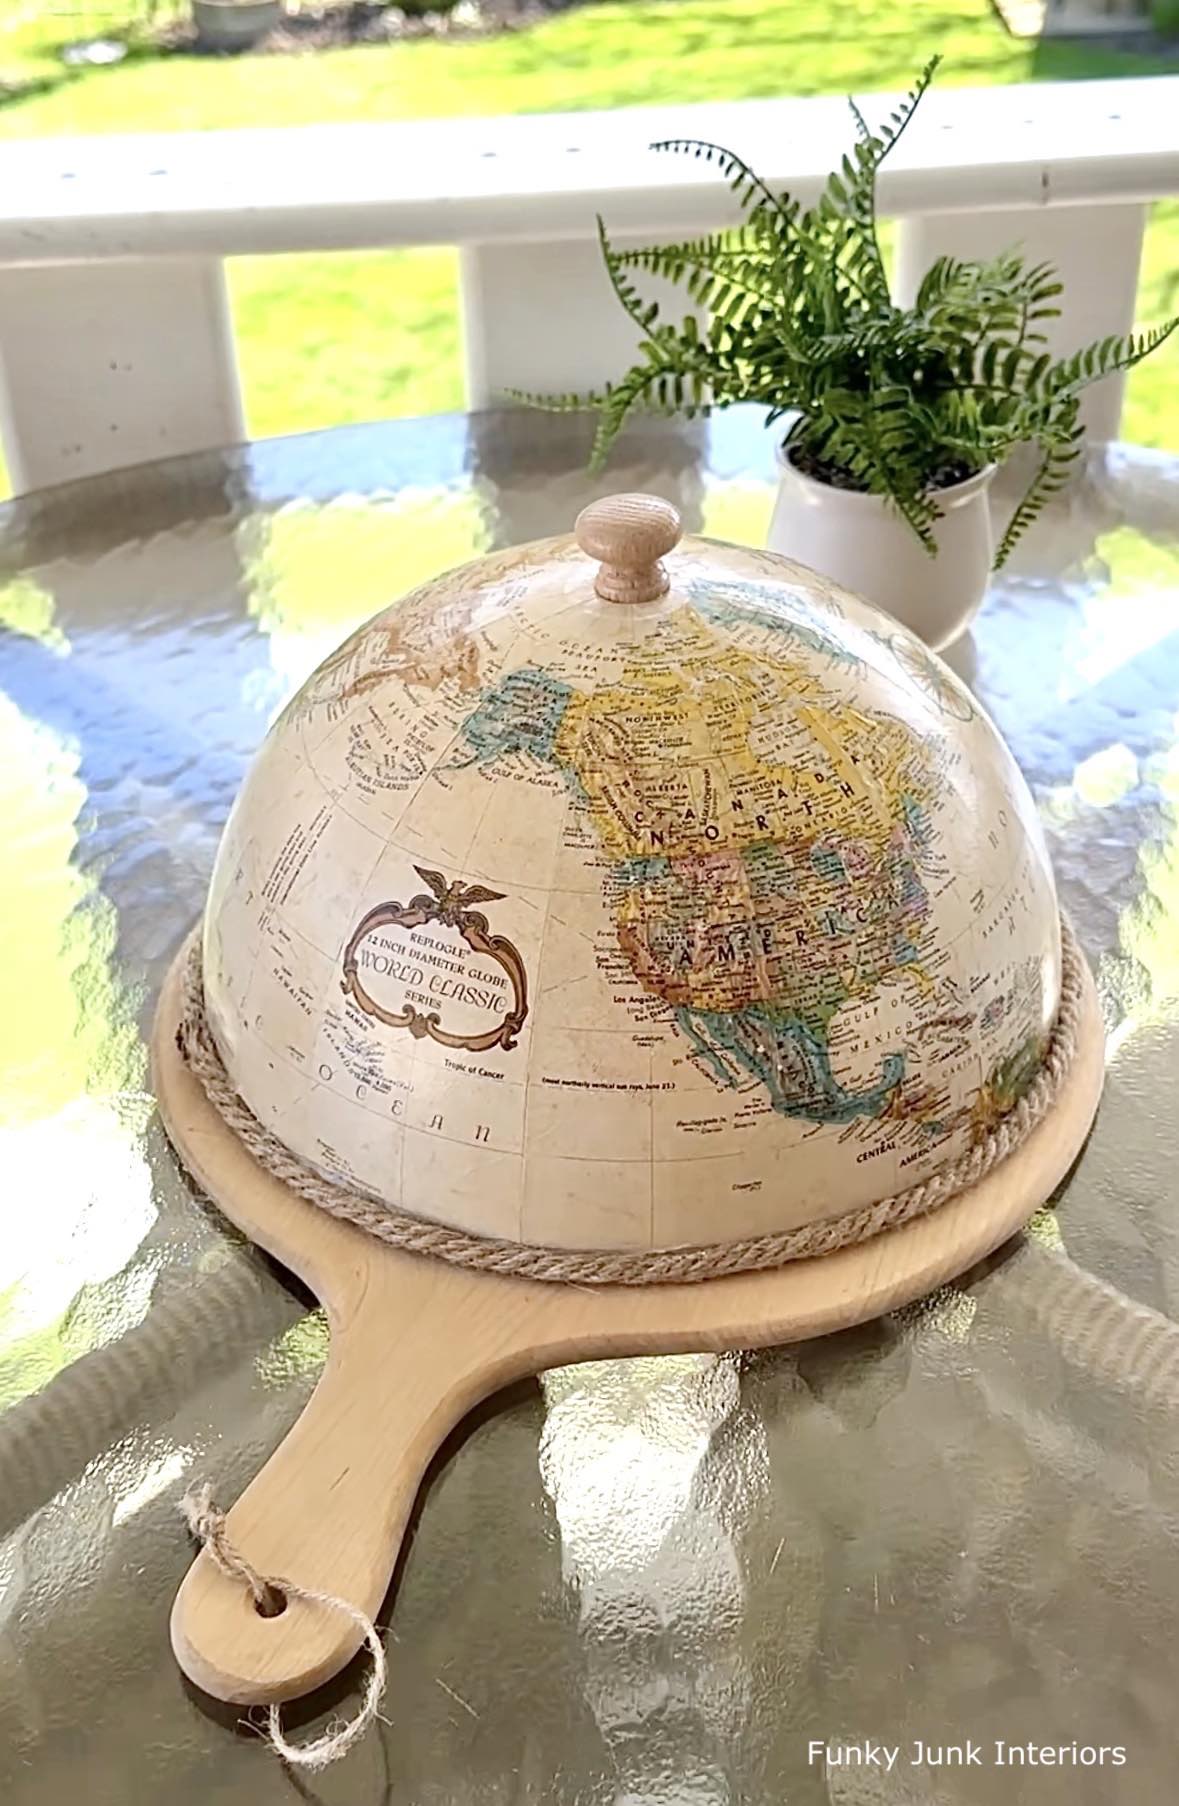
Isn’t that just the cutest thing?! The globe was the perfect size for this cute round cutting board with handle, making the perfect food cloche!
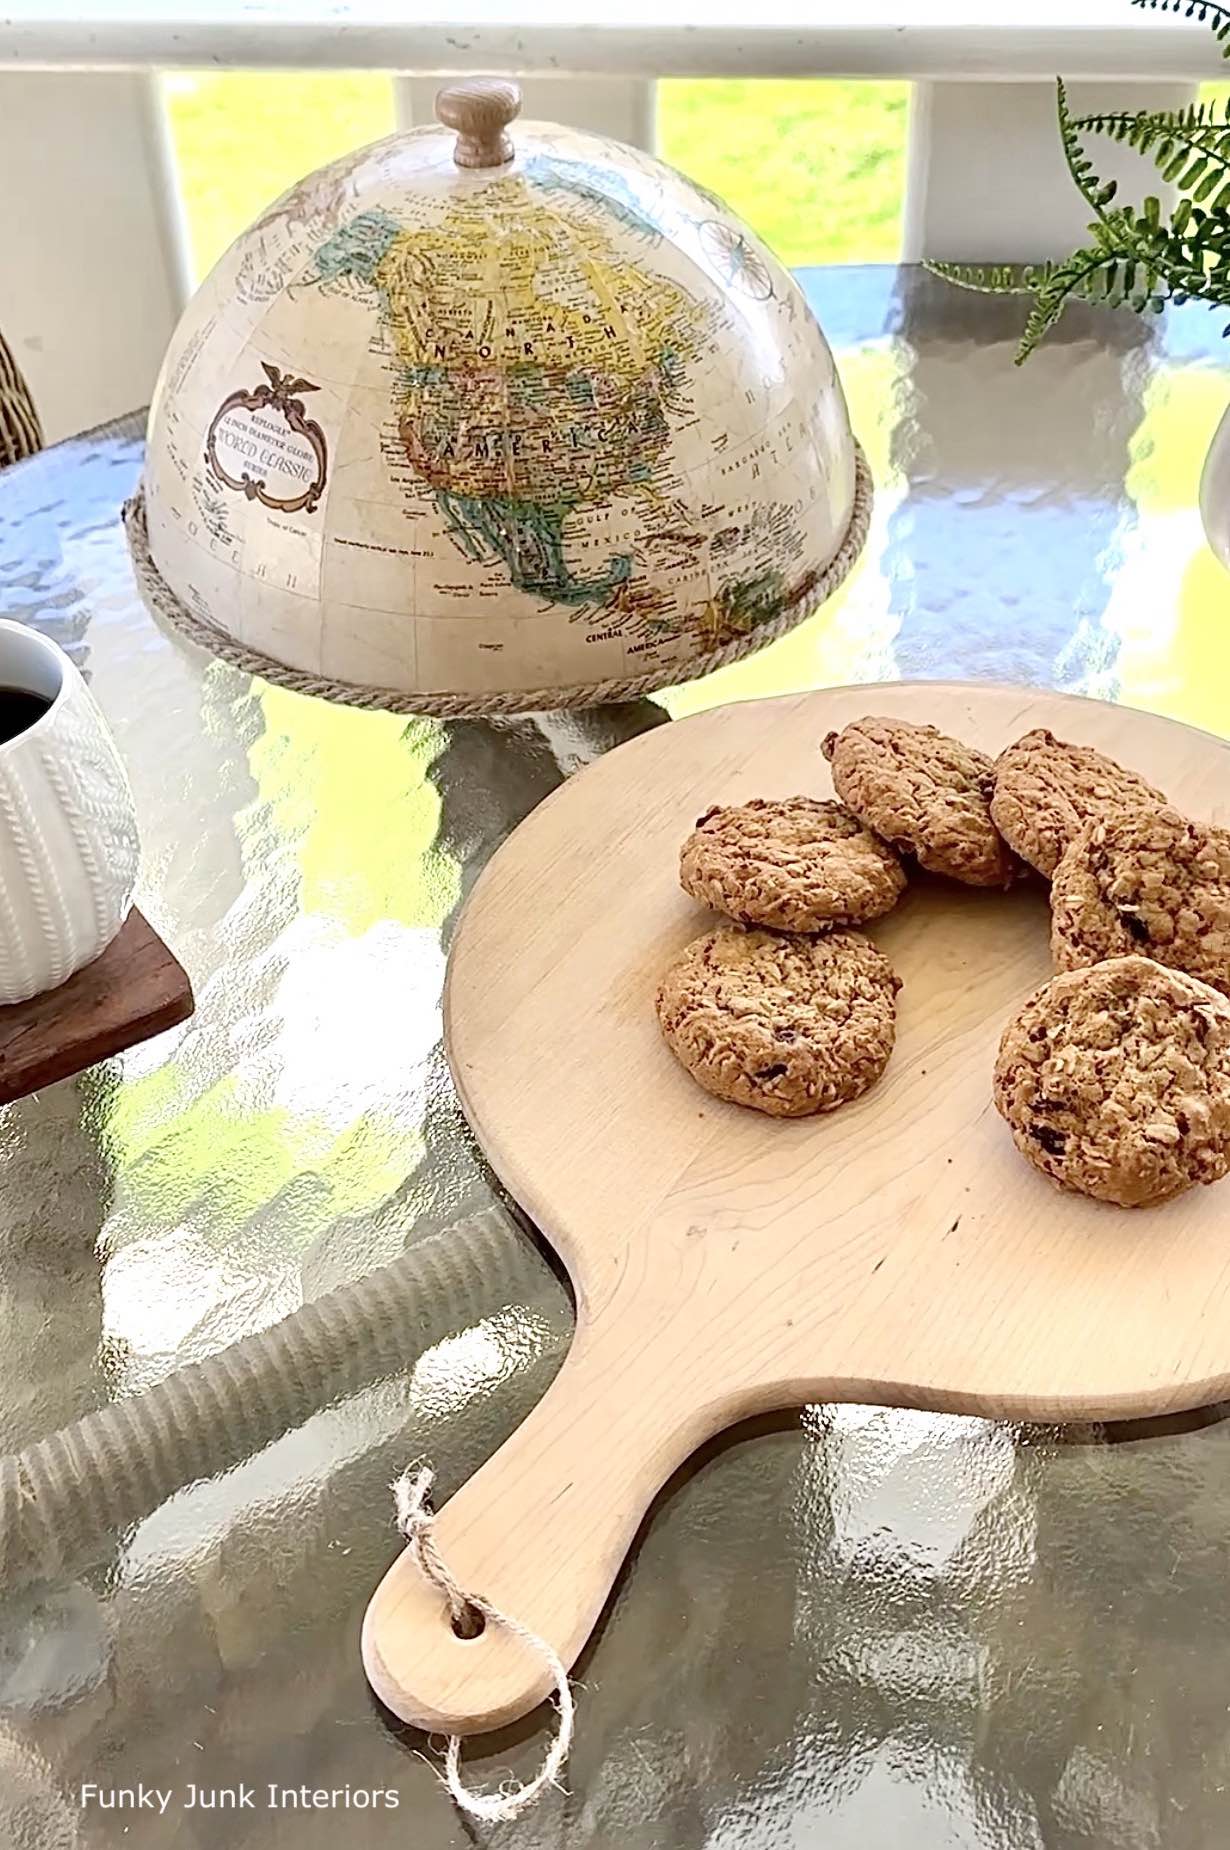
It’s especially nice for outdoors too! Or just to use on a dinner table or kitchen island protecting fun treats and good eats!
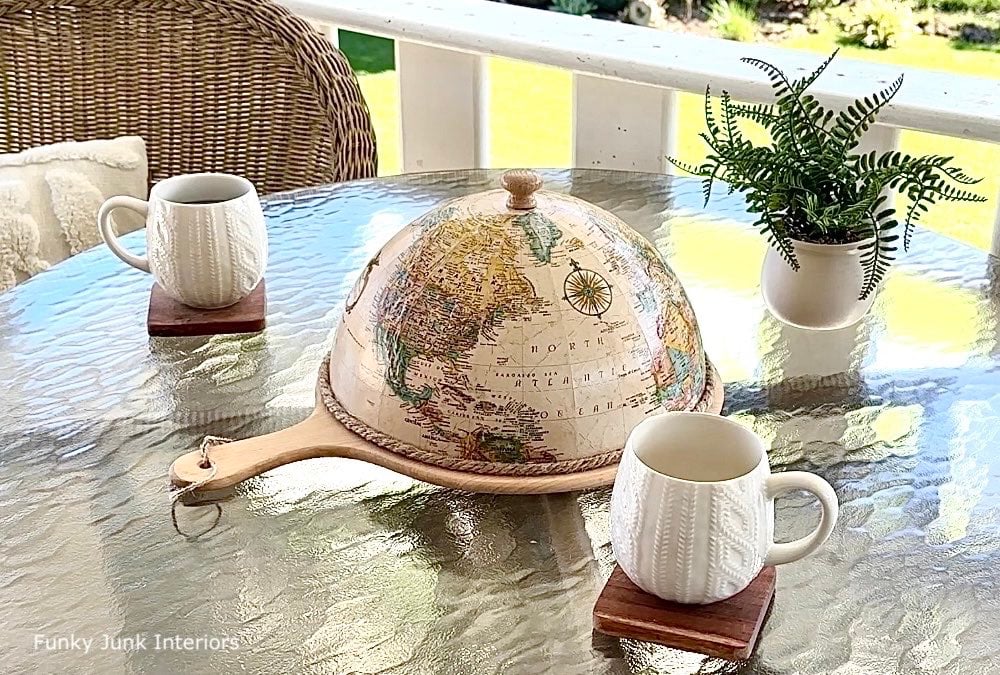
I love the look, especially with my wicker table and chairs on my patio!
With that said, I think I got plenty of mileage with one upcycled globe! As you can see, I made more projects than I had globe pieces, so now you’ll have to pick and choose which projects you want more. So far I kept the light and the bowl, but I want a cloche too!
Looks like I’ll be joining you in the hunt for another globe…
Which of the 4 upcycled globe ideas is your favorite?!
DIY Upcycled Globe Light, Cloche, Pedestal Bowl and Paper Towel Stand
Supplies:
Globe pendant light
Globe cloche
Globe pedestal bowl
Globe stand paper towel holder
Instructions:
How to take a cardboard globe apart
- Lift the top of the stand to pull away the globe.
- Use a screwdriver to carefully pry the globe apart.
How-to: Globe pendant light
- Hot glue thick twine around the edge.
- Cut a hole the size of a plug into the middle of the globe, then thread plug through from the inside.
- Insert a dimmable light bulb that doesn't get hot.
- Spray paint the stand black, then attach to a wall.
- Wind cord around the stand to hang the light, then plug into a dimmable extension cord for ALL THE PERKS!
How-to: Globe cloche
- Glue thick twine around the edge and a wooden knob on top.
- Place on top of a base that fits the globe size.
How-to: Globe pedestal bowl
- Attach half a globe to a candlestick pedestal with a screw ensuring map is sitting right side up.
- Hot glue grapevine garland around the rim. Fill as desired!
How-to: Globe paper towel stand
- Spray paint the globe stand in black.
- Attach a small black chain to the stand, with an easy release hook on one end. Thread paper towel through the chain.
Notes
Ready to check out more? Visit my creative friends below to see what thrift store item they flipped!
1. Shop At Blu Refreshed Vintage Metal Patio Chair
2. Funky Junk Interiors DIY Upcycled Globe Light, Cloche, Pedestal Bowl and Paper Towel Stand
3. Exquisitely Unremarkable Thrifted Botanical Print Makeover
4. Redhead Can Decorate Glass Rainbow Garden Tower
5. My Repurposed Life DIY Outdoor Fairy Light Lampshade
6. Our Crafty Mom Thrift Store Lampshade Makeover
Wow, you certainly got your money’s worth out of that project, Donna! So many great ideas. It’s tough to pick a favorite, but I love that lamp…and it has a dimmer switch? Fabulous!!
Thanks Kim! The dimmer cord I took a chance on from Amazon was a total win… works on any light as long as you team it up with a dimmer bulb! It’s SOOOOO good!
Wow Donna! These are so creative!!
Thanks Laura! When I was creating, I was wishing I had more than one globe so I could keep them ALL! haha
Love them all, but I think my favorite is the plant pedestal 🌍 pepper towel holder is very cool
Donna – thank you for posting these. My church rummage sales always has old globes in them & I’ve been racking my brain to come up with ideas for “recycling” them into something useful. I love the plant stand globe the best. I can even see it done up for Christmas with winter greens & a Santa on his sleigh in it (Santa traveling the world?). 🙂
Glad I could inspire you Sharon! LOVE your idea… I may have to borrow that one in December! haha The globe graphics do give anything you make a distinct vibe in between social studies and travel! LOL
ohhh Donna!
I can’t choose one favorite. I loved the bowl, until I saw the light, then it was my favorite until I saw the cloche!
The jute is genius. It looks so good with the old world vibe of the globe.
You are so clever and creative!
Pinned!
Gail
Thanks Gail! But fair warning, start with one globe and you may up collecting them… I keep wishing I had other colours to try. haha! I’m in trouble!
Great ideas, Donna, but I love, love, love, the pendant light and how you used the stand! Perfect!
Thank-you Ann! The light will NEVER be taken down, it’s just that good! I get giddy whenever I flick it on to use. haha
Wow Donna, these are so fun!! Great tutorials too.
Your creative juices were flowing big time!! My fav is the paper towel holder, but they all are so cool… I also need a cookie now 🤣
I love the way your mind works!! Gosh how does one even begin to choose a favourite? The pedestal bowl immediately made go “wow” and then the light happened. Thank goodness a globe has two halves otherwise I’d be stuck. Brilliant upcycles, Donna.
Donna, I’m blown away by your creativity! I would love all of these ideas in my home. Now I’m on the hunt for an old globe to update. Hopefully, I can find more than one! Thanks for the great tutorials.
Just when I think you’ve done everything….wham!….you hit it out of the park again! Thank you for the wealth of creative recycling ideas! You’re amazing!