
Repairing the rustic garden shed with demo tips – Part 1
Can you believe it? I’m writing a post!
This summer, I had created a fairly long list of outdoor projects that were LONG overdue. They were delayed due to me never having done those kinds of tasks before.
Once our summer heat hit and we were guaranteed a run of sunny days, I went in. Deep. To the point of no return!
What I didn’t expect was to get so caught up in all the new projects to the point of literal exhaustion by the end of each day… doing new things takes a LOT out of you!
So I decided to let the blogging go for a spell and just go full-tilt. Let’s just call this my summer vacation, shall we? But never before have I worked so hard during a vacation so there’s that! LOL
Anyway, I finally have enough pictures and a bit of a story to share on one of those many outdoor projects, and today I’m sharing how I’m repairing the rustic garden shed along with some demo tips I’ve learned along the way!
This post contains some affiliate links in which I earn a small percentage if you purchase anything through these links, at no extra cost to you. Thank-you for helping to support my blog!
Save the Shed series
.
Part 1 – Repairing a shed with demo tips (start HERE)
Part 2 – Framing a shed with door making tips
Part 3 – Adding reclaimed wood siding and a shingled gable
Visit all installments to date HERE
About the shed
.
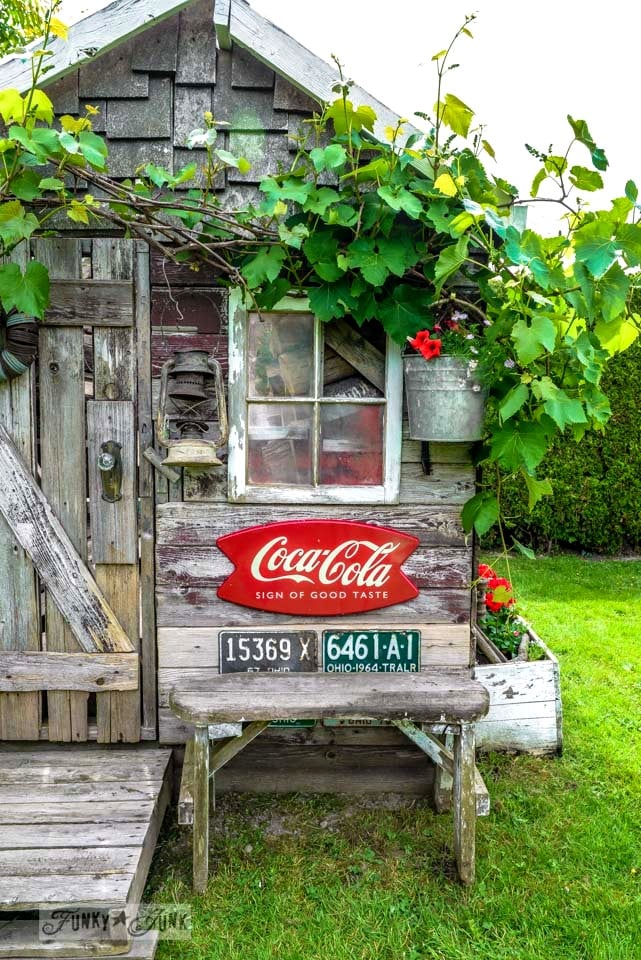
My rustic garden shed has long been a focal point in my backyard for many years. It’s a rustic cutie that has become the main focal point of my backyard over the years, with ever changing looks.
You can see it in better days in this pretty post HERE.

But here’s how it all started when I moved in! It was truly a green house structure that I simply revamped with old windows and reclaimed wood.
How the shed was originally revamped:
Part 1 – from a greenhouse to a shed
Part 2 – the building of a barn door
Part 3 – a planter box and a gate

Here’s how the shed looked just last summer, with the vintage bike edition. Cute as can be!
But if you look really super hard to the right, you’ll see a problem… the back is busted out and was in need of repair work.

Not to mention the very crooked front. Oh dear. The frame along the bottom had let go due to rotting wood. So it was time to make a big decision this summer. Repairing the rustic garden shed or let it go…
Tear it down or go new?
.
In all honesty, the shed in its current condition really is a tear-down.
So I played around with shopping for a new cute shed kit and hiring my new handyman Al to help me install it. But I didn’t like the new prices… and to store firewood or even a lawnmower… not worth thousands to me. If I spend thousands, I want it to really give me big wide open spaces to help my business!
Enter… indecision.
But to be completely honest, it wasn’t just about the money. I have never saved a structure before, and this was such a good opportunity to learn from! I mean, if I destroyed it, well… yay, right? No loss! So why not try and save it if I could do it affordably?
So that’s what I chose. I was on a mission to Save The Shed. Repairing the rustic garden shed would ultimately save me a bundle of money but offer so many building lessons along the way.
And if it fell after the fact? Yay, right? Trying gave me nothing to lose.

The damage
.
So for those of you who’ve always wanted to know what the inside of the rustic garden shed looks like, here you go! Now that’s a gorgeous she-shed, huh?
I’ve used it to store firewood since moving here.
But over time, the wood that wasn’t protected with plastic eventually rotted. Of course it would! But I didn’t think to preserve the wood back then.

The demo
.
Repairing the rustic garden shed… let’s get this show on the road!
First up was to remove enough firewood so I could work on the shed.
But the way the firewood was stacked was like a hill of dominos… remove one, 20 fall. So I kept removing until they stopped rolling.
Then it was official demo day! I used a crowbar and hammer and punched and bent and hammered the rotten framework right off the structure.
I mean, is there a methodical way to break stuff?


Using a sawzall to cut some of the framework also down proved helpful, so I didn’t have to pry open all those tight nail holds!
PS: Build with screws. It’s so much easier to dismantle. You’ll thank yourself later.
All the rotten wood from the back of the shed completely filled up the back of my truck. Which led to an extremely satisfying dump run.

Front of shed demo
.
After a day of recuperation (I needed it!) it was time to tackle the front.
Once again, just enough firewood was removed so I could pinpoint why the front was so crooked. Turns out, the frame let go of the foundation wood but just on one side this time. Yay for small saves…

And then the ripping apart began.
I removed the door, then started cutting away and prying on the rotten frame parts only, ensuring the new wood would ultimately have something sturdy to grab onto.

Since I desired to completely surround the shed with the heavy plastic liner for better protection this round, all the cute reclaimed wood used for decoration was removed as well.
And another round to the dump was in order!

Currently...
.
.And this is how the shed looks today. Just like at the very beginning nearly 15 years ago!
Chunks of the shed are missing, and just the frame is exposed, but at least the grounds are tidy, and ready for the next step of repairing and re-framing.
I won’t lie. This was a TON of work! And it really tested my patience, and (lack of ) strength. But when I got frustrated, I just took a break and went at it again, and did it in small increments to the best of my ability.
But my goodness… it was so gratifying to get this far and see the thing still standing! And knowing I could save it if I wanted to.
So since I’m such a demo day pro now where sheds are concerned (heh), here’s a few demo tips to help you along with your own demolition projects:
Demo tips
.
Consider the grandfather clause
.
If you wish to fix an older built structure, you generally can since it was there before you got there. But if you tear it down, you may not be able to legally rebuild it. Just do your homework and find out what the building codes are for what you are working on.
.
Use the right tools for the job
.
Ripping structures apart is really physically demanding. But it’s easier if you are geared with the right tools…
- crow bar
- mallet
- sawzall or circular saw
- hammer
- sturdy shoes
- work or heavy gloves
- hearing protection
- safety glasses
- extension cord (I like THIS ONE on a reel)
- collapsible work table
- containers for screws and nails
- rake
- broom or small hand brush
… and just get it going!
All tools were stored in a wheelbarrow, which made it easy to cart out the next day.
.
Rip it up!
.
How do you even take stuff apart? According to HGTV, they have big strong people that punch through walls. But I’m not that strong. So… how do you bang apart a buncha bulky wood?
- rip apart what you can with a crowbar and rubber mallet
- cut what you can with a sawzall or circular saw
- hammer nails flat where possible, for safety’s sake
- size everything to what you can carry and fit into your vehicle
.
Clean up as you go
.
Ripping apart is one thing, but clean up is yet another. So rather than do a ton of just one thing and leave heaps of mess, I chose to do a section at a time, and include the clean up as well. Once my truck was full, it was time to call it a day!
Then I booked in a dump run for the next day.
It was just so nice to start again with everything tidy! And it’s safer too!
.
Pace it out
.
Ripping stuff apart is hard physical work. So I found if I did demo one day, then rested the next, I was ready to go again by the 3rd.
Demo doesn’t have to be a race. I worked with my strengths and limitations, vs. pushing myself too hard. And I haven’t quit yet, so it must be working…
Scratch that. I quit several times over. But after a breather, I just wasn’t willing to let this beast beat me.

I’m actually pretty proud to get to this point. I honestly thought I”d have to get rid of the shed, but when I compared the amount of work on the demolition vs. save, I decided saving it was less work on me… plus I’m saving a ton of money not having to build a brand new one!
But I also know this little rustic shed is there for yet another lesson.
Who knows… maybe I’ll be building that new shed all on my own next summer after all these lessons. Because I have Shed #2 to fix too!
I must have a thing for sheds…
Next up: framing and strengthening the structure.
And start dreaming of what the new finished look will ultimately be… let’s surprise both of us, shall we? Because I have NO idea yet… so this should prove interesting!
.
Would you have tried to save the shed or bit the bullet and get rid of it?’
Save the Shed series
.
Part 1 – Repairing a shed with demo tips (start HERE)
Part 2 – Framing a shed with door making tips
Part 3 – Adding reclaimed wood siding and a shingled gable
Visit all installments to date HERE
More shed posts you may enjoy:
The first shed post – how it all began!


The Potting Shed garden tool hanging sign
Find the Potting Shed stencil from HERE

Adding garden-themed shutters from reclaimed wood
Visit all the rustic garden shed posts HERE
WOW , YOU AMAZE ME ! I admire you so much for just getting in there and doing it no matter what “it” is ! if I lived near you , I would have helped in any way possible. Great. Job.
Thanks Linda! I would have gladly accepted your help. Loading this wood into the back of the truck was probably the hardest part. haha
I love old and I love sheds (and porches) and I’ve always loved your old shed. Bet the hardest, dirtiest part is done. Great job. I can’t wait to see your “new” shed!
Thanks Wendy, I sure hope so! But I can already see figuring out how to frame it is maybe even moreso… I may have to use a few cheat methods to get the job done…
You are amazing! That’s a whole lotta work done by one person! You’re right about the “grandfather” clause. I know here by me that if a structure is demolished and a new one goes up in it’s place, permits are required and then the real estate taxes on the main house will increase due to the “improvements”. I can’t wait to see what you come up with for the finished project!
Well, we shall see, but thanks for the vote of confidence. LOL
I really looked into the rules and am being careful to follow proper protocol.
I love the tips about cleaning up as you go and about cutting things to size you can work with! Oh, and also about resting in between.
One item: the shed still has vines all over the top. I’ve found over my career in working with clients on their landscapes that vines on top of buildings = trouble, even though it is adorable.
Would you consider cleaning the vines off and using the roof as a new display surface for some of your other cool stuff?
Yes, you are right Susan. Vines on structures aren’t generally a very good combo. I’ve had to clean up quite a few that had crept into the shed.
For the time being, I plan to allow the grapes to grow over part of the roof. But when or if it comes time to replace the roof panels, I may reconsider that.
Being that it’s just a beat up shed, I’m looking at it as part of the grapevine structure… for now! haha
Wow!!
Looks a little different, doesn’t it?!
Save it! I have an affinity for it.
On it! Haha! I’m actually kinda surprised how well the re-framing is going for someone who doesn’t have a clue on doing it the ‘right way!’
Yay!! I’m so glad you are saving the shed!!
Not sure about you, but I feel like 2020, is really teaching us to work with what we have. Good for you. Your tips are great and I agree pacing yourself is important. Not that I’m good at it, but I’m learning, lol.
Hubby and I had 2 weeks off together, and devoted it to long overdue house projects. All necessary to achieve our goal of downsizing in a few years.
Donna, you continue to inspire me!
Thanks for the kudos Kim! Glad you are also finding good results despite our changing life circumstances!
I was hopeful staying home all summer long for the first time in a LONG time would prove worthwhile. It has! I’ve barely had time to miss my beloved Hawaii! Ok… partly a lie… but it is what it is, right?!
You are such a brave one! That is a ton of work and aching pains for sure. Question: Do you use all that fire wood for heating in your house? If not, I might have removed all the firewood..gave it away and fixed the shed to
hold gardening tools, etc. for the yard. You are correct when you say..it is a learning project. Again, brave of you to tackle. Wish you much success and can’t wait to find out the progress. Work safely!
Thanks Eloise! I want to keep the firewood. I use it on occasion through fall and winter as my fireplace burns real firewood. Just love that crackle! Mainly for ambiance though.
I can’t tell you how glad I am that you decided to tackle this mammoth task, Donna. Oh my goodness your shed is iconic and probably the precursor to every she shed wet dream out there. Am I allowed to say that 😀 oh well, never mind, I’m so impressed. No wonder you’ve been MIA for a bit. Can’t wait to see what transformations she goes through now.
I love your determination. At my age (nearly 71) I probably would have let it go or it would have taken me a year to get to where you are LOLOLOL But I can’t wait to see what you’re going to do with it. We have a ready-made plastic storage shed in our backyard that I am going to paint this fall though. Right now I have a painted section with lots of colors and words on it but I have other plans for it once I paint the whole side (only doing the side that faces the house because no one sees the other side or the back).
I love the old shed. Really wonderful
I’m glad you decided to save her. 🙂
So, is all that wood not good and have to be taken out of there. 😮
Me too!
Lots of the framework was rotten and had to be replaced.
The firewood is perfect! But it had to be moved in order to fix the shed.
What a project this turned out to be. LOL
Wow, I thought that you were going to make one simple repair. Now when you get it all said and done, it’s not going to look quite as vintage. I do have to ask – what in Blue blazes is that gargantuan vine that is all over your shed?
Hey Richard! It will look as vintage as it use to, dependent on the finishing materials!
The vine on the fence and shed is grapes! Pretty cool, huh?
Wow, just read this; I would have tried to save as well just because like you said, new rules etc. Good job!
ps I like sheds too, must be from growing up on a farm.
Thanks Kathy! I’m so glad I’ve been successful thus far… saving is a whole lot cheaper than rebuilding!
I’m so glad you’re saving this great little shed!! You have decorated the outside so cute with different looks each time!! I love it and would also have tried my best to save “her”!!! She’s just that perfect addition to a back yard…just a whole lot of sweetness!!
Thanks Karolyn, I’m thrilled that so far I have been successful in saving it! Didn’t see that day coming…