Learn how to build this easy DIY wood Christmas tree and star for free using scrap wood! Easy instructions make this a quick project, perfect for a front porch or Christmas decor for anywhere!
I love decorating my front porch for Christmas. In fact, I’ve since made a few cool vertical porch signs you can check out HERE.
However this year, I wasn’t sure what to put up yet.
But after glancing around my festive surrounding neighbour’s front porches filled with cute toboggans and pretty greens, I looked at my own bare porch without any holiday decor whatsoever, called myself a scrooge, and vowed to change that! And boy did I!
So I rummaged through my wood stash in my workshop, and came up with a pretty cute and easy way to build a festive wooden tree which would ultimately prove to be perfect for the holiday season, rustic-style!
I’m not a stranger to DIY Christmas trees. I’ve made quite a few out of wood. Here’s a few of my favs:
Other unique wood Christmas trees:
Stenciled Christmas tree sign with wood crate skirt
Wood Christmas trees with tree skirt presents
Small wooden Christmas trees, crate-style
String wrapped Christmas junk base trees with mini TREES sign
Now while all those are small, this round I wanted something larger.
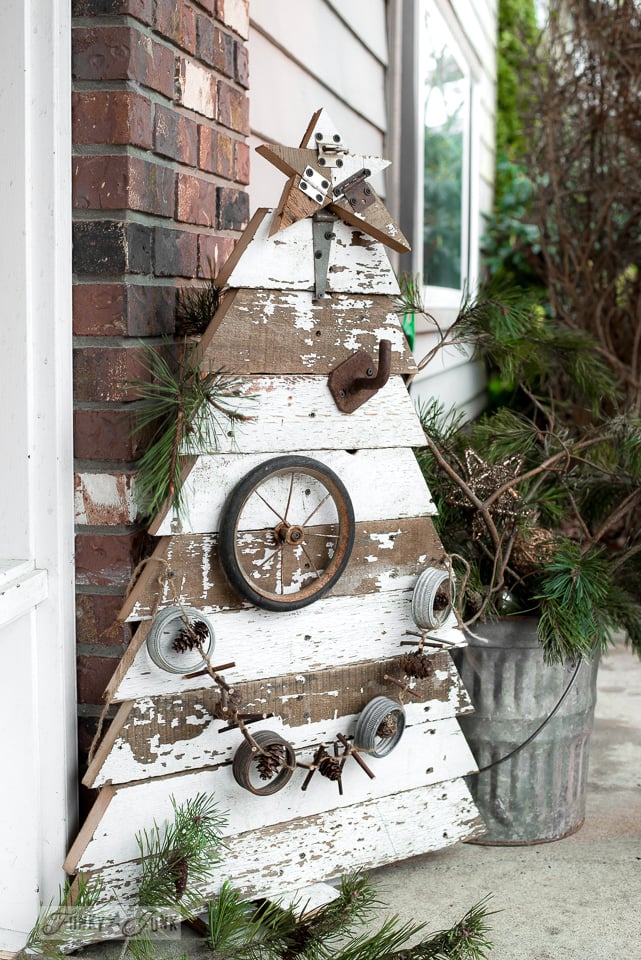
So I came up with this simple wooden Christmas tree, in true farmhouse style, that even morphed into getting a scrap wood star! And it’s fun to decorate with any kind of Christmas ornaments you desire… although mine are junk-style, all from scratch!
The size is large enough to make a fabulous outdoor decoration for the front porch.
So let’s make a tree wood project! Here’s the full tutorial:
This post contains some Amazon affiliate links in which I earn a small percentage from qualifying purchases through these links, at no extra cost to you. Thank-you for helping to support my blog!
Easy DIY Reclaimed wood Christmas tree and star

Supplies you will need
Gathering and preparing the wood
Remember all that amazing, chippy fence wood I picked up not long ago? Grabbing from my wonderful stacked setup in the workshop, I set up to work.
1. Gather plenty of like-minded reclaimed wood planks.
These chippy white wood planks will ultimately give this unique wooden Christmas tree a snowy effect, however any planks will do. Different colors of wood will just change the look however you can always paint the boards as well.
2. Prepare the reclaimed wood by pressure washing, allowing to dry, then lightly sanding.
Other wood sources to consider:
- repurposed wood pallets
- any wood planks, even new
- reclaimed barn wood
- plywood sheets
Other helpful woodworking tips to try:
Read The Easiest Way to Clean Reclaimed Wood HERE
Learn if your pallet wood is safe from THIS POST
How to take apart old pallets or fence planks easily


Building a wood Christmas tree stand
3. Use one plank to create a tree stand, Charlie Brown tree style!
The size of your tree stand should be dependent on the size of your tree. I will admit, this stand was a little too small. Try longer boards than I did, and you may get more stability if you position the stand in an x, rather than a cross.
a) Cut one board into two longer lengths of the same size, and two short pieces that will become feet.
b) Center, then cross the two longer boards to create an x.
c) Tuck the smaller pieces under the top boards at the far edges as shown above.

d) Flip the boards good side down, then attach the boards together with screws from the underside.
Pre-drilling holes prior to screwing the wood is a good idea if your reclaimed wood is brittle, to avoid splitting the wood.

Making a tall wood tree stand
4. Cut a tall wood post to the desired height of your DIY wood Christmas tree.
I used a 3 x 3 post.

5. Position the post on top of the stand, then assemble the post and stand together by screwing the wood together from underneath the stand.
Another great alternative is to cover the tree stand with a burlap tree skirt! However I decided to leave mine bare wood for a natural look.
Now for the really fun part! Here’s how I cut all the tree planks without measuring each and every one!

How to angle-cut the tree boards

1. Select an angle on the miter saw for all your angle cuts, which will create the Christmas tree shape.
I believe my angle was about 35 degrees.

2. Starting with the bottom of the tree, cut the longest board first.
* My first board was 28″ long, x 4″ deep. The tree ended up being 38″ tall. I suggest to cut all your small planks first, then the post last, to ensure it’s long enough for your tree.
Cut one side of the plank…

… then flip it over horizontally, and make a second cut on the opposite side.

2. To cut the next board, lay your fully-cut board on top of the new longer board, then pencil in a cut line at the same length.

3. Position the board in miter saw until the pencil mark hits the 2″ mark, then cut.
This will cut all your boards 2″ shorter from the last. No need to keep measuring!
Keep cutting the boards this way and you’ll have all your tree boards in the perfect tree pattern shape in no time.
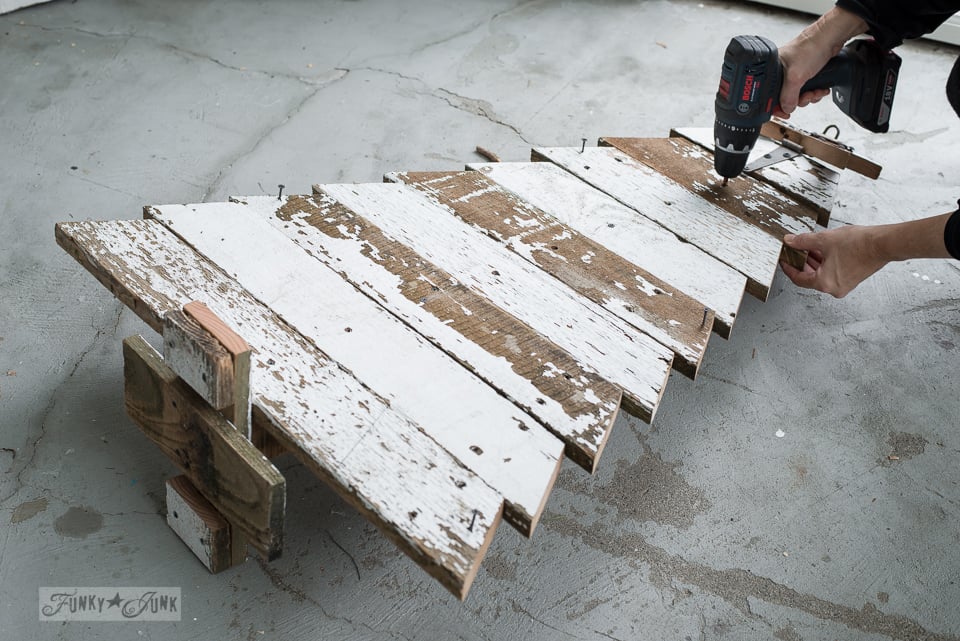
Assembling the reclaimed wood tree
4. Mark the centre of each board, and screw each plank to the tall support post, starting from the longest bottom board, working towards the top of the tree.
While my first plank was placed against the tree stand, you can also leave a little space between the stand and bottom of the tree if you want the trunk of the tree to show.
I used only one screw to secure each board, however you could use more.
To soften the rough edges, lightly knock down the fresh cuts with a sanding sponge.
These chippy white boards sure give the tree an authentic natural look!
Painting and protecting the tree
At this point, you could paint, stain or protect the tree with some kind of outdoor wood protectant if desired.
However I left my own chippy fence wood as-is, as my tree would be sitting under cover. It weathered perfectly.

View Christmas Crates stencil HERE

Check out Shipping Crate Stamps stencil HERE
How to stencil pallet crate markings
Another paint treatment to consider adding a pallet look with either of these two stencils, with one of them being Christmas-themed!
View Christmas Crates stencil HERE
Check out Shipping Crate Stamps stencil HERE
See how the Christmas Crates was used on THIS TREE PROJECT. So cool!

How to build a wood Christmas tree star
I didn’t want to go to a ton of work making a perfect Christmas tree star. No patience for that.
So… I used the edge cuts from the tree boards to build this. How easy is that?
With one exception. The top peak will have to be custom cut, to align with the bottom legs.

 1. Cut sharp angle triangle wood pieces as shown.
2. Dry-fit hinges that connect each of the star points, pencil-in screw holes, then pre-drill pilot holes. Attach with short screws.
3. Attach a large hinge behind the star, to attach to the tree.
Decorating ideas for the DIY Christmas tree
And your beautiful DIY wood Christmas tree is now ready to place on a front yard or back, and ready to decorate any way you wish!
Looks exactly like a pallet Christmas tree without all the work! Any boards will work. You could always create more of a scrappy look if you used different types of planks in various thicknesses and finishes. Any wood makes lovely trees in my opinion!
Rustic tree decorating ideas:
- use mini Christmas string lights or fairy lights
- hang a DIY garland (see mine HERE)
- add small hooks to hang small rustic ornaments like THESE
- attach rusty junk pieces or collections with ribbon or twine
- consider hiding the tree stand with Christmas tree skirts
- try some natural decorations such as pinecones or faux cranberries for decorating

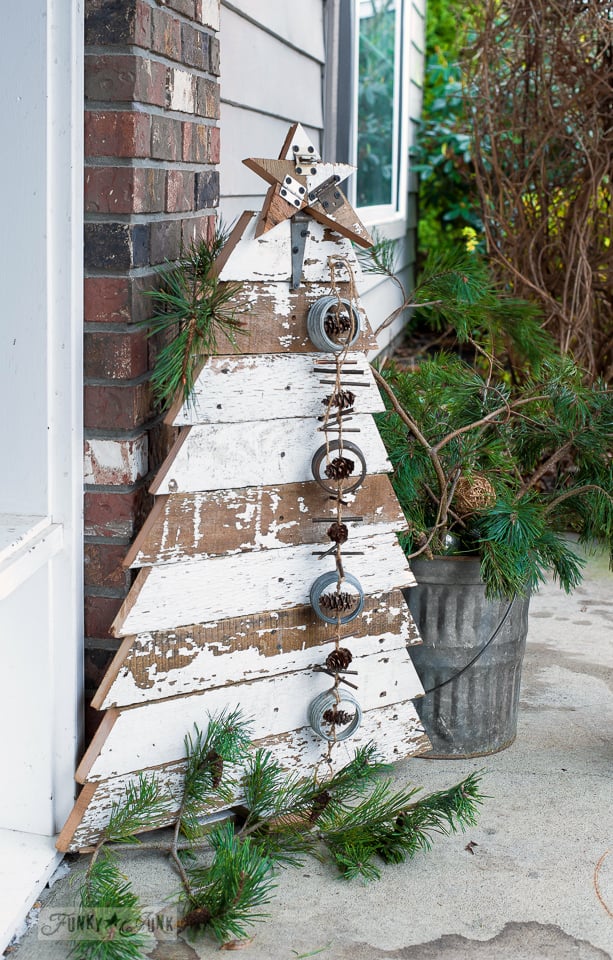
Mason jar pinecone twig garland tutorial is HERE.
I rather liked how this mason jar pine cone twig garland looked! Very quirky!
And of course, you can also build this wooden Christmas tree project for small-space decorating too such as beside a fireplace. Even a bunch of wood trees all different sizes would look super cool! See where your own creativity takes you!
And with that, I have one final thought…
What scrooge? My Christmas front porch has never looked better!
Think you’ll give this alternative Christmas tree project a go?
DIY Reclaimed wood Christmas tree and star
Supplies:
- reclaimed wood planks
- a square post or 2x4 for main support post
Instructions:
- Gather plenty of like-minded wood planks. Anything will do!
How to build the tree stand
- Cross two planks of the same size, and attach with screws.

- Add some boards as feet underneath the top boards so the stand sits level.
How to build the wooden Christmas Tree
- Cut a tall post to the desired height of your Christmas tree. Attach it to the tree stand.

- Select one angle on the miter saw for your tree shape. Mine was 35 degrees.

- Starting with the bottom of the tree, cut the longest board first. Mine was 28" long x 4" deep. Angle one side of the plank, then flip it horizontally and cut the other side.
- To cut the next board: cut one edge first, lay your fully cut board on top of a new board and pencil in the same length. Position in the miter saw until your pencil marks at 2", then cut. This will cut your new board 2" shorter than your previous.
- Repeat until all the boards desired are cut.
- Assemble the tree by screwing in each plank, starting with the bottom of the tree closest to the stand.

Scrap wood star - I built mine from the wood cut scraps!
- Cut sharp angles from straight edged boards.

- Dry-fit until it resembles a star shape.
- Assemble with small hinges from the front so they are exposed.
- Attach the star with one long gate hinge.

Notes
12+ Other DIY Christmas trees to make:

Wood scrap tree farm
Wood scrap Christmas tree farm

Scrap wood Christmas trees crate-style
Christmas and winter reclaimed wood trees, crate-style!

String wrapped wood Christmas trees with junk tree skirts
String wrapped wood scrap Christmas trees

Stenciled Christmas tree with 3D wood crate tree skirt
Vertical Christmas tree porch sign with added 3D crate

Tree shaped Christmas Tree farm sign
A You Cut Tree Farm tree sign in a Buffalo Checked crate
Visit many other DIY wood Christmas trees HERE
Check out all rustic wood Christmas decorating HERE
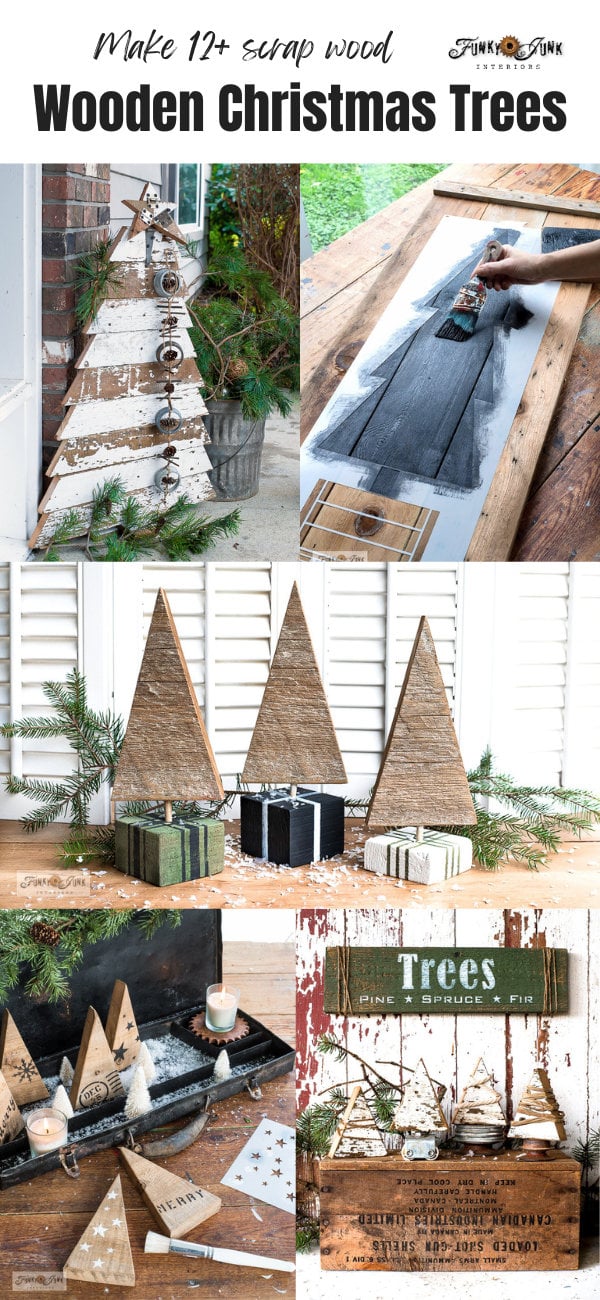
12+ wood Christmas trees in one post
Visit all my DIY wood Christmas trees i’ve ever made (and counting) HERE!
Visit all my rustic Christmas decorating from one post HERE
View all my Christmas decorating from one handy page HERE
I LOVE your tree, Donna! There is no Scrooge in sight.
Love, Love, Love your tree! Thank You for sharing.
Relatively new follower here, all I can say is I love this along with ALL your other projects. Thank you so much for sharing this! I am making this for outside my front door…
I love this tree! I would “undecorate” it and leave it in my landscape all year!
Adorable! I love the star with the hinges… very cute!
LOVE IT!!!!!!
Oh please do not take apart that beautiful tree! I’m not sure what the shipping would be but I would buy it in a minute if I could get it to Alabama! Love you and your style so much!!
That is seriously cute and definitely bumps you out of the Scrooge category. 🙂
Love it!!! All you do fits my decorating style….old and rusty AND repurposed. You are amazing.
I just love your tree. The boards you chose were just the perfect shabby distress. I will be on the hunt for fence now. Love all your projects and the inspiration that you give us all. Have a Merry Christmas my Funky Junk Friend!
Hugs
Becky
I especially love the garland. I really need to do something with my porch before my Christmas company shows up!
Another “junky” masterpiece! I LOVE this!! Pinning for next year! 🙂
You are so funny!! I love your sense of humor! I laughed all the way through this blog today. I really love your cute little Christmas tree! Where would you want to move to if you sold your house? Austin, Texas? That would be great, and we love people on bikes down here. Your son could go to Univ of Texas. See, it’s all planned out! Ya’ll come on down!
I also loved your Coca-Cola centerpiece from yesterday. And guess what I found in my attic 3 days ago while looking for other Christmas items that had seemingly evaporated? A CC crate made into a little wagon. That’s my project for today. Love your blogs! You’re the best!
That is awesome Donna. When Scrooge decides to get in the spirit, (s)he goes Big or goes home – love it! Great tutorial too – thanks.
So clever! I haven’t one anything outside either…you’ve inspired me!
Love it Donna! It’s the perfect junk tree!! Merry Christmas!
Hugs,
Jann
THAT IS VERY GOOD WORK
I love that your helper dressed up for the occasion (tuxedo kitty)! Merry Christmas from Southern Oregon. Thank you for all the inspiration!
(By the way, I’m originally from Ontario).
Looks really good Donna … GREAT JOB !!!
Love the garland too.
Merry Christmas,
Audrey Z. @ Timeless Treasures
Donna, I can’t even tell you how much I love this-it’s awesome!!
Donna, love this fantastic Christmas tree!! The way you made the star is awesome and of course love the decorations on the tree!! 🙂
It’s just perfect. I love it.
Hi, Donna! That is SO DARN BEAUTIFUL! I love everything about it, and your photos are just gorgeous. Thanks for the wonderful post, now super inspired to look at my pile-o-junky-wood again.
love this Donna your best & most creative person! love this tree and Lake or is it Skye? looks like he or she has his winter coat on! 🙂
Audrey
sunset beach ca
The tree is too cute,
Merry Christmas
Not only is that tree awesome but the instructions on how you cut the pieces to size was no less than brilliant! Thanks for the tip 🙂
So original Donna!
How wide and. Long is the bottom board
Hi Ann! I started with a 28″ long x 4″ deep board. The tree ended up being 32″ high. I’d suggest to cut all your small boards first, then the post last to ensure it’s long enough. Good question, I’ll add this info to the post!
Can you advise angel you cut boards for junk tree at? Thanks.
Hey Dennis, sorry, I don’t remember. It may have been close to a 45 degree. I’d just choose one angle that you like the look of and roll with it.
I adore this tree! That star with the hinges!!!
Hi, I was wondering what the length of the boards used as the base were?
Hi Stacy! The base boards are 11″ long, but I suggest to make them longer for more stability.
So sad that you plan on taking it apart after Christmas 🙁
I love this project so much that I featured it in my post “15 Rustic Farmhouse Christmas Decorations”. http://www.diyhsh.com/2017/10/15-rustic-farmhouse-christmas.html Hope you’ll stop by and check it out.
Thank you for this inspiration. I am so glad I didn’t put our old gate to the curb. Didn’t know what it wanted to be. Ta da Christmas tree. Love this! Love re cycling when it’s so adorable.
3. Position the board in the miter saw until the pencil mark hits the 2, then cut.
the 2? I’m not following what do you mean by the 2?
Hi James! On my old miter saw, the metal panel along the back of the cutting surface had a marked measurement guide that is shown in the picture. I never did figure out what the 2 meant but I’m assuming that’s about 2″ from the cutting blade, as my new miter saw isn’t numbered. Don’t put too much weight on the number, just cut 2″ shorter than your original board. Hope that makes sense!