Learn how to give your Christmas tree a little winter personality with this easy and unique DIY wood sled Christmas tree crate skirt made with reclaimed wood!

Once upon a time I use to share really ‘unique’ Christmas tree decorating. Such as this step ladder buried inside Christmas tree. And the time a ladder that BECAME the Christmas tree.
Yup. Quite the trees, huh?
But these days, I’ve swapped out the tree challenge to creating unique ways to create the best christmas tree crate skirts or collars with reclaimed wood! From this antique crate… a white chippy wood tree crate, to my fav, a modern farmhouse Christmas tree crate and today, a new one!
Because this year, a new idea emerged. I actually had planned to place the Christmas tree stand on top of a vintage sled. But when I changed my mind from an artificial Christmas tree to a real tree, the sled didn’t fit. Hmmm….
And that’s when the wheels started turning. Why not style a DIY Christmas tree crate into a sled shape?! So that’s exactly what I did.
This DIY wood sled Christmas tree crate skirt is built from reclaimed wood, and can be easily built around a Christmas tree already up! So yes, you can change your mind if you wish to swap out your current Christmas tree skirt to one that looks like a vintage sled!
And all for the price of free scrap wood.
You’re gonna love this sleigh idea for the holiday season… here’s how!
This post contains some Amazon affiliate links in which I earn a small percentage from qualifying purchases through these links, at no extra cost to you. Thank-you for helping to support my blog!
DIY Wood sled Christmas tree crate skirt
Supplies you’ll need:
4 wider boards to crate your tree stand
2 thinner, longer sled blade planks
Bosch orbital sander – I like variable speed
Kreg Jig pocket hole maker (optional)
Some rusty junk brackets

Cutting the wood sled & crate boards
1. Christmas tree crate:
Cut 4 wider boards that are slightly taller and longer than your Christmas tree stand.
Mine measure: 8″ wide x 20″ long.
I used reclaimed fence boards, however pallet wood or any reclaimed wood will work.
2. Wood sled blades:
Cut two thinner boards longer than your tree crate.
Mine measure 3.5″ wide x 36″ long.
3. Round the front-bottom of the sled blade planks by using a large plastic lid to trace, then cut out with a jigsaw.
4. Cut the back of the sled blade planks on a 45 degree angle, with the longest length at the bottom.
Lightly sand all the cuts with an orbital sander.

Assembling the wood sled crate
5. Attach one crate board to one sled blade board by screwing them together with the sled board on the outside. Create one for each side of the sled.
- Allow 9″ space along the top-front of the sled boards to allow room for a support board yet to come.
- Assemble the boards from the back so the screws don’t show.

Closing in the tree crate
6. Attach the front and back crate boards to close the crate up… if your tree isn’t already up.
If it is, close up 3 sides, and install the 4th once the crate is positioned around the tree.

Search for Kreg Jigs HERE. Mine is a K4.
Two ways to join the crate
Joining the crate can be done two ways. Either screw them together at the corners, or use a Kreg Jig pocket hole maker to assemble the crate.
How to use a Kreg Jig pocket hole maker:
- Select the front and back boards to add pocket holes.
- Face the wrong side of the board towards you.
- Adjust jig to your wood thickness, clamp into the jig, then screw the holes on both sides of each board.
Kreg Jig Video how-to:
Click above to watch a short video on how to use a Kreg Jig. It’s very easy!
Learn how to use a Kreg Jig from THIS POST.

Check out that vintage wood sled coming to life!

7. Cut a support board measuring the width of the sled that will sit on the sled boards.
My support board measures: 3.5″ wide x 23.5″ long.
8. Position the support board on top of the blade boards, then attach with screws from the top.
9. Bend, then attach two door hinges (or the long parts of door hasp latch locks) on each side of the support board corners for a fun hardware accessory.

10. Add a cotton pull rope through two door hasp latch lock brackets (the piece you hang a padlock on ), then cut and knot.
11. Screw the brackets to the support board.

12. Place a 3-sided crate around the tree stand, then assemble the 4th side. Install the support rope board and you are done!
If your tree isn’t up yet, finish the stand, then plunk the tree stand inside the crate.
A perfect fit!
But let’s add one more live Christmas tree detail…

13. Hide the tree stand by tucking in two burlap sandbags or some cut up burlap fabric inside the tree crate.
Or use a white furry rug or white sheet to mimic snow!
So let’s add one more small accessory for the tree, to chime in with the DIY wood sled Christmas tree skirt.

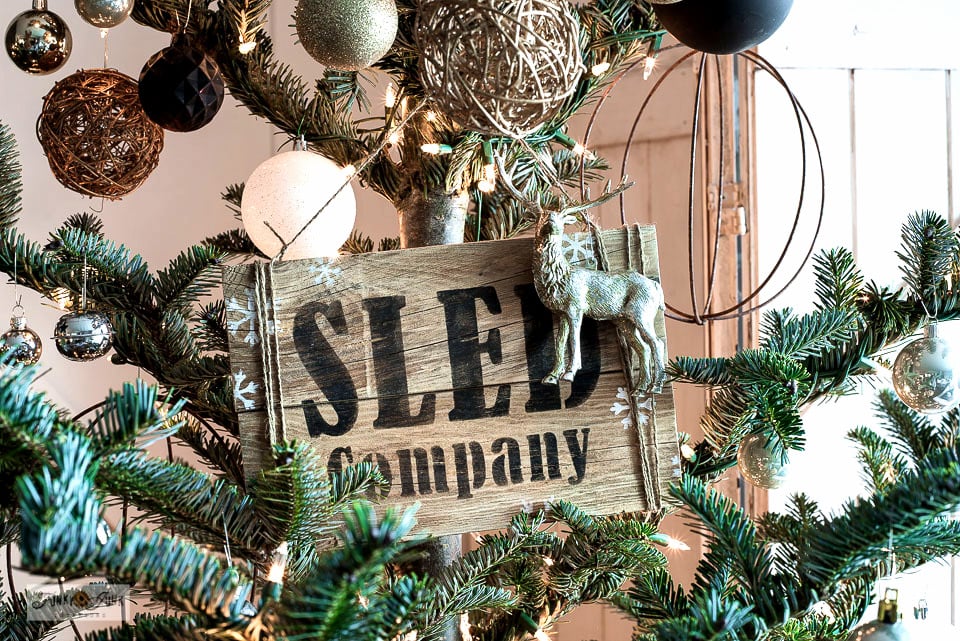
Building a mini Sled Company sign
This little Sled Company sign is sized perfectly to hang on a Christmas tree to chime in with the DIY wood sled Christmas tree skirt!

1. Cut and join two reclaimed wood planks with a Kreg Jig.
Each plank measure: 3.5″ wide x 10.5″ long.

Find the Vintage Sled Company – Small stencil HERE
2. Stencil Sled Company in Fusion Mineral Paint’s Coal Black for the lettering, and Casement for the snowflakes.
How to stencil for flawless results:
- Position stencil in the centre of the planks.
- Load stencil brush with black paint, then remove most paint onto a rag.
- Swirl or tap brush through the stencil lettering for the desired effect.
- Stencil on white snowflakes in random sizes and placements where desired. This stencil comes with 3 different sizes!

3. Starting at the top of the sign, wrap twine around the sides of the sign several times, ending with a long length on top.
Tie each side together at the top, but don’t trim the long ends yet!

4. Knot the two twine sides together in the middle with a knot. Then trim all the cut ends as desired.

Find the Vintage Sled Company – Small stencil HERE
So let’s hang up the sign onto the Christmas tree and see the final results!
Watch the video tutorial of the sign in Instagram stories HERE

The finished Christmas tree in a sled crate
Welcome to this year’s Christmas tree! This is a real cut Charlie Brown styled tree with a tall, skinny shape that fit this little tight corner of the living room perfectly!
Bonus points since I didn’t even have to move the furniture!

And with the little Sled Company sign that took center stage, it themes the tree perfectly with its swanky new DIY wood sled Christmas tree crate skirt!
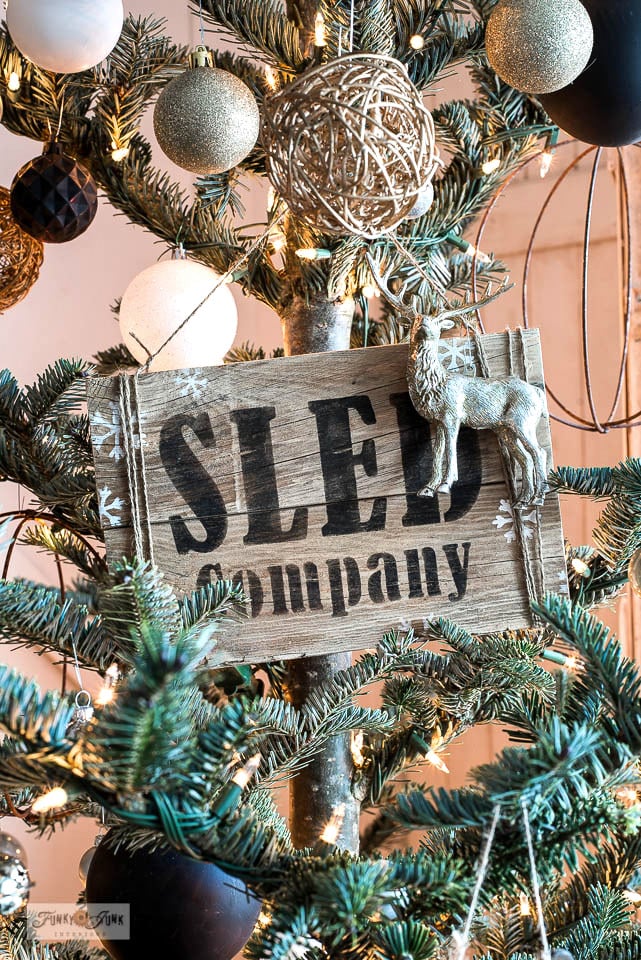
This Sled company sign is adorned with a silver deer, to further the story. Think Santa would approve?
The tree is decorated in neutrals of silver, white, black, and a wicker wood ornaments with a few rusty metal orbs for a little dash of rusty junk!

I landed these cute crossed wood ski decorations from Walmart which also chime in with the outdoorsy theme. Aren’t they the cutest?
And then there’s that tree crate in a sled. It really is the perfect fit for my smaller space!
However I could also imagine it being much longer if you have the room, so you can stash presents on or in it!
And that wraps up the Christmas tree tour!
We’re nearly there! And I can’t wait to put up the ‘ol feet and watch a few fluffy Hallmark shows.
Who am I kidding? I’ve already started… how about you?

Other DIY Christmas tree crate skirts:
Farmhouse Christmas tree crate with flocked tree
Black milk painted rustic tree crate with real forest tree
White chippy tree crate with sandbox corners with real tree
Visit ALL Christmas tree posts HERE
Guess what I’ve gotta have now? Yup, a sled skirt. I’ll let you know if I’ve got one by the end of the weekend.
I can’t wait to see your rendition! But if you copy it ya gotta blog about it! Them’s the rules, friend. Kidding aside, I miss your posts! It’s ok to just show messes too ya know. LOL
You always find the prettiest trees! I don’t care for full evergreens, it makes it hard to see the ornaments properly. You did a great job choosing this year’s tree! Of course the sled skirt is amazing too!
Thanks Sharon! I tend to gravitate towards the Charlie Brown types… I just prefer the quirk! And yes, they sure are easy to decorate!
Donna,
How cute is the sled tree skirt. Love it!
Thanks Nancy! I’m really pleased with how easy it is to make too!
Omg! How cool is that! I need to make me one of those sleds.
Love your tree, also! You always have the best trees
I didn’t know it until now but my Christmas tree NEEDS a sled. Next year for sure!