Transform recycled party trays into beautiful garden stepping stones with this easy DIY project! Not only is it a fun and creative way to repurpose materials, but it also adds a unique touch to your garden.
For years I’ve been wanting to try my hand at creating DIY garden stepping stones. But not just for decor. I tend to wander the landscape barefoot, so at times it sure would be nice to simply step from the lawn to the stones rather than tip toe through dirt! Trying to keep my feet clean is a summertime challenge I could do without…
Other garden walkway ideas:
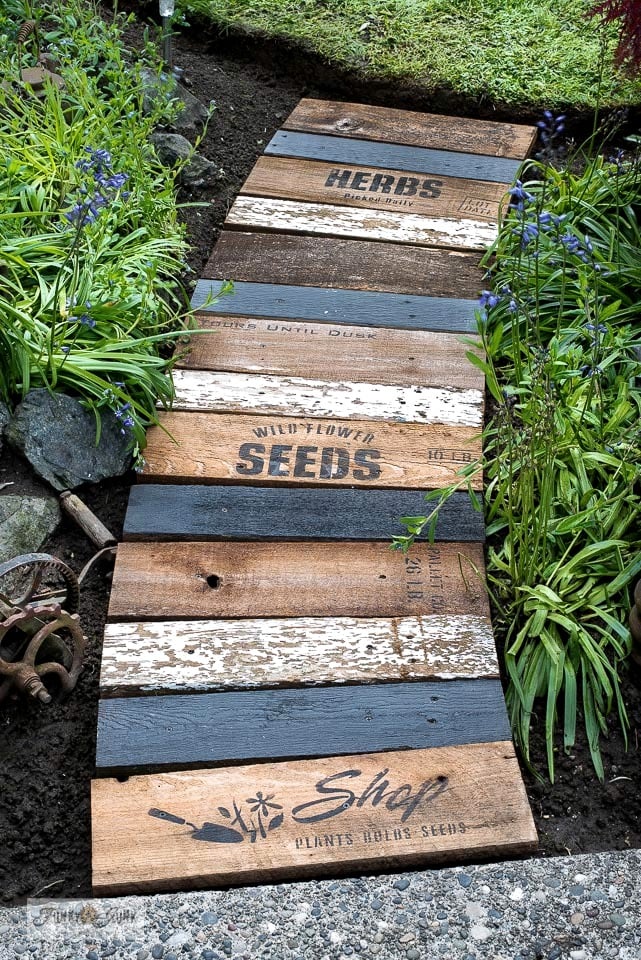
I’ve already honed into the garden walkway using reclaimed wood HERE. And THIS other wooden walkway was one of my favs! And yes, they both not only work great, they are cute and affordable to make too!
However sometimes you just need something smaller scale… like stepping stones to fit tighter nooks and crannies. Plus, I think they can add a personalized touch to an outdoor space, depending how you make them.
So when Hometalk recently challenged me to make some kind of stone path out of a recycled item, I was all for it! I had never worked with concrete before, so I was a little hesitant that I could make it work.
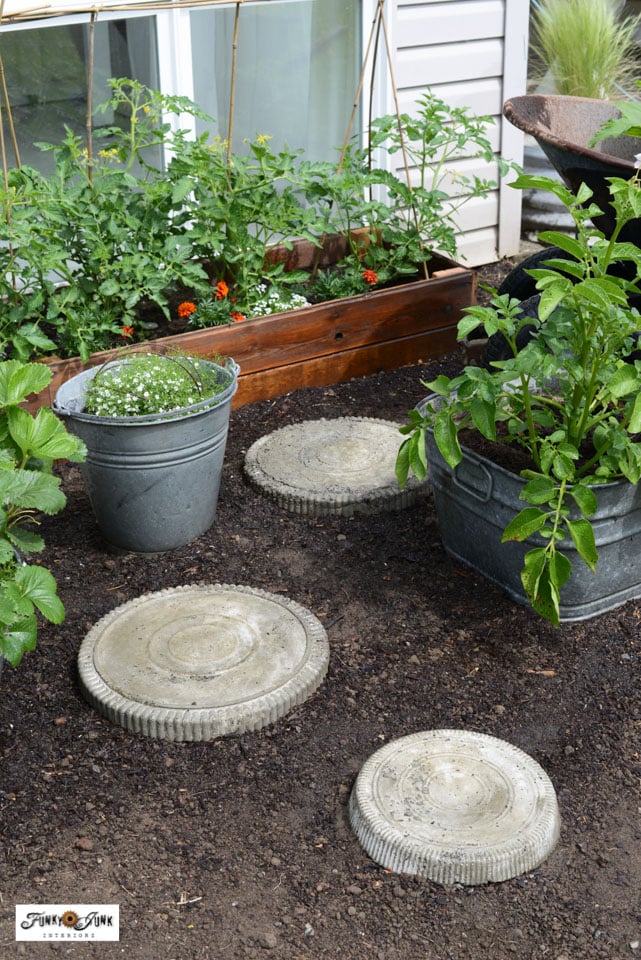
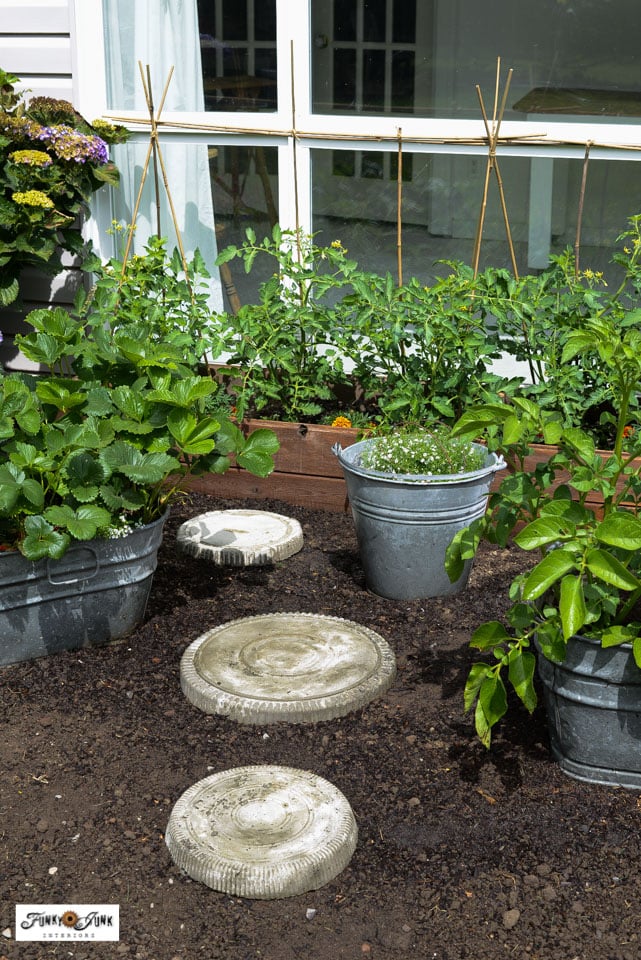
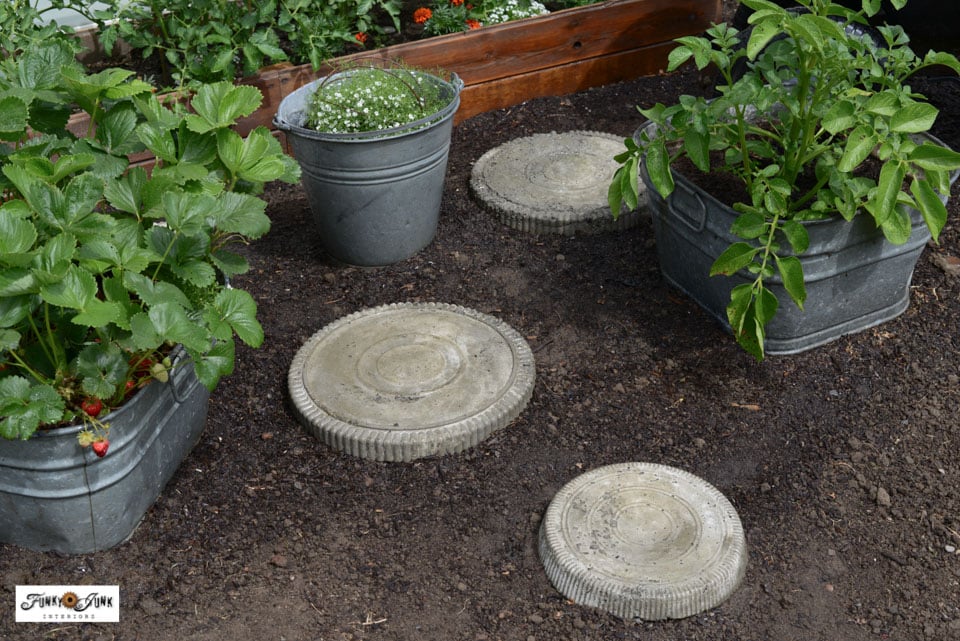
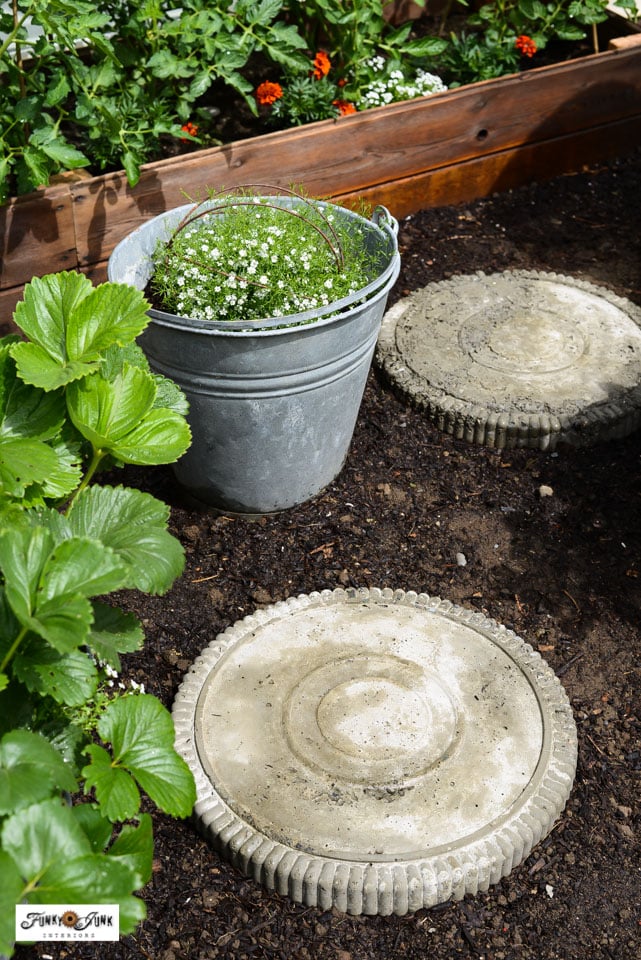
But the end result is a testimony that this project does INDEED work! I have since scattered the stepping stones through my little upcycled vegetable garden and can testify that my feet are indeed cleaner, plus the stones offer a beautiful addition to any garden space!
So today, I’m going to share all my best-served tips on how to make DIY garden stepping stones successfully so you can are also more inclined to give it a whirl if you would like to just quit scrubbing your feet… or shoes!
DIY Garden Stepping Stones Using Recycled Party Trays
Supplies you’ll need:
Clean round party trays using the bottoms or lids (mine made 11″, 12″ and 16″ stones)
Cooking oil (or spray)
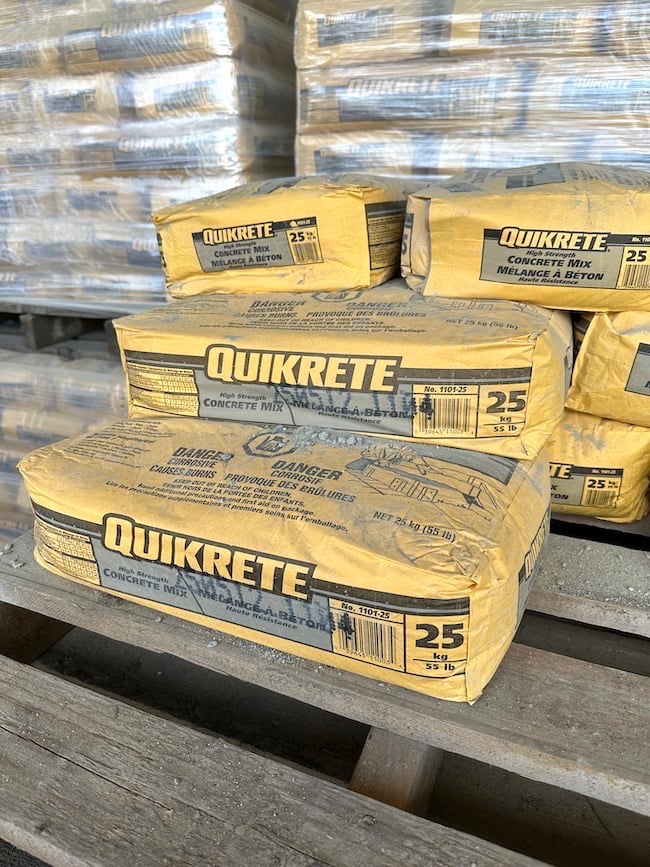
Quick drying cement – I used Quikrete which dried overnight.
Clean 5 gallon bucket (I use these for weeding the garden too!)
Hand garden shovel (I preferred this over a typical long handled shovel)
Water nearby (bucket of water or garden hose)
Selecting plastic party trays
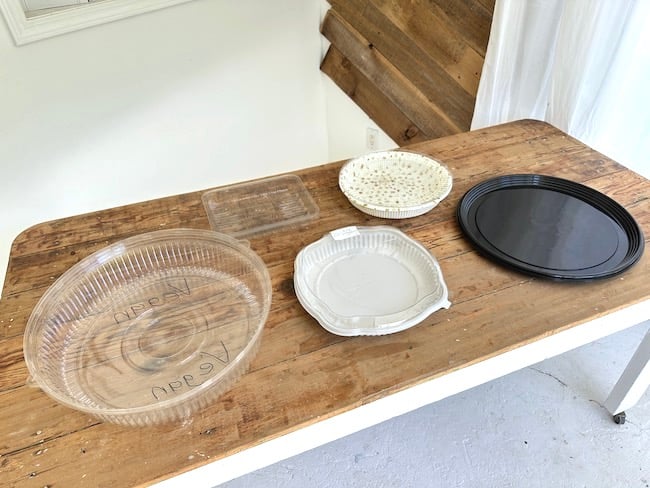
1. Gather up various sizes of clean plastic party trays.
I did a call out to my neighbourhood, and managed to collect 2 very large round tray containers and 2 smaller since I didn’t have any on hand. The largest containers were originally from Costco or SuperStore in Canada, and the smaller trays were from smaller deli stores. However I will be saving any future party trays in the future should I get some yummy food in them!
The stepping stone sizes my trays made were sized: 11″, 12″ 16″.
2. Decide if you will use the lids or the bottom containers.
Since all party trays are made differently, I used some lids and some bottoms, depending which side could hold more concrete. You’ll want to make sure you can pour at least 2-3″ of concrete inside so the DIY stepping stones will be durable enough to stand on.

Lubricate trays with oil
3. Clean, then oil the bottom and sides of the selected party trays.
Because I was concerned about the concrete releasing from the trays easily, I decided to prep the trays by lightly coating the sides and bottoms with cooking oil. Cooking spray would be good too! I’m not entirely sure this step is necessary, but since mine popped out really easily, I’m calling this move a win anyway! I mean, what can it hurt?
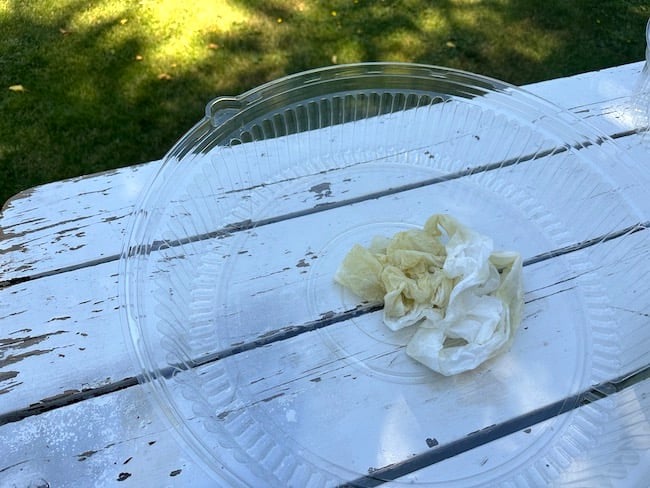
Using some tissue, I poured some olive oil into each pan, then smeared it around the bottom and up the sides so they were lightly coated. I didn’t go into every single nook and cranny and they still released well.
How to hand-mix a smooth batch of concrete
4. Pour some concrete powder mix into a 5 gallon bucket.
For my 4 stepping stones, I used up two high strength concrete bags of Quikrete in 55 lb bags. It is labeled for sidewalks, not just posts with an overnight dry time, so I felt that promised longevity and stability would be good for stepping-stone walkways. And it was. Great, in fact.
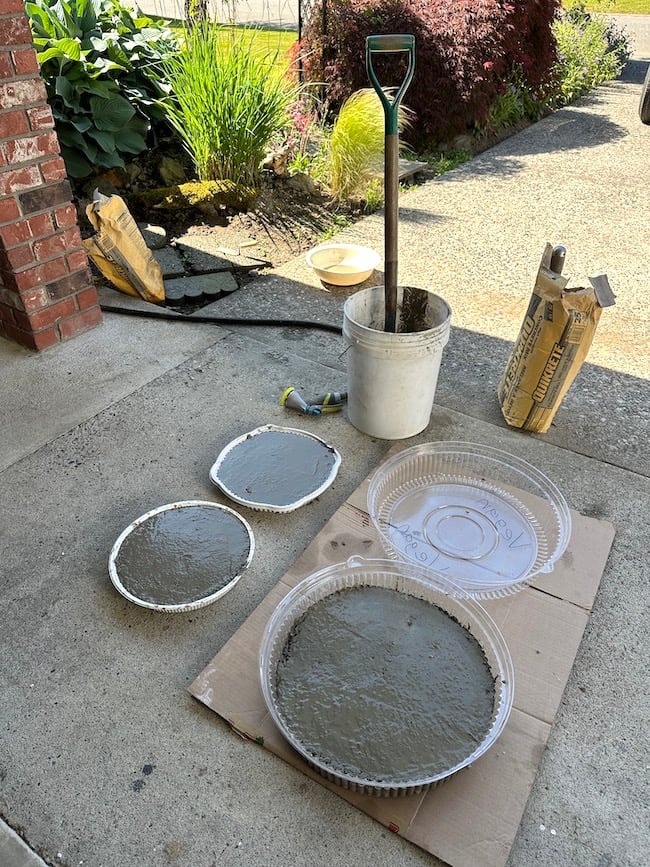
I guesstimated how much each tray could hold, then attempted to mix that size batch of concrete at a time. Mixing smaller batches was easier to manage, as working with concrete is somewhat heavy!
5. Add a little water to the concrete.
I started with a bowl of water attempting to measure and mix according to the concrete bag instructions. But I soon graduated to guessing using a water hose. LOL It wasn’t like I was building a house after all!
I added just enough water to get a mix started. If it was too dry, then adding more water gradually was easier.
6. Wearing longer rubber gloves for hand and arm protection, mix the concrete with a hand garden shovel.
I first started mixing the concrete using a large shovel, but soon found it was just too heavy for me. So I got on my hands and knees, and used a small hand garden shovel instead. WAY easier.
HOWEVER make sure you achieve a nice, smooth consistency, because the pours I made that were a little dry left some exposed gravel on top, while the smoother pours made smoother stones once flipped over.
Oh yes, and be sure to rinse off your tools frequently before any concrete sets on them.
Pouring the concrete into trays
7. Pour or shovel the concrete into the tray.
Pour in a little bit of concrete at first, then lift the tray and drop it several times. This will ensure all the nooks and crannies fill up on the underside.
I’d suggest to make your concrete pours at least 2-3″ thick. Too thick will become very heavy.
The smaller trays got filled to the top and the larger trays got filled to about 2″-3″ since they were so much bigger and ultimately heavier to lift.

8. Top up with more concrete until the desired thickness, then work the concrete smooth with a small concrete trowel until you achieve a creamy texture on top with the rocks falling inside the concrete.
9. Allow to dry overnight.
Releasing the concrete from the trays
10. Once dry, lift the tray with one hand, hold your other hand over the stone, then gently tip the tray to release the stone.
I suggest to do this over top of cardboard so there’s some cushion in case you drop it too hard! The large stones were still manageable, but barely.
And I also found the trays came out unscathed! They look as good as before I used them, so I have the ability to make more matching stones if I wish!
To paint or not to paint
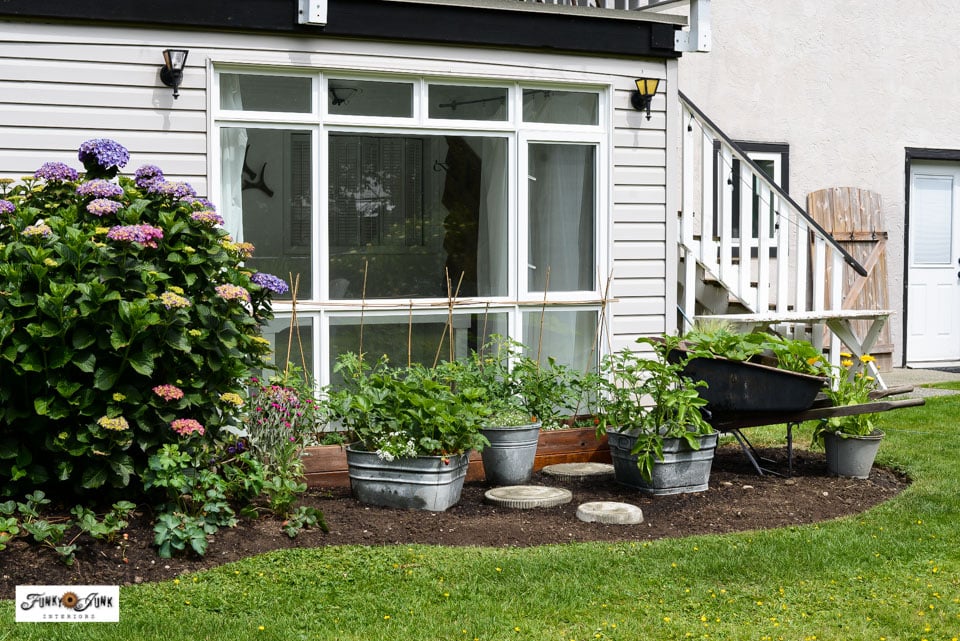
At this point, you can also paint, protect or stencil the stepping stones if desired. I decided to keep mine as-is since they chimed in super nice with the galvanized garden planters.
Plus, I don’t feel I have to fuss as much to ‘try’ and keep them spotless or need to worry about pressuring washing the paint off at a later date this way.
Take the full upcycled raised vegetable garden tour HERE
Position each stone where desired
11. Position each stone where desired.
I arranged my stones to become a concrete stepping stone garden path of sorts, through my vegetable garden. I made sure the stones were placed in areas that helped me reach the garden beds without effort.
The placement I liked best is placing the larger stones in longer standing places, while using the smaller stones as a walking pathway to get there.
Level each stone using a carpenter’s level
12. Place a carpenter’s level across each stone, then level using more soil or rocks underneath the lower areas until each stepping stone feels sound.
The soil underneath will help support the stones to stay level. No need for sand or gravel underneath unless you’d like extra insurance.
The stepping stones are also high enough to allow for great drainage around them as-is.
Then enjoy your lovely new, concrete stepping stone garden walkway or path!
I mean, check out those shapes! Aren’t they wonderful? I love the edge detailing that really took well to each container shape!
In the picture above, these two stones were poured differently. The top stone came out rougher and a little more rustic, thanks to using a dryer concrete mix (less water added). The bottom one was a smoother pour, resulting in a smoother finish. I like both looks, but this is good to know.
Price wise, since the bag of concrete was about $11 Canadian, I’d say the larger stepping stones cost about $6 each to make. They are more price efficient than buying from a store, plus they’re more unique too!
Other ways to use these garden stepping stones
I could also see any outdoor living space enhanced with this idea!
- Imagine the versatility of moss or ground cover growing in between them…
- Or a long pathway surrounded with mulch.
- You could even get all kinds of fancy and try your hand at a stone patio using different sizes!
Take the full upcycled raised vegetable garden tour HERE
Flagstone or brick are wonderful components. However those can get pricey and are very heavy to carry around which makes for a trickier installation.
I’m just so glad I was encouraged to try my hand at making DIY concrete stepping stones for a garden walkway! They have so much more personality than standard concrete pavers you purchase. I think out of all the permanent walkway ideas, various charm-filled DIY garden stepping stones win this one for me!
What do you think of the DIY garden stepping stones? Would this be something you may try?
Other unique garden ideas to make:
Garden-themed walkway with reclaimed wood
Upcycled raised vegetable garden
Wood raised garden bed for tomatoes
Visit more: garden junk HERE or / outdoor projects HERE
DIY Garden Stepping Stones Using Recycled Party Trays
Supplies:
Instructions:
Preparing the party trays for pouring
- Oil the bottom and sides of each party tray. I didn't need to go into all the nooks and crannies.
- While wearing long gloves and eye protection, pour some powdered concrete mix into a 5 gallon bucket.
- Add some water, then mix with a small garden shovel until you get a smooth porridge consistency. I found mixing small batches at a time easier to manage. And remember to rinse your tools frequently.
- Set the party trays on cardboard for extra protection. Pour concrete into each tray until it's at least 2-3" thick. I started filling the trays with a shovel, but as the bucket lightened up, I poured the concrete direct from the bucket.
- Lift the trays while filling, then drop them so the concrete gets into all the groves of the tray shapes.
- End with a smooth trowel across the top, then allow to dry overnight.
Removing the concrete from the trays
- With cardboard underneath, place one hand across the top of the concrete, then pull the tray away with your other hand until it pops off.
- Gently set the stone on the cardboard and allow to cure for a day or so to be on the safe side.
To position the garden stepping stones
- Level the soil, then position a stone where desired. Twist it abit to embed it into the soil.
- Place a construction level across the top, then continue to add more soil underneath until the stone sits level.
- Protect the concrete with a topcoat if desired. However I loved mine as-is!
Notes
Wow! These look amazing. I wish I weren’t living in an apartment! Glad you elected not to paint them. Does Quikrete contain gravel? You mentioned gravel a couple of times. Just curious.
Thanks Teddee, I’m so glad I went for it! And yes, Quikrite does contain pebbles / gravel, what have you. I didn’t investigate other types, just went with what my local hardware store had in stock. But I’d bet there’s lots more options!
Beautifully done and the tutorial was super easy to follow.
Thanks for the tutorial and information. One of the problems I encountered was being able to lift the bag of concrete mix.
If on a limited budget, Lowe’s and Home Depot sell broken bags of concrete mix for low prices.
Well, this is fun! I need to rework my garden step stones and add some more. I love this unique DIY idea!
Donna, This is such a clever way to make stepping stones! I’ve never seen someone repurpose these trays for concrete molds. What a fantastic idea. Love how your brain works.