Add a touch of whimsy to your winter decorations with this quick, easy and affordable tutorial on how to make paper snowflakes from doilies! Follow our step-by-step guide with helpful video to create 3 different sizes of 3D snowflakes for a stunning, abundant display! They look truly magical wherever you hang them.
As a Fusion and Amazon Influencer, this post contains affiliate links in which I earn a small percentage from qualifying purchases at no extra cost to you. If you shop Fusion Mineral Paint products through this post, you will get 10% off. Thank-you for helping to support my blog!
to get our newest upcycled projects sent right to your inbox!
Can you believe that we are deep into the midst of fall already?! While I loved making fall projects, such as the sock pumpkins being my ultimate favorite so far this year, in the DIY world it’s time to think of Christmas and winter projects too!
Other easy festive projects to make:
I love seasonal projects that can be made quickly and affordably! Some of my favorite winter and Christmas projects made with simple things are:
Branch and cranberry mini wreaths
Wooden candles made from wood blocks
Scrap wood Christmas trees in present bases
And today I have a new idea to share that is super affordable, and only takes a few minutes, that creates a major impact!
I particularly love to incorporate snow in my winter or Christmas decorating. Snow spray on this winter mantel looks pretty realistic!
However when I made these paper snowflakes with doilies, I couldn’t believe how fast and easy they were to make, taking only a couple of minutes per snowflake! While being super abundant thanks to their 3D shape!
While paper doily snowflakes are not new to the net, I am sharing my own take on them in hopes that these instructions are super easy to follow.
Try one, and you’ll be creating a major whimsical winter wonderland snowstorm in no time at all… because these 3D paper snowflakes look amazing wherever you hang them!
Here’s how to make each paper snowflake using pre purchased paper doilies:
Make Paper Snowflakes With Doilies: Easy, Affordable, And Visually Stunning!
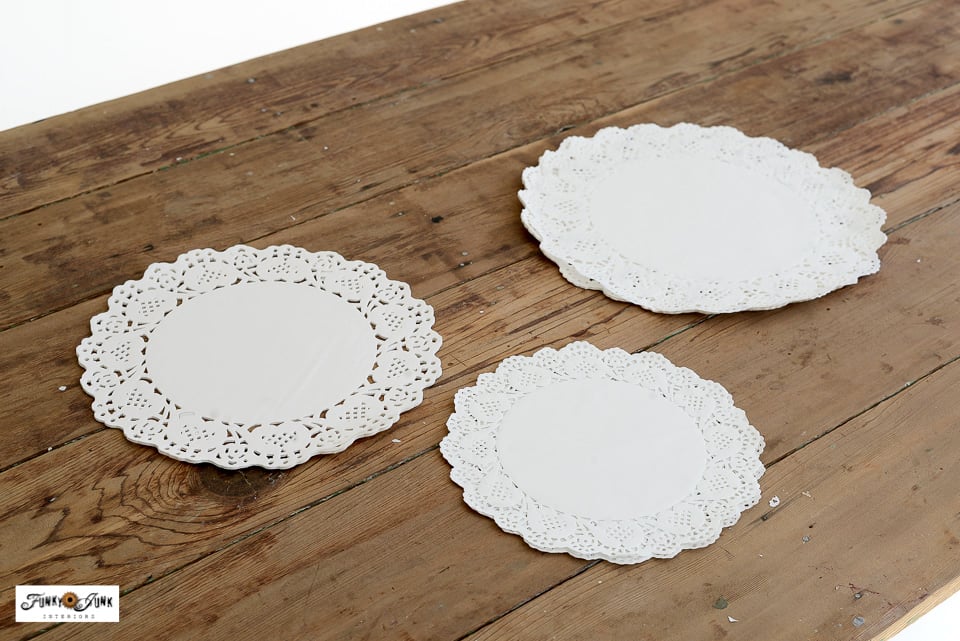
I started by creating 3 piles of the 3 different sized doilies.
Supplies you’ll need:
1 pack of 3 different sized white paper doilies – mine measure 8.5″, 10.5″ and 12″
Neutral toned thread or invisible thread (use whatever blends best with your background)
THIS is the 3 sizes pack of paper doilies I purchased HERE
How to fold each of 6 doilies to make 1 snowflake
You will require 6 doilies of the same size to make 1 easy paper snowflake. They can be made in any given size. Here’s how to fold and glue all 6 doilies to create 1 incredibly abundant snowflake!
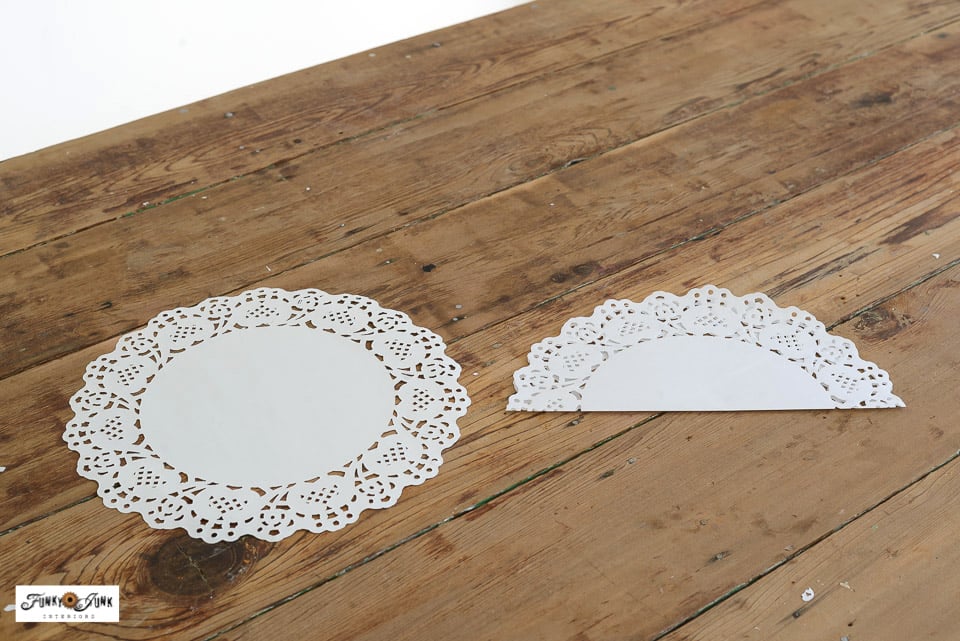
1. Place a paper doily good-side-down, then fold it in half.
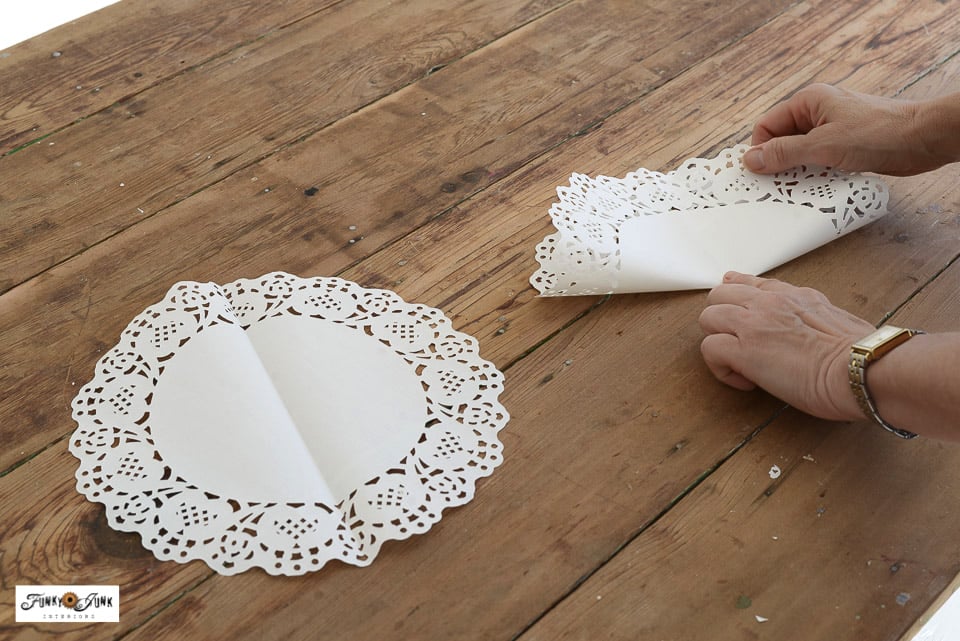
2. Open the doily. With center fold positioned vertical, fold the doily in half again, and pinch only the middle to make one small indentation.
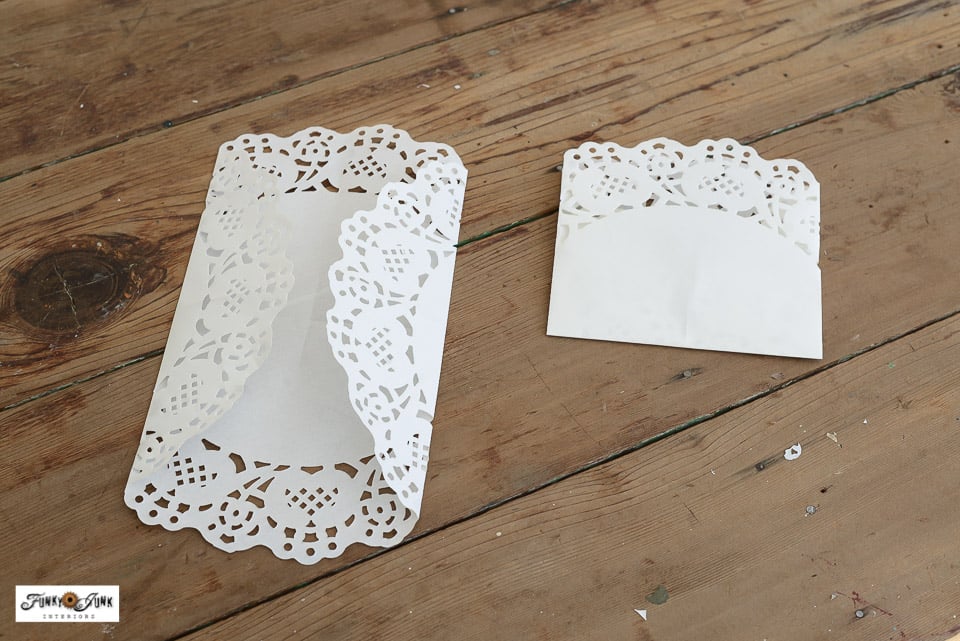
3. Open the doily, then fold both the curved top and bottom to the center mark so both meet, but don’t overlap.
4. Position the folded sides to your left and right, then fold in half with the fold on the bottom, and open side on top.
You should be left with a smooth front with no center fold showing. It took me a few tries to get this part right, but once you get it, you’ll fly quickly through the folding!
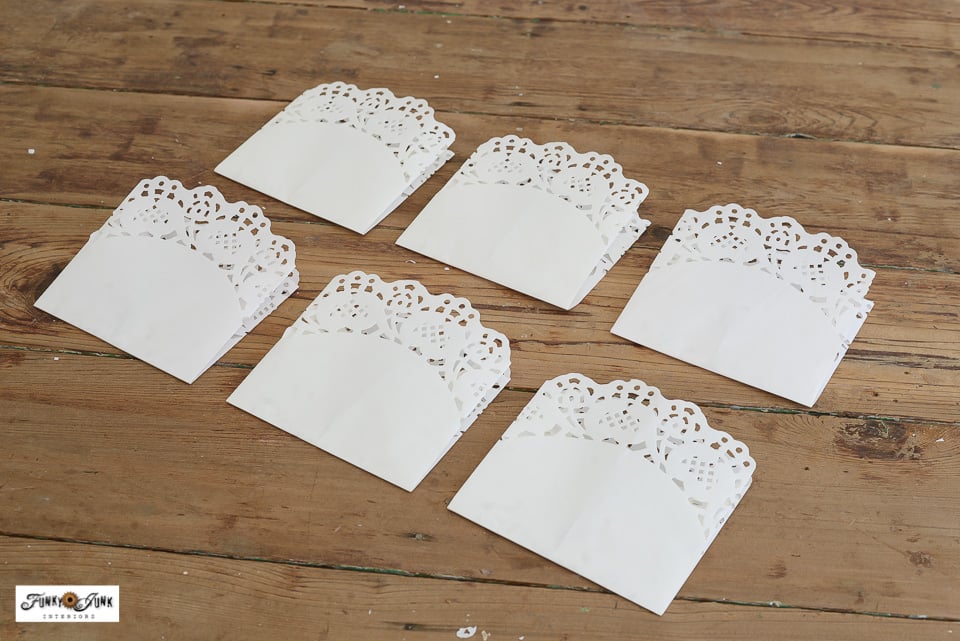
5. Use the first folded snowflake as your template, then fold the other 5 doilies the same way so you have 6.
Gluing the inside of each doily
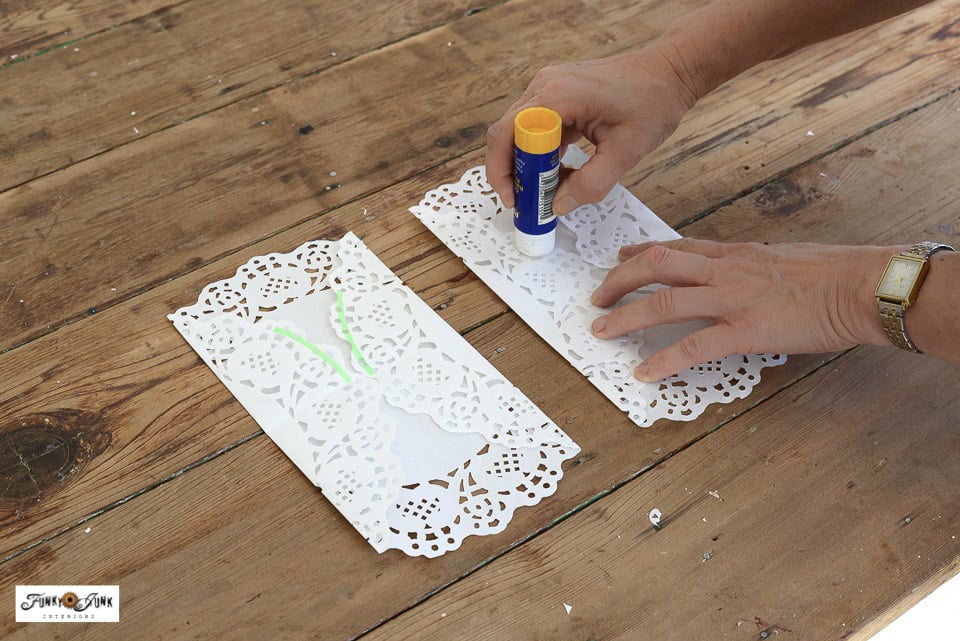
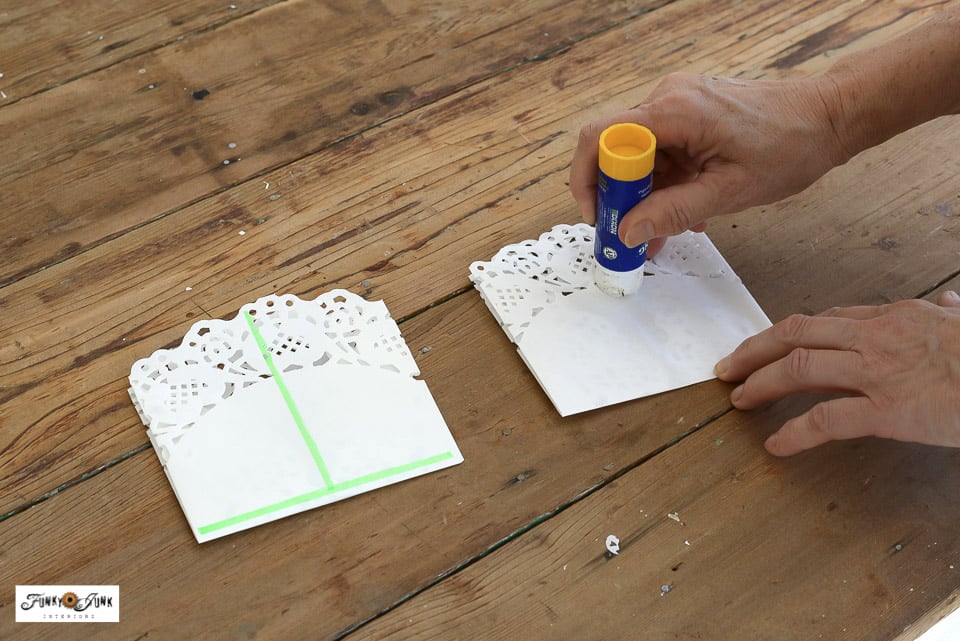
6. Open one side of the folded doily, then with a glue stick, apply glue on only half the left and right rounded lacy areas as shown in green, starting at the middle fold, then working up.
Do not glue right to the top, or you won’t get the right effect. Ask me how I know…
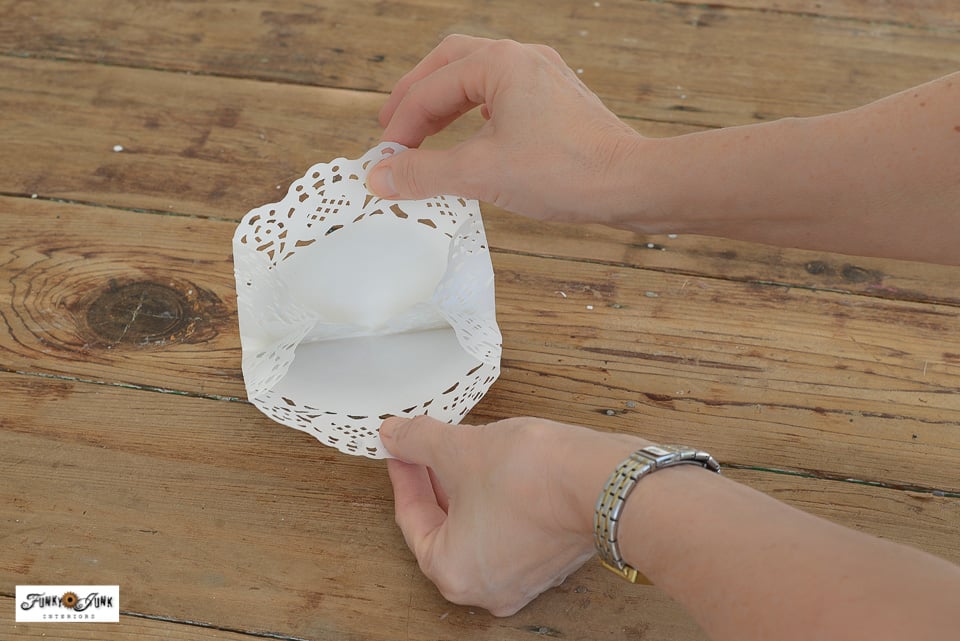
7. Gently open each pocket, to ensure the only thing stuck together are the small rounded sides on the left and right.
Glue tends to run through the open doily areas where you don’t want it to, so gently pulling each one open is important to get the right effect.
How to glue all the paper doilies together
8. To the front of one folded doily, apply glue horizontally along the bottom, and vertically in the middle to create an upside-down T shape. (as shown above in green)
9. Place another folded doily on top, then press along the glued areas so they stick together.
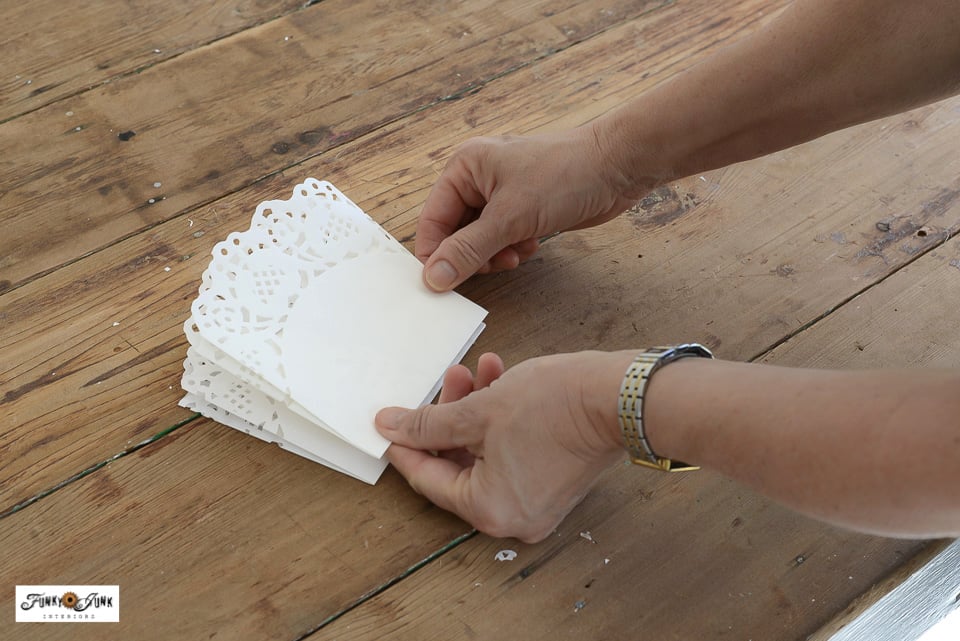
10. Repeat gluing the fronts and sticking the doilies on top until all 6 are glued together.
Check for open pockets inside each doily
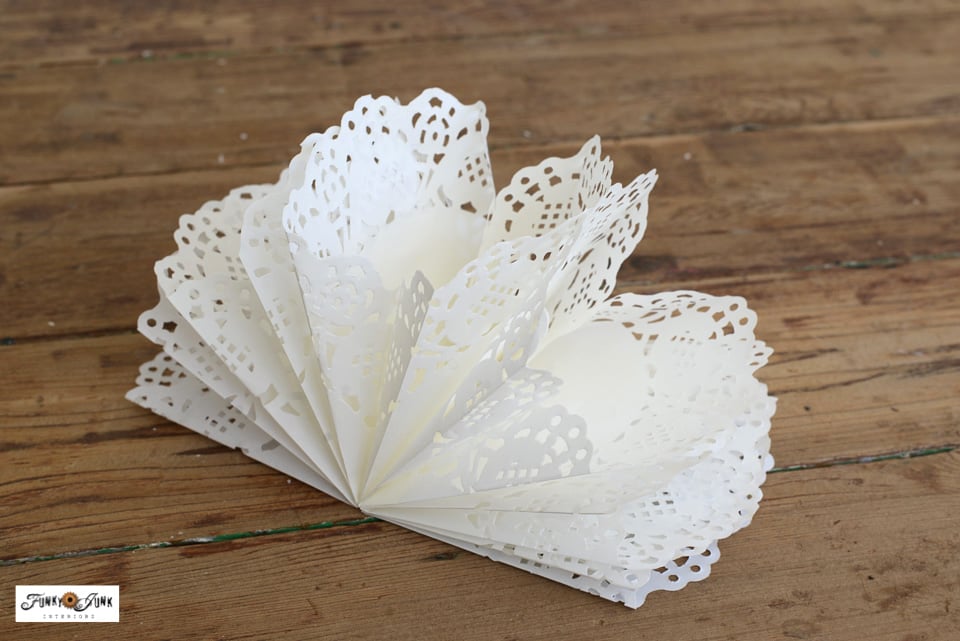
11. Slowly open the glued doilies into this half fan shape, then gently pull apart any stuck areas where glue seepage occured through the doily holes.
The pockets should be stuck to each other, with each pocket open inside.

How to join the doilies to create the snowflake shape
12. Apply glue on the top doily, then slowly bring the two ends together, holding them in place until the glue takes.
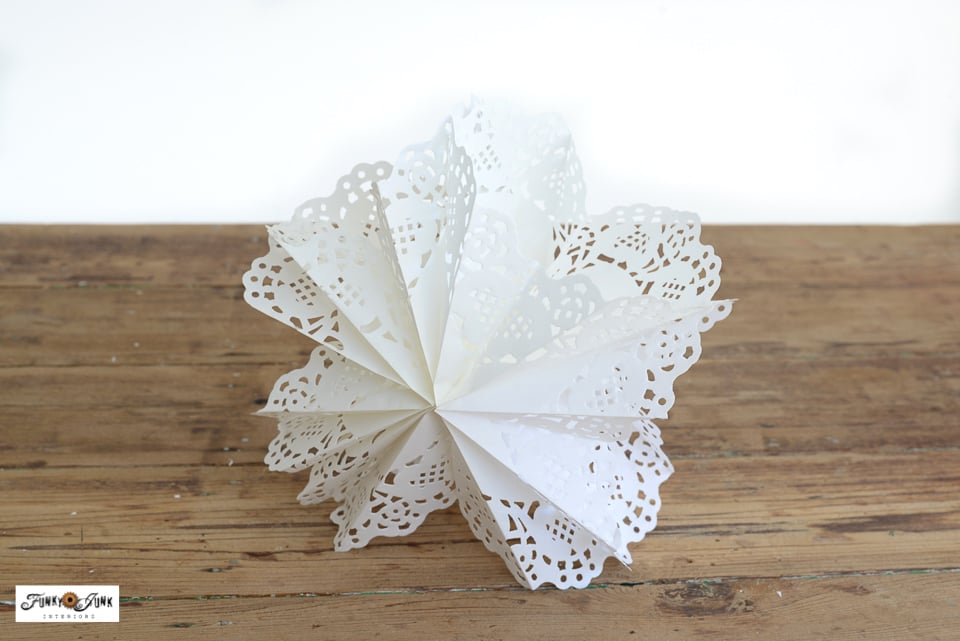
And that my friends, is how you make a 3D paper doily snowflake! The instructions written out feel lengthly, but trust me when I say, once you get the hang of that folding, you can make a paper snowflake in under a couple of minutes!
Watch the video below the photos to see how easy the process really is!
13. To make other paper snowflake sizes, simply use different sized doilies.
The effect is stunning and effortless for each size! The more the merrier I say…
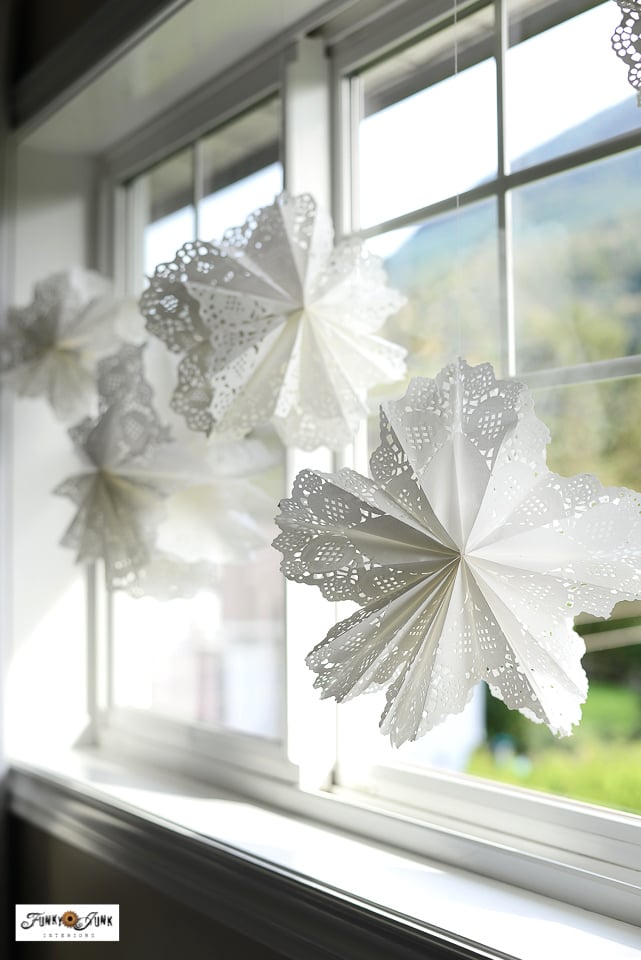
How to hang paper snowflakes
To mount them in a window, feed some neutral thread through a top hole, double up the thread, then tape it to the top of your window frame so your drapes can still close.
The thread basically disappears, making the snowflakes appear to be floating! It’s a wonderful effect.
Then stagger their sizes and positions so they have a bouncing effect.
How perfectly cute do these look filling this entire bedroom window?! When a gust of wind catches them, they slowly spin as if they are falling from the sky! It’s a very dreamy effect.
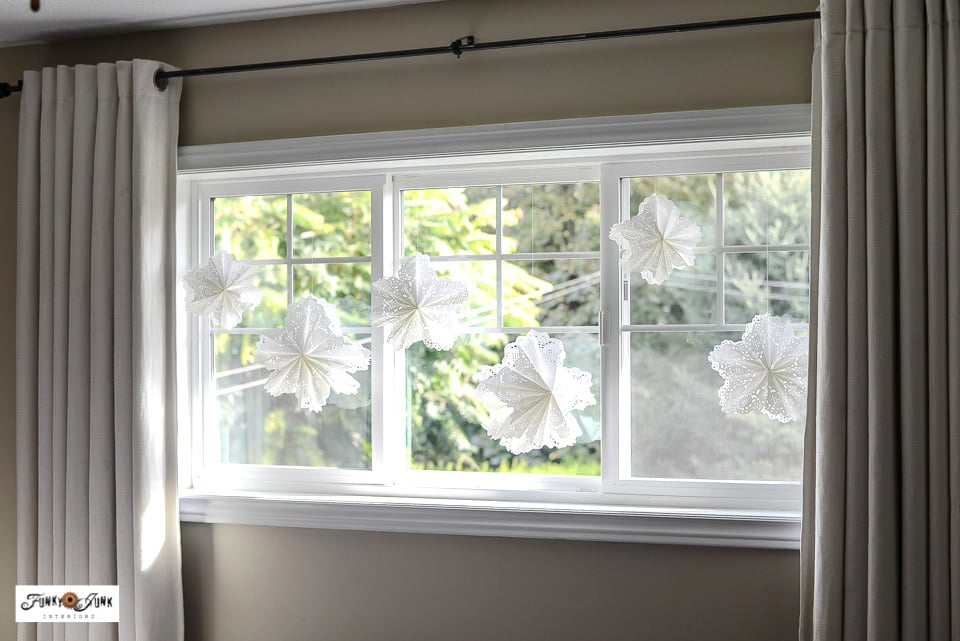
The paper snowflakes can also be hung from a curtain rod if the curtains always remain open.
And while the paper snowflakes look amazing grouped like that, here’s how they can look on their own!
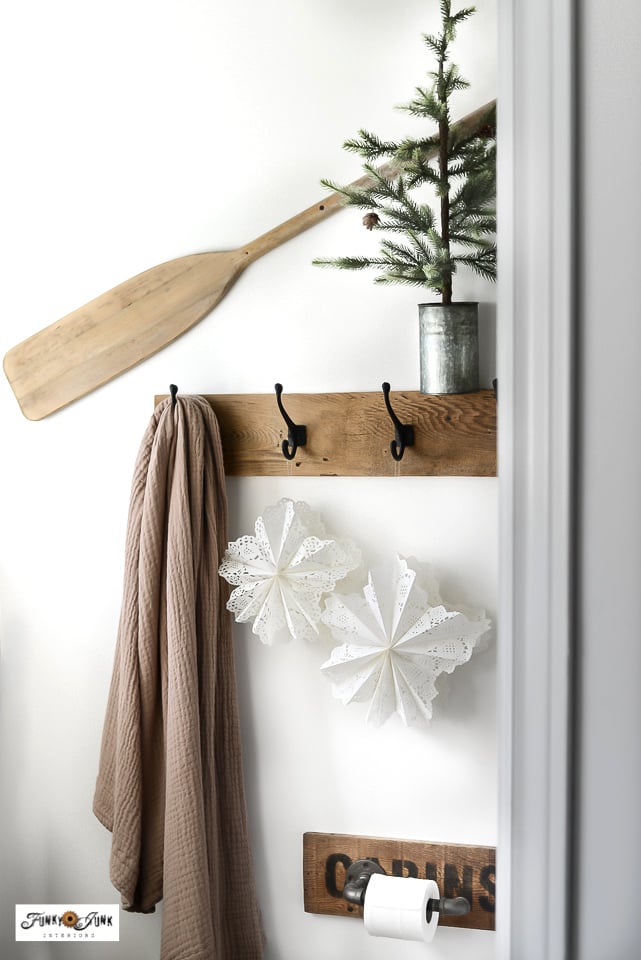
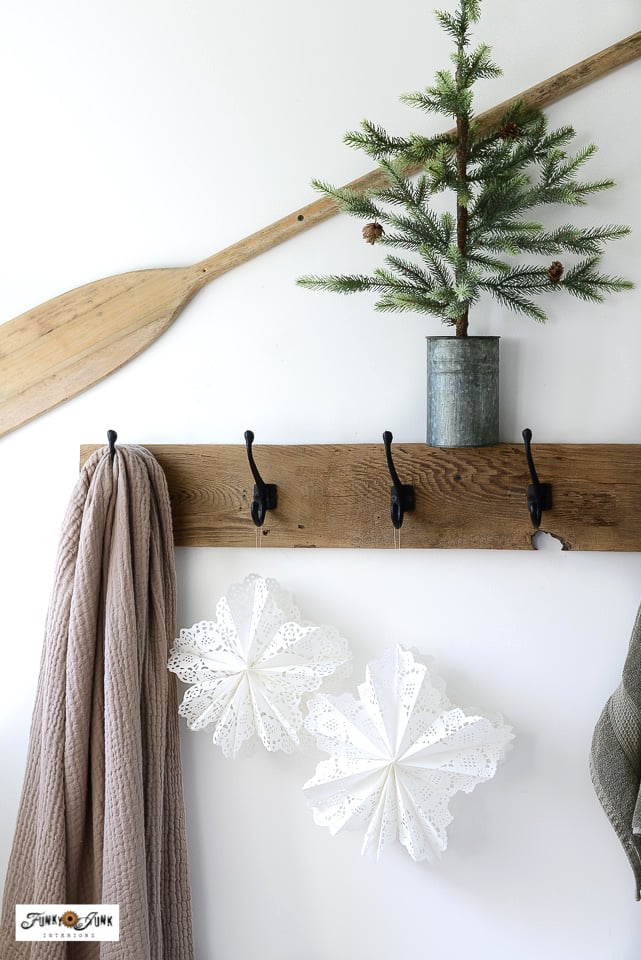
I hung two different sizes in my ensuite I just finished painting, from a row of hooks I just installed. So consider this a new mini tour of the newly refreshed space!
Aren’t they so pretty and delicate?
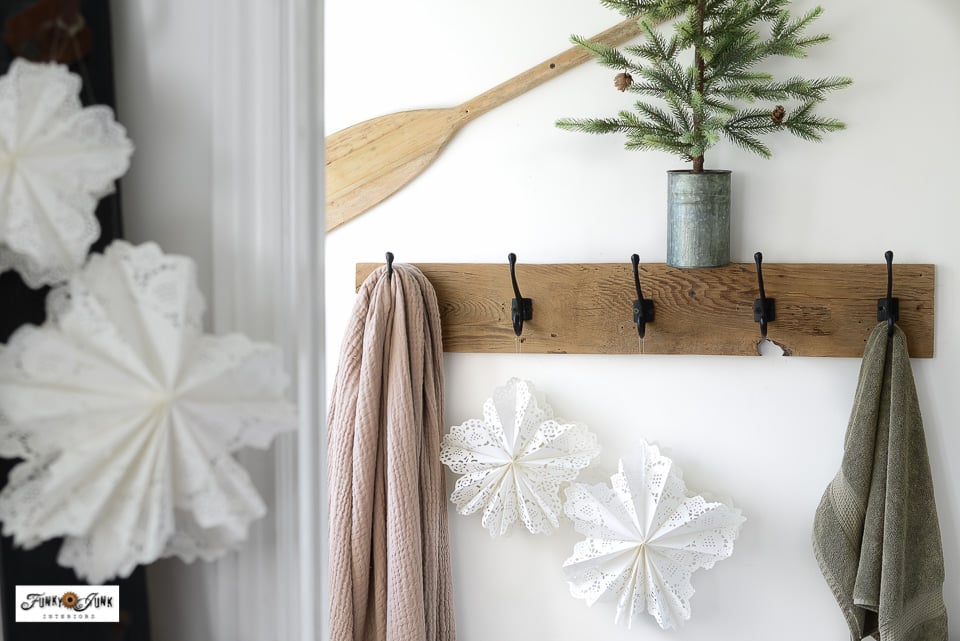
But the paper snowflake display didn’t end there…
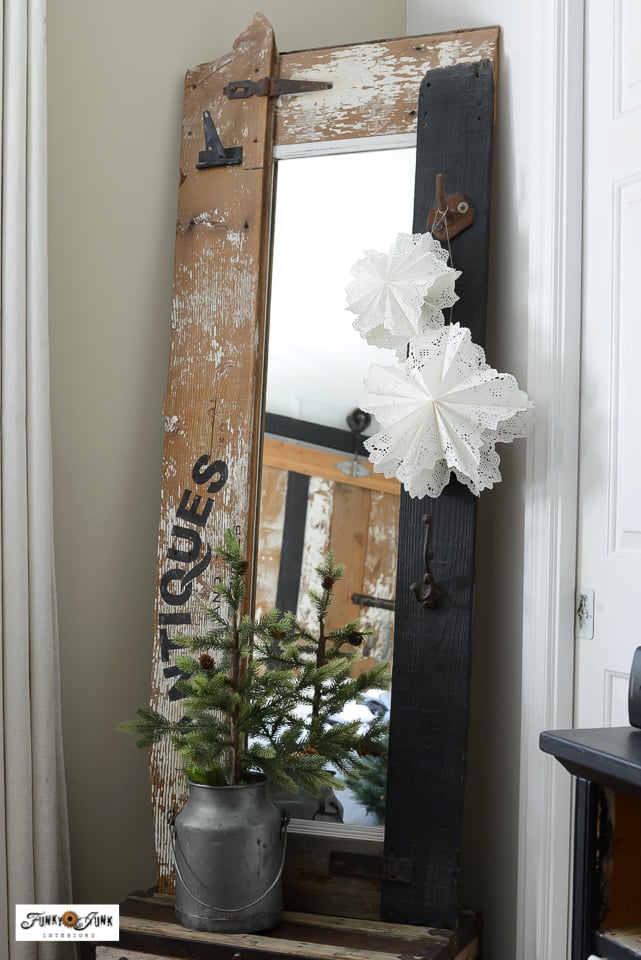
See how the barnwood mirror was made HERE
I also hung a small and large snowflake from the barnwood mirror in my bedroom!
Wouldn’t these easy paper snowflakes also make a great craft project with the kids? Or to gift a few as hostess gifts? Or just make a zillion for yourself and have the best winter or Christmas display ever!

Be sure to watch the short video below so you can see just how easy the snowflakes are to make!
Video tutorial: make paper snowflakes from doilies
Watch the short video above to view the easy snowflake assembly!
This winter or Christmas project is gorgeous, affordable, easy and quick to make, leaving a major impact wherever you display them! Let it snow!
Think you’ll try making 3d paper snowflakes from doilies this winter? Where would you hang yours?
![]()
Visit our top Christmas projects to make:
DIY wood chevron Christmas tree
Easy DIY pallet Christmas tree
Create an easy Herringbone wood Christmas tree
10+ unique and easy Christmas porch signs to make!
Visit our entire Christmas projects collection from one page HERE

Make Paper Snowflakes With Doilies: 3 Sizes (Step By Step Guide)
Supplies:
Instructions:
How to fold 6 doilies to make one snowflake
- Place a paper doily good-side-down, then fold it in half.
- Twist doily ¼ turn so the fold is vertical to you.
- Fold doily in half, then pinch only the middle to make a mark.
- Fold the curved bottom and top up to the middle pinch mark so they meet, but don't overlap.
- Twist the folds to the sides, then fold doily in half from bottom to top, so you end up with a fold on the bottom, and the open rounded ends on top.
Applying the glue
- Open folded doily, then apply glue to only half of the left and right rounded areas, from middle - up.
- Close the doily on the glue, then gently pull the pocket open to ensure it doesn't stick shut. You should be able to see the left and right inside sides glued, but can wiggle freely.
- On the outside of the folded doily, run glue horizontally along the bottom, and vertically up the center to create an upside-down T shape.
- Place another folded doily on top. Glue and stack until all doilies are stuck together.
- Gently open the doily to fan it out, then glue an upside down T to the top one and join the two ends together.
- Hang the snowflakes with thread that matches your chosen background area so they appear invisible.
- Make more snowflakes with different sized doilies to create a nice varied effect!
Hi Donna,
I’m not seeing a video. These snowflakes are beautiful and I would like to watch it, please. Link?