
This guide shares how to create flower bed edging like a pro using one simple garden tool! This is an easy DIY technique that offers instant and outstanding results! With video.
And be sure to visit Part 2 – How to freshen up flowerbed edges with more pictures
Every so often I get asked how in the world I achieve my rather impressive flower bed edges and maintain them.
So it was time to share my pro gardener brother’s secrets!
How I learned this technique
As I was walking through my garden pro brother’s own yard, his english garden style flower beds were abundant and outstanding on their own. However upon closer inspection, what made them look so sharp was the perfect garden edge surrounding the entire perimeter of his yard.
Not a landscape timber, metal edging, plastic edging, brick edging nor any edging materials of any kind were anywhere to be seen. Just clean, simple, perfect lawn cuts that really made those flowerbeds pop!
What I loved most was how something so simple and clean looking could look so professional. And imagine having flower bed edges that would never deteriorate ever again!
I wanted in. So I requested a mini lesson on how to get this amazing look with just trimming.
After 1 quick lesson, I went right home, hauled out a simple garden edging tool I already had on hand and got to work. To my amazement, the results were instant, even though I didn’t really know what I was doing quite yet!
So if a beginner like me can get pro results in my own garden bed, I know you can too! I’ve now been doing this method for years, and it never gets old. My sidewalks always look sharp, there are no durability issues, and nothing to buy. Just beautiful garden borders that dramatically elevate the look of your yard. And soon, yours too!
It’s a little labour-intensive to start, but it gets easier after the initial job is complete.
Here’s how it’s done…
Be sure to catch the short video at the bottom of this post so you can see the technique in action!

Before:
Does this overgrown flower bed edging look familiar? Let’s focus on the edge between the dirt and flower bed:
Issues:
- Soil is the same height as lawn.
- Grass has grown over the edge into the flower bed.
- Not enough breathing space between the lawn edge and plants.
- Weeds need cleaning up.

At least the flowers are pretty…

However this overall flower bed has overgrown plants, and the flower bed edging needs to be sharpened up.
I had thought of adding some landscape edging or rubber edging of some kind, but I didn’t want anything that would deteriorate over time. Edging stones are nice, but they can be tricky to trim or mow around.
So here’s how to create a clean flowerbed edge that will not only dramatically improve the curb appeal of your flower beds, you won’t believe how easy it is to do with one simple garden tool!
This post contains some Amazon affiliate links in which I earn a small percentage from qualifying purchases through these links, at no extra cost to you. Thank-you for helping to support my blog!
How to create flower bed edging like a pro

Supplies I used:
hand garden cultivator (I like this set!)
rubber-dipped garden loves (my fav!)
Shape the flowerbed
1. Create the shape for your flower beds in a gentle curve with a garden hose or heavy twine for guidance.
Make sure your landscape design includes curves that are relaxed enough to easily accommodate lawn mowers, without having to pull back your mower constantly to mow around tight corners.
Now grab your half moon edger next!

What is a half moon edger?
A half moon edger is a relatively inexpensive standard garden tool found at most any hardware store. They have a handle like a shovel, however it has a cutting blade at the end shaped in a half-circle, or half moon. This is so it can create garden bed edges easily.

How to cut flower bed edges with a half moon edger
2. Using a half moon flower bed edger, position it along your guide rope, tilt it a little to the side, then step on it.
3. Lift the half moon edger slightly, (not all the way out of the ground) reposition further along, then cut yet again on a slight angle.
Keep repeating this process as if you are cutting a cake, until your entire edge is completely done.
This technique gets easier the more you do it!

Remove the turf
4. Scoop or dig out the chunks of turf.
I like to tap the soil off with a garden trowel, then flip the turf chunks upside down in the compost pile.
If upside down, the grass composts and the works will turn into mulch/soil. If right side up, you’ll grow a new chunk of lawn in the compost. Then you’ll have to edge that… (kidding) (sort of)

Dig a shallow trench
5. Using a garden trowel or small shovel or spade, create a shallow trench along your fresh lawn edge cut, mounding the soil up towards your flower bed.
A trench creates a place for water to drain and soil to fall. And offers a shadow for a nice clean look. You wait and see!
Mound up the soil
To mound the topsoil, (or gravel or landscape rock), dig into the bottom of the trench, then bring up the soil towards the flowerbed in a smooth gentle mound. If the mound is too steep, the soil will fall back into the trench again. Shallow is best.
Trim the lawn edges
6. With garden shears, trim the grass edges horizontally and vertically for a nice clean edge in both directions.
Do not trim the grass on an angle. This will soften your edge.
Your grass clippings can then be easily scooped up by hand to clean things up or left to compost.

My fav yard trimmer (read post HERE)
You can also accomplish clean lawn edging with a yard trimmer head twisted upside down, (HERE is one similar to mine) however you will not achieve quite the same quality as when cut with garden shears. However it will be a lot quicker!

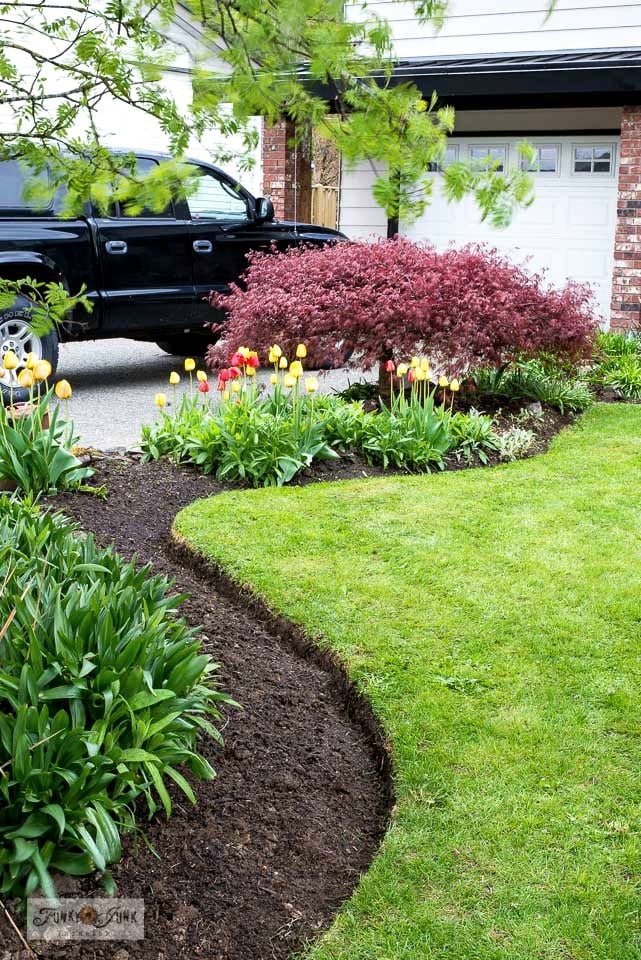
The outstanding flower bed edging results!
Then stand back and GASP at your awesomeness. This crisp and clean lawn edging really makes an outstanding landscaping edge!
Other lawn edging ideas to try this method against:
Don’t be afraid to experiment with other garden scenarios! There are plenty of options to use this garden edging technique anywhere you wish to create a beautiful and clean barrier for different styles or different looks!
- vegetable gardens
- driveways
- garden pathways
- river rock garden beds
- cut against railroad ties
- trim around boulders and other lawn features
- concrete pavers
Straight edges vs. curves?
Both straight and curved edges have their place.
However I would avoid creating flower beds with lots of small curves. Create shapes that fit a lawnmower well which will make lawn mowing around the flower beds much easier.
My own preference is to also choose curves over straight lines where you can. Curves will visually softens outdoor spaces, appear more natural and will hide crooked lines more so than straight.

Allow some soil to show
A little breathing space in between the flower bed edge and plants will show contrast between the two for a cleaner look, and is easier to weed and mow.

Isn’t that lawn edging seriously gorgeous?

Illustration
Above is an illustration of the flowerbed edging.
Video – How to cut flower bed edging like a pro!
.
Visit above to watch a short video clip of the easy technique!
How to maintain the flower bed edging
Now know, there is a little maintenance to keeping this up. However if you stay on top of it, you won’t find much of an issue. The finished pro look this offers is so worth it!
1. Mow as close as possible to the flower bed edge while keeping the lawn mower wheels on the grass.
2. Using the weed trimmer, cut horizontally where the mower couldn’t reach, and vertically along the soil to create a nice sharp edge each time you mow.
3. Gently fluff up the soil and scoop out the trench each time you weed.
4. If the soil starts to level with the lawn, freshen up the trench depth with the half moon edger if needed.
5. Recut your edges each spring if needed.
Read Part 2 – How to refresh flower bed edges HERE
How to create flower bed edging like a pro!
Tools:
- garden hose or rope
Instructions:
How to cut flower bed edges
- Create the shape of your flowerbed with a garden hose or rope.
- Insert a half moon edger into the ground, then cut along your guide. Use the edge of the blade for continuous cuts, like cutting a cake with a knife.

- Remove the chunks of turf, breaking them up into smaller pieces.

- Turn turf pieces over, removing as much soil as possible. Place turf upside down in the compost.
- Using a garden trowel, create a shallow trench along the fresh cut, mounding the soil up towards the flowerbed.
- With garden shears, trim the grass edges horizontally and vertically to create a super crisp edge in both directions. Do not trim the grass on an angle.
- Hand-scoop up the grass clippings.


How to Maintain
- When it's time to mow the lawn, cut as close to the flower bed edge as possible.
- Trim the rest of the uncut grass with hand sheers or a weed trimmer.
- Cut the flower bed edge horizontally and vertically to achieve the sharpest look.
- Recut flower bed edges each spring to maintain.

And now it’s time to rest up from the backyard flower bed edging until next time. Well done, Jenna!
I hope you found these garden edging ideas helpful and you’ll give it a go! And don’t forget to come back to report your success!
Take my 2011 FULL garden tour (as seen above)
Do you edge your flower beds? What are your secrets?


Be sure to visit How to freshen up flowerbed edges like a pro – part 2
Other popular outdoor projects to make:

Make this adorable Potting Shed rake sign – tutorial HERE
Find the Potting Shed stencil (and all my others!) HERE


Make this easy pallet wood garden walkway in minutes!

Make this garden-themed reclaimed wood walkway

2 pallet outdoor sofa – so easy to make!


Make this cool reclaimed wood fence without cutting any boards!
wow, you did an amazing job. It looks like a magazine shoot. Thanks so much for the step by step tut. I think I can do this.
I really need to do this with my garden beds. Thanks for the tutorial!
What a timely post! I’ve recently noticed that the garden needs new crisp edges, but rather than digging in, I’ve ignored it, preferring to take bike rides instead….promising to get to it later. You’ve given me the incentive to get to work. Thanks to you, and to your brother for sharing!
Looks good – but grass grows within a week. How often do you have to clip this then- weekly? Yikes!
Hey Linda! Yes, it’s like any grass trimming. When it looks fuzzy, it needs a trim. 🙂 If you use sheers that cut while standing up, it’s pretty much a breeze to keep up!
Pro Donna. When can you come over to do mine?
So glad to see this!! I will be trying it your way. Now, do you have a really easy, great way for getting rid of Monkey grass gone wild? Have a great week, Donna! Best, Vicki
I edge all of my beds too. I use a shovel – it just works easier for me (maybe it’s th soil too). It takes a while but sooo worth it! Thanks for the tips on trimming – I will certainly be doing that. What a difference!
Brenda
This is great! Who would have thought it would be so easy? Thank you so much!
I fell in love with your edging technique when you shared it many moons ago but I don’t think I caught the trimming of the grass by hand part – THANK YOU for sharing. Can’t wait to get outside and give it a try!
It’s really beautiful. I wish I HAD grass to edge and blog about. I live in Phoenix and have a rock yard. Yuk.
Great tutorial. Thanks for the info. I would love to know the names of some of the flowers that you have in this area. Thanks for sharing. Have a great week.
Hey Donna! the garden edges look wonderful.
So… what if you don’t have grass?
we have a brick side walk out front and a concrete patio pavers in the back… would you cut next to the brick and make that straight? and hill up towards the dirt/ or grass? away from the concrete?
I’m going to try this. It can’t hurt and hopefully it will make it all look so much nicer!
Pat
Yes, absolutely I’d try that! A trenched edge really looks smart against any surfaces. You’ll be amazed at the difference. 🙂
That looks fantastic Donna!! Thanks for sharing!
Suelynn
We did this with an “edger” machine we rented when we first did our garden beds, but they have slowly grown back. Great tip on how to refresh that look again! I’m gonna go do that today.
Oh how I wish creeping charlie would follow the rules! (or die already!!) I trench. It still does what it wants! Someday I will win the battle! Great post and truly a fantastic idea.
Wonderful step by step and just what my gardens need! As soon as it cools a bit (weather wise) I’ll be trying this – Thank You So Much!!!!
I noticed your garden bed edges in the background of your “pallet walkway redo”. I had garden edge envy, thanks for the tutorial on how to achieve this. clean crisp look.
I really need a garden. Yours is so pretty with that yellow ivy crawling around.
What a huge difference that makes, Donna! It looks fabulous! Thanks for the great tip! 🙂
xoxo laurie
Donna,
This is brilliant!!! Now can you come and do mine?Seriously I must be doing something wrong.I do this every year and it never looks as nice as yours.What kind of edger is that?Where did you buy it?Maybe I am using the wrong kind.
((Hugs))
Anne
Thanks Anne! It’s nothing fancy, just a standard schmandard half moon edger. Stomp down straight down for nice clean cuts further into the grassy side and you’ll achieve your desired edge.
Donna that is the way my daddy edged. I learned from him and that is how my flowerbeds look too.
I edge far enough out so my hubby can mow and then you never have to weed eat. O.K. rarely.
Your soil looks so loose and rich, not like ours at all. Your beds and walkway look very nice and neat. Good job!!!
This is a really helpful post! I always wondered how master gardeners always get and maintain that perfect edge in their lawns!! How often do you mulch your flower beds? Is there a rule of thumb there?
Just like my Dad has always done his! They look amazing!!! Your garden is lovely, too! I am so jealous. Here is So Cal everything is a dry and crispy brown color unless it’s being watered by underground sprinkler systems.
I love the grape leaf looking plant on the right in the last photo. Are they grapes, ir some type of grape ivy?
Your dog looks very content!
xo-Lisa
Hard work but it looks great.
Donna …The edging looks great. Thanks for the tips!
Francine
You have no idea how helpful this is! I hate to admit it, but my yard looks so bad that all my neighbors love it since it makes theirs look better by comparison! LOL! Between keeping up with my job at Dish and the rest of the household, I can never find the time to even hire landscapers. You’ve laid out all the steps so simply that I don’t have an excuse anymore. It’s time to give my yard a facelift! Thanks for including detailed tips and instructions too. Most gardening blogs only show you the finished product, which is annoying for people like me who rely on instructions to do anything! I usually get all my gardening information from HGTV just so I can record it and rewind if I missed a step or good tip. Luckily, I have the Hopper DVR with tons of money to house all my shows and everything else the rest of my family wants to record, since I am the only one interested in home stuff. I’ve never tackled a project this big, so I’m a little scared. Wish me luck!
Love the tutorial. You must not have snakes! I love this look but because we’re in the South have many wild animals that like to creep and hide under things. I do keep my liriope trimmed somewhat like this when I can avoid the intense sun we have. Jealous!!
I take it that this is bad to do if you have snakes but am wondering why? I use a shovel to do my edges but they don’t look nearly this great. I want to try it but I do live where there are snakes. What do you think? To do it or not to do it?
We indeed don’t have snakes so I’ve never considered that!
My own system is a little different. I have some sifted compost or sifted manure in a wheelbarrow. I put the milkcrate that I used (1/2″ holes) atop that. Using a flat spade, I make an edge with that and put the soil & weeds/sod into the sifter & shake & it falls atop the compost in the wheelbarrow. What doesn’t go thru the holes (sod/weeds/rocks/ plants) gets added to the compost pile/bin. Sometimes I find plants that I replant in empty spots. When the wheelbarrow gets pretty full, I mix it up and fill in the gouges I’ve made. I step on the soil mix I have put down & make sure it is level with the grass so my hubby doesn’t scalp the grass edges.
REally excellent tutorial and great pics to follow. thanks.
You are right, the shadow really makes the pop POP!
I used to use the ugly black plastic edger to keep the grass and weeds out of my flower gardens but found that bender board works and looks better.
I am off to do it right now! So excited! So many projects! Thanks for the tips!
Beautiful yard and garden area. Thanks for sharing.
Thanks, that looks gorgeous! My only question is how do you keep grass from growing around the plants? Did you hoe it all down or did you use landscape cloth around the plants?
Hey Peggy! Just good ‘ol hand pulling weeds is how I maintain it. Nothing fancy. I loosen the soil with a small garden shovel then pull them all out one at a time.
I hand pull all my weeds. No landscape cloth in sight!
Thank you So much for this, Donna! We need to do this~I love the way it looks 🙂
Yep, this is the only way to get that professional look. Our previous home was landscaped by a Master Gardener here in Seattle. Beautiful flower beds, but edging them baffled me for the first two years. Then we visited Bouchart Gardens in Vancouver, B.C. and I saw them edging their miles and miles of flower beds. The half moon edger is key. I keep the edges “tidy” with a line trimmer and ‘edge’ with the half-moon at the top of each spring or when necessary. Thanks for sharing this!
Just a word of warning. Do not try this if you have a slope to your flower bed. The rains took the soil down into the little ” valley”, and then followed the slight slope towards my paving stones and into my rock walkway and towards my water feature. What a mess to clean up.
Donna,
Love your illustration and photos of the process! I’m going to pin this to the Home Depot Garden Club Pinterest board @ pinterest.com/homedepot/garden-club/
Michael Nolan for The Home Depot Garden Club
Thanks for this! We just edged our flower beds following this method and they look beautiful!
I’ve seen this from a gardener before, but I’ve yet to do it. You’ve inspired me to get it done this spring. 🙂
Excellent! I’m going out now to trim the climbing vines! I have some “hints’ to add. You can use a garden hose to outline the area, Home Depot has this walk edger thing. It’s like a sharp blade on the end of this metal stick (so you just walk along stepping on the cutting thing). It cuts about 4″-5” deep. Case abandoned run down properties (those that have the roofs caving in from 1810). You can dig up a bunch of neat plants there. I got a lot of ivey from the funeral homes overflow parking area 🙂
Also, this “trench” you speak of….. I wonder if you could add black mulch to keep it from weeding up (?).
Oh absolutely! You’d need to scoop away a lot of soil though to get the mulch thick enough to do much. Landscape fabric underneath would also be awesome.
Hi – the trouble with my flower beds/grass edge is that the grass seems to recede! so I am getting bigger and bigger flower beds! Any advice?
That indeed can happen! Perhaps every couple years you could fill in the edges, reseed and start a new edge again… that would certainly do it!
What I want to know is how you keep that beautiful Husky contained with a four foot fence! 🙂 Mine would be over that and off to the races!
Haha, she wasn’t a jumper at all. Guess I lucked out!
Thanks! Ever have one of those “why didn’t I think of that” moments? Now there’s going to be some purty borders in my garden this year. Thanks again!
Excellent tutorial, Donna! Thanks SO much for sharing your expertise! Step-by-step instructions with beautiful pics are so helpful! I can’t wait to begin!
Since moving into our house 2 summers ago I’ve needed to do some edging, but didn’t know how. Now I do! My garden thanks you much!
LOVE IT! Looks easy enough. I’m heading to Lowe’s to get an edger today! Thanks for the “pin-spiration!” LOL
I tried that but then when my riding lawnmower tires roll along the edge it smashes it all down and so it doesn’t work for me.
What I do to mow around the edges…
I’ll move the lawnmower forward, stop, then rotate towards the cut, tap down, straighten, and move forward again, repeating the tapping motions all along the cut edges. No issues with smashed down grass!
Thanks for keeping it simply.Looking forward to more tips and info!
Thank you for posting this! I am getting ready for my yardwork and am pretty excited. I think I always did this the opposite. I love the way your edging looks, I hope mine comes out this nice!! Does it take a long time to cut with the scissors? I have a lot of edging.
Lynne
I don’t find it that big of a deal, Lynne. Just get on your knees and go for it!
Hi
Love your pic’s and was wondering if you could tell me what the name of the plant in the picture that is red? It is in the last picture on the left hand side.
Thanks I am inspired!
Hi Donna I am re-reading this as I am gearing to get ready to do this.I have a question do you mulch or add anything or just keep the dirt? We have an open field next door to our home and we need to keep it mulched or stone.We decided on stone because we get allot of wind.Just wondering how to keep this neat looking with stone.Any advice would be greatly appreciated 🙂
xx
Anne
@ Anne: after having selected and prepared a location for landscaping, I added soil to create a slightly sloped mound, trenched out the edging as described by Donna and than laid down weed fabric all over the mound down to the base of the trench. Afterward I cut “X’s” into the fabric where I plan to plant something than I red cedar wood mulch a circle around the base of each planting Than I laid down large potatoe size white river rocks (mini boulders) all along the trench as a visual border, about 12-14 inches wide. I also used the white river rock to create a circle around the red cedar wood mulch of each planting as an added visual layer (about 5-8 inches wide depending on plant size). The final step was dumping 1/4 inch red rocks on the rest of the uncovered portions of weed fabric.
Hey Anne! With stone, you’d just need to remove more soil so the stone has room. I’ve done it with lava rock before and while it works, it is trickier.
Pirro’s comment to your question is really awesome! I don’t think I can better that advice. 🙂
Thank you! I’ve been looking for a how-to on this forever! This explained it so much in detail for a novice like. I can’t wait til morning to try this in my yard.
Oh I’m glad I found this! I have done this once, but needed a refresher..I’ve been upkeeping it with a weedeater/edger but it never looks as good as when you do it like this..especially when it’s grown out over the winter. I need to use mulch in my bed and prefer cedar mulch. Do you know where I should start the mulch? I suppose I should not put mulch in the trench or that defeats the whole purpose, correct?
Hey Katie! In order to put mulch down, you’ll need to dig away more soil. Definitely leave the trench empty then just mound the mulch up and away from the trench. Should work just fine!
good morning I lve this look where do I buy the shovel for the edging to do the job right. thank you so much.
Any hardware or gardening type store should carry it.. it’s called a half moon edger.
Thanks a bunch, I just had some fantastic top soil delivered and cant wait to get dirty this weekend :0)
Just the inspiration I needed to get my beds under control!
Your garden looks great!
Thank you!
Yes! The time… me too! All of mine need redoing so even a little at a time will eventually get the job done. 🙂
Thank you for the tutorial. I was so confused about, how to even begin! You explained it so well! I pinned it so other beginners with edging could use your site! Thank you, your blog is awesome!!!
Thank You, it’s what I have been asking everyone. Now I know, the trick will be if I can do it as nice as you have your garden
Thanks for the great tip!
I love all the great ideals I get from you, keep up the good work!
Love it!!! I used to do this, but I haven’t gardened properly for years due to back pain and post natal depression. I forgot what made me happy in the garden and this type of finish reeeeealy does. Your great at tutorials too . I’m now off to edge my compost bin lol
Thanks for the great info! Your edges are beautiful!
I am about to do a complete over haul of my front and back yard. This tip will make it soooooo much easier when I get the beds going. Thank you so much!
You are amazing!! I’m going to attempt this “neat” project as soon as possible! Thanks!! and double thanks!!!!
Thank you for your detailed example of flower bed egding. I just went out and tried it myself and it worked perfectly. Robyn
Thank you so very much for the simple instructions to this amazingly easy technique that costs virtually nothing!
Was out doing this tonight and remembered your blog. Thank you for sharing! Will finish tomorrow.
Not really following how you mow it . Could you explain further please thank you
Liu
Sure thing Liu!
Push the lawnmower along the edge, but a bit at a time. With each stop, turn and tap towards the cut, then straighten and push forward again. Repeat until you’ve cleared the edge. Then go over the vertical cut edge with hand clippers for a super clean finish.
I hope that makes sense! I think I’ll have to do a video on this entire procedure one day soon….
I’m not sure what you mean by ‘taping’ your mower.
I like the tutorial a lot. I thought I had everything you need for gardening, but I don’t have the half moon edger. I must get one this weekend!
Hi Sidney! By tapping, I meant to higher your mower, swing it towards the cut edge, then gently let it down. Lift up again, straighten and continue on to the next section and repeat.
I’ll do a video this summer of my edge method so it makes more sense!
I AM PARTIALLY DISABLED AND LIVE WITH MY ELDERLY MOTHER BUT LOVE GARDENING AND YARD WORK, BUT IT HAS TO BE EASY. I HAVE MADE OUR SMALL FRONT YARD INTO A “ROCK” AREA AND HAVE PLACED POTTED PLANTS ON THE ROCK INSTEAD OF PLANTING EACH YEAR AND WEEDING ALL THE TIME. THE ONLY PROBLEM I HAVE AT THIS TIME IS THAT THE FRONT YARD ENDS AT THE PUBLIC SIDEWALK AND I DO NOT KNOW WHAT TO DO ABOUT A SIMPLE AND EASY BORDER THAT I CAN PLACE TO KIND OF GIVE IT THAT ‘BOUNDARY’ FEEL. DO YOU HAVE ANY SUGGESTIONS? I HAVE TWO SECTIONS THAT ARE THREE SIDED, EACH SIDE IS 6′ BY 14′ BY 20′. WHAT DO YOU THINK? I WOULD GREATLY APPRECIATE ANY ADVISE OR COST EFFICIENT IDEAS THAT WILL BE EASY FOR ME TO DO ON MY OWN TO SERVE THE PURPOSE THAT I AM LOOKING FOR. THANK YOU,
MARCIA TESTER,
WEST VIRGINIA
I love that idea thank you so much for sharing! I have been needing an idea like this for a long time. Yay!
Your garden is so beautiful!!! Thanks for this great tutorial, the illustration at the end really helped me! I can’t wait to buy an edger and try this! 🙂
Oh, you will LOVE the difference Eliza! It takes a little elbow grease the first time but gets easier. 🙂
This really ties into the natural element of the river.
Ornamental grasses and native wildflowers provide refuge to wildlife and add maintenance-free vegetation to your outdoor space.
Popular materials include from concrete, asphalt, pavers, brick, and natural stone.
Very nice job , Sister… wow , you did good explaining yourself and it was not over done. i t was just down to earth, cutting the earth. And i liked your cut ups, making jokes. i could work next to you as a team member. thanks again, John in Ohio
I did a flower bed just yesterday, using this method and I love the results! Thank you!
Awesome! Thank you for sharing! I’m gonna start working today on this. 🙂
Great post. I need to do this. Love your flowers beds!
Dear Pro Garden Edger,
I paid a landscaper $3K to do this to my front yard. He edged the beds as I described them to him. He planted the flowers covered the beds with ground cover and mulch. When I came home the mulch was not the color I had chosen, but because he took so long to show up (late summer) in drought season. The ground cover started to appear throught the mulch in many places. Some pieces flapped in the wind. The mulch washed down from the beds into the little gully he had made while edging the beds. It became clogged with the mulch and has weeds growing through the mulch. I slightly pulled back the ground cover to find that it hadn’t been fastened with cover “u” pins and the ground cover was mostly remnant pieces. Do you have any idea how much mulch should be put down so that weeds won’t grow through it? I feel it could either be not enough mulch was put down, or because “u” pins weren’t used, they’re just popping through areas they find open. My neighbors had another landscaper create flower beds for them and opted not to have the ground cover material and they’ve never had a weed in their beds. The young tree and the bush in the front yard have mulch piled high all around their bases. I thought if that was done, the water wouldn’t be able to wick away from the bark. I’ve already paid for the complete job and after reading your easy fix I feel like I’d rather do it myself and get it right. Am I just misinformed? It looks as though an amateur created the flower beds, now. Shame on me for not asking how often the beds would need to be maintained. I guess any nice yard takes work. I don’t mind that but I do mind paying for something I didn’t get. Thanks for listening. What type of sheers did you say that are needed for cutting the grass along the edge? Thanks for thisw forum to ask questions. Kindest regards, Nancy B.
Hey Nancy! I’m by far no pro, but I’m sorry to hear your project didn’t go as planned.
You can do this project yourself, but I won’t lie, it’ll make you sweat. 🙂 But I agree, it requires maintenance just like anything else we do, so know going in, that what you’ll create will be wonderful, but it will require constant trimming.
I don’t use any special tools. If you go into any garden centre, ask them which ones would be best for trimming grass to create nice sharp edges. It pays to purchase quality sheers and also ask for a sharpening stone or ? The blades need attention on a regular basis in order to accomplish nice sharp cuts.
Thanks for the instruction! Worked like a charm! Btw I was a little afraid of buying the edger when I was checking it out at Home Depot but is was very easy to use.
Nice, crisp edges!
I love this look!! My gardens are looking like the first photo! Thank You.
I’ve always done my yards like that. Thank you for sharing. Each year I wondered if people who saw me doing it thought I was crazy… it’s finally nice to know someone else out there does edging like me. And yes they are Perfect! 🙂
Beautiful ,thanks for the tips ! Now we can all have fully manicured garden beds ! Theres nothingmore beautiful ! Makes a neighborhood a step above the rest! Its free !
I just love this my grandson and I started one garden edging. It looks great. Now I am going to try more.Thank You
Another unexpected tool that can be helpful is an old steak knife. (There are always tons for sale at thrift stores and garage sales.) Use it to do any finer detail edging that you need. If there was a funky angle in your curve from using the half moon edger, just slice the sod away with the knife. The serrations make it easy to cut through! It’s one of the best sod tools around. 🙂
That’s just flat out brilliant!
That’s a fabulous idea!!!
Looks awesome! Very neat and clean! Thank you for teaching us how!
I LOVE IT!!!!! Thank you !!!
Your garden is so beautiful….I’m about to go try to edge like a pro. But….my question to you is how are you keeping weeds and grass from growing in your garden beds?
Hey Kym, ohhh, they grow. I just pull them out when they do. 🙂
I use this all of the time. It works too! My neighbors have a yard full of creeping Charlie. I trench just on my side of the property line over the fence & it keeps it out. This works!! I would prefer this type of landscaping vs. hard scaping. It’s easy to change the shape of your garden if you need to make it bigger, or need to change something. Last weekend I made my existing garden about 1 ft. wider, it only took an hour or so!!
Very pretty!
Donna, you are a gal after my heart! I loved the flower bed, that is my obsession. Every year I try to create something new…I love your junk too!
Blessings to you!
These are the kind of tips I need. I have just the area in my front yard that could use this treatment and I plan to use it. Pray I have the strength and energy to do it! Thanks so much it looks so professional!
You can actually edge flowerbeds with a sharpened knife, a dinner knife with a good handle is ideal. This gives an even neater cut than an edger and it’s no more difficult to cut the lawn than a Christmas cake! The cut sod can be under cut with a spade or trowel.
Hi Donna!
Beautiful edging job…I do mine the exact same way! The only thing I do differently is to use a narrow hand trowel and really clean up that “gutter” (I have a lot of clay so it’s necessary). Glad to know I’m not the only one to try and knock off as much dirt as possible from the lifted grass. I’m sure my neighbors think I’m nuts! I bought my house last year after it had been vacant for over a year. It was a real mess, but is really looking beautiful now! Still much to do!!!!
Love your posts! Love your garden!!!
Donna,
Re: Question. Home landscaping, protecting lampost flowers from deer and rabbits (without chemicals)
Great job on your edging gardening tip! I’ve been trimming bushes and edging lawns since I was 14 yrs old! After 35 years, all these gardening tips look and sound the same. However, your blog, made it look like fun…with fantastic results. Fun graphics and sharp photos! Keep up the great work.
Any hints on how to drap a lamp post with invisible netting (like they do at the malls) to keep away small critters? I live in Maryland.
Have a Great Weekend.
MGM
Thanks….I am giving this a try on the next area. My lawn guy told me this is the way they do edges to keep mulch from falling back into the lawn, but have encountered problems with this on a slope.
You are brilliant! This is the perfect time of year to do this. My neighbor will be sooooooo jealous!
Donna….although I do my own edging as well, I have to say you do a much better job than I. The beds are beautifully done and I love all the color combos and garden ornaments. Can you be my neighbor???
Thank you sooooo much, it worked like a charm. My beds look so much nicer.
So glad Barbara! It takes a little effort, but once done, it’s relatively easy to keep up!
Great info. I live on 2 acres that is fully landscaped, which I maintain. I have lots of beds, but I love the crisp edge between the grass and soil and try to create it. In the past, I have used a very sharp knife to create the edge, but I will try your idea this summer.
Thanks again.
I really am glad you posted this. I am ready to revamp everything in my yard.
I will be using this method on my beds this year, even though I am on 2 acres. The beds will look gorgeous! Thanks for the info.
Love your beautiful garden! Thank you for sharing your tips. 🙂
Hi Donna. I love your wood plank walkway and your garden edging. Your accent pieces and look have inspired me with decorating ideas for my small retail store where I sell wild bird supplies. Thanks for the tips and inspiration. And I must say, your ability to inject little tip templates and your funky junk interiors name on all your photos has impressed me, too! Thanks, Donna and keep up the good your giving!
Marie
Great way to edge ! 1st time on your site. Found it by your pallet link.
Thanks………..
Beautiful! I saw this on pinterest and I’m going to have to try it for my permaculture guilds and flower beds. Thanks!
Hello,
Do you find that water pools in the bottom of your edging after it rains?
Hi Michael, not at all! I guess we have exceptional drainage because that’s never happened. As long as the soil remains fluffed up, there’s always a place for the water to run I suppose!
Will try this idea. I have a terrible time with my beds. BTW – love your sweet doggie! Mine help me outside, too!
I am doing this in my garden!!! This is a really great idea. am tired of the ugly black edging that detracts from my beautiful garden.
I’m new to gardening…bought a house last summer and I’ve got much to learn…please explain how you trench the soil away. It’s your tip about the “big deep dark secret. Trench your soil on the side of the cut, then hill it upwards” that I’m a little unsure how to do!
Visually (in the graphic) it looks like you are removing the soil closest to the grassy edge…are you then moving that same soil further back onto the garden bed to create the trench? Are you using a hand trowel to make the trench?
In desperate need of edged flower beds!
Thanks,
Lisa
Hi Lisa, you guessed right! Just a little hand shovel will do the trick! Dig out the trench and spread the soil upwards. It really works great!
Donna, are you saying if I have bark mulch in my bed to leave the trench empty of mulch, and mound the dirt up towards the bark edge of the bed
thank you!
Hey Larry! Just replace the soil with mulch. Do the same things. Although with mulch, you’ll need to dig away soil to allow enough room for the mulch.
The deal is to have that nice looking trench. That’s the key to making a super clean, beautiful edge. It’ll look awesome!
dear Donna! thanks ever so much for this posting. i just needed to see this done in your garden and will try to do it in mine next week! i will post on my blog. will be german though 😉
greetings from Austria!
That was fabulous! Thanks so much! Very clever presentation and illustrations, as well.
Your edge is great! I have a couple acres of crab grass. Will this edge work with that?
I can’t see why not!
Thanks for the visual!
1: When cutting your new edge on the grassy side, cut deep.
2: Make sure you have a wheelbarrow handy, those chunks are heavy.
3: Every 2 years or so add new rich soil to your flowerbed.
4: Use kneepads (found at your big box garden center stores)
Tony 🙂
Awesome tips… have been wanting a simple way to do my beds and this is fantastic.
Craig Hohnberger
Can I do this edging and put down mulch instead of leaving bare dirt?
I just finished edging my beds and my sidewalks when I saw this on Pinterest! Love LOVE LOVE a nice clean edge.
Here is my hint for laying out a nice curve that is lawnmower friendly. Take your garden hose and lay out your curve. Push or drive your mower next to it and see if it will easily navigate the curve. When you have it laid out right, just use the hose as your guide and edge it.
That’s a great idea, Barb. I’ve tried laying out beds before, but always got stuck between them being too curvy or boringly arced, so I never built them. This sounds like the perfect way to edge some nice curves that are interesting without being too tight. Thanks for sharing.
Thank you, I’m not much of a gardener but I plan to try this, it looks like something I could actually do to make my beds look better.
Love the pictures and tutorial, had tried this in the past but your tips will make it better when I do it again. Love your mix of flowers and garden items. Thanks
Great work! The edges look so clean and professional, something I need to do around my deck. I was wondering though, could you cut in the soil, then place pavers around the inside of the edge?
LOVE your husky btw!! I have a husky of my own. What beauties they are 🙂
I love all your ideas. You remind me of my mother with all your creative ideas. Keep putting them online
I constantly emailed this weblog post page to all my friends, as if like to read it then my contacts will too.
I’ve always wanted to know how to edge my landscaping so that it looks professional. Yours is beautiful! I love it. Thank you for the help. I can’t wait to start mine! Thanks again!
Thanks Kathy! I suggest to do one bed first to sample it out… but warning… it’ll ruin the rest of your garden! hhahaa
I love how your Jenna crosses her front paws. My golden does the same thing. I hope I’ll be taking a photo of him relaxing, cross-pawed, by my soon-to-be lovely edged borders. Thanks for the tutorial.
Thanks. I need to go out and ‘edge’ deeper! Love the pallet wood walkway too! Hopefully I can locate some. 🙂
I am on my way to buy a half moon edger! thanks so much for sharing this. I just created a small flower bed and I wanted that look but did not know how. borrowed an metal blade edger to make the curved cut but it was like you said, no edge or trench! I cant wait to try this tool!
Nadyne
What a cool site! I can’t wait to edge my flower beds the way you do. The shed is really nice too.
Great Job – Love those clean edges. I use a 3 wheel edger, deep. Still need that extra touch though for ‘crisp’ with scissors. I wish there was a lawnmower, or riding edger..err! Thanks for Sharing
Wow, your yard looks beautiful! I’d love to try this technique with a new strawberry patch I’ll be planting. Do you know if this technique works with Bermuda grass (which can spread by sending out rhizomes horizontally)? Or would the Bermuda grass jump across the gap?
And thanks for posting the cartoon of what the overall cross-section looks like! It helped me understand better about the trench.
Hi Sarah! I think I need a visual for this one… if you have a picture or url to a website where I can see what you mean, could you send it my way? Thanks! donna@funkyjunkinteriors.net
Hi Donna,
Okay, if you go to this link and scroll down a little, you will see a picture of grasses that shows what rhizomes look like. They basically extend outwards from each clump of bermudagrass and make new clumps grow. (Whereas many other grasses reproduce mostly through seeds.)
http://home.howstuffworks.com/grass.htm
Found your blog today and love it! This post makes me want to get out in my yard, but since it’s still cold here I’ll wait awhile. I love the bench, but did you try sitting on those cushions? LOL I wouldn’t think burlap would be very comfortable if you were wearing shorts. Maybe if they were washed and drowned with fabric softener. 🙂 My question was about your wooden accent pieces in your flower beds. They’re so pretty, but do you leave them out all year long? I had an adorable little decorative birdhouse that someone gave me and I left it out all year round and in two years it disintegrated. Now I’m wondering if I should have used a sealer on it? Do you treat your wooden pieces?
One more question: what kind of grass seed do you use? That is the prettiest greenest grass I have ever seen, sure wish mine looked like that.
I actually didn’t seed my yard, so I have no idea what was used. I think our yard was turfed but the previous owners.
We get lots of rain so that certainly helps. I also think at the time I was regularly fertilizing the lawn, which I haven’t done in a couple years now. But I think I’d like to start again. Sure makes a big difference when I do!
Hi Judy!
I throw a blanket over top of the burlap when I sit with shorts. I generally have a blanket with me anyway so that works great! At times I do remove the burlap and use a painter’s drop cloth which is much softer.
The wooden pieces in the flowerbeds can deteriorate. Protecting them with an outdoor sealer is a really good idea! I personally haven’t but the bird houses should be protected. Thanks, will do that this year! The chair collapsed on me so there’s that… haha
Donna, WOW, your posting from July of 2012 is STILL getting comments. This just shows how valuable the information you have posted is.
I have used my (inherited) edger along the lawn which grows up to the city sidewalk. (I don’t have an weedwacker/timmer.) And then the edged-bits can be replanted in my back yard where I need a little more “filling in.” But I hadn’t learned to edge the flower beds. I’ll be following your instructions just as soon as it stops raining!
I just wanted to add that, as well as sharpening your shears or grass-clippers, my grandfather used to sharpen that half moon edger as well. Makes it much easier to cut through the roots of the turf you are trying to cut, and I find stepping on and pressing down on the edger requires less effort than having to jump upon it. Just a small detail to make life easier for those of us who have balance and stability issues to deal with.
Yes! Sharpening the edger is a super excellent tip! Thanks so much for chiming in!
I’m so happy to know how to do this!! Thank you!!
I think these ideas are great. Thanks fotr giving me something to think about. and the directions to do the job right. Thanks good work.
I love the crisp edging too but my question is, how do you get a nice rounded edge or how do you get the nice even flow of the “pattern”? I’ve done the edging but my design looks a little uneven or not symmetrical. do you use a bend board as a guide or a can of paint to spray the path you want to edge first?
Hi Suzanne! Sometimes I’ll use a garden hose for an idea, but ultimately it leads to going by eye moreso. I just keep cutting until it looks right. 🙂
Thank you so much for the tips. Every year I struggle for that professional look. Now when the hubby mows if I can get him not to spray the grass into my edged area argh!
Thanks again!
Nancy
Yes now if when the mow they keep the grass spray OFF the bed area!!!
But still not sure what you mean on how mowing the edge. Wish I can see a video! You tube perhaps????
Thanks again, Susan from Indiana
Susan, good idea. I’ll see about doing that this summer.
Thanks a LOT! I’ll try it tomorrow!
Hi Donna,
I really love your flower edge, specially the way that you explained, I promise I’ll give it a try. Thank you so much to you and your brother for sharing such and easy but a great idea, you are the best.
It truly works Gina! A sharp half moon edger and a little muscle is the key! 🙂
How do I edge a stright line for a flower bed, between my yard and my neighbors yard.?? When I don’t have starting point from end of the bed to the other end, its over 50′ long. Is it solely buy eye,?? I’m guess no
That would be tough, Al. I’d be inclined to use a straight guide of some kind. Maybe edge against the side of a ladder, and keep moving it along?
You can place a stake at each end of the flower bed, then you could tie a cord or twine between the two stakes, and edge along that. Or use the garden hose, if you have one that is 50-feet long, or I’ve used an outdoor extenstion cord stretched between the two stakes BUT NOT PLUGGED IN and BE CAREFUL NOT TO NICK IT WITH THE EDGER. (Sorry for shouting, but “safety first!”)
Great illustration, thank you for sharing
Wow, beautiful garden! It’s very pleasant to the eye.
Thanks for sharing your technique on how to edge a flower bed. It’s really helpful.
Keep on sharing.
Wow, your flowerbeds look amazing! It is so crisp and clean. And I have to say, your grass is so green! I like what you said about keeping your curves pretty wide, for the sake of your lawn mower. You don’t want to have to keep repositioning your mower. I love that your dog is so happy with it, that is so cute!
So, so, SOOOO helpful! Thank you for your pictures and illustrations. I am going to steal your chair in the garden idea, if you don’t mind. Your gardens look meticulously kept and still have a rustic, sort of they-grew-like-that appeal about them….well done!
Hi, Love your blog and edging technique. Want to warn you that moneywort can be highly invasive. It fell from flower baskets my previous neighbor had here, marched through the garden, through the lawn, down the banks of my brook, and into the forest on the other side, pulling down ferns and obliterating all streamside plants on its way. I spend literally work-weeks trying to keep it in check, as that is all that is possible once this cute little monster has taken hold. Just trying to save you some future time. Cheers Marian
Thank-you! I have a feeling that may be something I have in my garden now. It’s relentless!
I LOVE YOUR SITE!!! Why are we not neighbors? LOL Thank you! Heading out to edge and mulch now.
Hi! I have come back to this post via Pinterest multiple times because I am planning on edging my front garden area this way–it looks so beautiful!
I was just wondering, I am getting new soil as well as mulch to put in the area I plan on edging. Should I wait to edge until both the new soil and mulch are down, or should I lay the dirt & mulch and edge afterwards? Or should I lay down the soil, do the edging, then the mulch?
These are probably silly questions, but this is my first house and I am somewhat of a black thumb 🙁
Thanks so much!
-Ashley
Hi Ashley!
I’m not sure it matters when you edge. But I’d personally probably edge first, then add soil/mulch. That way you don’t have to cut around new fluffy stuff, which can be trickier. You still may need to trim up a few areas after adding your soil anyway. Have fun! You’ll love the results!
Thank you for this great info!!!! I just discovered your site.
This is so beautiful. Thanks so much. Trying it this weekend. Your garden looks like a haven!
Hi, great article! Question on maintaining the grass on the edge. How do you keep the grass that you’re cutting back with hand shears from flying into the mulch and trench? Or is picking out all the clippings just part of the process? Thanks in advance!
Hi Chad!
If there’s lots of grass, I’ll at times place something on the soil so I can simply lift and dump the clippings. But more times than not, I just allow it to fall on the soil, and I gather it up by hand, or slightly bury it into the soil so it naturally fades away on its own.
OK, thanks for the quick reply! I was thinking the stray blades of grass would cause new sprouts, but I guess not (even though we have mulch over the topsoil)?
(Please disregard my duplicate question, my original one wasn’t showing)
What kind if tool do you use to make the trenches?
Thanks,
Lynda
Hi Lynda, the half moon edger makes the cut, then the shovel scoops the soil away from the cut.
Hope that helps! One day I’ll make a video on this process. That would be much easier. 🙂
Hi, great site! How do you keep the blades of grass from flying in the mulch bed and trench when trimming with hand shears…or is there no trick to avoid this? I spend almost as much time picking grass out of the trench and bed as I do trimming it!? Thanks in advance!
thanks for the tips on edging … very nice looking
Hi, Donna. Rather than mowing the edge as you’ve described (rotating and straightening), have you tried mowing parallel over the trench with two wheels in the bed and two wheels on the grass?
To minimize grass clippings in the bed, and to keep the grassy edge at the same height as the lawn, track two wheels in the trench edge, then adjust the wheels in the trench to raise the blade height even with the lawn so as not to scalp the edge. Perhaps something to try?
WOW!!! I am doing this in front of my house this year! Excellent! Thanks for sharing this doable trick!
OMG! You saved my day! Owesome work! Thanks for sharing! I can do a small flower bed as a reward/therapy after pulling weeds by hand for weeks! Thank u!
You truly have inspired me with all of your great projects and creativity. Thank you from one funky junker to another. My hubby is always threating to haul all my good junk to the trash. NO WAY!!!
Thank you for this post! It truly made a huge difference in your garden. I just bought an edger last night, Hopefully it won’t take forever. LOL, however I don’t for see myself hand cutting the edges though 🙂
Looks fabulous! I thought it would take digging and installing that plastic edging, etc. I think I’ll redesign my front yard to be as neat and trim and beautiful as yours! Thank you and your brother!!
I love this and tried it on my first project but now that it is complete, it kind of disappeared. Does this work on a slope where the downward side ends in your lawn? I am very afraid the mulch is going to end up all over my lawn. If not, what else would you do? Its just a skinny area and I don’t want to use wrap around edgers because it will look like all edgers I think.
Thanks for any help you can offer.
Hi Connie! Downhill can be a little tricky, but I think it can work, as long as your soil is mounded back far enough.
Your perfectly awesome edging motivated me to do mine. Did a small part of my garden this morning after reading your tutorial. Took me an hour to edge about 12 feet! Looks great! Will spend an hour each morning to get it all done.
What a great job. I am a gardening and love it. I love your edging. I find your process very easy. I would like to know the full scale of making a kidney shape bed around a hot tub area.
How do you keep the weeds out of the bed after it’s completed?
Hi Norma, weekly weeding is the key to keeping any flowerbed up imo. But trust me… I at times miss MANY weeks! LOL
Love the trench edges. This is what I want to do with my garden.
Thanks for the pictures.
Just a wave from Alberta! Well I got my soil, sleeves rolled up, ready to go! I am thinking of having my dog employed to do the digging, darn should of trained the dog properly! Shucks! Oh well, I guess, I will have to dig in my garden myself. Hope it looks good and everything doesn’t die, crossing fingers. Thank you Donna for such a great awesome site, without it, I would be scratching my head wondering how to go about my garden project, Wish me luck!
You’ve inspired me! Thank you
The edging looks beautiful !!! I have the half moon edger….AND I covet the birdhouse with the knot hole on the chair !!!! Where can I find one ???
Loved your edging project. Looks great. We have 2 acres in Florida, and I loved some of your ideas of putting bird houses, rustic items within the landscaping. I may try this. Thanks for the hints. Great job.
Going to redo my flower garden this weekend! Great, thank you. Do you have an idea for my backyard? 1/3 of it is in the shade and cannot keep grass, only weeds and with four dogs I’m at my wits end as what to do about it. I needs some ideas, stones with a fire pit? What do you think?
Hi Janet! Sounds to me like a great sitting area! Covering it with planks to create a ground floor deck? Love the fire pit idea and even an outdoor kitchen of sorts! I’ve always dreamed of an outdoor fireplace. 🙂 Lots of options if you wish to create an outdoor living area! Try a google search on outdoor living for some ideas!
Thanks for the tutorial on edging, I really need to do this in my front yard. Love your yard and gardens and use of “junk”. I also use junk in my gardens, much to dh’s dismay..LOL But I’m the one taking care of it, so I do what I want >>> Just sayin’.
Wow Chad, those are the coolest! Thanks so much for coming back and sharing that fab tip!
Please tell me what hedge shrubs are on both sides of the dog in the picture that is just above the shed. Your gardening is beautiful!!
Hi Marie, thanks! To the left of the dog is honeysuckle, to the right are grapevines. But if you mean the evergreen hedges on the left and right side of the yard, I don’t know what they’re called.
Hello,
I’m new to gardening and just found this site!! Luv it!
Be careful when laying a pallet walkway. I have old beams in my veggie patch as paths and we covered them with wire because they were so slippery. They have lasted a long time though.
Your how to edge a flower bed post is great information and on my plans for spring (which is here now) but how in the world do you keep grass out of your flower bed, from blowing in it when you mow and growing in it. It prolly doesn’t help that there 100 acre field south of me and in the fall those pesky grass tumblers full of seeds come and bed down in my flower beds, but even still we have bermuda and of course it grows best in my flower beds
Hi Shelley,
When I re-trim the grass edges, they do fall in. I just scoop them out with my hand. The little that remains composts and you don’t even see it.
Hope that helps!
When doing the edging, I look for bare spots in the lawn and use the grass chunks as plugs. If not flip upside down and let sun dry out soil and shake it off on beds before mulching.
…..what is the amazing plant with the bright red leaves ? !!!!!
Hi Daisy, I think it’s a version of a coleus but am not 100%.. perhaps save the picture and bring it to a local greenhouse? Hope you find one!
Ah ! Coleus ! Gosh Donna , that brings back memories ..yes …my mother used to grow them from seed when I was little..I will be looking out for the seeds..thanks .
Great ideas! I’m excited to get started!!!!
I love this edge. I learned to make this edge with the deep trench since I was a little girl. I learned this from my farmer dad. Hopefully one day I’ll be able to do this again when I have a house. Yours is a real beauty though with the use of the shear and so on. Thanks for sharing
Wonderful! Thank you so much for this post.
Great job !!!!! I have been doing this for years ! Also, trenching on a slight angle will help keep the grass from growing in. Mulch 3 ” next.
Ms. Funky Junk,
You have created a beautiful edge to your flower beds! Your “secret” tip of making the soil lower than the lawn is exactly what I have been doing! Yay! I had just wondered if I was missing something like an actual barrier to keep the grass from growing over and aiming for the soil again. I see now that what I am missing is keeping at it, e-v-e-r-y week! Aha! Light bulb moment! At least I’m glad I don’t have to install metal or plastic edging which would heave and be another thing to have to maintain in our Ohio “Freeze, Thaw, Freeze” environment!
Many thanks to you AND your awesome brother!
Sincerely,
Beth Bishop
Wooster, Ohio
Beth, you and I think the same way. If you don’t have to add anything extra, there’s nothing extra to upkeep! So glad you found us to inspire you by!
I just wanted to say that a hundred years later I STILL reread this post every spring to get stoked to edge my garden beds. I love all your posts but this is the one that brought me to your blog all those years ago. THANK YOU!!
Haha, I agree! I read this post and think, I need to re-edge! This summer I hired that part out as I had a pro gardener come in for other things as well. That was a real treat!
Glad this post offers the needed enticement!
love what you did with the flower beds how often do you use your edger around them
Thanks Vivian! I edge once a year in the spring. If I keep them up well all summer, they only need to be done that much or less. If you let them go, you may find it easier to re-edge rather than attempting to play catch-up.
The first time takes a little muscle, however you will just not believe the results! Well worth the effort.
when mowing your lawn do you put lawn mower over edge of the grass or just
before the edge with the mower i have my edges trimmed every 2 weeks is that ok
Hey Vivian, I do it two ways…
I first mow as close to the edges as I can, then will stop and turn the lawnmower so it overhangs the edges, tap down, then straighten up again. Move forward and repeat.
Lately I’ve been just getting as close as I can, then follow up with a battery run weed trimmer. I’ll clean up the top, then rotate the trimmer and clean up the edges.
I say do whatever works and looks good! I’ll shoot a video this summer and add it to this post. Stay tuned!
that looks lovely! Wouldn’t you add mulch over the dirt? It would help the soil stay in place thru hard rains and watering.
Hi Patsy!
Great suggestion! I don’t really find the soil moves around when it rains myself. If you fluff it up enough, the rain penetrates well.
Mulch is certainly an option, however I prefer to work with straight soil as I find the mulch eventually disappears or mixes with the soil anyway, making for more of a lumpy removal of the weeds.
For a true mulch experience, I prefer to add landscape fabric prior, however that of course puts a whole new spin on how the flowerbed will operate for feeding / new planting.
Isn’t it nice to have SO many choices?! 🙂
Thank you soooo much for this post. Best description of edging I have ever read. You have taken something that seems to me to so overwhelming to do and simplified it so that I do believe I can do it! Thank you sooo much
My pleasure Diana! It is easy however does take a little bit of muscle first time around. I’m currently building a video so hopefully can add that to this post soon!
I am disabled so I must have lawn guys. My lawn looks great but none of them seem to know how to edge the flower beds! I don’t expect them to use those great garden shears. Can you tell me how to explain to them how to hold a weed trimmer to make that nice clean edge around the garden edges?
Thank you so much!
Hi Kathleen! The best way to achieve the look with a power trimmer is to first cut the edge, then maintain it by turning the head fo the weed trimmer upside down, and trimming the cut that way. It does a pretty nice job! When I add my video, I’ll include that part too!
To really clean up edges of cut beds, I use the Spear & Jackson 4900RSS Razorsharp Steel Edging Shears I bought on Amazon. The angled blades are perfect for this job. Before string trimmers these were state of the art. Now, they are just quieter and nonpoluting and very relaxing.
Thanks for posting your gardening tricks and ideas. I can’t wait to beautify my garden now!
Happy gardening,
Francesca
Thank you for the info. Great ideas. Summer is such a beautiful time of year.
Thank you again
Thanks for breaking it down step-by-step! I’ve always liked this look, and I’ve always cringed at the icky garden edging at the home store that never seems to really look. I’ve kind of done this, but he “trench” part and the horizontal and vertical trim is what I’ve been missing.
I’m so glad you came across this Veronica. You will be STUNNED at how those simple steps immediately transform your flowerbeds. I hope you report back with your progress! It really isn’t difficult, it just takes some diligence.
Hi. How would I apply pine straw mulch to this? I usually tuck in the edge and leave a small amount of “dirt” visible between the edge of the pine straw and edge of the grass. Is this the best way? Or should I bring the edge of the pine straw to the edge of the grass border?
Thanks,
Barry Weissglass
Oops. One other thing. How much distance between the edge of the plants and the edge I am creating? I assume I should measure the distance from the outer edge of the plants’s foliage to the inner edge of the border, yes? Once again, pine straw all the way to the edge or leave some dirt showing? If I should leave dirt, how much?
Thanks again,
Barry Weissglass
Hi Barry! When I add mulch to a flowerbed, I have it resemble soil, so basically put, no soil shows. You just need to dig out the soil a little more to allow for the topping.
I personally wouldn’t worry about measurements. What looks good to you? Sometimes I allow plants to climb over an edge, other times there’s at least 6″ of soil exposed between edge and plant. It really depends what you like the look of and don’t mind caring for. It’s more work to allow plants to crawl over an edge but it can look cool too!
All the best!
Hello! One question…did you remove a lot of dirt from the existing flower bed so that it was lower then your lawn? My bed is higher then the ground in front of it and I’m thinking the mulch/dirt will just go into the trench if we get a good rain. Thanks!!
Hi Teresa! No, I didn’t remove any soil. When you dig into the soil to create a trench, moving the soil upwards, it appears like that but it’s all there. If your soil is higher than the edge, you may have to mound more so it doesn’t tumble down. I have some spots like that too in certain areas. If I keep at it, it appears to still work!
I suggest to try anyway and see how it works for you!
Tutorial very informative and that is how I edge BUT have plastic with mulch on top so am having a hard time making my trench. Should I pull mulch and plastic back, edge and then put plastic and mulch down to the very edge of my soil? Will my mulch all end up in the trench? Its hard to throw soil back because my bed already goes uphill. I have been putting soil in a bucket but I can’t really fluff up soil. I know I should have done edging before putting plastic and mulch down. 🙁 Ran out of time and weather. Any ideas sure would be appreciated. Thanks so much.
Thank-you Mary!
I would do exactly as you suggested. Pull back the plastic and mulch, then create your edge / trench. Then place your plastic into place which should land lower than your edge. Replace soil and mulch.
I don’t know what kind of mulch you are using, but I’ve used this method with bark mulch before and it does work. It’s just a little harder to work with since the bark mulch chips get in the way of cutting clean edges.
The finished results will be well worth your time! Just take it slow and do a little at a time. I hope you update how you make out!
You may have to scoop away some mulch and soil to a lower level if the hill is too steep.
Won’t all my mulch end up in the trench?
Hi Mary! No, it doesn’t roll back into the trench if your hill isn’t too steep. If it’s too steep, you’ll need to level the soil and mulch on top moreso.
Thanks for sharing these simple steps! I am a novice and need all the help I can get.
I do that but find it annoying as some grass roots are quite deep and grow into the flower bed or at least into the groove of soil. I dig and prod at the root as far as I can into the lawn which leads me to the question which grass is bed for a lawn. Have tried to identify the grass we have but it’s impossible as there we have so many different types of grass. One grass we have has a white root and while the blades look lovely, broadish and a lovely green, it’s roots go deep. Thank you – have been struggling with this for a long time.
Pauline here again – forgot to ask if it’s worthwhile making an edging with pallet wood at the grass edge. None of my edging is curved so although it should work am just wondering how long the pallet wood will last before it breaks down. Am so interested to hear your replies. That you
Hi Pauline! Any treated wood will last longer than non treated so I’d suggest to start there, and further protect it in some way. Pallet wood isn’t generally treated for weather so my guess is it would break down pretty quick.
I wish I had known how to do this when I had a garden! I always admired those clean-edged flower beds in photos. Great tutorial!
Loved this post and tutorial! Thank you so much for the detailed and thorough explanation! I’ve been wanting to try it and finally got it done today in my back yard, with great results! It looks like a professional job to me and I saved LOTS of $$ by doing it myself!
Thank you again!!