Create a unique, rustic wooden garden path in a quick afternoon, with a clever frame that won’t easily rot! Includes other unique garden walkway ideas too!
Thanks to some really epic summer-like weather recently, I’ve been working on the landscape in the garden and yard areas to ramp up the curb appeal.
Since I removed all my flowerbeds out of the backyard, that area is so easy to keep up! But my front yard is quite another thing…
Most of the area by the front door is surrounded in flower beds… which makes for very pretty focal points! And while more effort to maintain, it’s certainly worthwhile!
It’s in this area I like to add a little extra low maintenance garden design with walkway ideas. Little garden path ideas that weave through flower beds really make you feel like you’re entering whole new destinations, don’t you agree?

Reclaimed wood garden walkway – visit HERE
Previous garden path
And I’m certainly no stranger to adding a quaint wood walkway. I find it a fun challenge to come up with a unique and easy way to create wood walkways that don’t break the bank using specialty deck boards, composite decking, fancy brick-laid path ideas or a herringbone pattern layout that’s complicated.
Wood from pallets or simple reclaimed wood planks do the trick for me offering a ton of versatility through how I wanted the garden walkway to look like. They also really enhance patios and garden shed areas as well like I did with THIS PALLET WALKWAY by my garden shed.
Other unique and easy walkway ideas:
An easy and beautiful Wooden Walkway in an afternoon
Pallet wood boardwalk and gate around a garden shed
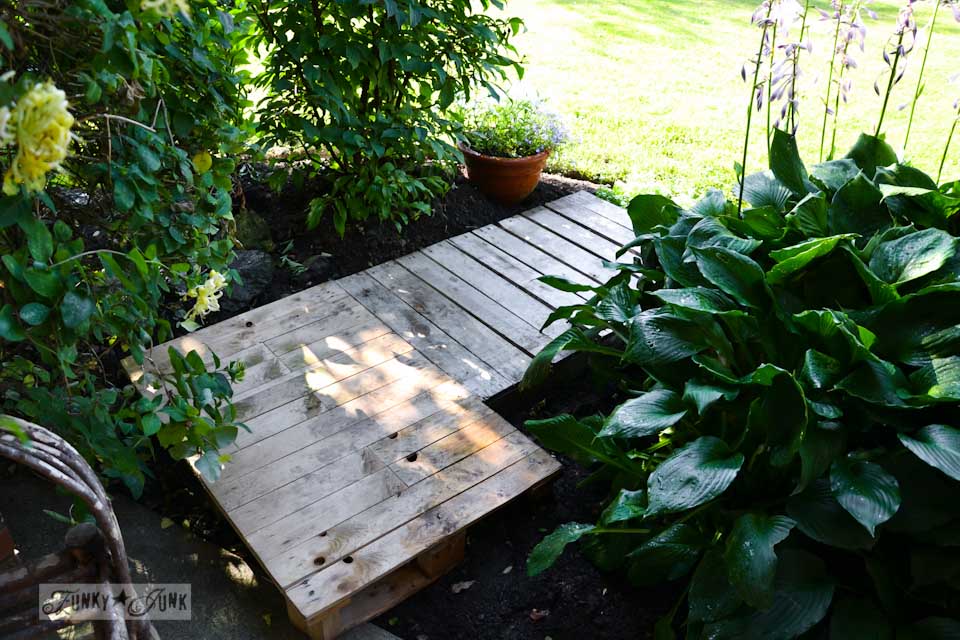
The above garden path lasted for a GOOD long time, despite me not protecting the wood with anything!
But once the wood eventually broke down, I threw a few cement walking stones in its place until I could come up with some other unique garden pathway once again.
And of course, over time, things got messy…

The current situation!
Welcome to reality. I love stone walkways or a quaint stepping stone path, but not like this. LOL
The spring flowers happily pushed their way up in between this simple stone walkway (not good aesthetics) that’s really concrete stepping stones any which way they could. And weeds that compete for space. It was time to tap into the landscape designer in me and ramp up my creativity to create a fresh and new garden walkway for me AND potential guests!
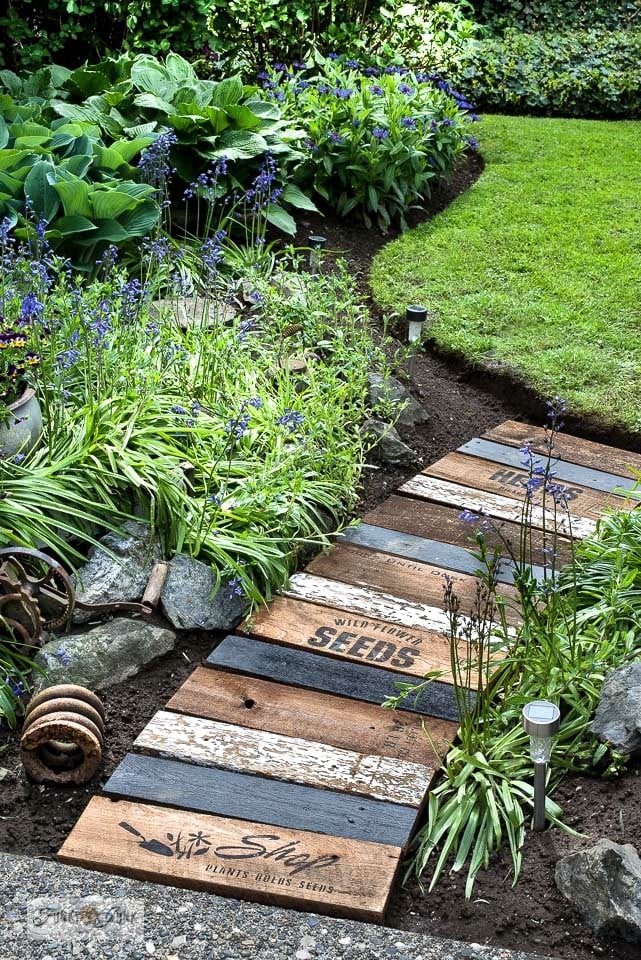
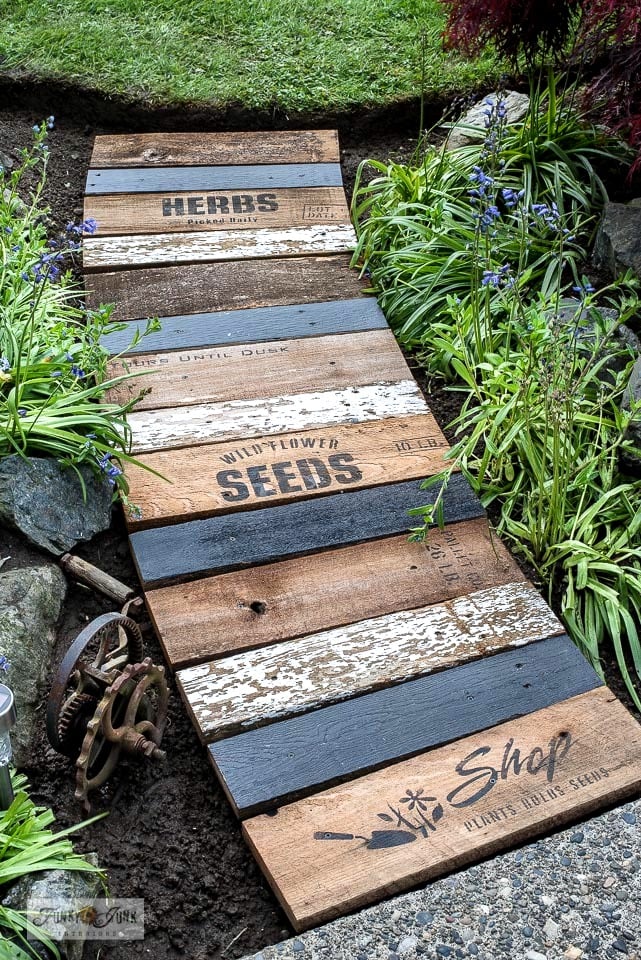
Bringing out some reclaimed wood planks from my very substantial stash, I dry-fit boards over top of the mess until I came up with an idea that ended up with even more visual interest than my last garden walkway! Filled with loads of rustic charm!
My goodness… the new walkway design is SO easy to make and is much better protected from the elements too thanks to the unique way the top planks are placed! This new look made quite an impact for the front garden that was not only beautiful, but the added stability makes it so useful too!
Desire a new, beautiful garden path that’s easy to make in a quick afternoon with any reclaimed wood you may have? Here’s how!
This post contains some affiliate links in which I earn a small percentage from qualifying purchases through these links, at no extra cost to you. Thank-you for helping to support my blog!
Garden walkway ideas using reclaimed wood for a charming pathway that won’t easily rot!
Supplies I used:
2 long treated support boards cut to fit – mine measured 2″ x 4″ cut at 6′ long
reclaimed wood planks – mine are reclaimed cedar fence planks shown in THIS POST, cut to 6″ x 20″
Stencils from Funky Junk’s Old Sign Stencils:
Funky Junk’s Old Sign Stencils used for these garden walkway ideas
- Locally Grown Herbs
- Garden Shop
- Wild Flower Seeds
- Shipping Crate Stamps
- Welcome to my Garden (for Tours Until Dusk)
Cordless drill and screws
Outdoor durable paint – I used Fusion Mineral Paint in Ash (get 10% off HERE)
Optional: some kind of ground cover path materials such as landscape fabric under mulch, pebbles, pea gravel etc.

Preparing the area
1. Clear out the garden beds you wish to place your garden walkway, then lower the depth of the soil.
With a shovel and rake, the soil was raked out to lower the level of the pathway, so once the wood was in position, the garden path would be level with the attached driveway and lawn.
This also makes for easier lawn mower positioning.
You could also dig a little deeper to place in something to fend off moisture, such as gravel or sand if desired. I haven’t needed to myself.
2. Add a weed barrier of some kind if desired.
To keep the weeds down, one could add some landscaping fabric first, then cover with some kind of cover such as mulch, pebbles, pea gravel, crushed stone, etc. These materials may also further protect the wood you will put down first.
I personally chose to leave under the walkway soil for ease of weeding.

Dry-fitting the reclaimed wood boards
3. Dry-fit two long baseboards to the length of your walkway.
The best support boards for this DIY garden path would be to use treated wood planks.
4. Cut random planks to the desired width of your walkway, sanding them well so they are safe for even bare feet.
I recommend to ensure each board is level with the next to avoid it becoming a tripping hazard and for ease of using a wheelbarrow.
5. Rotate board types with contrasting color or positions to style your walkway as desired, keeping a safe and functional pathway in mind. I find perfectly aligned edges give this look a more modern design, while staggering the boards to be a little more rustic.
This part of designing your walkway is a little like playing with blocks. Simply place the support boards into position, then decide if you’d like your pathway to have straight lines or curves.
Board measurements:
Two support boards – 2″ x 4″ cut at 6′ long
Cedar fence planks for top – cut to 6 deep” x 20″ long
Garden pathway shapes to try:
- place down all the same looking boards
- use random boards in different tones
- zig zag the boards
- line up the boards different from each other like THIS PATHWAY
How to curve a garden path:
Since my own path was to be slightly curved, this took a little fiddling to get it right, but it turned out awesome!
-
- Position support boards on a slight angle and wide apart, close to your adjoining sidewalks or driveway.
- Lay walkway boards on top, having them touch on the inner sides, and slightly spaced out on the outer sides to create a gentle curve.
- Double check that the support boards don’t show, while still offering maximum support, so the walkway doesn’t tip if you step on a plank edge.

Painting the walkway support planks
6. Cut support boards to fit, then paint or weather-treat if desired.
I used reclaimed treated fence posts, and set them direct on the soil.
However, as previously mentioned, you could also place landscape fabric underneath if desired topped with other landscaping ground cover such as mulch or pebbles.
However, I do find the wooden garden path easy to tip to weed as-is.
I ended up painting the tops in Fusion’s Ash so they’d visually disappear once the top planks were in position. It looked way better!
Weather protection ideas for walkway ideas:
-
- use treated wood
- gravel
- garden fabric
- treat the boards first
- bark mulch underneath

Designing the walkway wood planks
7. Design / decorate the top planks as desired.
You can also have fun painting the boards in various colors, however I ended up painting random top planks in Fusion’s Ash for a somewhat rustic-modern look.
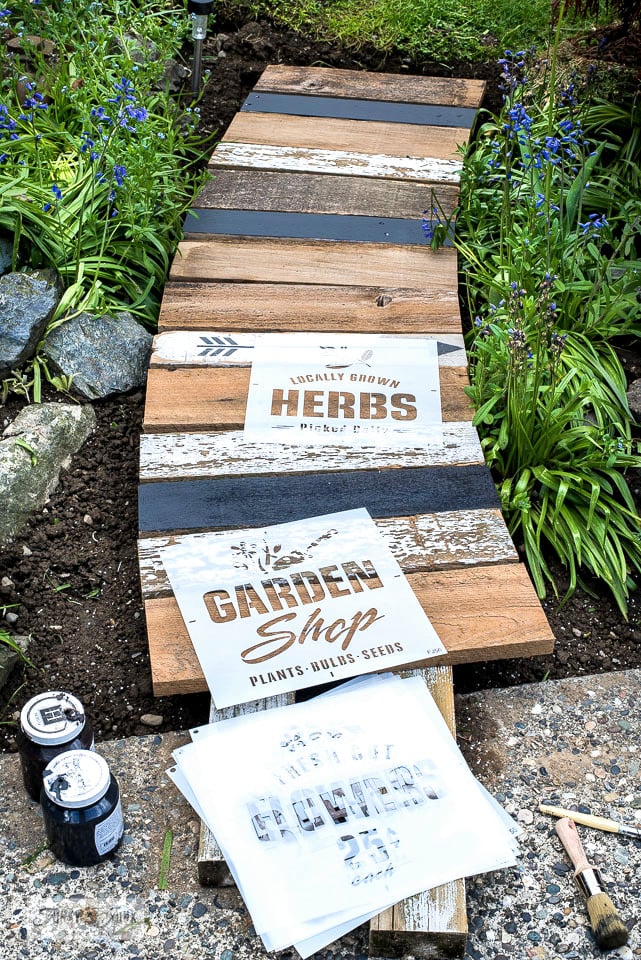
View stencils HERE: Locally Grown Herbs / Garden Shop / Wild Flower Seeds / Shipping Crate Stamps
Stenciling the planks with garden stencils
Then garden inspiration vibes hit, so some planks were stenciled with some garden stencil designs as if the pathway was made from garden crates! Fun!
The designs were stenciled in Fusion’s Ash.
At the time, I chose not to topcoat to further protect the stenciled designs, but I would suggest to do so as future pressure washing removed most of the lettering on these.
How to stencil with flawless results
- Position stencil into place with masking tape.
- Load stencil brush with paint, then remove most paint onto a rag to create a dry-to-the-touch stencil brush.
- Tap paint through the stencil to achieve the desired effect.
Learn more about how to stencil from THIS POST.
View a short video near the bottom of this post so you can see how the pathway was stenciled and built.

Attaching the stenciled planks
8. To prepare for heavy foot traffic, position the stepping planks on top of support boards where desired, then attach with screws from the top, using outdoor deck screws.
Because the walkway was curved, the right side of the boards touch while the left side of the boards are slightly spaced.
And as you can see here, the black support boards practically disappear! All you see is a pretty walkway along the mulch path. Perfect!
So are you even ready to see how cute this turned out?!
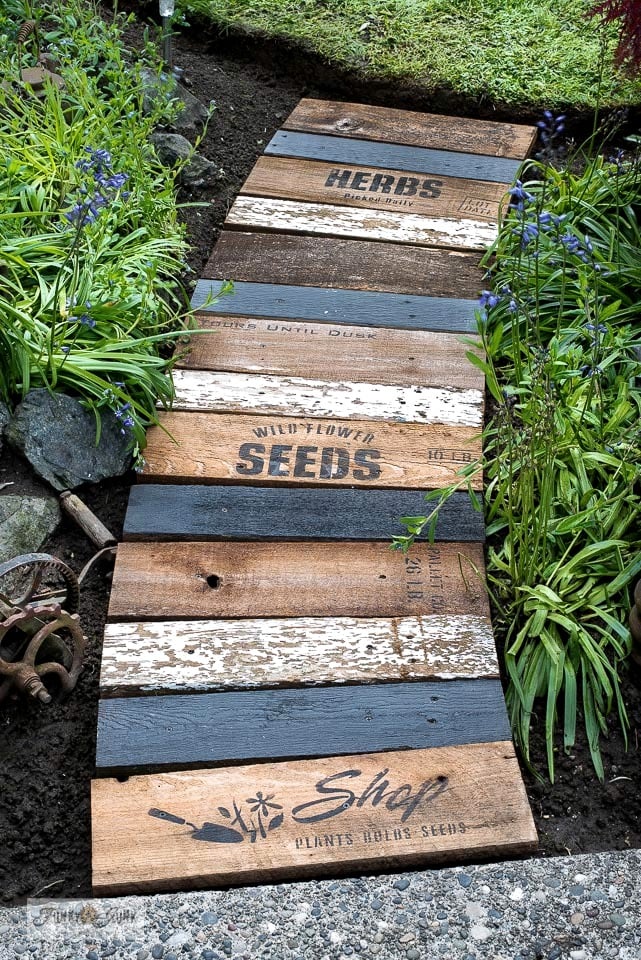
The finished garden path!
.
All ready for pedestrians! How fun, right?!
This garden-themed reclaimed wood walkway is rustic, easy to make, totally customizable and it works awesome! I love all the textures the rustic wood gives with the different plank treatments!
I also love how the charming reclaimed wood chimes in wonderfully with the natural surroundings. It was the right material for this project!
And it’s built to last for an outdoor space, thanks to the top planks sitting on top of support planks! I found this design the best choice that lasts much longer than the previous designs.
Where to find garden stencils
.
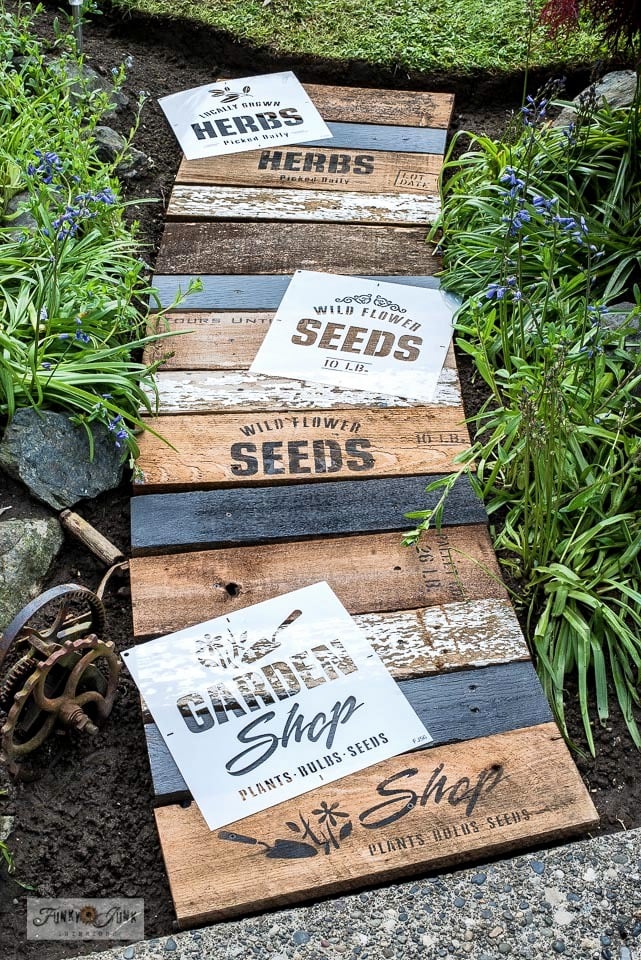
View garden design ideas through these stencils HERE: Locally Grown Herbs / Garden Shop / Wild Flower Seeds / Shipping Crate Stamps
![]()
I personally love theming the wooden pathway with garden stencils, however you could design your timber walkway any way you wish!

Stencil design tips:
- use random stencil placements
- rotate the stencils in different directions
- stencil bits and pieces of whole stencils to create custom stencil designs
No need to worry if the entire stencil doesn’t fit on a step plank. A trick I use is to simply use bits and pieces of the stencils to achieve the perfect fit, which ultimately further customizes your projects anyway!

View Wild Flower Seeds stencil HERE
Try different stencil positions. Moving 10 LB off to the side made this look like more of a random stamped crate. Just what I wanted anyway!

View Locally Grown Herbs / Shipping Crate Stamps stencil HERE
Locally Grown Herbs was teamed up with part of Shipping Crate Stamps for a random crate stamped look.
I like to angle some stencil images and even run off the edges of projects when attempting a random stamped look.

Easy to customize for any garden space size
Aside from looking totally adorable, I think the best thing about this garden-themed reclaimed wood walkway is the fact that you can so easily customize the size desired to suit either large or small gardens.
The gentle curve of the walkway makes for such an interesting element for any backyard walkways that can weave through your hedges, shrubbery or garden flowers! It’s a lovely front entrance look that really makes your eye gravitate towards the yard.
Imagine a walkway like this leading right to a garden pergola… the options are limitless where these garden walkway ideas can work!
I just love how charming this easy DIY project turned out, and really adds a touch of rustic appeal to the garden, don’t you think?
The reclaimed wood sure adds warmth to surrounding concrete walkways.
As for how it fits in with the rest of my front yard?

Nestled amongst all the shrubs, ferns, ground covers, flowers, ornamental grasses and other greenery, I’d say it fits like a well designed glove! It’s beautiful! All ready for a meandering walk to really up that relaxation!
Update May 2025: I also added an arbor over the pathway, so stay tuned for this update coming soon!
It also provides a great focal point from the bench to truly enjoy it!
Video – How to create a garden path from reclaimed wood
.
Click above to watch a short video to share some of the walkway steps!
Other garden pathways made of brick, pavers, natural stone or gravel paths, wood chips, mosaics, sand or other loose materials are all great ideas too.
However if you’d like a DIY project that’s something a little different that’s also super cost effective, I personally think this reclaimed wood garden pathway is one to make! It’s my personal favorite one to date.
Think you’ll give this idea a go? What garden walkway ideas have you come up with?
DIY a beautiful and easy reclaimed wood garden path that won't rot!
Supplies:
Stencils:
Fusion Mineral Paint:
Instructions:
- Clean out and level the area you wish to place your garden walkway.

- Position two long treated posts or planks (for left and right sides) along entire length of your walkway. Paint in black so they disappear. (option: place landscape fabric underneath to keep the weeds down if desired)
- Cut smaller walking planks to the width of path desired and assemble to support boards with screws from the top. Stagger the colors of the boards if they differ.
- Paint the boards where desired.

- Stencil images on the boards in random places.
- Treat the tops of the boards with a weather protectant in a non-slip variety if desired. I didn't treat mine with anything.
Notes
Other backyard walkway ideas to make:

Offers a rustic yet modern natural look to your garden space!
A super-easy two-pallet walkway
A simple solution for homeowners that is easy to make, safe to use, and can cost you absolutely nothing! Plus you can use various shapes to get the look you want.

Pallet path porch for a garden shed
Other unique garden projects to make:

How to create flower bed edging like a pro – Part 1
Freshen up garden bed edges and maintain – Part 2

Make a reclaimed wood garden fence
Visit many other garden-themed projects HERE
Check out all other stencil projects HERE
Wow what a great idea and you did a fantastic job putting it all together!
Thanks JoAnn! It really brought in a rustic touch in just the right way!
Donna,
Love it! A job well done.
Thank-you Nancy! This was a fun one!
Cute!
Thanks Teddee! Couldn’t have been easier as well!
I have been wanting to do a scrap board walkway for awhile now, just haven’t gotten to it. I like the idea of the two boards underneath first! I hadn’t even considered that.
Now you have me fired up once again to get mine done. Thank you.
Yay Pamela! Yeah, I like this idea better than my last since the wood you see isn’t embedded in the soil. I think it’ll last a lot longer! I hope you go for it, it was SO easy!
OMG! How cute! I would love to do something like this around my house, however we do have carpenter bees that buzz around during the summer. Do you have any insects that go after the wood? I’m thinking maybe since its pallet wood and some pallet wood has been treated, that maybe that would deter any insects?
Thanks Sharon! No, on the west coast of BC we don’t have a wood pest issue. Maybe you can ask your local lumberyard the best kind of wood for your issues or try and found out how to seal the wood or treat it?
I love, love , love this idea!!!! I’m making a rock garden down by my creek, thinking it might need a walkway.?
Thank-you Lisa! Sounds like you have the PERFECT little spot to make it even more special!
Your garden path is sooo clever and quaint! The new look is such an improvement. The old stones just didn’t do your garden justice. The natural element of wood truly blends in much better with your natural landscape. Well done….AGAIN.
Thanks Sharon! Yeah, those stepping stones were just a quick (lazy) fix. You know me… gotta have the old wood! haha
Love this project, but cannot get the Video to work.
Would love to see the steps in video.
Anyone else had that problem?
Hi Sandra, do you have an ad blocker on? If you turn it off, you should be able to watch!
I love it almost as much as the original. Not sure where in my yard I can do this but I’m determined to figure out a place! Love it!
Haha, thanks Jill! Hope you can find a spot to make it work!
The first time you shared your garden path I fell in love, but this new version is sooooooooooo stunning Donna. It makes me want to rearrange our flowerbeds so I can build one too. Gorgeous
Gosh, I love everything about this sweet wooden walkway, Donna!
Love the stenciled planks and fusion paint. It’s adorable and easy to do. Absolutely great!
This is so stinking adorable! I need a pathway in my life. Thanks for posting this! Love it!
This is so cute. Such a clever idea. How do you edge your garden beds to look so nice?
Hi Jo!
Thank-you! Find the flowerbed edging tutorial at: https://www.funkyjunkinteriors.net/2012/07/how-to-edge-flower-beds-like-pro.html
This look absolutely gorgeous! When it rains, do the planks become slippery?
Thanks Brandi! They didn’t appear to be. I don’t generally walk on them when they are wet though!
This is absolutely brilliant, and exactly what I wanted! Even though I didn’t know I wanted it until I saw it! Now I am really excited to get started on this project and clean up the walkway down the side of my house.
Thank you so very very much for posting this!
Where do you get the reclaimed wood? We live in a rural area- South of Pittsburgh- near West Virginia and Ohio. We have been trying to find just a couple of boards for shelves but haven’t found anything. Thinking of making nighttime raids on one of the many falling apart buildings??
Hi Jo!
This wood is from a fallen down fence in this post:
https://www.funkyjunkinteriors.net/2015/03/an-old-fence-wood-lottery-win.html
I keep my eyes open for things about to collapse, then ask! haha
Thanks- I need to be more brave, I guess no ninja night time raids. Of course at the moment I don’t think I can approach anyone I don’t know well… There is a wonderful old falling down shed by a horse field up the road from us. But I kind of love it-I don’t want to put it in the owners mind to tear down??♀️
Haha! Yes, I understand that completely! But if they plan to take it down anyway, at least they may call you before they do! I’d perhaps leave a note with your number… can’t hurt to try.
I absolutely love this idea and your execution Donna. We do get the odd snow fall in Edmonton, I expect the shovelling would enhance the effect of aging. I just might try it.
‘Just love it!!
This is so adorable!! Thank you for the ideas! I’m building a new garden completely from scratch and had originally thought of making or buying stepping stones. I have tons of reclaimed wood, so I’m doing this instead.
I love and use fusion paint on my indoor project, but didn’t realize it would hold up outside (I live in Florida and it’s moist and humid)! Has it weathered the seasons well for you?
Hi Roz! Fusion does really well outdoors! But it’s only as good as the surface you put it on. I ended up pressure washing the lettering off this walkway about 2 years in. The top boards only now need replacing as they eventually rot if you don’t use treated wood nor protect them, neither of which I did, but I don’t mind redoing. They served me well for a number of years so I knew their lifespan would be limited. The treated support boards are still going strong right on soil though!
I love this!! I have been looking for an easy way to create a path from the deck on the house to the deck for the pool. My fiance said he would help if it was recessed and it didn’t interfere with mowing the lawn. This is perfect. It looks like we can do it in a single weekend.