Here’s how to create a simple and striking wooden walkway for your garden, just in time for spring! All you need is a little scrap wood!

I love creating price efficient projects in my garden that enhance the landscaping. And one of those projects happen to be garden paths.
The benefits of a garden path
- easy to build
- free if using scrap wood
- keeps your feet clean
- create meandering pathways for added charm
In particular, wooden walkways made from scrap wood. DIY wooden walkways are so easy to build, and are easily replaced to create new ones when the desire hits!
They also really enhance a flower bed as well, especially if you create a gentle curve, which appears to take you through a meandering garden. Not to mention how pathways keep your feet clean!
Sounds enchanting, doesn’t it?
If you’ve ever desired a meandering wooden walkway in your garden somewhere, you will love this easy tutorial!
Since this pallet wood garden path is so easy, you can make it in an afternoon with pretty much any scrap wood you may have on hand!
Here’s how I created mine…
This post contains some Amazon affiliate links in which I earn a small percentage from qualifying purchases through these links, at no extra cost to you. Thank-you for helping to support my blog!
Make this easy wooden walkway
Supplies I used:
.
reclaimed wood or wood planks with thickness to it
orbital sander
miter saw
tape measure
pea gravel or mulch for underneath if desired


This little project began in July 2011, HERE.
Creating a pallet wood garden walkway came to mind one day.
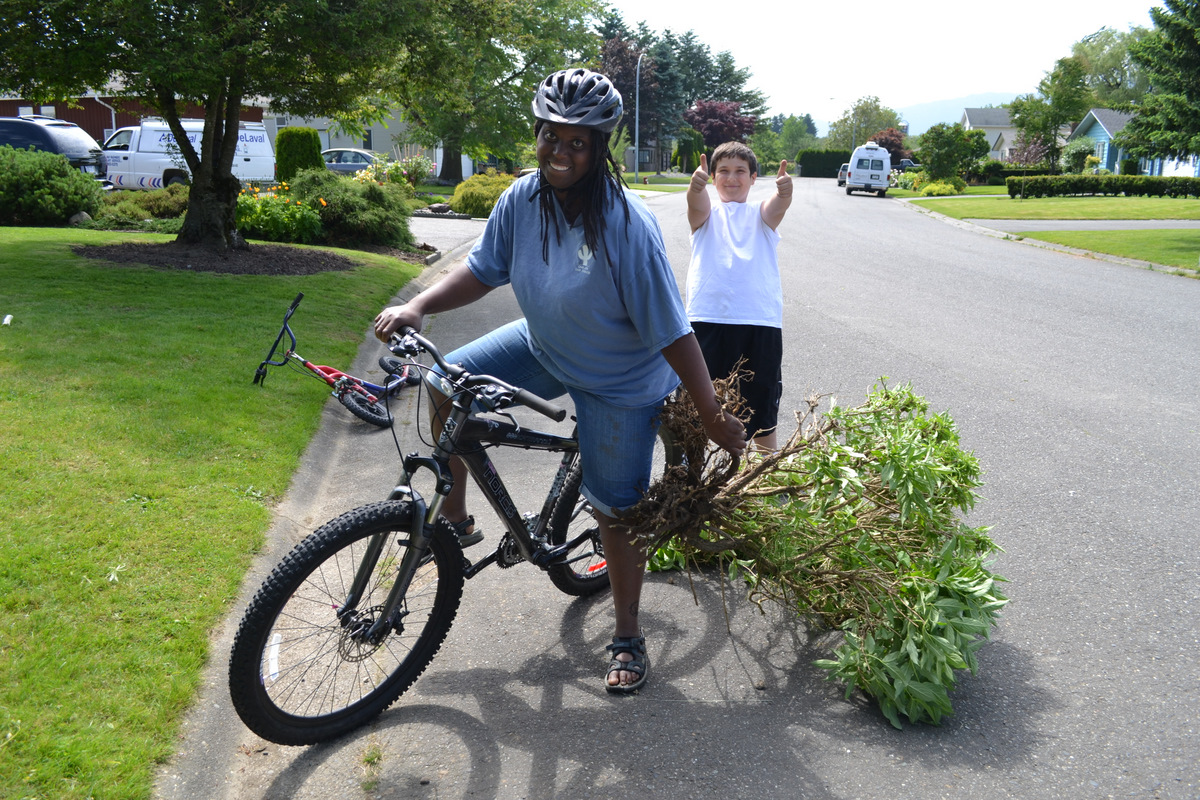
The yard was getting a major revamp with the help of my wonderful neighbours. Since some overgrown shrubs were being pulled, and new soil hauled in, I desired a pathway…

…from the driveway to the lawn.
Let’s build a pallet wood garden walkway!

Preparing the area
1. Decide where you wish your garden pathway to go.
Because I decided to create easy access from the driveway into the front yard, the removal of some overgrown shrubs was first.
2. A nice flower bed edge was cut, then created so it had more curb appeal.
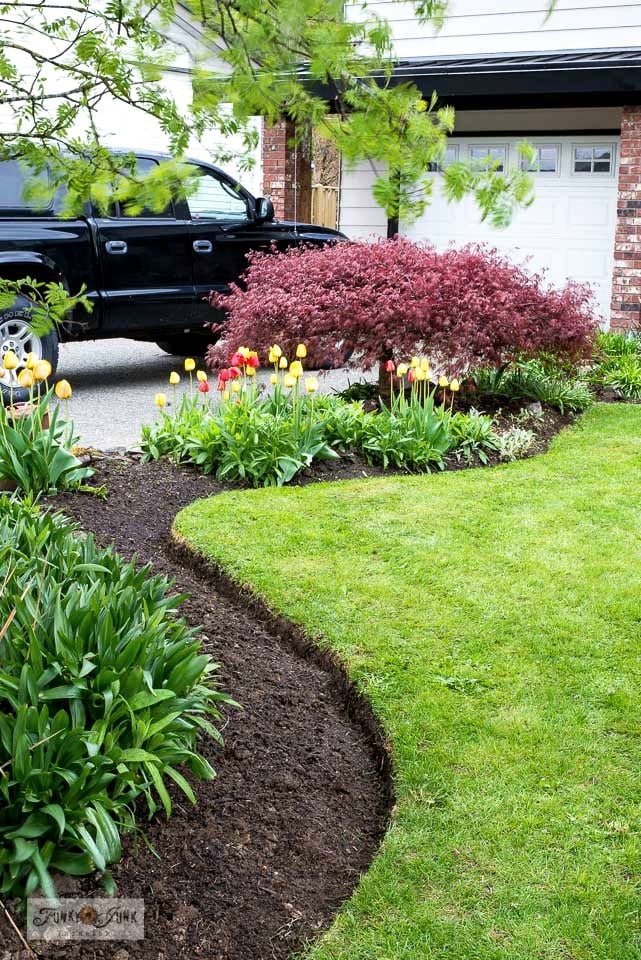
Learn how to edge flowerbeds like a pro from THIS POST.
Video – how to edge flowerbeds
.
Visit above to view a short video on how to edge your flower beds like a pro!
Read the original post: How to edge flowerbeds like a pro HERE

Adding new soil for added cushion
3. With the removal of some shrubs and greenery, an empty space was created in the flower bed with plenty of space for a wood pallet garden walkway.
4. Some new garden topsoil was added to create a nice cushion for the planks.

Choose your planks
5. Collect reclaimed wood, then cut the wood slat length to the appropriate path width desired.
However the particular boards I found were thicker in depth, much like a 2×4. This created a great way for water moisture runoff and allowed part of the boards to embed in the sod for added stability.
You could also choose other boards such as weather-resistant hardwood planks, thinner pallet slats, or otherwise. Different lengths for boards could also be interesting!
However if using thinner boards, I suggest building your wooden walkway as per THIS GARDEN THEMED wood walkway design.

Starting the path
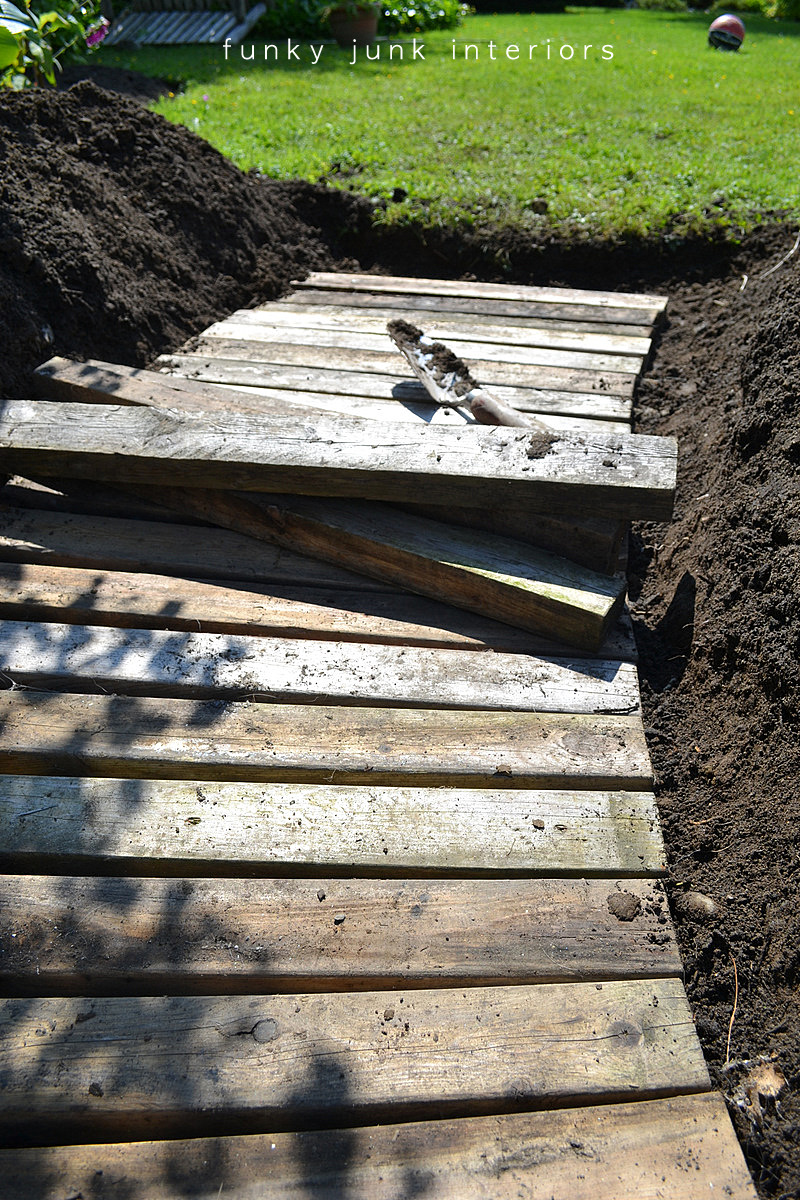
6. Using a shovel and garden rake, create a specific path (lower than your adjoining surfaces) for the boards to sit, ensuring once boards are placed, they are level with the attached driveway, sidewalk or grass.
This will help the pallet pathway to avoid becoming a tripping hazard.
And this would be a good time to place weed control fabric, then mulch, pea gravel, or another weed deterrent before installing a DIY pallet path if desired for a more permanent solution.
I went right over the soil though and this walkway lasted YEARS.
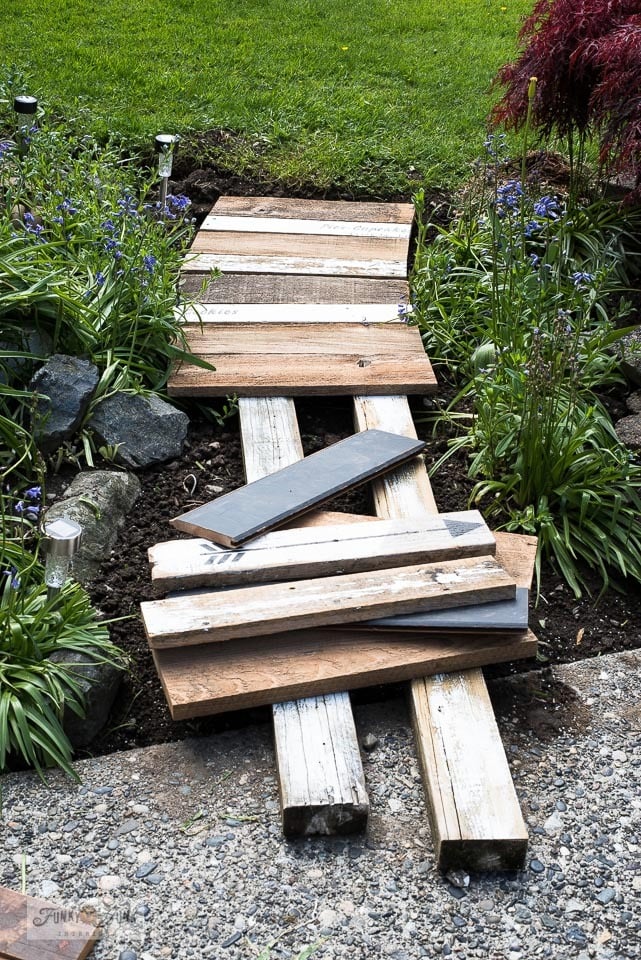
Positioning the wooden slats
7. Leaving some soil cushion in the pathway, position each wood plank, then slightly wiggle them into place so they are slightly embedded into the soil to help hold their position.
The extra soil cushion really helps stabilize the boards.
And leaving a bit of a gap in between each board helps to slope rain water off the boards as well. Spacers of some kind could be used if you wish for perfect spacing. I did mine by eye.
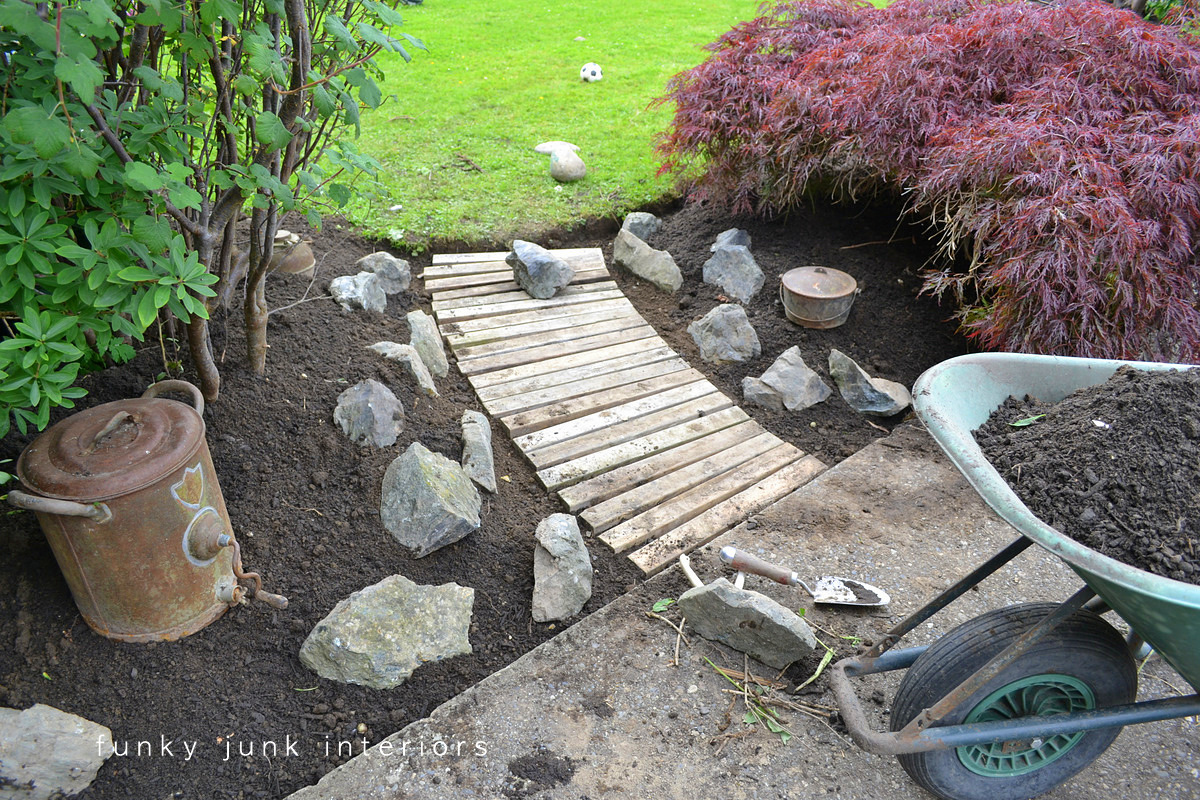
8. Keep adding boards until you’ve completed your path.
Consider a slight curve, or stagger the lumber along the sides of the walkway so they aren’t perfectly smooth, whatever look you wish! There are unlimited ways you can design your walkway!
9. Push a little bit of soil in between the boards to help hold them in place.
10. Walk on the boards and perhaps pound them down a little with a mallet to ensure they don’t rock.
Add more soil to stabilize if required.
After care
11. Leave the boards throughout the entire space loose so they can easily be lifted up for pulling weeds.
And they are easy to weed! Lift a couple boards up at a time, weed, then replace!
Adding flower bed accessories
Random rocks and rusty junk acting as garden art were then positioned around the wooden walkway, creating a rock garden effect.

Some perennial rock garden plants were added against the rocks so they’d return each year. Aren’t those flowers pretty?
From a crowded, overgrown flower bed before…
To this very pretty pallet walkway after! What a difference!
Questions / Answers:
Do you use treated wood?
The wood planks I used were not treated wood, however they did end up lasting for 3+ years before the wood started to show rot. But I don’t mind, I simply replaced the planks when it was due time.
HERE’s the newer garden themed wood walkway design, which includes a clever fix so the wood doesn’t rot as easily!
How should you protect the wood?
You can of course use an outdoor water protection product to further protect the wood against the weather elements or eventual rot. This will help keep the walkway more durable. However I choose to leave my wood as-is and just replace it with other free wood when the time came.
What about termites?
Since I don’t have serious bugs or a termite issue where I live, I wasn’t concerned. However if you do have termites, I’d suggest to keep this garden pathway located away from your home and to use treated wood.
Is the wood slippery when wet?
Because wet wood can be slippery, you could always add sand to your wood sealer if you choose to seal your garden path. I personally don’t have issues with the pathway being slippery as-is.
Do the boards stay in place?
They do! The pathway boards stay in place thanks to slightly embedding the thicker boards into the soil.
If you only have thinner boards, I suggest creating THIS GARDEN THEMED WALKWAY instead.
Should you put gravel down first?
I think placing this pallet walkway on top of the gravel is a good plan if you wish for the boards to last longer. I don’t mind the fact that these garden path planks will eventually rot. The plan is to replace them when needed.
Another thought is to stabilize the boards from underneath and embed those boards instead so the top boards don’t rot, much like you were building your own pallet. In fact, I may try that next!
Update: And I did! Check out THIS new walkway!

The little curvy pallet wood garden walkway was one of the easiest DIY projects I’ve done yet, and is the perfect solution for getting into the yard now. Such a simple project made such a big impact on the way we use our yard!
And I love that bench we plunked in the front yard. It entices lots of neighbourly conversation and is a really nice spot to sit with a coffee and watch the kiddos play. However this garden walkway would also suit a backyard so nicely! Or even located by the front door.
The good news is, you get to choose what parts of the yard you’d like your wooden walkway to go!
I’m so glad I gave this pallet wood garden walkway a new home! Just collect those in-expensive pallets or reclaimed wood to make one of your own!
Think you’ll try one too?!
Update: And check out how the pathway did in year 2 HERE.
Other garden projects you may enjoy:
Build this garden-themed walkway on top of treated boards!

Make this FULL pallet walkway… even easier!

Build this pallet wood garden gate!

Assemble this easy 2-pallet chair or loveseat for outdoor living!
Visit many more pallet projects HERE
Read more gardening tips and ideas HERE
Check out more garden junk projects HERE
http://www.orchidlanedecor.com
It looks lovely and I can see how it will make a huge difference to the way you use your yard. Great job 🙂
Suzy xxx
Good job Donna….you think of so many creative things to do with pallet wood and old pots.
Mel’s Designs from the Cabin….Mel
I LOVE this! How fabulous!
Holly
http://www.lifeasathrifter.blogspot.com
What a wonderful project that turned out great. I love before and after pictures.
FlowerLady
I’m so glad you shared more about this project. I “pinned” the walkway photo a while back. I want to put one leading from my pool to the pool house.
It looks fabulous!! I love the use of timbers!
I have been planting trees!
Hugs
SueAnn
I love that idea. I also love that little Japanese Maple. Great job.
Love this idea Donna. I have three pallets I am at a loss as to what to do with them. Not sure if the hubs would be up for this one, especially after the pizza oven. He told me never to ask him to do another project again LOL…til next time~Have a great day.
What a great idea & looks good 2! ooooo I am seeing your “popular posts” on your sidebar….blog tips for newbies….heading over there now 🙂
Great idea and I love the old pots added to the landscaping…….all looks wonderful!
Looks great of course as everything you do does 🙂 Will be an easy fix to replace when they start breaking down.
I’d really like some how-to info on how you edge your yard so perfectly. Any tips?
Love the pallet walkway! A simple way to enhance your yard and garden.
I’m a new follower of your blog and I must say I’m totally addidted! You are so creative and inspiring!! Go FuNkY jUnK DoNNa!
Another great idea! I have a trench for a walkway. Does that count?
I love the new look Donna… great job. I love curves in the garden.
Now can I borrow your neighbours for a day?…lol.
Hugs, Deb
Wonderful! I was eyeing some pallets my husband was using for firewood yesterday and he thought I was nuts! I told him, “Never underestimate what you can do with pallet boards.” And here yet again, is another great idea!
Love it! Can I borrow your neighbors? I thought having a new house with no landscaping would be easy to work with, I was way wrong!
Your pallet idea is great, I love how you use them!
How smart, Donna! Looks great.
-Trish
I LOVE it! You have the BEST ideas and projects, thanks for sharing! I just made myself some giant numbers yesterday per your tutorial! Have a great day! 🙂
Jennifer
Cottage Patina
That really turned out nice. I’m sure that having that access really does make a difference. That bench in the front yard looks very inviting!
Jane
Thumbs up!
I really like this Donna! It opens your yard up and draws the eye to your lawn and the bench. Great job! Pamela
What a great project.
I LOVE this! What a great idea!
Looks great Donna, you have some really great neighbors.
Vanessa
It looks really cool with the curve to it and so much more open looking! We have a ton of pallets sitting around getting all nice and pretty gray, but my hubby won’t let me touch them. He saves them for our firewood to sit on so they’re not touching the wet ground. I’m thinking of just getting some of my own to keep. ;^)
We are “planning” a similar walkway beside my garden shed, but the intent is to give the impression of a wooden foot bridge, but it will be on the dirt with fat posts along the sides with a draped rope “handrail” between the posts. I doubt it come to reality, but it looks pretty in my head! LOL!
What a great idea! It really opens your yard and has a warm inviting feeling. Did you sand the boards at all to smooth them?
I need a walkway between a fence gate and my deck. I didn’t know what I wanted to do so of course, I haven’t done anything. I think something like this would work and would look really nice.
Thanks so much for sharing!!
#29 Tricia, the boards were smooth prior so I did no extra sanding. I just really lucked out. I don’t know what they were originally from as they were already dismantled when I found them.
Donna
It’s great! I love a little garden path.
I so need to do this. I so need a path through my garden area and this is just the thing. Now to convince my husband to take me pallet shopping!
What a great idea!!
Donna Love your walkway. Love your bench too. Heck I just love all of it. Great post. Thanks for sharing.
This looks fantastic! Your yard is beautiful. I long for a big back yard. I just recently hooked up to your blog and love what I see. Love your ideas and creativity. I’ll be back for more.
Cherish Life *Lisa*
This turned out great! I love how you have pots and things, in with the flowers and plants. Looking forward the end of Summer sharing! Have a great weekend!
Never mind a year… Looks pretty awesome right now!!! X
It’s wonderful.Looks like a little bridge.
cool. real cool.
Beautiful! What wonderful neighbors, too!
What a terrific way to upcycle those old pallets! Great idea! (BTW, your neighbors must be terrific!)
OOOOHHHHHH!!! How did I miss this? Just exactly the idea I need. Thank you thank you thank you for sharing. Husband out of work, me the only income and a garden in need of a real facelift where the dogs have worn a muddy pathway. What a gift to read this and learn from your creativity.
I think I will try this as a pathway on the beach. The sand gets very hot. My only concern is splinters on bare feet. Have your pallet boards stayed smooth? Thanks!
Yes, super smooth! Just sand them really well before you put them down if you’re concerned.
my hubby says the wood will rot. i was going to do the same thing with my pallets. have you had any problems with rot?? please say no. LOL
Donna…junk? You transformed this space wonderfully. I would end up in that space each am with my coffee and journal. Love it!
You call the boards pallet, are they actually from pallets that are used for stack various items and then taken apart?
I love the look and would like to follow in your steps (no pun intended) but want to make sure I get the right material.
You have a great website!
Cindy
Hey Cindy! I found the boards among a pile of ripped apart crates and pallets. I am not 100% certain what these boards are off of. Watch for deeper wood slats so you can create a water run off.
I think I should have named this post reclaimed wood vs pallet wood, but… oh well!
I love the look. It makes me want to dig up my whole front walk and do it that way. But on second thought, shoveling the snow in the winter would be a real hassle. Hmm Maybe a walk way out to my pond…
Donna –
I love your pallet walkway! I am thinking about doing the same thing in my tiny backyard from the patio area to the above ground pool and surround it with sand instead of dirt to give it a “beachy” look. Thank you for the inspiration!
– Deena
This looks really great without costing a lot.
I love the pallet walkway..was it hard rippin those boards off. Also it looks like you stained them?
The boards were found loose in a pile of ripped apart crates and pallets so I got off lucky! These boards were not treated at all.
I love this – but what about termites?
Hey Gary! We don’t have a termite issue in our area, however many others apparently do. Please use caution when creating this project near your house if you have a termite issue for certain!
Forgive me if you’ve already mentioned this, but did you treat the wood prior to laying it down? I live in sunny California and the sun is harsh on outdoor wood furniture. Just wondering if I need to place some type of coating on the pallet slats.
Thank you!
Hey Dusty! No treatment on the boards transpired. For the final photos, I’ve wet them to make them look nicer for the photos.
Wow! This is great. How thick are the boards and how wide is the walkway? I have some wood from pallets and want to give this a try. This is way better than the costly and heavy stones I was going to use. Thanks so much for this great idea!
Love the pallet walkway! Have been looking for a cheap way to do a funky garden walkway-thanks!
Plant mint sprigs in the crack between the planks and when you walk on your path you will crush some plants the mint odor will be wonderful.
Mint does well in sidewalk cracks and will spread easly
Ron
Winter Springs fl
Hi Donna,
I just love, love, love your idea for the pellet wood garden walkway.
I do have a big area where I want to do mine.
Cant wait to see if finished.
I am going to start with garden chairs with pallets soon, big job….
Thanks for the great ideas…
Thanks
Madelein
Thanks for the great idea. We need to do something between our driveway and deck. I think this would work great.
Awesome! Love your site … Girl after my own heart. I love my classy junk! I’m going to do the pallet path. Thanks for the idea! Perfect for my side yard with a recycled beach cruiser art junk piece. My honey just finished a large pallet trellis that I stained dark brown & planted Confederate Jasmin to grow on as a backdrop for our backyard dining area at beach bungalow! Looks wonderful. 😉
Screw each piece of wood to an appropriate length of old garden hose to make it more stable and flexible. Then when you need to move it you can do so with ease and by rolling it over you simply unscrew the old and replace it. Also you can do it in more manageable sections to make repairs easier.
Absolutely LOVE LOVE LOVE this!!!
Tried this and it was complete disaster!! As soon as it rained the boards were covered in mud and displaced!!
Sorry it didn’t work out Sarah! Maybe my soil has more sand content?
Also, do try thicker boards if you can. Mine were fairly deep, which provided great water run off.
You also need to make sure the flowerbed has excellent drainage, otherwise I can see the mud puddle effect for sure!
Mine’s still holding strong just like in the pictures going on 3 years now!
Love what you’ve done with little more than scrap and your labor!
Great idea … shall find a place for one of these! Thanks for that – happy gardening!
Thank you fot taking the time to answer my question. I have been looking for a backyard walkway idea that will not break the budget. Really like yours. Thank you again.
Your ideas are truly amazing. I Absolutely love this pallet walk. I have been indecisive for two years about how to build an inexpensive path from my flower garden to my swing. I think that you are a gardening genius. Never in a million years would I have thought about such a simple task. Thank you a hundred times. You are bookmarked and I will try to remember to post a picture of my new walk when I complete it.
Donna Pace
Love this path. Out looking for chunky pallets tomorrow.
the only problem that I see with this project is the fact that you put that wood directly on the ground there by leaving yourself wide open to and invasion of ants and termites. They screaming free lunch come and get it.
Hi Cathy, our region doesn’t have termite issues, but that is a valid concern for those that do.
Nice article – and the follow up, too.
I love this idea!!!
Was looking for walkway and edging ideas and happily found several here. Love your blog! Thanks for posting:)
All of my woodworks I made with woodprix. Google and try it.
Your yard looks marvelous! Good job!
I love this and want to try it in my back yard. No pallets available, could you tell me the length, width & depth of your boards? I’ll hit up our local lumber store for something similar.
Hi Sara! I no longer have the pathway so I can’t measure, however the depth was similar to a 2×4. Hope that at least helps!