
And finally, the pallet wood desk project is complete! And all it took was pallet wood, two sawhorses, and an old ladder. This is the perfect build for even an non builder!
If you’re just tuning in, this is part 6. Scroll down below for the steps on the build.

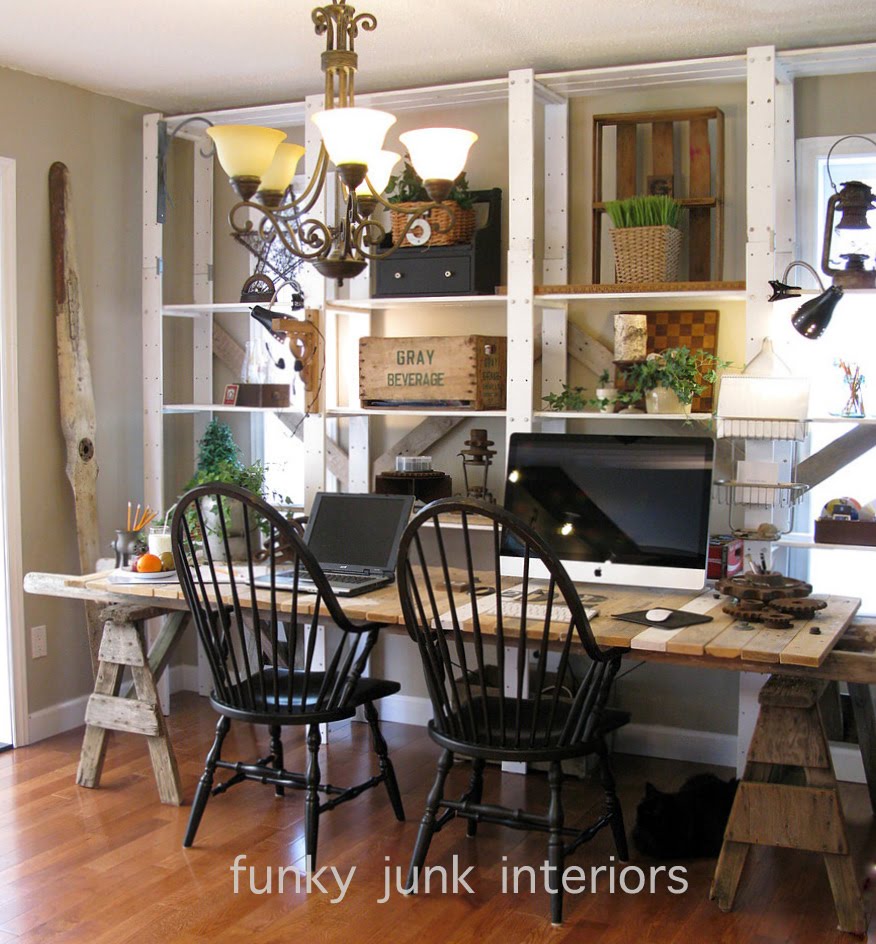
My blog office is located in our dining room. I LOVE blogging in this room because it’s central to everything else that transpires in the household. There is no need to hide away in an office or bedroom and miss out on what the others are doing. I’m right here.

What makes this office extra special though, are all the elements I’ve surrounded myself with. I love everything on that floor to ceiling storage system. Every object inspires me.


But what makes this post really special today is the fact that this long awaited funky table is now complete.
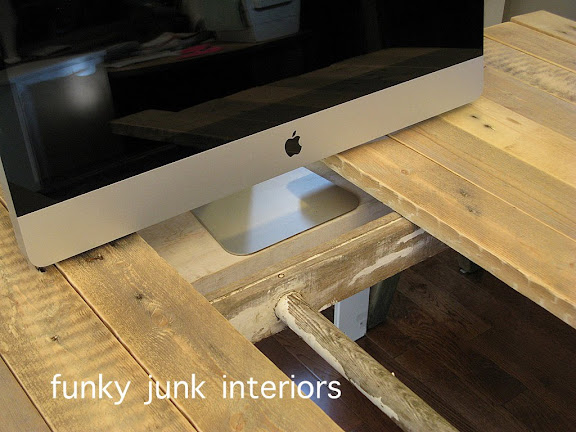
I desired a bigger table than what I had, as well as the top secret feature this desk hides. The 27″ monitor is sunken into the desktop! This enables me to have my eyes level with the top of the screen, no longer looking up, which was really hard on my neck. ( see part 4 above )

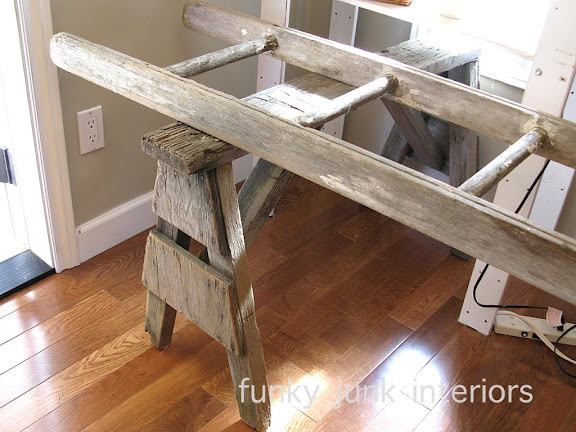
And the build couldn’t have been easier, especially for a non builder such as myself. Two sawhorses are the legs…

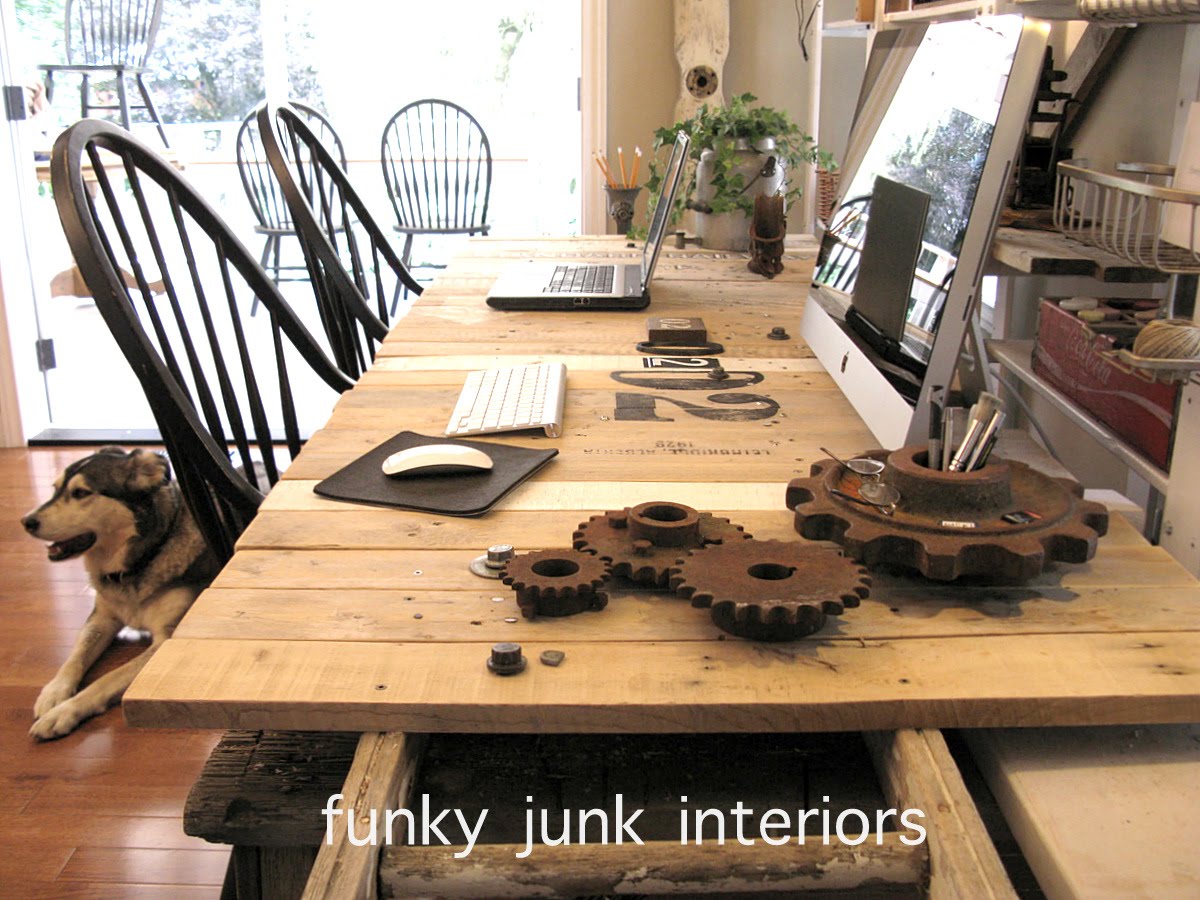
… and the old palette boards for the top were simply screwed onto the ladder framework below. I made no effort to hide the fact that a ladder was used because I thought it added an additional whimsical detail. AND a place for the meat grinder pencil holder to sit of course. 🙂

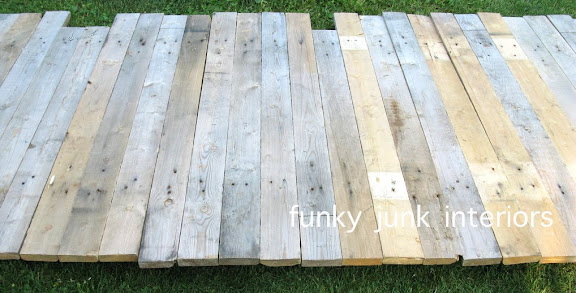
Old palette boards were sanded and attached in a slightly random style to encapsulate the feel of someone gathering different boards over time, saving them up to create something special. All the wood was left in it’s natural state. The top of the desk will receive a matte finish in due time so it’s extra cleanable.

No two boards are alike which is what makes them extra special. The odd white one was even thrown in for good eclectic measure.

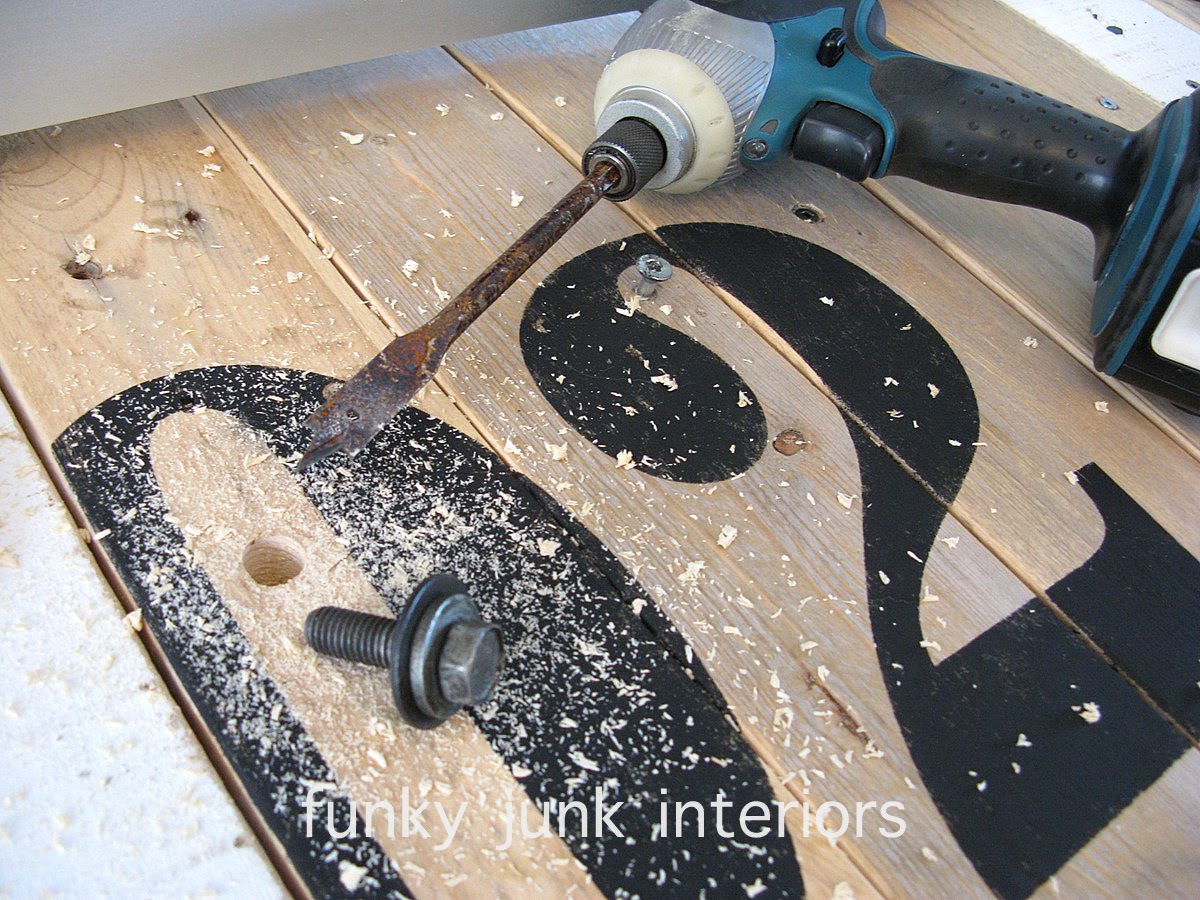
Plenty of random screws, big bolts and stenciling just add to the gathered over time scrap look I was after. I felt the boards resembled railway ties in a way, hence the chosen words used for the stencil.

What’s not to love, when you surround yourself with all the things you love?

I especially love the desk for the fact that it isn’t fussy. The more wear the boards will no doubt receive, the better they’ll look over time. If you start with something old, you get the look far faster than if you start with brand new.

Just so I don’t miss out on any action, the desk was designed so my son could sit with his laptop right beside me. He wants to start a Lego/photography blog, so stay tuned for that one! I’d like to entice that artistic ability he has any way I can. And what better way to encourage/monitor his doings than having him right beside me? 🙂

And for those that know me well, it comes as no surprise that I’d incorporate my rusty gears and cogs into the mix on my side. 🙂

And this little bit of numerical fun changes every 5 minutes. I’ll eventually figure it out. 🙂
Blogging is a wonderful hobby, but this location makes it all the more special.
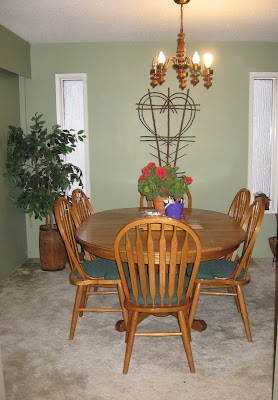
Before

and after. And I love it. 🙂

Related posts:
The wall unit build is HERE.
The wall unit staging reveal is HERE.

~ The Pallet Desk Project ~
Part 1 – defining the need
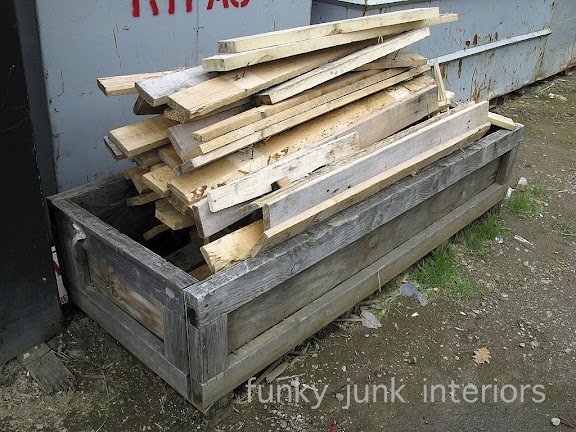
Part 2 – gathering materials
Part 3 – preparing the materials
Part 4 – the build and sinking the monitor
Part 5 – finishing details
Part 6 – the big reveal – this post
What a cool spot to work in! I have trouble ever finding desks that are big enough, so I would think I’d died and gone to heaven if I had that much space to spread out! You are so creative–and always inspiring. It’s fun to see the things you come up with. 🙂
Wow! That desk is so unique and practical at the same time. I can see why you love it. And your dog is just adorable.
It is fabulous!!! I love it! Great job Donna.
Oh my goodness. You never cease to amaze me! The table is perfect. I love all the stenciling you did and the extra touches like the cogs and pencil holder. 🙂
It’s been great watching it take shape – I love the finished result!
Fabulous as always! What a wonderful place to share your inspiration with us!
The desk is so awesome and unique and perfectly suits you and your style. It has Donna written all over it. I love the whole area. It’s beautiful.
What an absolutely FANTASTIC table/desk !!! I have two old palettes out in my backyard and I’ve been trying to figure out what to do with them, I’m so inspired by you!! I absolutely love those shelves too, decorated with all your favorite things. Perfect !!
Thanks so much for linking up, I’m sure many more will be equally in love with your creation.
xo
Kate
That is amazing! I have two palettes in my back yard too (like Kate!) and I have wondered what to do with them! You area always amazing and inspiring! What a wonderful place to blog too!
It looks great Donna! Such a big space to spread out =)
Wow, that desk is so cool. I love how you titled the post “The Palette Desk Project” just like that’s the most natural combination of words ever. Palette. Desk. I love it.
I would love for you to visit my painting GIVEAWAY!
This is great! I love your desk and your use of various objects as pencil holders, etc. Magazine worthy for sure!
Nancy
Hi, there. I was very surprised at how creative was your working space. Congratulations.
Looking at the photos I realised that I also have a sewing machine drawer. If you pass by and look at the July archive you will see how I transformed it. Bye for now
Just perfect as I knew it would be. Perfect for the space and perfect for you. Love the way it looks and fits that space so much better. Thanks for sharing all the steps too. Fabulous!!
I love love love the table/desk!! It is perfect with the wall unit and so you!! As I look at my traditional desk here in the office I am wondering how I can funk it up!!
Fabulous!!
Hugs
SueAnn
Wow, what a fabulous desk and workspace!!! It is so personal and unique and just oozes with character. I can’t stop looking at all the fabulous little details. Perfection!!!
amazingly old and unique! you did an exceptional job and i want to thank you for taking us along with the process. =}
have a creative day,
amyw.
What a wonderful workspace! How inspiring to have it displaying all the things that you love. It turned out just lovely!
Super job, Donna, you never disappoint! I read through all of the related posts. I love your garage shelves all painted and your crazy meat grinder/pencil holder. The space is definitely you!
Fantastic job on the desk! Completely customized for a low price (I’m assuming!) and I love the “Canadian Content”.
It’s so great your son wants to start a blog, he wants to be just like his mom!
It’s amazing! You did good!
It’s great to come over here, see what you’re up to, and feel normal. I love your desk!! My work table outside the greenhouse is made of sawhorses and pallet boards … fabulous workspace for free! Yours is nicer, though, since you took the time to sand it and add a few personal touches. Making it large enough to work side-by-side with your son was WONDERFUL. Great project … as always.
Connie
It is ‘one of a kind perfection’ just like the awesome lady who envisioned it all!
Fabulousness! (its a word!) It turned out so great. And now you both have more room to spread out. Always a plus. One word of caution. I have a door for my desktop and the more space the more clutter seems to appear! I need to tackle mine 🙂
Amazing!! I want one, too~ you are such an inspiration!!
Love it!! I feel the step that totally made it your style was the stenciling feature. Without that, it just wasn’t complete. And the chair for your son… the best part! Another inspiring project, Donna. Thank you!! -Tammy
I love it!!
Lethbridge Alberta?? Seriously!! That’s where I grew up!! I spent all summer there. I love your blog more now!
What an awesome work space!
Donna
Your spot is gorgeous! You style is very similar to mine…Love your home and your blog! Hugs,Meme
It’s marvelous. I love your painted numbers/words; they add just the right touch!
it looks so great 🙂
So ingenious, Donna! The use of the ladder is genious! Loving the pencil grinder. You sure do know how to add whimsy to all that you create!! A great place you have carved out to continue to let your creative juices flow!
Checking in from the party!
Very, very cool! I love all the objects, that they are old and have history. You are very talented at accessorizing! Could you rub some of that off on me? 🙂
Donna, your projects are always SO cool & inspiring. I love how you pull all those mismatched things together to work for YOU. Looks great!
I can always count on you to come up with something so unique & creative!!! I love it!
The sawhorse legs are perfect!!!
Oh Donna! You are nothing if not creative!!!! This is amazing and so uniquely you!! Way to create a spot that is inspiring so that you can inspire the rest of us. (Oh and my oldest son will definitely want to read your son’s LEGO blog so tell him he’ll already have one loyal reader waiting when he starts it!)
Amazing! Everytime I see your meat grinder I cringe to think I gave mine away! Argh. Oh well..something to hunt for!
I had to turn the monitor to show hubby your pencil holder on your desk. He gets a kick out of you! I think the desk has some of your best efforts displayed~the stenciling ala the crate staircase is really neat. I love that you have a space for your pal and you encourage him to do his thing! They grow up very fast you know.
Donna this desk is AMAZING!!! Great job! And thanks for sharing!
WOW – what a statement! Love your space!!!
I am so FLIPPAN FLAPPIN in LOVE with every itty bitty eensy weensy detail of this. I WANT that table! AS always…everything you do is FABULOUS including this! 🙂 …SIGH, I’m in LOVE!
I can’t even tell you how much I love this area! Stopping by for the first time and so looking forward to perusing your posts!
Kindly, ldh
No other words to say except. . . “LOVE IT!!!!!”
Incredible!! I love it! I love how your mind works, and the amazing things you come up with! Awesome!!
Love it! Thanks for stopping by my site. Wish I could sink my iMac into the desk, too, but it’s on granite. 🙁
Love your blog, by the way.
Your desk is pretty cool and one of a kind, very origial. I love it! And whct could be better than you and your son working side by side?….Christine
It’s simply wonderful!
Great vision + Elbow Grease = Amazing Results 🙂
Love it Donna! It’s so wonderful and so YOU!!!
xo,
edie
What an awesome blog space! I am loving that desk!!
What an amazing job! I love it too, and Lethbridge is also home for me, so a very sweet surprise to see that sign. Can’t wait for your next project- I learn so much from you.
Jo
A.Maz.Ing. I knew it would be cool, but I am so amazed at your creativity! Ummm…I’m thinking you should have your own TV show. Come on HGTV, you need to see this!
It’s great, Donna, and so perfectly you.
You are too cool!! I love this project…
OUTSTANDING…so original & creative. Love it!
Congratulations! One more fabulous project completed. It is more than I ever thought it could be. The details and the accessories really add to the whole look. I just found a meat grinder in my basement! I am glad that you are labeling your photos now. Screaming Meme just had your living room wooden “curtains” with no acknowledgement. Well Done…. now on to the closet. Ann
Love, love, love it!!!
stunning.
this is so you! but who wouldn’t love to sit at that big desk & take in the BIG monitor.
both are so awesome.
love the cool accessories as well.
incredible.
kellie
Unbelievable! Girlfriend, you just keep doing your thang. What a uber-awesome office area. Seriously, your creativity amazes me. I LOVE the stencils you used, and the stuff on the shelves looks so at home. Everything is perfection. Every.single.thing. Including the dog 🙂
Love the use of found objects! I remember my grandmother’s meet grinder she would attach to counter and make some yummy pimento cheese. Sweet memories! Beautiful work as always!
WOW! It is just amazing how you can transform wood into something so awesome!
Hi Donna, I just love your table too. The graphics are wonderful and the size is what all creative types really need….huge!
Thanks for all the inspiration….xx kelley
Gorgeous! Inspiring! I love it!
Donna, you amaze me! This office is so you and wow – the things that you create.
-Rene
LOVE IT…..You are incredible!
Amazing – LOVE IT! Thanks for the step by step.
It looks completely you! I love all the details that make it special–the nuts and stamped on words and that you totally thought outside the box for a solution to your needs. Thanks for sharing and inspiring!
Great job! A wonderful, unique space! No one else has a space like that, cool details.
~ Julie
I love the meat grinder as a pencil holder. How fun! Thanks for sharing your wonderful desk. La
awesome work space
Donna ~ you never cease to amaze me and this is fantastic ~ love it, love it, love it!!
Love the table and the space. You think of everything. That meat grinder just cracks me up! I love it.
Oh Donna, you did it again!
It looks so good, you have such a rare talent! I LOVE it, I truly do!!!
Oh btw yesterday on the blogher thingy there was a link to a post someone did on the health hazards of used palettes. You did something to prevent any health damage, didn’t you.
Anyway Project succeeded!!
So so cool, and perfectly you!!
hugs and blessings
barbara jean
The new desk finishes off that space nicely and is a perfect reflection of your style. I’ve looked at using palette boards for projects, but they seem too thin. I’ll keep looking, though.
http://froufrugal.blogspot.com
That is truly one of the most amazing desk/transformations I’ve ever seen.
April @ homehinges.com
I just stumbled upon your blog and it’s incredible!! Your desk (and shelves and everything on them) is the coolest thing I’ve ever seen! I LOVE the old grinder turned pencil holder, that is awesome! My MIL has a grinder exactly like that, wonder if she’ll part with it. 🙂
TOTALLY AWESOME!!
Donna,
You are one super cool lady. I am in the BC area this week and it would have been wonderful to have met you. You are one super cool lady with the most unique style I have ever seen. Perhaps I will get to meet you one day.
Hugs, Cindy S
Oh my goodness! I just found your blog (via Poppies at Play). I love your office, especially the meat grinder.
How cool! As soon as I saw the Gray Beverage crate I know you were another Southern Alberta girl. I love your style, off to explore more.
I absolutely love this, everything from the found wood to just figuring out how to do it based on what you needed.
BUT….do check on one thing. Does your monitor have vent ports at the bottom? Is it drawing air thru the bottom edge? I know that is how the iMac is designed, and it needs certain clearance to be able to pull air thru to cool the unit down. Just something to check on. I would hate for you to have just designed a way to slowly cook your new expensive monitor! I fried my iMac by letting MY CAT SLEEP IN FRONT OF IT. Basically it was just sucking in her hair like a vacuum. Nice.
Anyway, just check into it!
what a gorgeous table – congrats !!!
Donna… You are crazy talented! I love this whole room and want to make that wall unit… TODAY. You are amazing!
~Whitney
It looks like something straight out of a magazine. Would you mind sharing what the paint color is on the wall? Thanks.
~G~O~R~G~E~O~U~S~
Looks amazing, love the personal touches…numbers, cogs…wow
That looks FABULOUS!!! Love those old boards and the yummy sawhorses. (Of course only a blogger would call sawhorses “yummy!”)
Happy New Year,
Hugs,
Gina
I remember reading this post when you published it way back in Aug. I loved it then…and I love it now! Thanks for sharing your creative ideas with us.
Such a great look! LOVE all the details. Just found you via TLC. Cheers! Rosa
Seriously great desk, amazing what you can do with some old pallet boards and a little elbow grease….
OMG!!! I ABSOLUTELY LUV YOUR PALLETT DESK. BEYOUND AWSOME : )
~ CHAR
You know I love this! The ingenuity and creativity astound me every time I see it! The lettering is the perfect touch, and it’s a great space for you and your son to work together!! 🙂 Thanks for linking up at the Workspace Showcase at WWC, Donna!
Love this space and how you re-purposed things!
I agree with everyone, not much more to say but wonderful and enjoy!
Very cool! You have inspired me and I am going to try and make one as funky as yours. Thank You 🙂
What a fantastic work space! I love all the detail you included, the pencil holder is really cool, and the gears, oh my. So glad I found your blog!
Oh you are such and inpiration! I wanted to do this too with some saw horses that we have but my project has turned out a little different than originally planned. I just love all the details of your desk.
This such a fun project. Personal spaces need to be fun as well as functional—–makes me want to dig right in and start on a project for myself.
I can’t stop staring at this table and shelving! It is absolutely gorgeous! I’m in love with your site, by the way – just found it thanks to Pinterest. 🙂
Hello,
I read you on the “maison Chic” in France !!!
Your work is wonderfull !!! I have a same story of her, i’am alone and in order to make a nice home i take old thing for to give them an other life at my home!!!
I follow you with facebook !!!
Hélène
Scuse me for my bad english 😉
bellissimo progetto!mi piace molto complimenti per l’idea molto rustico!!
Incredible space and use of pallets! What a great use of ladder too. Thank you for sharing it.
wow that is great desk idea