
Rustic wood garden shed gate
Today we are revisiting one of my garden sheds that hasn’t yet been completed… but leave it to me to go ahead and add a rustic wood garden shed gate I didn’t even realize I was going to make!
Well, I’ve always known I wanted a garden shed gate in this area of the backyard, so with the way this summer is going, there was no time like the present!
But let’s quickly revisit where this shed and fence project left off last summer… then I’ll share what I did next! It’s a cute and easy one!
Revisiting the Garden Shed / Fence Series
.
Over the last two years, I’ve been working on a 2nd garden shed in my yard. I did a deep and massive backyard clean up, removed flowerbeds, planted lawn, then built a fence.
Catch up on the shed / fence series to date HERE
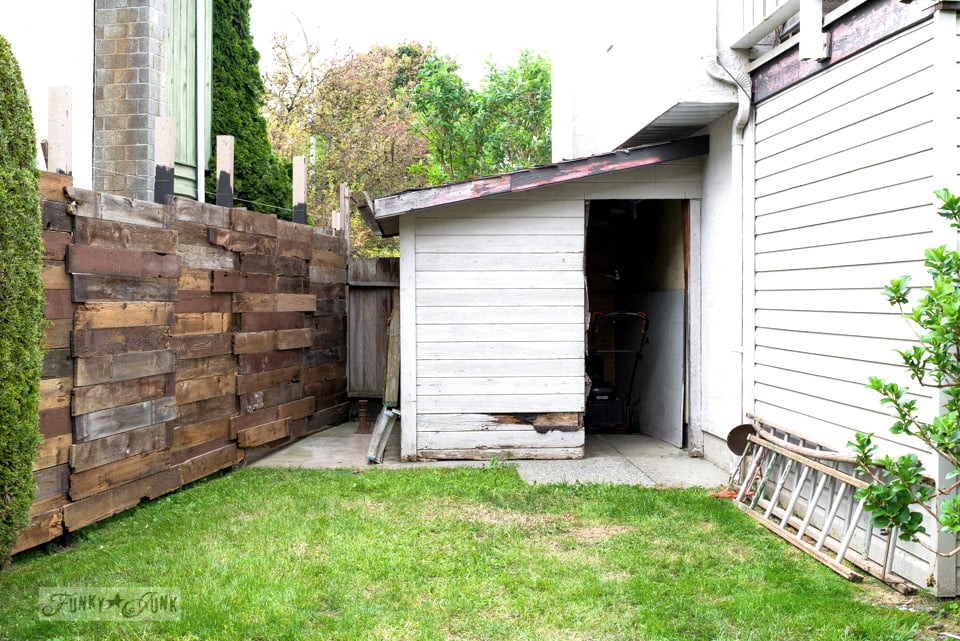
But I never did get to the shed. Yet. I mean, other than pressure washing it and repainting the trim (and hiding the holes with a wheelbarrow.)
In truth, the shed is really a tear down, but I’d like to try and save it because building completely from scratch is a little over my head at the moment. I mean, so is adding just a new roof! But I aim to figure it out…

So to get my feet wet, I started a simple clean up around the shed first, and caught myself staring at the fence panel in-between the fence and the shed.
My first thought was to perhaps rebuilt it differently from the road side, but then I thought… why don’t I turn it into a hidden gate that I’ve wanted here forever anyway?!
But the intended frame of eventually something bigger turned into something completely different… which I loved even MORE! And it was so easy to do.
Here’s what I ended up doing… which surprised even myself.
How to build an easy rustic wood garden shed gate
.
This post contains some affiliate links in which I earn a small percentage if you purchase anything through my links, at no extra cost to you. Thank-you for helping support my blog!

Supplies I used:
.
Reclaimed cedar wood fence planks (how I find mine)
My overall gate size – 17 ¾” wide x 39″ tall
- 5 ¾” x 39″ (2 for sides)
- 4″ x 6″ (3 for middle sections)
- 2″ x 4″ (lock blocks x 2)
- Overall gate size – 17 ¾” wide x 39″ tall
Kreg Jig (visit THIS post to learn more about my own jig!)
Cordless drill and screws
Acrylic craft paint or paint of choice – I used Fusion Mineral Paint’s Coal Black
(locate a local Fusion retailer from HERE)
Various Funky Junk’s Old Sign Stencils:

How-to:
.
1. Decide on the overall size of the gate desired, then cut two planks to desired length.
2. Decide on the overall width desired, then cut 3 middle supports to make the measurements work.
3. Using a Kreg Jig, create pocket holes on both sides of all three middle boards so they can be attached to the two long side boards.
4. Assemble with screws. (I used drywall screws)
Video – how to build the gate
.
.
Click above to see how I put the gate together.
Click below to learn how to use a Kreg Jig.
Video – how to use a Kreg Jig
.
.
.
Click to view a helpful video on how to adjust and use a Kreg Jig.
Read more on how I used the jig to build a screen door HERE


Adding the gate hinges
.
5. Attach door hinges.
I used two regular interior door hinges that I spray painted black for outdoor durability.
To install, I propped the gate in place, then decided where it would be best to add the hinges, then attached with screws.

Lock blocks
.
6. Add two locks made from blocks of wood to the front and back of the gate.
These small blocks of wood measure 2″ x 4″ at ½” thick.
A washer was placed in between a block of wood and the gate, then screwed to the gate.
The washer helps make the lock spin easier. Works great!

Find all garden-themed stencils HERE
![]()
Stenciling the gate
.
6. Stencil garden-themed sayings on the gate panels to resemble garden crates.
To add a little more interest, various garden-themed stencils were used make the gate appear that it was made from cut up garden crates or signs.
Once the gate was hung, the images were stenciled as shown below.
Visit many more stencil projects HERE
.
So are you even ready for some pretty dramatic befores and afters? Here we go!

Before – back yard view

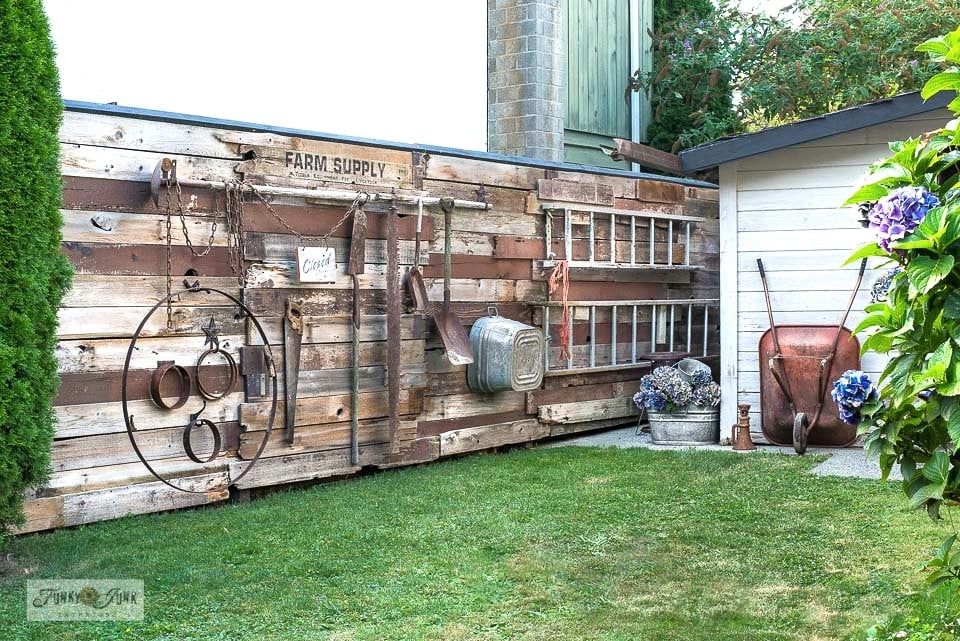
Bam! Lookit that pretty view! First time in… probably forever.

The finished gate!
.
After: back yard view
Parts of Garden Shop was stenciled in Fusion Mineral Paint’s Coal Black
So, this was meant to be a frame for larger pieces of wood to be attached to hide the fact that it was a gate. But after seeing it like this, I couldn’t cover it up! It was simple, cute, and did the job well!
I may create a longer gate that goes to the ground once I fix up the shed and possibly add some kind of screen to the openings to keep other’s pets or wildlife out of my yard, but for now this will do.

Before – road view.
Hideous, huh? No wonder I ran away! Those ivy vines are nasty.
After – road view
Wild Flower Seeds and Shipping Crate Stamps teamed up with ‘Bulbs’ from Garden Shop were stenciled in Fusion’s Coal Black.
Crazy difference, right?! It’s so simple too!
Hiding the pocket holes
.
This was the side of the fence with the pocket holes showing. They were simply covered up with other reclaimed wood parts, doubling up the thickness in the centre parts. It turned out really cool and very intentional!
And then.. I started to pressure wash the house… and I knocked a whole buncha paint off the shed and house. Oh boy did I.
So I rolled with it and staged the gate with the paint knocked off the shed!
Nothing like just making it work, right?

Before – road view (I know. I KNOW!)

The full tour
.
After – road view.
So. Much. Better!
I love how my side ties in with the neighbour’s now too.
And now the moss on the shed roof even looks charming! Who knew?

Even though it’s not even done. Doesn’t it look SO much more inviting?! I can barely believe this is the same corner.

The gate is narrow, measuring 17 ¾” wide, but if I don’t carry too much stuff along with me, it works great! Just enough to scoot through.
Sure beats walking all around the entire house just for a garden tool or two!


Stencil: Welcome to My Garden HERE
Welcome to my Garden sign
.
To dress the shed up a little, I added an curbside found old window dry-brushed in black, and topped it with a rustic Welcome to my Garden sign I made previously.
I stole it from my front entrance wall in THIS POST.

The fern bucket planter
.
To mimic the look of a flower box (but something MUCH more instant), a fern-loaded rusty bucket was hung from a screw, and a little wooden #5 tag was created and stenciled for a little extra bling.

Stencil: Vintage Crock Numbers HERE
Rustic number tag
.
It was a great way to tie in a little more wood and is actually a great hack if you don’t wish to stencil an authentic antique!
Tag angles were cut at 45 degrees.

So there you have it. The coolest, easiest rustic wood garden shed gate you could possibly make that really made this little area of the shed look inviting and cute!
Even with all those ivy marks…
This area still has a ways to go, but as I hack away, I’ll keep sharing the progress!
Catch up on all of the shed / fence series to date HERE
.
Other related projects you may enjoy:

Reclaimed wood Farm Supply garden fence

Garden-themed scrap wood walkway

How to make a screen door from scratch
Visit other Gardening posts
Along with many other Outdoor projects
The gate IS VERY cute! Simple but very functional. So creative too! I like it!
Thanks Sharon! It was a very simple change but it made a BIG difference!
LOVE it! Such a cute little gate and I like all the decorating too.
Thanks Jill! Not bad for a temporary pitstop! haha
Donna,
Very nice. Wish I had your talent.
Thanks Nancy! It was a fun challenge and easy to replicate!
The gate and the shed look just great! And I’d pay for a mossy roof!
Haha! Thanks Wendy! For years I’ve cursed that roof… but it does look better now as if it’s more intentional… plus it came in handy for my ‘ol knees as I pressure washed the side of the house so there’s that! LOL
I have plans to replace the roof at some point!
So cute! Now I need to figure out where I can put one 🙂
I just love how you share your human aspect ~ I can SO relate!
Thanks again for the fun!!
Haha, yes, oh so human with all the work that needs to be done for sure! Glad you can relate and thanks for the kudos Kimberly!
How perfect… I love it!
Love it!!!! The whole look works. What a change, even the ivy marks add character.
It looks lovely but then again everything always does! 🙂
You’re going to love having that secret gate. We built one a few years ago and it’s so handy to cut through to water plants in the front yard but ours doesn’t have near the character that yours does. Such a difference and I love how you decorated your shed too.