
DIY She Shed garden sign
Learn how to create a charming and easy DIY She Shed garden sign for your own garden shed or potting bench! Step-by-step instructions.
Back when two garden-themed stencils were developed, Grit Antiques came out with a She Shed project.
I didn’t design a stencil that said She Shed! Miss Clever Jane just got all creative with Shed and made it up.
Ever since that project, I vowed to create my own She Shed garden sign at some point!
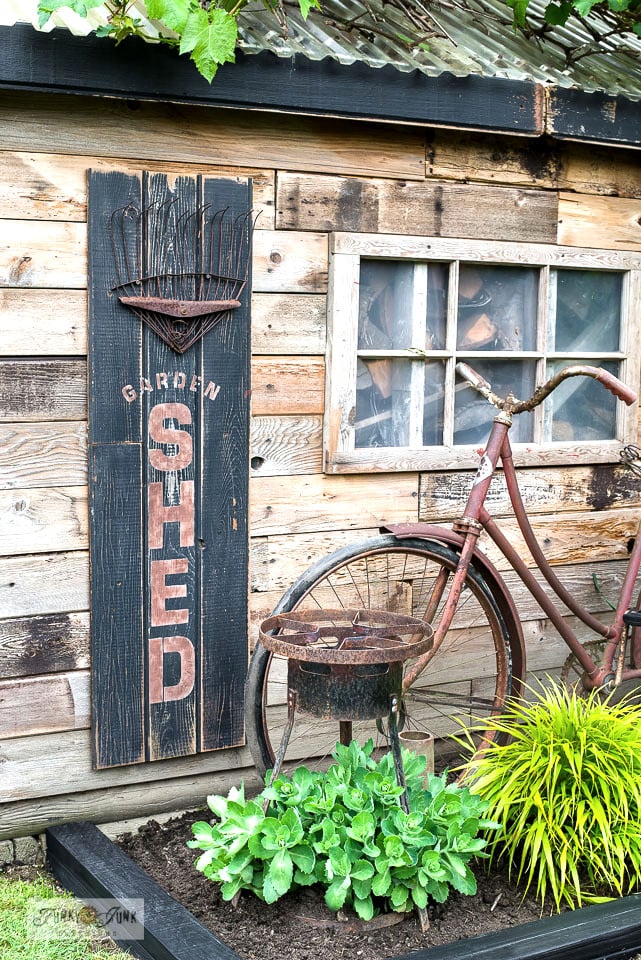
And today was the day. This charming sign made for indoor or outdoor use was so easy to make, and would be perfect to hang up on a potting bench or right on your own garden shed! This garden sign is lightweight, easy to design it in the dimensions of choice, and is versatile to use in a number of ways!
Here’s how to spruce up your own yard or shed with this charming garden sign!
This post contains some Amazon affiliate links in which I earn a small percentage from qualifying purchases through these links, at no extra cost to you. Thank-you for helping to support my blog!
DIY She Shed garden sign

Visit Potting Shed stencil HERE
You’ve seen this little soil sifter before, as a Super Market grocery magnetic board.
But I couldn’t pass up this easy little garden supply organizing idea… garden-themed in more ways than one.
Anyone else love and collect antique soil sifters? Or is this a drying rack? I really don’t even know. But anything wood and metal cage-ish is a-ok in my book!
Supplies needed:
.
stencil brush (I like dome-tipped stencil brushes best)
soil sifter or bulb drying rack
s-hooks for garden supply hangers
paint of choice – I like using Fusion Mineral Paint’s Coal Black (website link)

Designing the sign
This entire sign was stenciled in Fusion Mineral Paint’s Coal Black.
1. Design your sign by measuring the words and elements you wish to use.
2. Position the stencil in the appropriate place, then stencil SHED only.
3. Reposition the stencil again to stencil SHE out of SHED only.

4. Move the potted flowers to the middle of the sign between She Shed, then center it horizontally and vertically before stenciling.
5. Position and stencil the MY from Welcome to My Garden stencil on the left of She.
How to stencil without paint bleed
- Load the stencil brush with paint.
- Remove most paint onto a rag until the stencil brush feels dry.
- Tap or swirl paint through the stencil for desired effect.

The plank of wood was then positioned onto an antique soil sifter, which frames it nicely and offers a place to add S hooks to hang up gardening tools and essentials!

How to install the sign
For installation, the soil sifter was attached to the wall first with screws through the mesh, but backwards. This is so the S hooks had some space in between the wire and the wall.
Then the sign board was attached with screws, some hitting the sifter, some hitting the wall.
The sign board was left a little longer, providing more hanging space for a roll of string, and a potted plant!

Add a potting bench for extra garden storage
And the perfect finishing touch? Adding an old storage cupboard on casters for loading up even more garden supplies to use as a potting bench or simply a way to organize your garden tools would be a wonderful addition!
And don’t forget to add a handy clipboard, so you can sketch layouts for your new flower bed designs! Or add a few clothes pins to save those plant coupons!
This She Shed sign would look equally charming attached to your own garden shed, don’t you think? This garden sign would also make a lovely birthday gift for a friend or that green thumb enthusiast in your life!
But here’s one more fun surprise…
Jennylyn from Fusion Mineral Paint did a LIVE Facebook broadcast today working with the Potting Shed stencil!
Read Jennylyn’s How To Post HERE
So there you have it. An easy She Shed sign that can be used countless ways. Where would you hang yours?
Other garden sign project ideas to make:


Potting Shed with old rake garden tool organizer

Oversized Tulip Crate Flowerbed
Stencil a charming Garden Shed sign with a rusty rake

Create charming garden labels on cedar strips!
Visit many more unique garden-themed projects HERE


Disclosure: I work with Fusion Mineral Paint to showcase projects using it and because I love the stuff. I was not monetarily compensated for this post. The stencils are from my own line.
LOVE IT, D!! What a creative use for that stencil.
xo Michael
Thanks M!! You could make a HE SHED with yours… hahaha
This just changed the direction of a project inside my almost-finished pantry! Was planning to use pegboard to hang my pans. Not any more!!
Hardware cloth on a wood frame with S hooks, here I come! Thanks so much for the inspiration!!!
That sounds so cool Wanda! Glad something here inspired you to think outside the box!
I love how you draw from your stash and create. It is inspiring.
For ages I have been admiring the wall rack bottle dryers, but not the prices. I have not seen a creative alternative in your archives, but may have missed it???
Keep those creative juices flowing. Spring is here and it may be a great time to begin replenishing the stash from garage sales and flea markets. 🙂
Oh… thanks for the challenge Brenda! I’ve loved the bottle rack dryers for a long time, but wasn’t sure what to do with one. Guess I’ll invent an excuse to make one now! haha
And thanks for the kind words!
Ever since I asked, I have been thinking about how to make a rack… a wall one. Wood strips, but the hooks have me stumped. Now that your wheels are turning, I will wait and see what you come up with. Can’t wait.
Another project I scoured your archives for was a tiered tray made out of old cake tins/pie plates/discs. Most I have seen are rustic, but I always love your “take” as it is always above and beyond, then styled to perfection.
I know what would make an adorable she shed if the wood wasn’t needed!
nothing like making a girls day! I love it and love the flower pot stencil!
thank you, xo
Love your site. The she shed is something on my bucket list. Your so creative. Thanks for sharing.??
Donna, I have to copy the She flowerpot Shed Idea! I love it. You always find a way to rock those S hooks and fun accessories too!
Yes, copy! I want to see your rendition! I know it’ll be even MORE charming done with your talents! 🙂
Love it Donna! And I was wondering what hardware cloth is? It’s always interesting to see how you incorporate your stencils in a myriad of ways. Thanks so much.
Thanks Joanne! Where was the reference hardware cloth used? I’ve reread the post and cannot find… am I blind? I don’t know what it is either! haha
Update: found it in a comment! It looks sorda like chicken wire but in squares. If you google search it, it comes up pretty easily.
Who knew! 🙂
good morning Donna.
I checked out the brush link, but it is an add on. Are there other brushes you recommend?
I have been using Robert Simmons brushes for years, I mean the same brushes I bought years ago. Some of them are wearing down, but I was hesitant to buy them now as I wondered if the quality would be the same.
Anyway, glad to see you have recommended some and they are Cheap!
(Not so with the other one I mentioned)
thanks for the help.
blessings!
Barb
PS cuuuute project. I have one of those screens, but never knew what it was for.
Hey Barb! Oh, sorry about that! I’ll be sure to check all the info on links next round!
Here are a few I’ve been wanting to try as well that are not add-ons…
Amazon affiliate links…
http://amzn.to/2pzobcw
http://amzn.to/2qAV5Iv
http://amzn.to/2pzt8lQ
But please know, I have no working knowledge if they are any good. I’d be inclined to spend more vs. less though. Quality generally outranks cheap any day!
You mentioned using Tough Coat on your new headboard for your bed. Is it a particular name brand, or will a matte finish polyurethane water base product offer the same protection. You were using it to stabilize the flaking paint on your boards… Thanks.
Hi Brenda! The Tough Coat I used to stop the flaking chippy barn wood is by Fusion Mineral Paint. You can find it at:
https://fusionmineralpaint.com/tough-coat-how-to/
I highly recommend it! The only other clear coats I have ever tried came out of a spray can. I far prefer the performance of Fusion’s version! Not smelly at all.