
Love playing checkers or chess? Here’s how to create your own stylish DIY checkerboard with a Buffalo Check stencil and scrap wood! Easy and fun to customize!
I’m a big game board fan. So I decided to challenge myself to come up with my own version of a checkers game!
Here’s a couple past DIY game boards that I’ve whipped up in the past that turned out so cool…
Other DIY game boards to make
Puzzle board made from a bulletin board
Tic Tac Toe serving tray with game piece coasters
Fun, aren’t they?!
So let’s try checkers next!
How to play checkers and chess
This DIY checkerboard can be used for checkers or as a chessboard if you already have chess board pieces to use.
Pulling out a few stencils, I came up with a super cool way to create a checkerboard that is easy, and SO fun to customize! While my take is rustic, think of all the options you can have with yours? Will it be pastels or deep and moody for you?
This post contains some affiliate links in which I earn a small percentage from qualifying purchases through these links, at no extra cost to you. Thank-you for helping to support my blog!
DIY Buffalo Check checkerboard

Find Buffalo Check stencils HERE
Where to find a Buffalo Check stencil
I already knew Buffalo Check could work as a checkerboard as Becky from Beyond The Picket Fence made one on a table a ways back that was really super cool!
However I came up with another game plan that anyone could do with a simple piece of plywood… and with a slightly different look to the checkerboard! This board would be Buffalo Check but still resemble a traditional checkers game!
Supplies you’ll need
.
Square piece of plywood (cut to 20″ x 20″)
4 cedar strips (18.5″ long x 1.5″ thick)
*Stencils from Funky Junk’s Old Sign Stencils HERE
- *Buffalo Check – Medium
- *Shipping Crate Stamps
- *Antiques’ numbers strip
- *Stars from Mini Christmas Patterns
Coal Black – Fusion Mineral Paint
Stain & Finishing Oil in Golden Pine & Natural – Fusion
Get ALL Fusion Products for 10% off if ordering online HERE

Preparing the checkerboard base
.
1. Cut a piece of plywood to length 20″ x width 20″, then paint with Fusion’s Raw Silk to create a base white checkerboard.

Find Buffalo Check stencil HERE
How to Buffalo Check a checkerboard
.
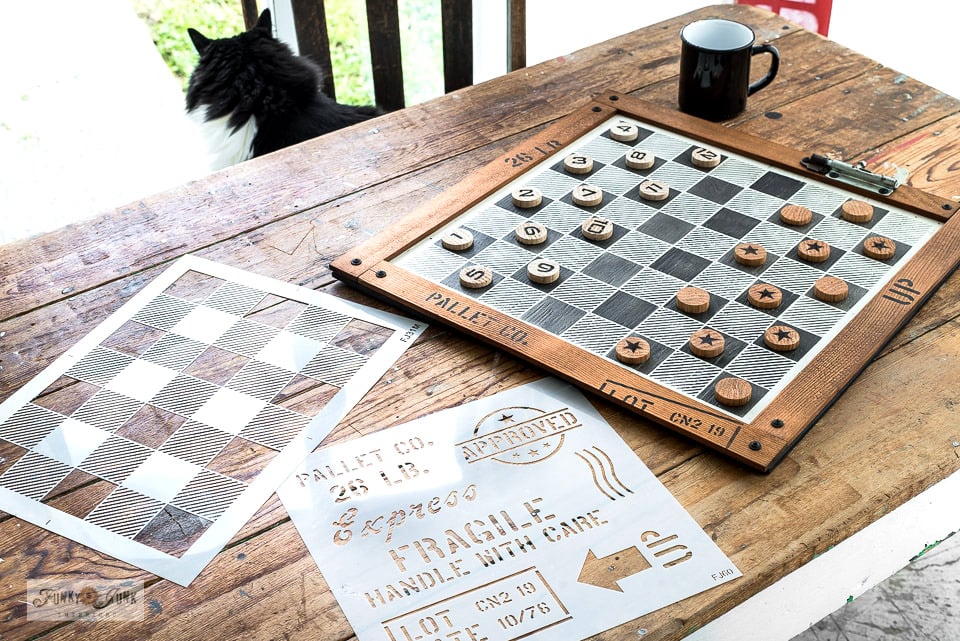
2. To create the checkerboard pattern, Buffalo Check – medium was stenciled with Fusion Mineral Paint’s Coal Black.
- Since Checkers is 8 squares x 8 squares, mark the centre of 4 squares horizontal and 4 squares vertical.
- Mark the middle of the board at horizontal and vertical.
- Position the stencil in the middle, attach with masking tape then begin stenciling.
- To continue to pattern, overlay the stencil against the edges matching up the pattern to continue until your checkerboard is complete.
- Once checkerboard is complete, reposition the stencil over top once again, but this time, to fill in the empty squares. (see video at bottom of post)
- Continue until all the empty squares are painted.
* View video below to view this easy process!

3. To smooth out the checker pattern surface, Fusion Mineral Paint’s Beeswax Finish was applied to the board to create a little sheen and so the checkers would slide easier.
Although Fusion has a built-in top coat, it is a matte-finish paint, so the added protection helped slick up the surface.

4. Using a palm sander, the edges of the white board were sanded back a little to help finish the board. That step is coming soon.

How to make DIY checkers
.
5. A closet dowel was cut with a miter saw to create 24 DIY checkers. (I cut the checkers at 3/8″ thick)
6. Each checker was held by hand, then lightly hit with a variable palm sander (dialed very low) to smooth out the rougher edges.
This worked fantastic!

7. 12 of the checkers were stained with Fusion’s Natural Stain and Finishing oil, while the other 12 checkers were left natural.
This created two different wood tones. Very cool!

View stencils: Antiques numbers strip HERE / Mini Christmas patterns stars sheet HERE
8. Various stencils were used to decorate the checkers with!
Idea: You could leave one side plain, and just stencil up the other sides so once they become kings, they’re easier to spot!

How to build the frame
.
9. Four cedar strips were cut to size so they’d frame the checkerboard. (18.5″ long)

10. Each cedar strip was stained in Fusion’s Stain and Finishing Oil in Golden Pine.
My goal was to match the darker checkers with the frame. Since the wood was different, it took stains differently, that is why I used more than one stain tone.

11. Before the frame was attached, Fusion’s Coal Black was painted along the sides of the plywood, then a little where the board was sanded so it left a nice edge once the strips were attached.

Attaching the trim
.
12. The cedar strips were positioned into place, then predrilled, then short black screws were used to attach.
Pre-drilling holes helps to avoid the wood from splitting.
The video below this post also shares this framing step.

Shipping Crate Stamps stencil HERE
13. Random Shipping Crate Stamps images were stenciled on top of the cedar plank frame with Fusion’s Coal Black, to mimic the frame being made out of pallet wood.
Fun! Instant personality!

The finished DIY Buffalo Check checkerboard
.
So cute right?!
The key with pallet stamps is imperfection, so don’t overlook tilting the odd one or having them slide off the sides of a given surface for a super random stamped look!

And then my pallet-styled checkerboard was complete! All using random scraps of wood I already had at home.
And if you don’t have these wood scraps on hand, the materials are easy to obtain.

Find Stencils: Shipping Crate Stamps / Buffalo Check
It’s so CUTE!

And just for fun, a hinge was installed on one side of the frame… because I had it. Nothing like a little junk jewelry for good measure, right?!
And all that’s left to do is to play checkers!

Um… Sky? It’s your move.
Too bad the bird won over checkers… any other takers?
Video below
.
Click below to view a short video of the process!
.
.
How would you do up your own checkerboard to suit your style?
DIY Buffalo Check checkerboard - with video!
Supplies:
Instructions:
How to make a DIY checkerboard
- Cut a piece of plywood 20" x 20".
- Paint in a light colour.Fusion Mineral Paint - Raw Silk
- On the Buffalo Check stencil, mark the center of 4 squares horizontal and 4 squares vertical.
- On the painted plywood, mark the horizontal and vertical centers.
- Position the Buffalo Check stencil to match the center marks, then stencil a dark colour.Fusion Mineral Paint - Coal Black
- Continue the pattern by overlapping like-minded patterns along the edges.
- Fill in the white squares by repositioning the Buffalo Check stencil open squares over them, then fill in.
- Coat the checkerboard with wax to protect and create a smooth finish for sliding the game pieces.
How to create checkers
- Cut a closet dowel in slices.
- Stain one set of pieces to create darker checkers.
- Stencil to decorate as desired.
Notes
Other DIY game projects to make:


Make the perfect bulletin board puzzle game board

.Tic Tac Toe game tray with tile pieces
Visit other Shipping Crate Stamp projects HERE
Check out other Buffalo Checked projects HERE
Create checkerboard floors or walls with this larger Buffalo Check stencil!
Visit ALL my stencil projects HERE
I love how you personalized the frame with my fav set of stencils-shipping crate stencils!
Cute!
Gosh, I love your rustic DIY checkerboard, Donna! It would make a fabulous Father’s Day gift. Pinned
Who won, you or the kitty? Ha!! 😀