Looking for a unique and stylish way to dry your laundry? This DIY wood and pipe laundry drying rack is the perfect addition to any laundry room! Learn how to make it yourself with these step-by-step instructions, along with more unique laundry room ideas!
As a Fusion and Amazon Influencer, this post contains affiliate links in which I earn a small percentage from qualifying purchases at no extra cost to you. If you shop Fusion Mineral Paint products through this post, you will get 10% off. Thank-you for helping to support my blog!
There is one room in my home I somehow continually succeed in avoiding. And that would be my laundry room. I mean, I use the washer and dryer all the time! It’s just that the rest of the room needs work. More laundry room ideas are indeed needed.
So when the requests kept coming to bring a LAUNDRY stencil design to life, I knew I had my work cut out for me.
As it stands, the room wasn’t ready enough to try this new creation out. But that doesn’t mean I can’t encourage myself with inspiration and make a new project for it!
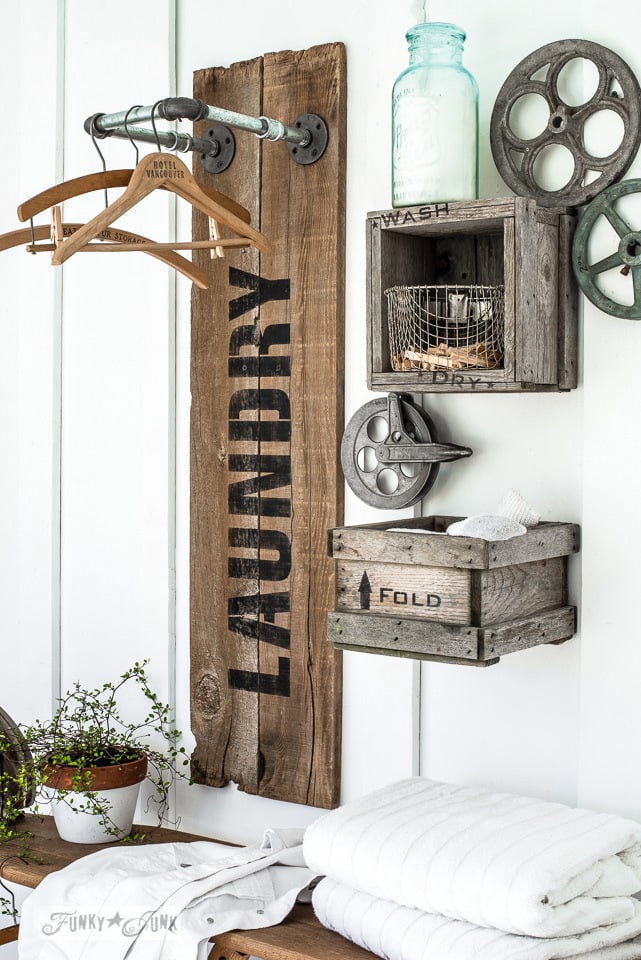
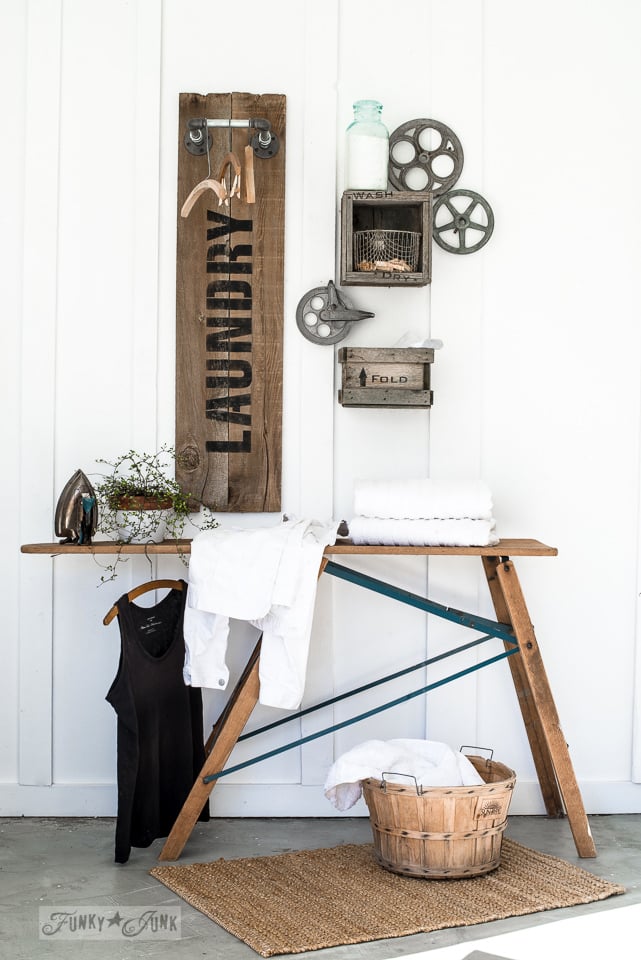
Space is tight in my laundry room, so this mini reclaimed wood and pipe LAUNDRY sign hanging station does it for me!
It’s cute, current, and super easy and cheap to create! Oh… and it works great too! Built-ins are wonderful for saving storage space, while working hard doing all the chores. And who can’t use a few fresh and new laundry room ideas to keep things interesting?

I could also see this idea working in a bedroom or bathroom! But here it is, laundry room style.


View Laundry stencil in 2 sizes HERE
About the Laundry stencil
This Laundry stencil (offered in 2 sizes) is SO fun to use! It hosts big, bold timeless letters that help you to create old style whimsey in your own (hopefully finished?) laundry room! The subtext morphs the stencil into a market sign, which is designed to be easily taped off if simple is more your choice.
So let’s put it to work!
Laundry room ideas: DIY wood and pipe laundry drying rack
.
Supplies I used:
reclaimed wood sized to suit
pipe fittings – I used 3/4″.
Fusion Mineral Paint’s Coal Black
measuring tape
cordless drill and screws
miter saw

Outfitting the pipes to create a U shape
1. Twist some ¾” pipe fittings to create a U shape that will attach to boards.
This can be designed with any size or length of pipes. It just really depends how large you’d like to make your laundry rack.


Dry fitting the stencil and pipes onto the boards
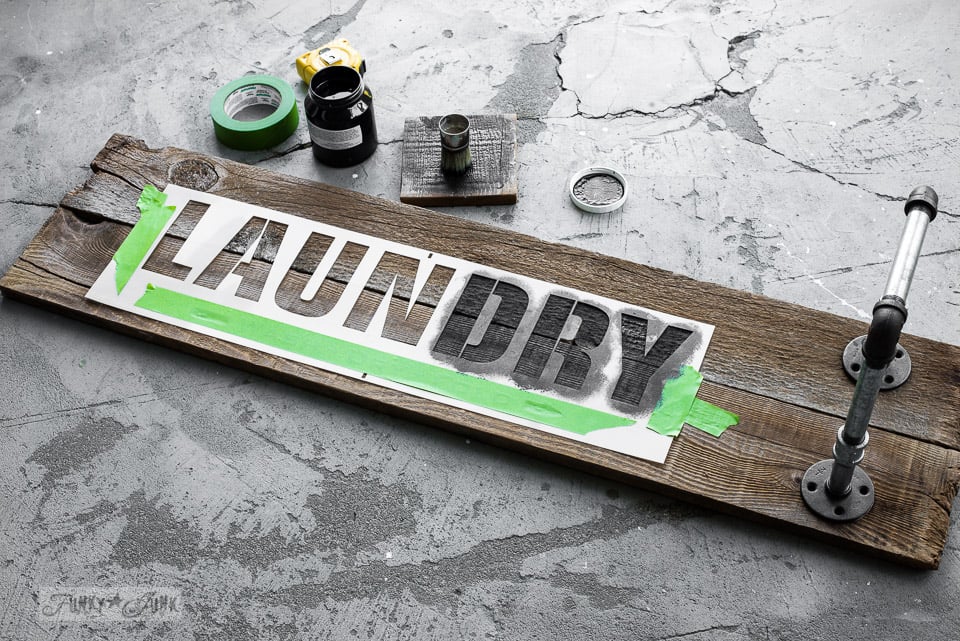
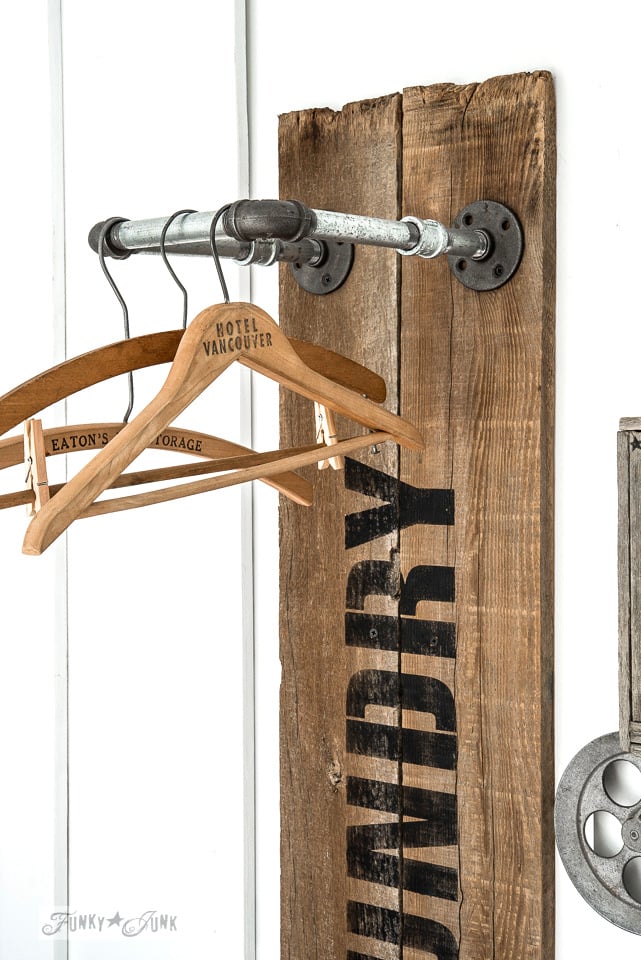
2. Position the Laundry stencil onto the left side of some boards, leaving enough room for the pipe fittings on the right side.
I stacked two loose reclaimed wood boards for this look. They were not attached to each other.
This is where I like to imagine and play. Either horizontal or vertical would work!
3. Cut the wood to the desired size, then lightly sand with an orbital sander.
I used reclaimed fence wood that had been previously pressure washed. I also like to attempt to keep the edges natural if possible.
Stenciling the Laundry sign onto the boards
4. Use masking tape to hold the stencil in place.
Cover any registration marks and subtext with tape you don’t desire to paint. I personally had other plans for the subtext!.
5. Load your stencil brush with paint, then remove most of it onto a rag until the brush feels dry. Tap the paint through the letters until desired paint coverage is met.
A dry brush is the key to achieving sharp stenciled images.
.
More tips on HOW TO STENCIL are HERE
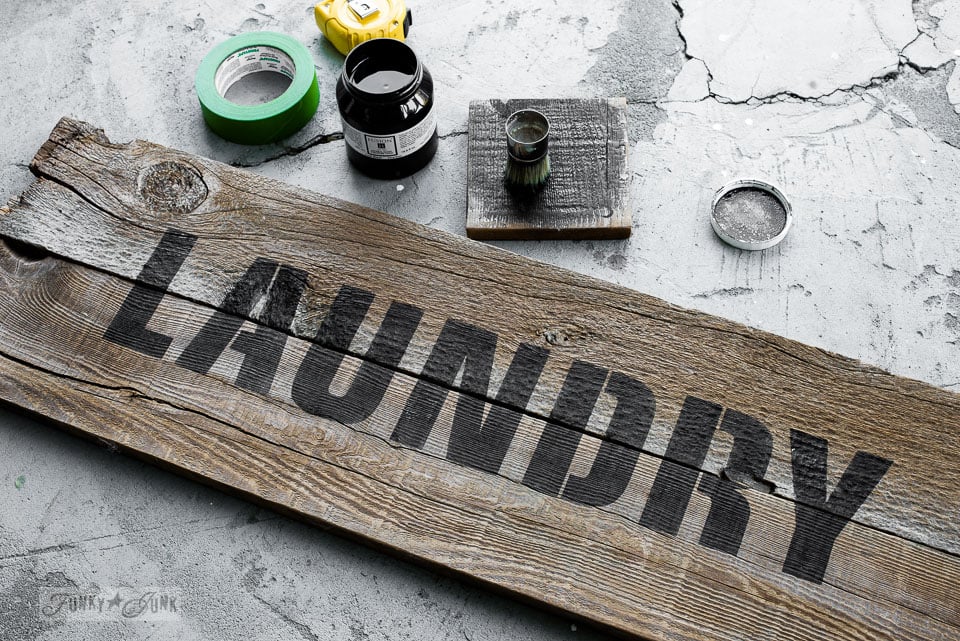
6. After paint is completely dry, lightly sand over the letters with an orbital sander to distress their look if desired.
Tip: You can avoid sanding if you stencil with a lighter touch that doesn’t completely fill the letters in solid.
Installing the boards to the wall
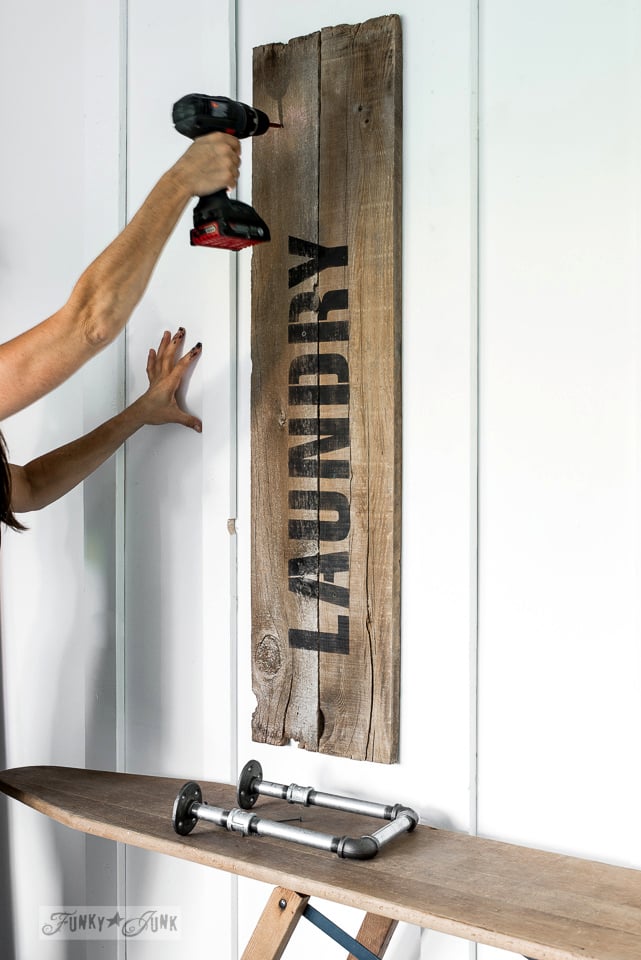
7. Position the boards vertical against the wall. While using a carpenter’s level along one side, screw each board directly onto the wall.
Each board was installed onto the wall as shown above, one at a time since they were not previously attached together.
If your mounting doesn’t hit wall studs, I suggest to use screw anchors before mounting the boards.
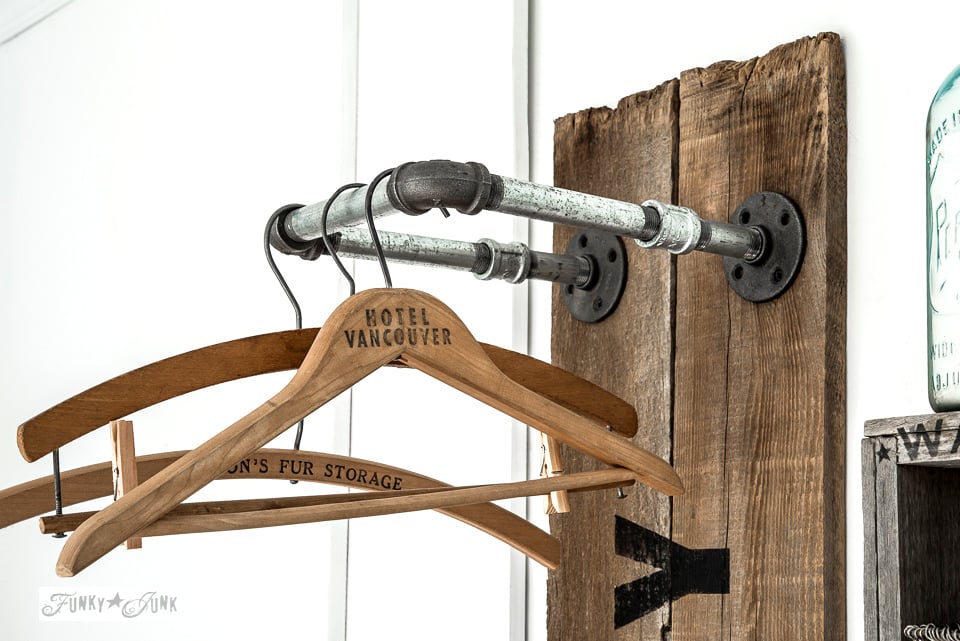
8. Mount the pipe fittings onto the boards above the word Laundry.
Connect all the pipe fittings first, then attach one side with one screw. Then place a level across the top, while screwing in the 2nd side. Once straight, secure with more screws.
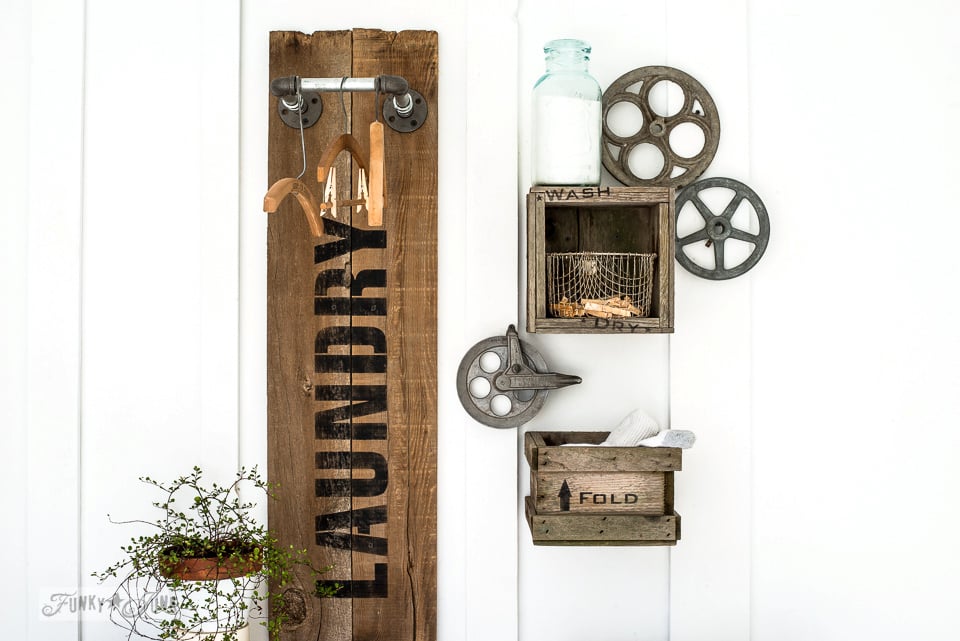
The finished wood and pipe laundry drying rack
And you now have yourself a rustically cool Laundry drying rack that is art and function all-in-one! How cute! And it works so great!
But let’s have some fun with that stencil subtext now, for an unexpected twist.

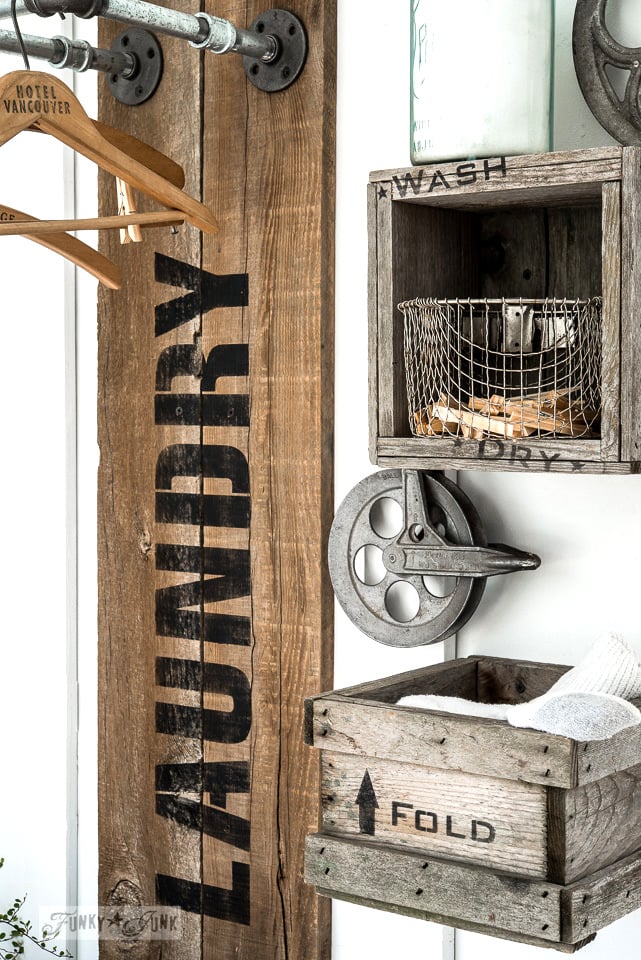
Adding crate shelves for additional laundry storage

Two little crates were installed as shadow box styled bins, doing a few helpful things to keep detergent or clutter off a countertop or appliances.
“Wash” showcases, the laundry soap inside the mason jar, DRY holds all the clothespins, and FOLD is the perfect little catch for the odd, lonely sock that is looking for its friend.

Putting the laundry instructions to use in an artful way was a fun challenge!

Authentic crate stamping tip


If you desire a true, crate feel with your stencilling, look for faded boards and crates as your backdrop, then stencil with uneven coverage.
If the lettering appears darker in some areas, and lighter in others, like a bit of a fade, it looks pretty authentic! This is where a little imperfection comes in handy.
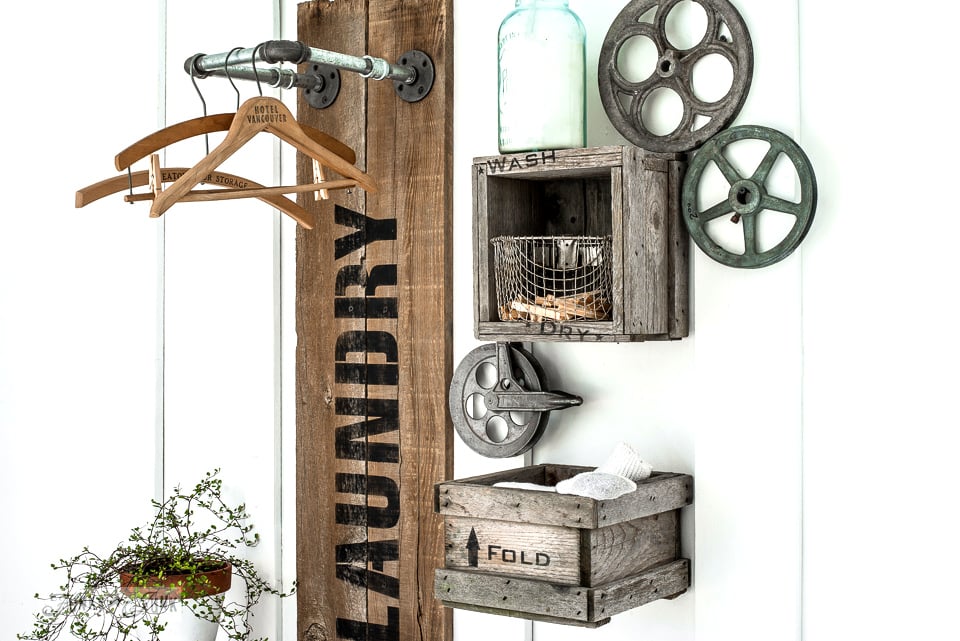
And this is why you may wish to collect wash line wheels… because they look pretty cute as laundry room wall art!
Honestly, a collection of any one thing, as long as they are all slightly different, creates an interesting, artful grouping if displayed together. Which does not help curb my junk hoarding habit one bit.

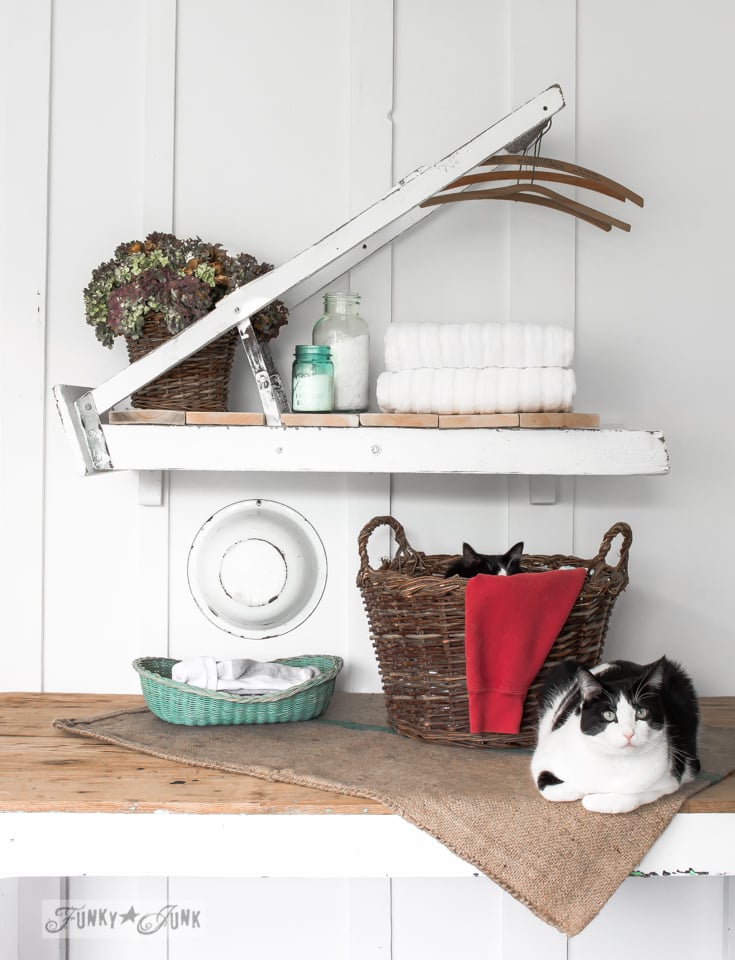
I also actually iron on an antique ironing board since I have only 4 in my stash. But even if you don’t, collecting these make instant, pretty side tables for any tasks that require a little extra space.
Do you remember the desk top lamp I made from one HERE?
Now I’m REALLY enticed to get my laundry room done! I need this wood laundry room drying rack in my life pronto!

Guess I’ll just have to use it right where it is until then…
I think the best laundry room ideas are ones that you can fully customize to make them work for your given space. And this laundry rack certainly does just that!
Need a laundry rack of some kind too? Check out another design I’ve made from a vintage ironing board HERE!

Shop for the Laundry stencil in two sizes HERE
Other unique laundry room projects to make:

Vintage ironing board laundry drying rack
Laundry room easy board and batten wall makeover
Visit all laundry room inspired posts HERE
Laundry room ideas: DIY wood and pipe laundry drying rack
Supplies:
Instructions:
- Position the Laundry stencil on the left side of two stacked boards.
- Form the pipes into a U shape that will fit onto your desired wood. Position them to the right side of the stencil.
- Stencil the letters onto the boards using Coal Black.
- Screw each board to the wall vertically.
- Screw the pipe fittings above the lettering at the very top of the boards.
Well Donna, or should I say Tren! You done gone and did it again! I love the stencil and your earlier pantry stencil from the other day. And I am so excited because I am off today and am going to a hardware store to browse. I know the wood and metal trend is hot right now, but I’ve liked it for a long time. I’m thinking that I am so in love with wood and it’s smell and look probably because my Dad was a carpenter and I’ve got fond memories of him always working on something. He would come home from work and smell like sawdust. Loved it. Thanks and here’s wishing you and your son a wonderful day!
So great idea! Thank You!
This is so cool and I love that hardware. I’m thinking a neat wall box to put your laundry cleaners in would be neat too. Another fun stencil idea for the home. Love your creativity – it’s always the best.
what an awesome display! we’ve been on the hunt for an old laundry sign(no luck) to hide the breaker box in our laundry room…this will be perfect!
do you have one more stencil coming out? I’ll wait to order if you do
Love the stencil and how you put it all together.Thanks for sharing.???
Oh my goodness Donna, how creative and cute and handy as a pocket on a shirt.
You never cease to amaze me with your creativity and love your thought process, and the way you make it happen.
My laundry room is in the basement and this would look so cute down there and I have plenty of wall space for it.
Donna – totally off subject. On instagram on The Dodo there is a cat sanctuary in Hawaii on an island with 500 cats. Please visit it next time so I can live vicariously through you!
Great post today too.
Oh my goodness…. I just looked it up. It’s on the island of Lanai and requires a ferry ride. I will keep this in mind next round! That would be so cool to see, thank you!
Donna,
Love your laundry room display! I use an antique iron board to iron on too.
This may be a dumb question…..
What are the length’s of the pipe that you used. There are 2 different length’s. I love this!!
Oh gosh Lorie, sorry, it’s already taken apart and the pipes were used for another project. I suggest to go pipe shopping with a hanger in tow, so you can get the right length to work with what you have. It’s really that easy. Happy pipe shopping and sorry for my delay in replying.
These are great!! I have just used the same idea to create some stencils for our new boxes in our store. 🙂 Thanks!!!!
Hi Donna
I am wondering did you connect the boards together before you put it on the wall? Or did you just put them side by side put the stencil on the wood then hung the boards separately?
Love your junking!!!
Hi Lori, sorry for the confusion.
Each board was installed onto the wall, one at a time. They were not previously attached together in any way.
I’ve added this info to the post to better clarify. Thank you!
ABSOLUTELY LOVE this laundry sign and arrangement…now I need to find someone to do it for me. Thanks for sharing.
Jenny! There’s nothing to this one. Really, no building at all, just screwing the planks to the wall, then screwing the pipes to the planks. You can do this in a couple of hours.. yourself! 🙂
I Love this. I want one of these ,my hangers are hanging down from handle above on the cupboard.