Learn how to turn a single car garage into a functional garage workshop that also serves as a parking space! Complete with a rustic antique tools wall gallery!
When I first had the dream of parking in my single car garage, I honestly thought the only way I could manage that feat was to ditch my workshop workspace completely.
But I couldn’t have been more wrong! Not only did I get both a full working workshop and space to park, I have more work area than ever when it’s in workshop mode!
Sounds impossible doesn’t it? But the key to making this work?
Parking in a Garage Workshop Series
1 – Come up with a plan and purge hard!
2 – Build custom storage to suit spaces
3 – Hang up whatever you can to save space
And be willing to pull the truck outside when it’s workshop time!
Welcome to Part 4 – the final reveal!
Read all installments to-date HERE
And I did it!
Today I’m sharing Part 4 of the final outcome, all decked out like the prettiest garage workshop ever! With plenty of space to park too!
This post contains some affiliate links in which I earn a small percentage from qualifying purchases through these links, at no extra cost to you. Thank-you for helping to support my blog!
An antique tools garage workshop
you can also park in!
See the mess and clean up in Part 1 HERE
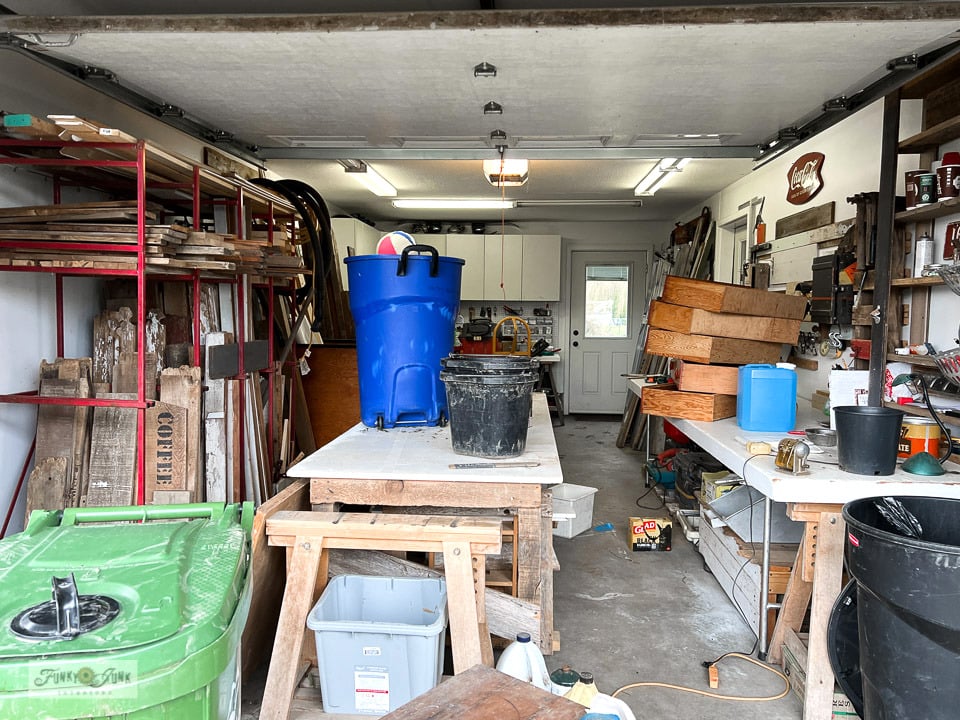
The messy before:
It seems like forever ago that my workshop looked this messy. But with a cold snap brewing outdoors, I wanted my truck indoors, so I hustled and made it happen.
The days were long, but I chopped up the monumental tasks into hours if that’s all I had to spare. The key was to keep at it even in small increments.
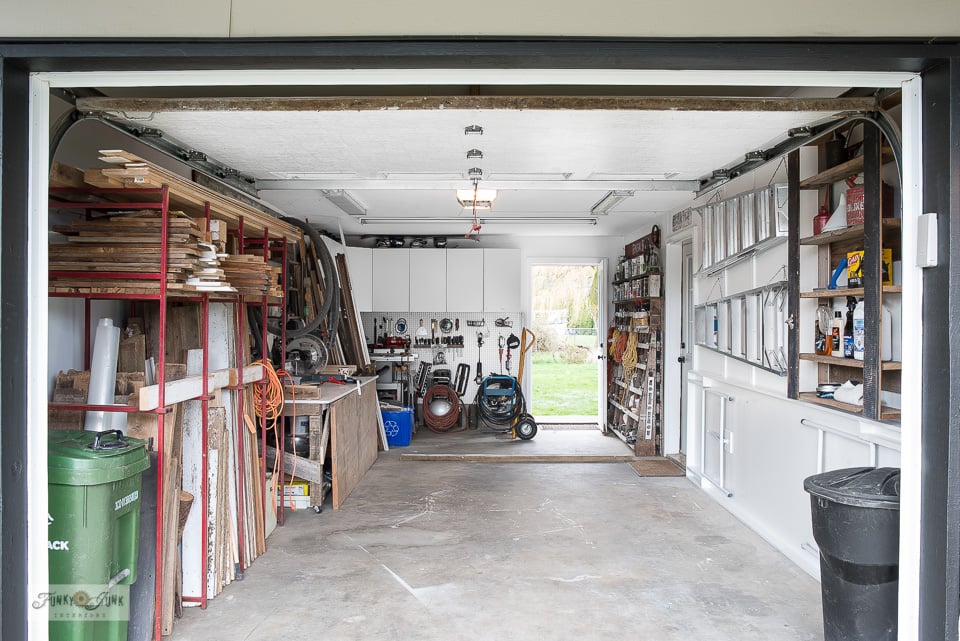
The organized after!
Today, the garage workshop is neat, organized, and pretty too!
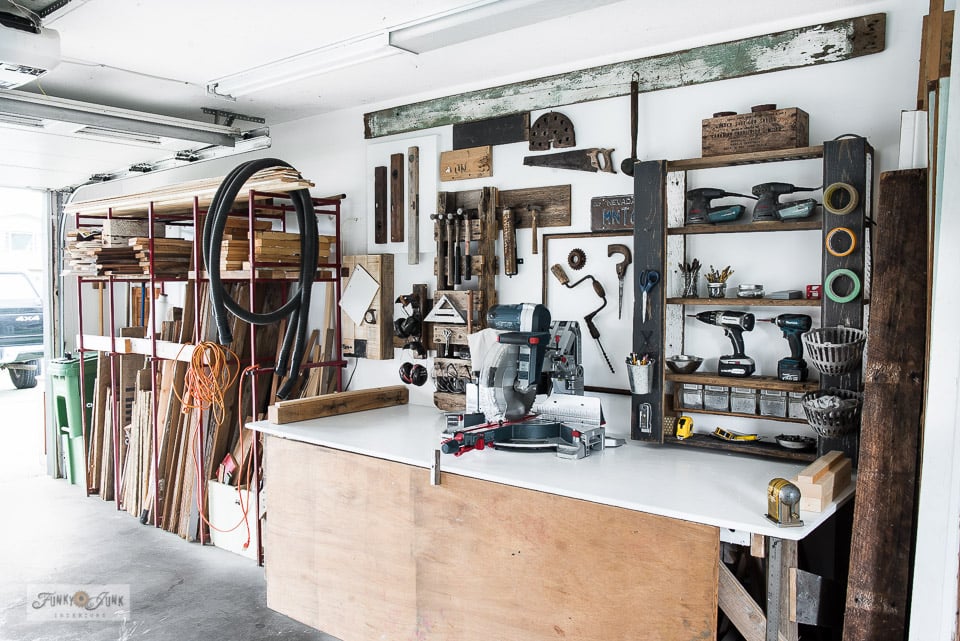
To the left is the bulk of the workshop tools, work surface and wood storage.
And to the right is extra storage space for things that can lay flat.
This arrangement allowed me to back my truck into the garage, and open the driver’s door against the flatter wall, while the other wall still housed all my workshop gear ready to go without any additional setup.
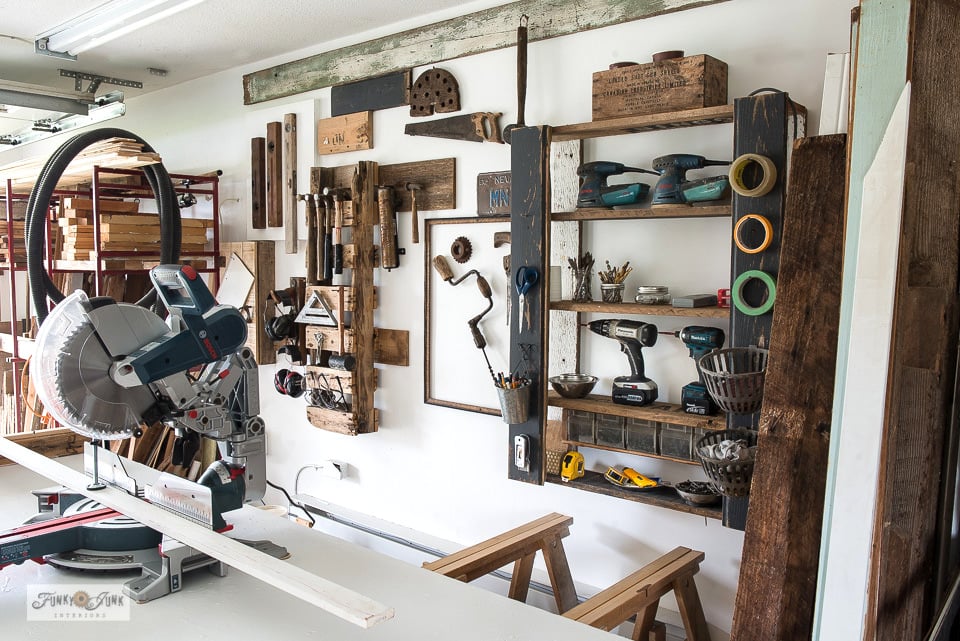
So today I’m taking you on the full tour, which includes the mitre saw area I haven’t shown yet, with all the hidden special features this compact yet productive workshop entails!
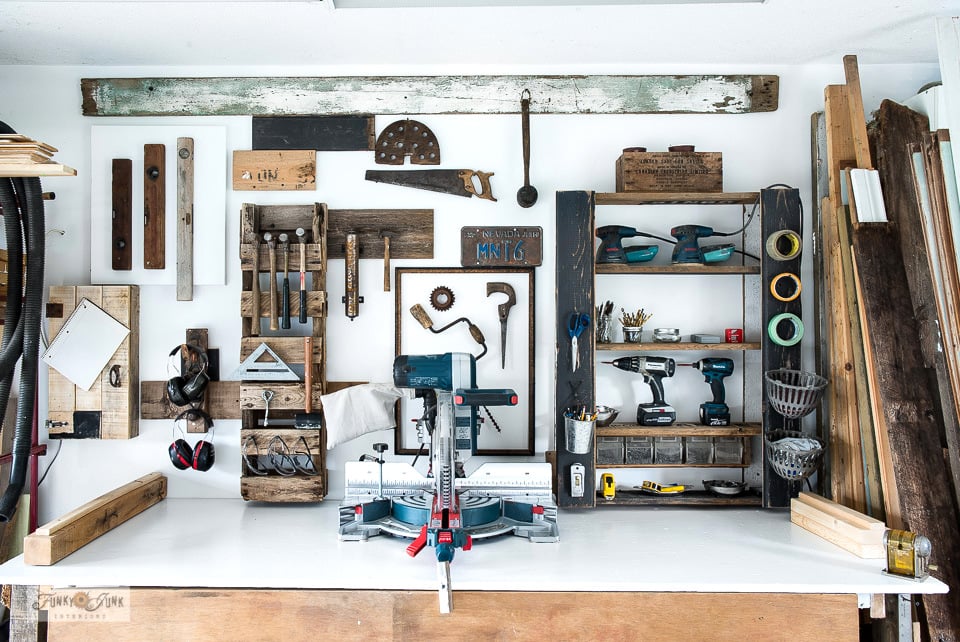
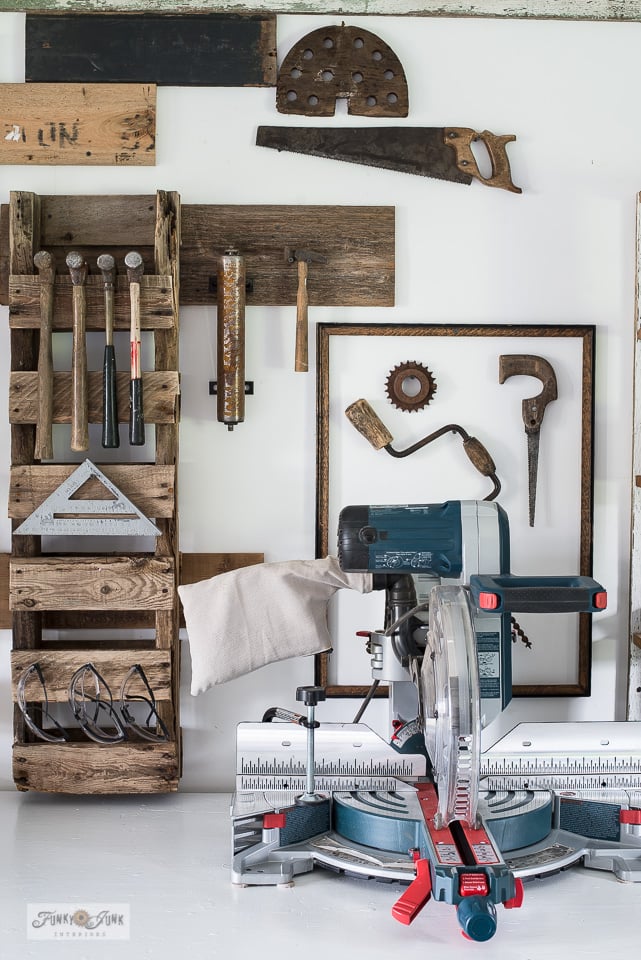
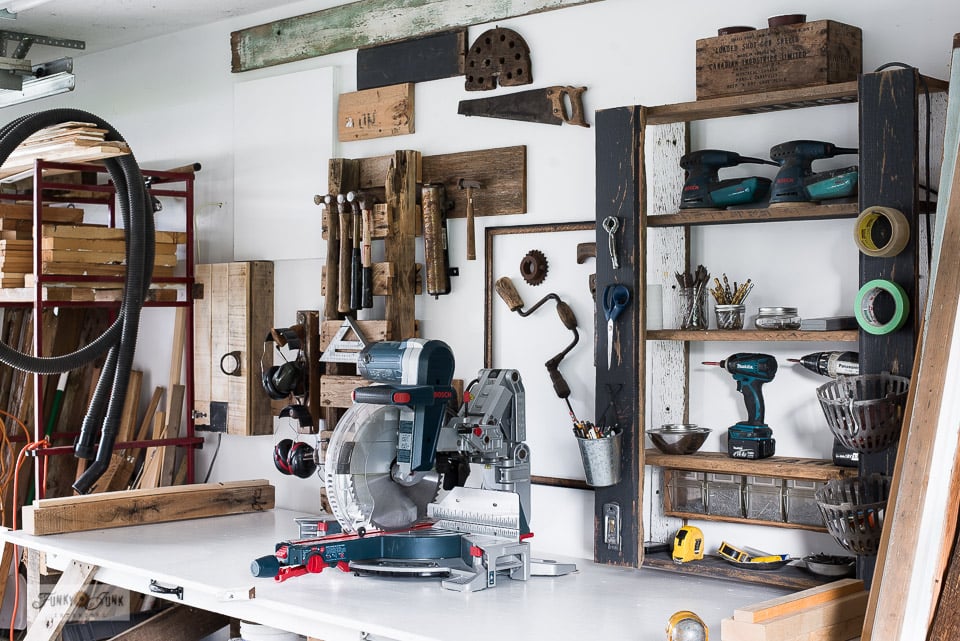
The miter saw work table
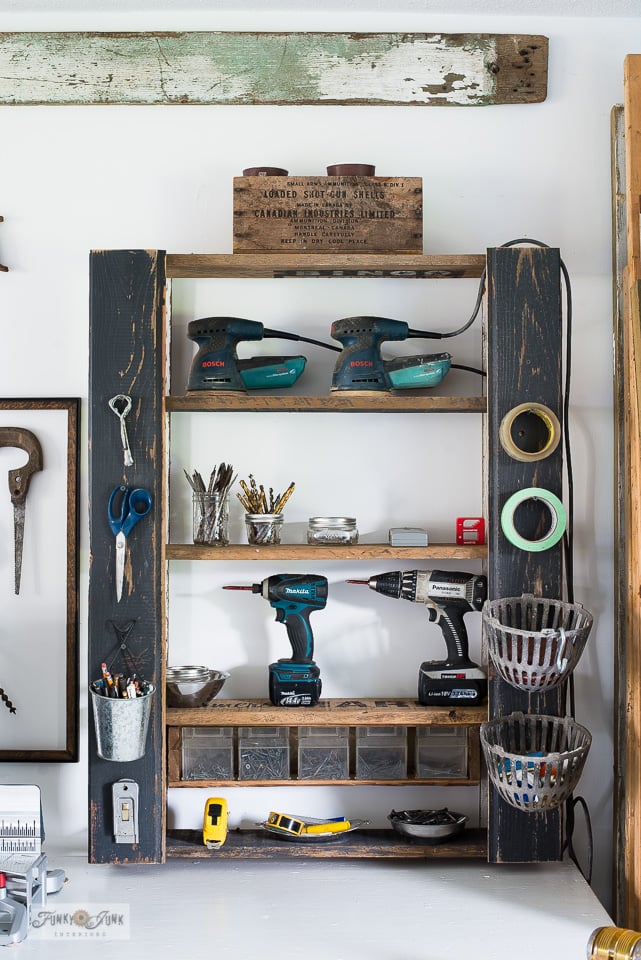
This workbench houses my miter saw, along with a custom reclaimed wood power tools shelf to the right, and a chunk of pallet holding hammers, etc to the left.
The outlet is below the table, a heater baseboard is centered below the table, and a double ceiling fluorescent lighting fixture is positioned perfectly over the saw!
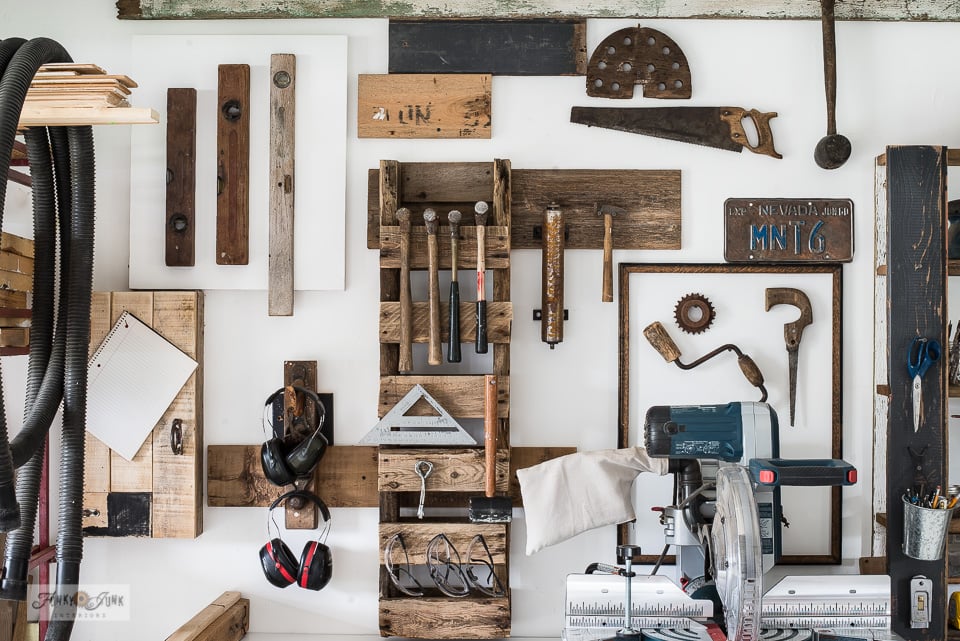
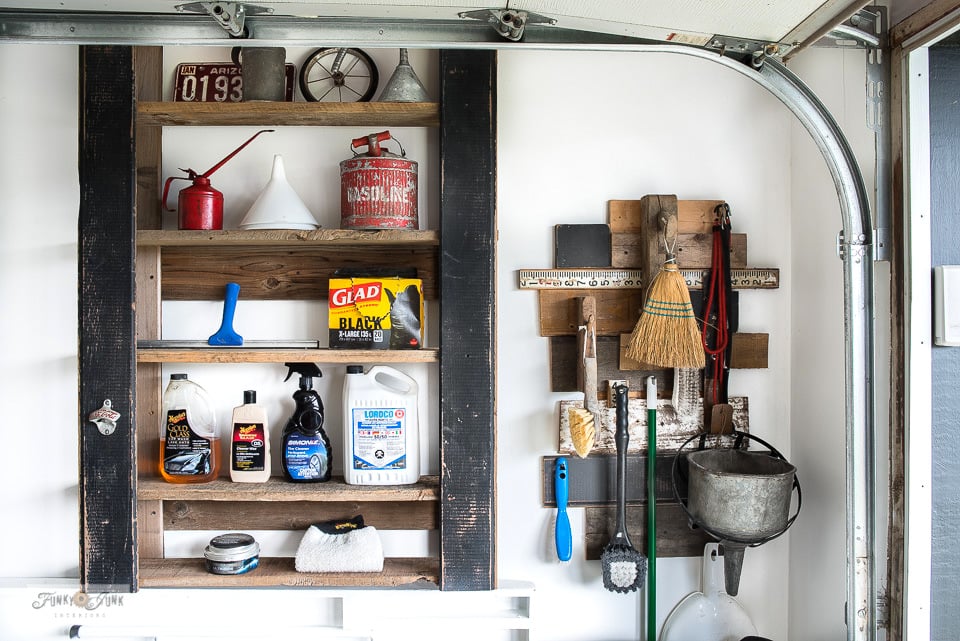
The wall behind the miter saw provided such a fun opportunity to store the tools I needed, along with display my antique tool collection to theme it up right!

Antique tools wall gallery with storage
I’m a believer in surrounding yourself with things you love to look at. And you can bet the wall gallery effect the antique tools take on totally inspires me to crank out those DIY projects!
Check out a review I did on this Bosch miter saw HERE

Most of the antique tools are also in working order. It’s always fun to pull one down now and then and work it old-school!
Staying to a mix of wood, rust and blue on this wall space made everything blend in well with the newer miter saw!
But there’s some hidden secrets to this area I can’t wait to show you!

A hidden compact work table
Note the wood door that’s in front of the work table. It’s held in place with a simple chunk of wood.
This is actually the top of a work table!
Find some handy workshop tables on Amazon HERE
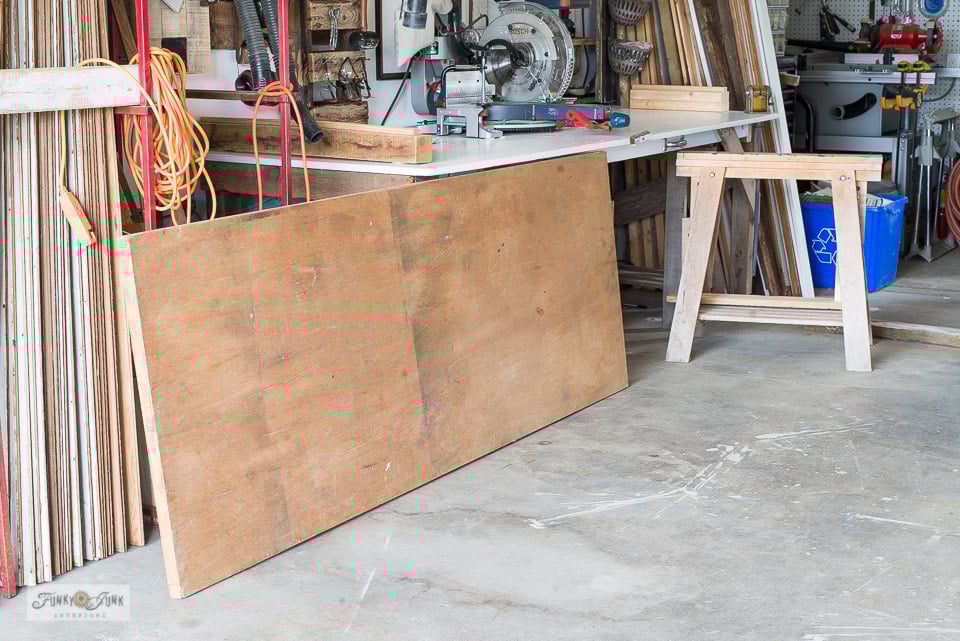
Once the door slides to the, the two sawhorses hidden under the table can be pulled out.
(the sawhorses are actually lightweight IKEA trestle table legs like I used on my sewing desk HERE)

And boom! There’s an extra work table I can leave indoors or haul it outside for sanding!
The key to making this work well was ensuring both the door and sawhorses fit the height of the table, and that they were lightweight enough to move around where desired.
It works epic!
But there’s another secret to the main miter saw table…
Check out various sawhorses on Amazon HERE

Pull-out work table on casters
The space to saw long planks of lumber is rather tight if the boards run beyond the table length. However there’s a fix!
Visit a huge variety of casters to put on tables HERE

Attaching full swivel casters and two door pulls to the front of the work table makes pulling it forward a breeze! In this position, I can cut any length of plank. And when done, it’s easy to push back into place again.
However the best way for this to happen is to ensure just the table came out with the pull.
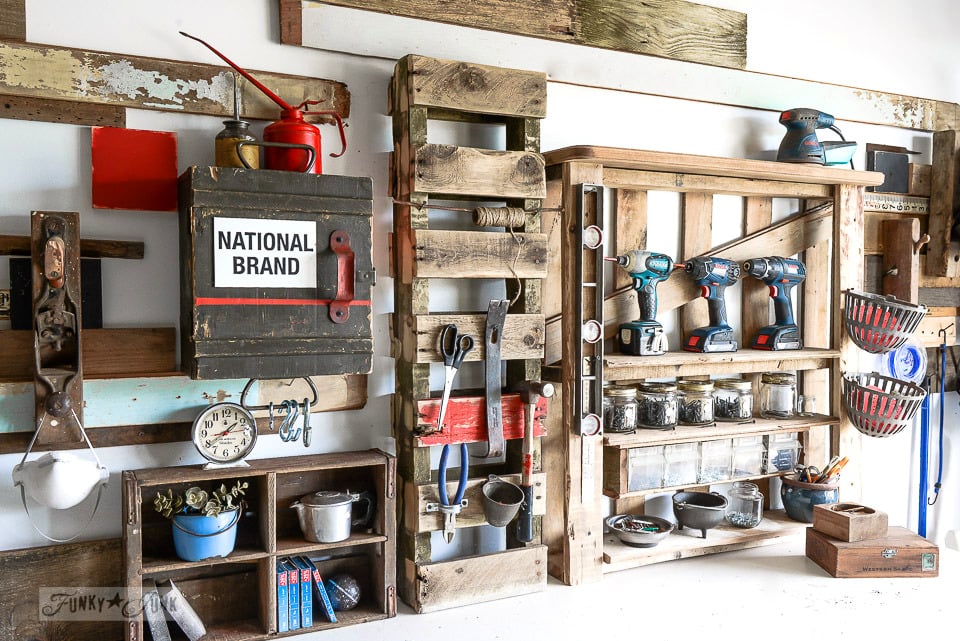
Shelving and storage wall mounted
To help with that, all the shelving was mounted to the wall, so the table could be pulled out by itself, rather than housing a bunch of other stuff that would create more weight.
See how the shelving was made in Part 2 HERE
Note the space between the shelving and the work table. Cool, right?!
See some unique workshop shelving ideas HERE
Another one of the essentials is the hidden cable box. See that little wood cupboard hanging on the wall to the left?

Learn how to make the pallet cabinet HERE
Hidden cable box inside a cabinet
The pallet wood storage cabinet has no back, exposing the cable box when the door is open for easy access, then once closed, is protected from dust, and hidden from view!
I hang a notebook on the outside of it instead. Much more productive.

See how this pallet tool storage was made HERE
Piece of pallet for tool storage
This chunk of pallet located on the left side of the miter saw houses hammers, a carpenter’s square, safety glasses, right next to the hearing protection.
Visit my own recommended DIY tool must-haves in THIS POST.

This power tools space is functional and looks good too!

See where I found the red storage rack HERE
Reclaimed wood storage rack
To the left of the miter saw worktable is the lumber storage rack.
I’m so grateful the durable could stay, because it stores all sizes of reclaimed wood just so perfectly! I’d be completely without it.
I also have an extension cord that is accessible and ready to be used indoors or outdoors. That way I don’t have to dig around for the plugs behind the table or wood storage rack.
There’s even a place for the shop vac hoses, hanging from overhead wood!

See the holes in the wall in Part 1 HERE
Wall boards create decor and mounting capabilities
There is also a hidden method to this wall gallery. Some of the boards are covering drywall holes that were cut during a renovation. I never did patch up the drywall because I like accessing some electrical installations in walls.
So instead, random planks of wood cover some holes, becoming part of the decor, and more secure ways to mount hooks and other storage for tools.
A woodworking workshop that is neat, tidy, bright, pretty, and ready to create!

Take a closer tour of the pegboard storage HERE
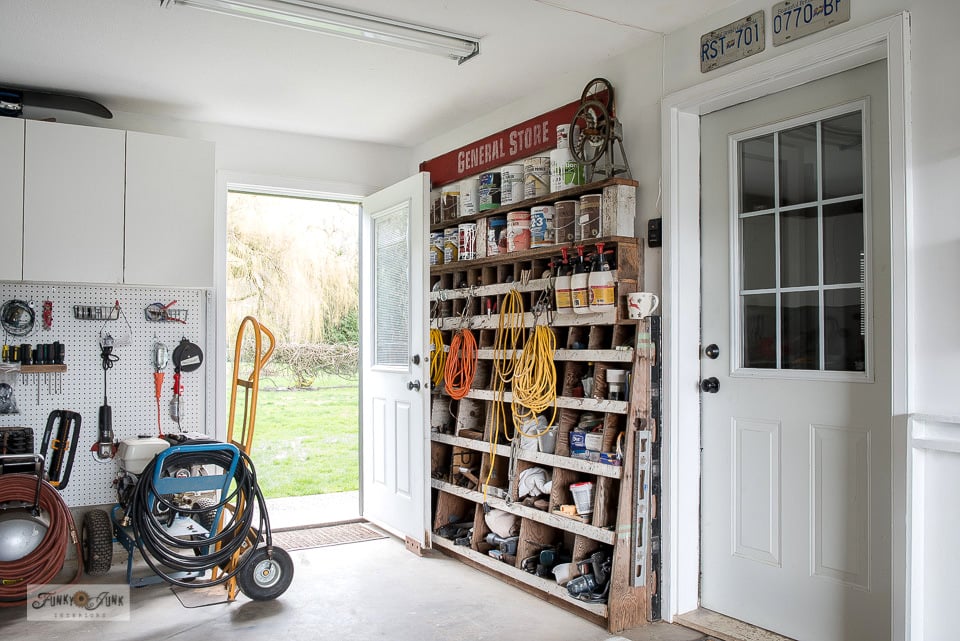
Back of the workshop
Towards the back of the workshop is the tool pegboard, tool chest, storage cupboards and larger equipment such as the table saw, pressure washer and compressor to the left.
The board across the garage floor is positioned so the back tires of the truck hit it when I’m backing in, to warn me where to stop before I hit anything.

See more of the General Store cubby bins HERE
View General Store stencil HERE
Cubby storage
To the right is a large cubby filled with rusty junk, paint supplies, sandpaper, electrical cords, construction levels, etc.
This cubby is sized so perfectly for that space, don’t you think? It completely clears both door accesses 100%!
And that open back door really helps to add natural light along with excellent ventilation when the front garage door is open as well.
Find some helpful paint can storage ideas HERE
Visit Part 3 – Painting aluminum ladders with wall storage
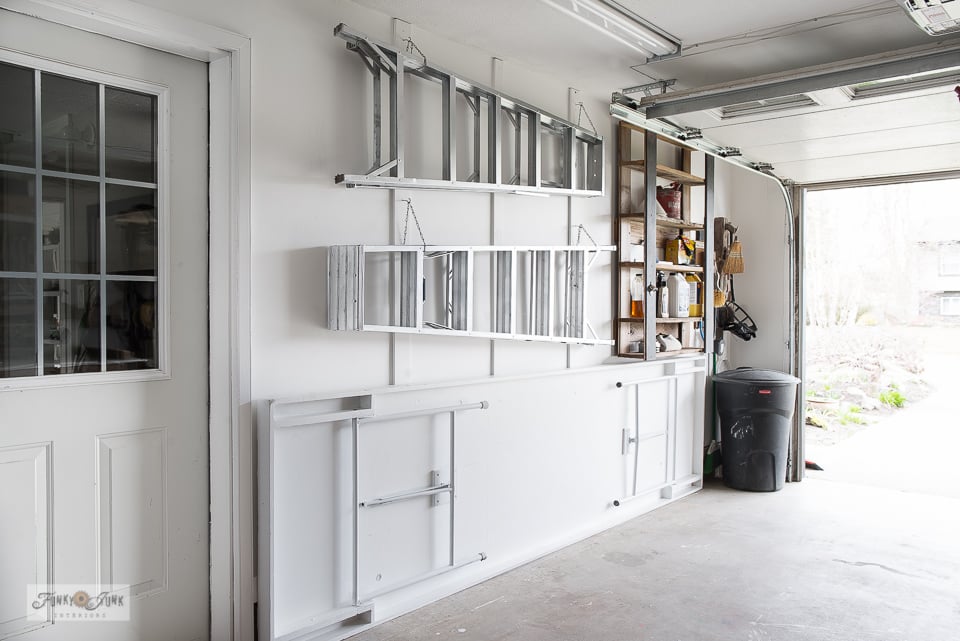
Flat wall storage
I’ve already shared the flat side of the workshop in Part 3 HERE.
The key to this wall is to ensure everything is stored as flat as possible so there’s room to open my driver’s door once the truck is backed in.
And the most important save for me was keeping that amazing huge worktable! So it was painted white like the rest of the wall so it would visually disappear. Looks pretty, doesn’t it?
Even the aluminum ladders got painted, then mounted to the wall on boards for easy and accessible ladder storage.
Stock up on a variety of lightweight aluminum ladders HERE
Search for some attractive folding tables HERE
Learn how to make this garage shelving HERE
… and the garage shelving and ladders mounted above it to the wall, so everything would fit.
All the garbage cans are located near the garage doors so they are within easy reach on garbage day.
I mean, look at all that concrete floor workspace!
When the truck is pulled out, I have more square foot building space than I have ever had, for furniture makeovers, repairs or loads of workshop table space to work with!
The only thing I am currently lacking is storage of undone pieces. I do have some space in my laundry room if need be. But the lack of storage is keeping me honest! When I haul something home, I work on it right away so I can move it into its new location and use it, rather than store it!
And it keeps me from collecting too much, because there’s only so much house anyway, right?! If I bring something big home, something big has to go as well. The lack of storage space may encourage me to sell locally too. Because I will never stop woodworking on DIY projects.
Summary…
All this was thanks to buying another truck.
Because never in my wildest dreams did I think this new garage workshop arrangement was possible. Until I hauled out the mess by purging hard, found new storage spaces, and made it work!
And now I get to play with all my tool toys in this pretty new custom garage setup that fuels me to WANT to build more stuff!
Just as soon as I get rid of something else first…
Read the entire Parking in a Garage Workshop Series
2 – Easy and Free DIY Garage Shelving for tools
3 – Painting aluminum ladders with storage wall
4 – The finished garage workshop tour (you are here)
Other spaces I create in:
View the first upcycled workshop setup HERE
Visit other workshop organizing projects HERE


Check out the photo studio HERE
this is epic!!!!
Thanks Mary! I’m SO enjoying it! The first time I used it, I rushed to clean up every speck of sawdust. Wonder how long that will last… haha
What an undertaking! Congratulations! Makes me wish I had a garage!
Thank-you Teddee! It was a big task, but so worthwhile! I never knew I could have this much space!
Fantastic!!! Great space!
Thanks Zefi! Working in there is a dream these days! It was so worth the effort!
Can you please come to my house and help me do this??
It’s wonderful!!
Thank-you Eva! I still can’t believe this is my new workshop! But there’s no easy fix… just gotta decide it’s what you want and start hacking at the pile a minute at a time! haha (ask me how I know)
You thought of everything! It’s amazing Donna!
I’m working on clearing out my garage as well, by tackling all the projects stored in there, while also tackling yard work, lol.
Today was a beauty day, and I got all the bushes etc trimmed. Piles picked up. Next sunny day is edging. 🙂 Could you come show me how it’s done??
Thanks Kim! I’m thrilled with the outcome and it’s so much fun to work in now! And you’ll do great with the edging… if you were down the street, I’d be helping in a heartbeat!
Wow, that looks so great Donna! I love the pallets storage solutions you’ve got and the rolling saw table is genius!