
Welcome to my first attempt at board and batten!
For a kitchen back splash.
Starting small is a good thing, no?

This wooden planter was my inspiration.
I have a bank of 3 windows along one side of the kitchen. And I fell in love with these distressed wooden planters.
My desire was to get more whites into an otherwise fairly woodsy kitchen interior, while adding some additional architectural elements.

How to board and batten a kitchen backsplash
I had these cedar strips that were are given to me by a neighbour. They were rough as can be so I started by sanding them until smooth.
Then I gave them a coat of primer, as well as a good quality exterior semi gloss coat of paint.

Here is the kitchen backsplash before. Boring indeed. However I wanted something I could do myself that didn’t take 10 years and was over the top expensive.

First I did some drywall repair to achieve a super smooth surface.

I then gave the wall 3 coats of white semi gloss paint.
The cedar strips were cut to size with my circular miter saw then painted with the same semi gloss paint.
The boards were randomly spaced to fit around switches, however for the most part, around 13″ apart. They were attached with finishing nails via nails and hammer, countersinking the nails, then filled with with a whipped lightweight wood putty.
TIP: (Putty sands smooth, so don’t use caulk for this part)
I was going to caulk around the edges of all joins but I decided not to in case, you know, I changed my mind. 🙂

And here is the beautiful result!

What a difference a few wood strips and fresh coat of paint makes!
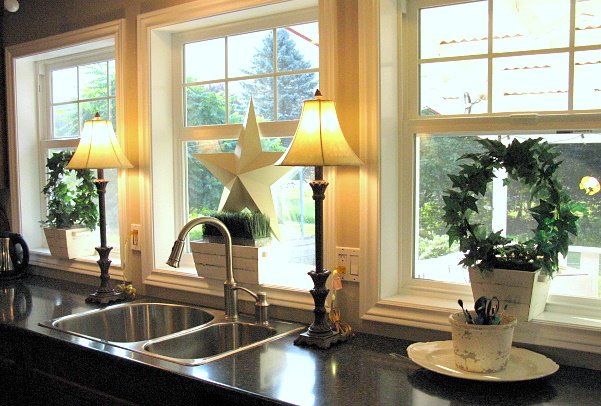

Here’s the bank of windows so you can see how the backsplash ties in with the rest of the room.

And how it looks in 2019. Take this tour HERE

I love the backsplash look! And for so little effort!
You can view a more updated version of my kitchen HERE

Some other board and batten projects I’ve done since:
Create an ‘attic’ board and batten wall in a bathroom
Board and batten wall in the master bedroom
Board and batten in the entryway
Turned out great!!
That looks stupendous!
I admire your talents!!! It looks fabulous!!
I’m totally impressed!
I love the lamps next to your sink….beautiful!
What a great look , it really adds charm.
Stop by my blog this weeks for lots of great projects re-visited.
Chris
Just Beachy
You have done it again! I love it! I want to be you when I grow up!
I thought your kitchen was gorgeous before, but now it’s stunning, gees your a smart one.
This turned out wonderful! I have cord issues, so I make little sleeves out of pretty fabric to cover up the plastic-y cords and plugs. Like you, I have been planning to tile my backsplash for YEARS, but somehow it never gets done. This would be pretty and quick… hmmmm… I feel a project coming on!
Blessings ~ Eileen @ Star’s Fault
Beautiful!!! Your blog is one of my favorites! Keep up the GREAT ides. You’re very inspiring.
Great job!
gorgeous. you are one talented lady! i WOULD LOVE to see more of your kitchen and every single nook and cranny in your home!
I love it! I love it! I love it!!! I’m sooo stealing, err I mean borrowing, this idea!!!
Oh my goodness, the Nester would be in “awe” of the whole kitchen!!! It looks fabulous, I love the contrast of the white and the warm wood.
Wow – really a small change but so much impact! I have really fallen in love with your projects and I’ve been talking about you to all my friends. All rave reviews!
Both of my thumbs up!
Aw shucks… thanks gals!
Eileen, that is EXACTLY why I had to try this. I’ve now tiled 3 floors plus and you’d have to hypnotize me to get me to tile another thing at this point!
Jessica, I’d love to show more of the house and I indeed will as I get things polished off here and there. I’ve had major renos done to the entire thing so many areas are still very bare and undone looking, just like the backsplash was. I promise to keep adding what I achieve and is hopefully worthy of showing.
Southern, your comment made me smile. Thanks!
Ok… off to create more work for myself. But isn’t it cool to love doing it at the same time?!?
Now… the pics always look good when they’re taken. My big pie in the sky question is, why in heck do things go downhill so quickly as soon as you turn your camera off?!? It’s as if the invisible Mess Goblins creep out at full force just because they can…
Funky Junk Donna
Looks great!
Simply gorgeous! The kitchen looks great and I love the wooden boxes on the windowsills.
What a great idea! I LOVE how it turned out. Your wall of windows, those lamps, and the topiaries….WOW!
Absolutely gorgeous!!
It looks great. You did a fabulous job!
What a clever way to recycle some leftover mouldings! Your DIY backsplash looks wonderful! It is a great alternative to tile or any of the more common materials. This is truly a unique way of sprucing up what was once just a plain wall. Great work! Thank you for sharing!
I love it! Never thought of this for a backsplash – brilliant!
Donna, Your place looks like it’s right out of a magazine…or should be in one!
take care my friend
Wow! what a simple GORGEOUS fix. Love it! You’re really making some headway on projects. Good for you. You’ve inspired me and made me think. I too feel a project coming on! I need to clean up after those mess goblins too though. Funny how that happens.
Your batten and board idea turned out beautifully. I love how it matches the Nantucket sort of look you’ve got going.
I really enjoy your blog!
sushikaydesigns@blogspot.com
I am so jealous of your kitchen windows! You just don’t see big windows like that in a kitchen very often. You did a fantastic job with it! It all looks great!
Very impressive. I really like this idea.
Pretty! I love the barn star hanging in the window. I may have to try that…
It looks Awesome! I am so in love with your kitchen! Amazing! I love those 3 windows and you decorate so beautifully!
Beautiful. I thought you were going to go horizontal with the boards but was plesantly surprised.
I have to say that I love the lamps, plants & star by the windows. Ah, balance – my eye craves it.
Wow, who would have thought you could make your kitchen look even more beautiful than before but you did it, amazing! I love your kitchen!
Love it, it goes perfect with the charming rustic chic style of your kitchen.
very cute! Classy!
Great job!!! I want to do the board and batten technique in my dining room. Maybe one day.
Your back splash is so charming! It looks wonderful in your beautiful kitchen.
This turned out great! I like the texture too.
oh, WOW!!!! I LOVE this!! So chic!! 🙂 and your windows….get out of town!! 🙂
Happy squeals~well done!
Come by and see my Pottery Barn inspired typography basket.
I love your lamps. And I love the trim you did on your wall. And I love your canisters to the left of your stove, which I also have. From IKEA right? I installed mine under the cabinet and I absolutely love them.
Great job. Your kitchen is beautiful.
Great job! Also love the symetry on your windows above the sink – with the topiaries and lamps.
Hello Donna – there’s so much that I LOVE about your kitchen! That back splash is so cool. I love your ideas. I also really like those lamps by the sink. Yes, Nester would be blown away by what you’ve done in there. Thank you for sharing!
Blessings,
Marie
http://emmacallsmemama.com
Such a great kitchen! I could stand at your sink washing dishes for days! Wonderful job!
Love it! With a $0 budget, I don’t have many options for my backsplash. I do have scrap 1 x 2’s, a handy hubby, and with a decorative painting & mural business, I have loads of paint and the willingness to paint anything that will hold still long enough! I think the project fits the bill. 🙂 Thanks for the inspiration!
That is beautiful. I have been struggling with what to do in one of my bathrooms. I might have to give it a try. Thanks for sharing.
Sweet girl…I can’t BELIEVE the difference those little tiny pieces of board made in your precious kitchen! You did an AMAZING job!!
WOW. When I saw Kimba’s referral and the idea I wasn’t sure how this would work, but I’m in awe!!! This is lovely.
Gratitude is the fairest blossom which springs from the soul.
Fantastic transformation… it really changed the look of your back splash! Nice professional job too… You have a gorgeous kitchen too!
Have Fun~Happy Fall…
~Really Rainey
First…I am totally jealous of those beautiful windows of yours…:) I also love the board and batten…it looks so great…nice work!
That is really cute and I love the star in the window! Care to show us what it looks like from the outside?
I have a linky party going on, come on over and link up! http://theshadesofpink.blogspot.com/2009/10/room-month-great-pumpkin.html
I have been thinking of doing a bead board back splash so I loved seeing this! I would love the texture of the cypress. Love your window and LOVE lamps in the kichen–they just make it more civilized 🙂 Great job! This is my first visit and I enjoyed it!
Yet another project of yours that I LOVE! What a great idea for backsplash!!!!! It goes well in your kitchen! ~ Ashley
That looks simply fabulous! I’m just not gonna rest til I do a board and batten treatment *somewhere* in my house.
I’m a new follower!
peace, cindy
(would love to have you pop over for my very first giveaway…)
nice–a homey touch!
What a really impressive way to dress up a backsplash! It creates a nice finished look. Love the topiaries on the window sills. I kill ivy, so I finally gave up buying them.
🙂 Sue
Sue.. top secret… the plants are all FAKE. I kill everything, even things that don’t die without a fight, so fake works for me!
Cindy, it’s so easy! Once you do it, you’ll want more more more.
Sheri… never thought of that. I may have to add that to this post.. hmmm…
Becky, yes, cannisters from ikea. I just painted the pine wood.
Those three windows were my dream for a very long time. It was no small effort to make happen, but it finally did. I never take them for granted.
You gals sure know how to make another gal feel good. Thanks!!
FJ Donna
OMG! THANK YOU THANK YOU THANK YOU!!!! I had this idea for our bathroom, but I couldn’t find it anywhere the way I wanted to show Scott! This is the perfect thing for him to see what’s going on in my head! Thanks for sharing, and inspiring!
That turned out wonderfully. Very creative, and like you, I’ve been waiting for just the right inspiration to make my backsplash. This has certainly gotten me thinking…
Jan
That looks beautiful! I followed your link from your comment on my blog. Thanks for stopping by, and leaving the nice comment on our backsplash project. I really loved the way it turned out. It’s a pretty look, for not a lot of money. We just used the Plybead Board stuff, and I think the whole project cost us a hundred dollars or less! Gotta love that! 🙂
Again, thanks for stopping by, and have a Merry Christmas! Beth.
I love this idea, how much space did you leave between the seats?
Hi Jane! If you meant slats, they are randomly spaced to work with my wall and switches, but on average, about 13″. I vote to do what looks good!