
Creating a split rail fence garden
I have such a cool LONG awaited yard update to share today, which is all about how I went about creating a split rail fence garden!
But let’s get caught up on why…
Visit Part 2 – How to start a lawn from seed with these epic supplies HERE
This post contains some affiliate links in which I earn a small percentage if you purchase anything through these links, at no extra cost to you. Thank-you for helping to support my blog!

The previous tree and driveway story
.
I was graced with this tree when I first moved in.
And that somewhat unruly strip behind it is my RV parking that use to be gravel and had since grown in with weeds.
But I’ve never loved this area nor tree. The tree itself was super high maintenance, requiring monthly trimming. While I somewhat kept up with it, I let it go for the most part because… well, I hated it to the point of even resisting taking proper care of the grounds under it as well! That would give that tree a lesson, huh? LOL
This spot belongs on my property, but it always appeared to be part of next door’s because of its weird positioning. And since next door took better care of their grounds than I did (oops..), I felt it was unfair to leave the area as is.
So after talking to Jake and Janette about the grief this tree was giving me, we all agreed it was time to let it go.
This spring when my pruner Walter came by, he took the tree with him. Done! No more endless trimming and constant weeding! I then hired out to have the stump ground up. We were free and clear! Time to let the lawn grow in and be done with it.
Next up was to replace the tree with something else.
A team effort idea
.
Just down the road was a darling, low lying split rail fence garden along a front yard. Since I’ve been working on getting more rustic wood into my landscaping and on the outside of my house, and Janette incorporated more wood to the front of hers, I felt perhaps we could do our own version of a mini split rail with a tree we actually loved, along with some plants surrounding it.
Janette gave me her blessing, and we deemed this a community garden effort, because we would share not only share the duties of keeping up with it this round, we’d also both choose what to put in to chime in with BOTH our yards. We wanted the feature to look as if it belonged to both yards this round.
Cool, right?
Creating a split rail fence garden
.

Shopping for split rail fencing
.
Right away, I put a call out in a local Facebook group to see if anyone had any split rail fencing they either wanted to get rid of or sell for cheap. Someone just down the road had two kinds, so I chose the more rustic split rails on the right, which also had bark and moss attached. Cool!
I reasoned, if we didn’t use this and chose new for the front instead, I’d just use this in the backyard somehow. Regardless, it was a neat way to trial our idea out in a price efficient way.
If you wish to shop for split rail fencing, I suggest:
- Look around locally for a yard feature you love
- Do a google search online for other ideas
- Do a google search online for local places that split rails or customize to suit

So I loaded up! Great fit, huh? Not to worry, I filled up, wrapped it and strapped it down well so it didn’t move. I was only about 1/4 mile from my home anyway.

How we planned the garden bed
.
- Dry-fit the rails where you’d like them to go.
- Decide on plants that would fit to suit.
- Cut out the shape of the bed following the desired lines of the fence.
- Install the fence in place, then plant.
Once home, I did a dry fit with the rustic split rails on what I had in mind.
Janette and Jake fully approved! But we did choose to use new split rails since it would create a cleaner esthetic for the front yard.
Our split rail source was a family member who custom-split our rails to be slimmer than usual since we didn’t wish to overpower our minimal plantings we decided on.
While we waited for the split rails to arrive, LOTS happened.
We put up the allen blocks we had separating the two yards on Facebook which were removed the next day. So Jake sprayed the weed grass on my side to kill it, so we could scrape it clean more easily.

Visit Part 2 – How to start a lawn from seed with these epic supplies HERE
How we created the new lawn strip
.
Next up was to plant the new lawn strip.
A new post has been created with all the details on how to start a lawn from seed, including some pretty epic tools that made the job SO much easier!
Visit Part 2 – How to start a lawn from seed with these epic supplies HERE

Preparing the flower bed feature
.
Next up was cutting the shape of the flower bed so I could remove the remaining turf where the fencing would go.
Don’t even ask me how many times I went to the dump. Between the shed and this garden patch, I’ve lost count.
Learn how to cut and shape a flowerbed HERE

However when I started fluffing up the soil, the previous tree roots were in the way of the new tree. DOH! Of course they were! Stump grinding only gets rid of the stump from the surface…
This put a halt to our planting plans… until Jake got involved. He started digging all the way to China and finally got rid of the biggest, fussiest root in the land! He dug so deep he nearly disappeared from the yard surface.
So our plans could ultimately go ahead after all!

With soil smoothed out, the layout of the garden bed shaped, and a big ‘ol hole in the middle of the flower bed, NOW it was time to go shopping for the tree, plants and grass seed to help complete our little split rail fence garden!

Shopping for trees and plants
.
Janette and I ultimately agreed on plants that was maintenance free, so an evergreen of some type was on our minds for the tree, then various grasses would surround it for a clean, somewhat contemporary forest feel.
This tall skinny tree was a close contender! And I may get it for somewhere in my own yard yet as I positively love it!
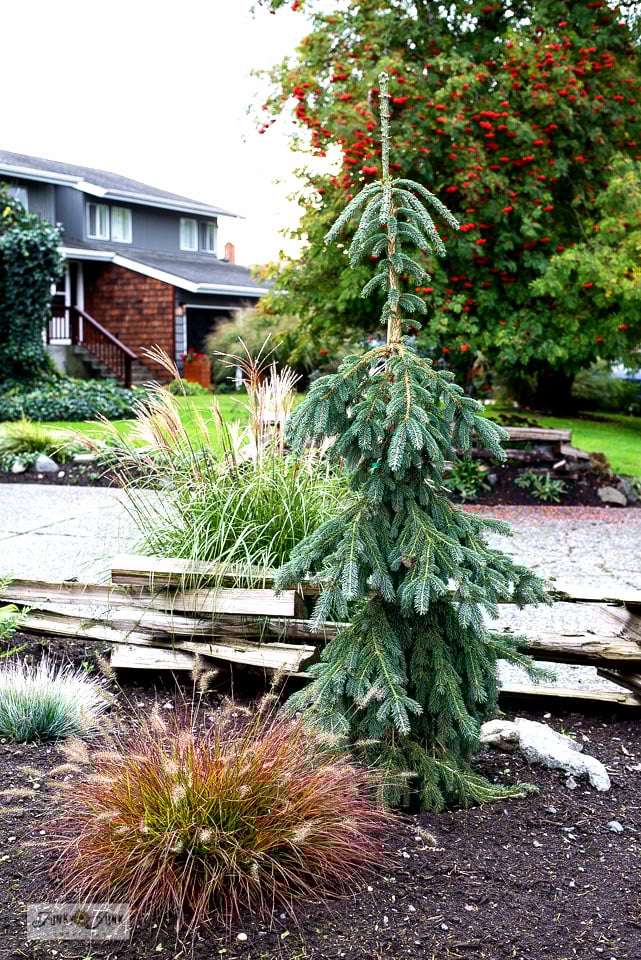
But we really had our hearts set on something that had more of a distinct droopy style, so we chose…

… this cutie pie instead! The evergreen tree is Weeping White Spruce / Picea glauca pendula.
It reaches a max 15 feet and we don’t have to do a thing to it. Perfect! There’s more info on our plant choices further down this post.
Can you see it? Forest plus grasses plus split rail fence = our new look!
And then Saturday approached, and with all hands on deck…
…. the cutest little split rail fence garden transpired!
The cutest little section of split rail fencing was installed by Jake with Janette’s and my assistance. While I don’t have a step by step, (I let Jake work quick!) I do have a split rail section I’ll be doing in another part of my yard myself which I’ll share more on when I ultimately finish it up right.

But I’ll do my best to explain how we installed the split rail fencing section. It was so clever!
How we installed the split rail fence
.
1. 11 smaller scale split rails were custom ordered x 10 feet long. This would take care of both sides of my yard.
2. We did a dry-fit first, stacking the rails into the position we desired, overlooking where they were too long.
3. The bottom middle rail was placed on the ground first. Then two rails on each side were stacked against both ends, not worrying about length right now. We kept layering all the rails to suit until the middle section was 3 rails high.
4. The rail lengths were cut to length desired where the rails joined using a small chainsaw.
5. Each point that touched the ground, a wood round (cut at approx 4″ long) from a log was placed underneath each part where the fence touched the ground. This would minimize rotting.
6. A hole was drilled through all the rails where they joined, to the size of chosen rebar. The top rail was only drilled from underneath, because this would serve as a ‘cap’ so the rebar didn’t show.
7. Cut-to-size rebar posts were pounded into the drilled corners, then into the ground support, ending with the top split rail acting as the cap.
Amazing! It worked out so well! It’s a bit of a fiddly process, but we ended up with a very sturdy structure just as cute as can be!

Tree and grass names
.
Weeping White Spruce / Picea glauca pendula
- Zone 2
- Foliage is blue-green that hugs the trunk, sweeping downward
- narrow conical habit
- moderate growth
- up to 15 feet high x 3 feet wide
- full sun
Isn’t our droopy little evergreen tree the cutest? It really chimes in with my love for my bike forest trails!
This Weeping White Spruce is a maintenance-free tree. You just leave it be. We will leave the stake intact it came with to help it keep growing straight up.
We also chose some various grasses that didn’t get too large, including:
- Smoke Signal / Schizachyrium scoparium
- Beyond Blue / Festuca glauca
- Everillo / Carex oshimensis
As for the other side of the driveway, here’s what I came up with…

The split rail fence on the other side
.
I dry-fit the leftover rails into place and BAM… yes, that would do!

The rails are still loose, so when I attach them properly, I’ll share the process with you.

Once our lovely forest-infused split rail fence garden was established, both Janette and I wanted to chime in our yards with it RIGHT NOW.
So we both started digging stuff out, and I ended up with 3 massive grass plants (name unknown) from Janette! SO cool! Looks like it’s always been there! I mean, who gets fully established grass from the get-go?!
And we had just enough rails left for Jake and Janette to also build a mini split rail version in their own flower bed too!
Once my lawn grows in, I’ll share how this all marries the two yards. It looks SO good!

The reason I haven’t yet joined my fence is because I’m still making a decision on this tree. I believe it’s a Mountain Ash.
It really is the perfect size for the yard, but it drops leaves all year around, plus makes a massive berry mess leading to drunk birds flying into my and the neighbour’s picture windows. Year after year we get BAM BAM BAM.
I’d ultimately love to replace it with a rapid growing BIG TALL SKINNY evergreen… so I’ll keep you posted on that decision.
I don’t take getting rid of trees lightly, so I’ve allowed this tree to continue to bug me for many, many years before getting to this point.

All I know is, this stay at home summer with all our hard work is paying off big, because at LONG last, I’m just positively thrilled the outside of this place is starting to feel like me! And the split rail fence garden has a lot to do with that.
With even more stories to tell and changes to come… I haven’t even shared about getting my trim painted yet! Or how the shed demolition and rebuild is coming along… but I will soon!
Are you a split rail fencing fan too? What’s a look or feature you’ve always wanted to incorporate?
Other related posts you may enjoy:

Update! Read Part 2 HERE including growing a new lawn
.
The lawn has officially grown in! Visit the full how-to on how we planted, and what we used that made the job SO much easier! Read it HERE
And check out how the spit rain fence garden is doing a short 2 years after HERE

How to make a screen door from scratch

How I made a scrap wood garden walkway

How to make a simple reclaimed wood garden-themed gate

How to make a wood screen door for challenging windows
Visit MANY more of my outdoor projects HERE
You are getting so much done!!
It looks amazing Donna. I love what you and your neighbors chose to plant, and love how you collaborated with them :). They sound like amazing neighbors!
We have a Mountain Ash Tree in our front yard, and we love it. This spring we witnessed a huge flock of Cedar Wax Wing’s strip the tree of it’s berries.
I’m dying to see the shed!
Thanks Kim, we are loving the upgrade to something we both actually love!
And please send those Cedar Wax Wings our way next round. When the buds came out on the tree, I felt like quickly clipping off all the buds! You can have my tree too btw… LOL
They are pretty. But I prefer them in my forest runs…
Bring on the skinny Christmas trees?????
Looks really great!
I knowwww! I love them!!! Especially the ones that weep!
Love the look overall and the collaboration with your neighbors. I used to have a split rail (not the zig zag design which is even cooler) but did not replace it once it started to fall apart. I recently began thinking about it again and seeing yours makes me want to reestablish mine! If so, I will follow your tip to see if I can find used rails. Great look!
Thanks Michele! I managed to find several used sources. Those who have land tend to have a pile sitting somewhere!
But I admit, once this new stuff came in with even bark attached here and there, I was smitten! We even waterproofed it so it holds the woodsy tone, since we both want to incorporate wood grain around the exterior of our houses. It really chimes in so well!
Hope you land what you’re after!
Love the new pine tree and landscaping. Nice to have great neighbors also.
Lots of hard work for sure. This year has been the same here. I did pay to have a large section of my garden in the front of the house re-done by a
landscaping firm but I did lots of the prep of killing sections of plants and digging out old stuff. In this Michigan heat; there were buckets of sweat.
It is so rewarding to see all the fruits of your labor. Congrats.
The Mountain Ash is a beautiful tree; but the mess would be a big
contender for removing it. I had two mulberry trees cut down; don’t miss that mess of cleaning up the berries from my driveway almost daily.
Removing trees and replanting is not for the faint of heart for the work, hiring someone, and the expense. Lots to think about. Best wishes on that topic.
Sounds like you made some amazing headway yourself this summer, Eloise!
And you are right on about expense and such. Even getting rid of my little tree turned into a big expensive deal, especially if you want the stumps ground down.
A little at a time is the only way to tackle changes it seems. I do that part well at least. LOL
But yeah. I’m over the constant mess of this tree. It drops leaves all summer (crazy, right?) and then let’s get the birds drunk and drop berries all fall long next! I call it the Bird Bar…
Once I figure out a replacement, I may go for it!
You are so blessed to have neighbors like that!! It is rare to find you live next door to people you chime with so well. Thanks so much for this post and it’s inspiration!
You are so right Tracy! Being on the same page is everything! And to see a similar fence go up in Janette’s yard to chime in with our feature made me feel, we nailed this one just right!
Oh my goodness, Donna, I’m so envious of your green garden right now. It’s Winter here in S Africa and we’re surrounded by dull, brown bleh landscapes 😀 I had no idea weeping mulberries roots went down so deep either. We have two in our garden and I love them, probably because they’re the first tree that bears fruit in the Spring and they entice a ton of feathered friends to come for a visit. But you’re right, they are high maintenance so a droopy, weeping Spruce sounds like a much better idea and the split rail fence looks so perfect. Can’t wait to see what that area looks like when it starts filling out.
Thanks Michelle, I really love the new vibe myself! I’m pushing pause on the evergreen because the brunt of the privacy would be at the bottom of the tree which isn’t ideal. Good thing I’m so indecisive… I delay EVERYTHING so there’s lots of time to think… LOL
Wow, Donna, you’ve had one busy and productive summer! It sounds like you are blessed with great neighbors. Love your rustic split rail fence and it’s so…BC (jealous). We have two large mountain ash trees in our backyard that started as saplings from my grandma & grandpa’s yard over 50 years ago (bought house from my uncle). Our backyard is like the neighborhood aviary pub where all the feathered friends meet to enjoy their berry brew and get drunk and disorderly. LOL
Haha, that’s hilarious! I probably wouldn’t mind the mountain ash as much if it was located in the back 40 somewhere. I just don’t like the daily mess it makes. I think it belongs in some cow meadow somewhere…
I love the new look and split rail. Other observations, if that is a big green hosta outside the front door I think you fed it growth hormones, it is huge, and now I am confused, where is your junk fence, I thought it was on that side?
Thanks Bliss!
The hostas are completely ignored and just do that. I guess they like where they are, which is mostly shade. Yay! Whatever works.
The junk fence is in the backyard. This post shares the front yard.