Learn how to build DIY pallet shelves, repurposed from any reclaimed wood! A simple, free project offering loads of workshop storage!

As you may already be aware, I’ve been working on revamping the workshop, adding some enhancements while working at gaining every available square inch!
Recap
Start with the full workshop series HERE
Or take the finished dream workshop tour (to date!) HERE
But the key to any workshop additions continues to be all about turning finds into super productive upcycled organizing and storage system ideas. I love the rustic look, and of course the free price is certainly right!
Especially if we’re talking about diy projects that use free pallet wood.
Most recently, this General Store rusty junk bin was a big perk getting all my junk stash in one place again! The General Store stencil is from HERE
And just yesterday, I landed two wood doors from the curb, with one door now turned into a fabulous worktable area seen HERE!
I’ve also been busy painting the work tables to freshen them up, cleaned up the walls with fresh white paint, and will eventually be covering the white melamine cabinets with something quirky too! And on it goes.
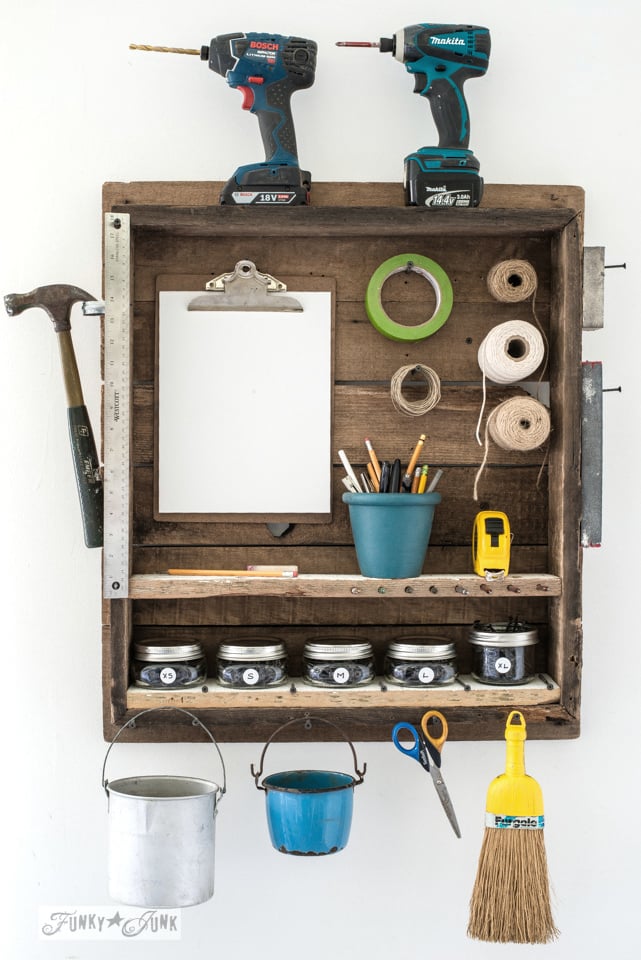
However today I’m happy to share the newest woodworking projects addition… wooden pallet wood shelves with a bit of a secret. They look like pallets, however any reclaimed wood will do!
And for free too! A free shelf is always good, yes?
So this round, don’t worry about trying to round up free pallets. You can make this vertical shelving unit with any reclaimed wood you have on hand.
Original pallet shelf
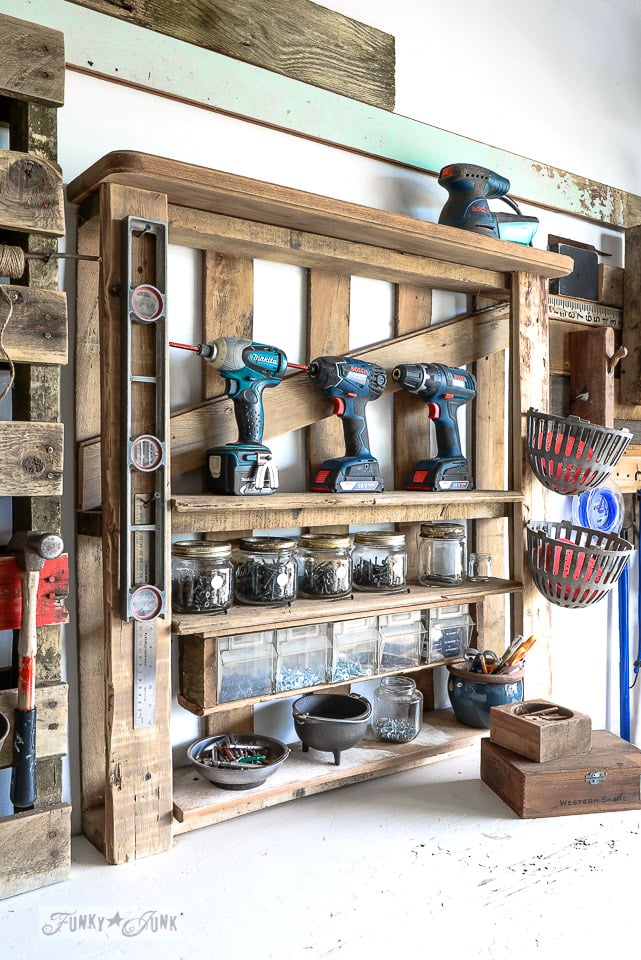
Enhanced Pallet shelving for power tools
But I don’t always pretend. These authentic wooden pallet shelves wall shelf became one of my easiest woodworking projects ever. Open shelving where you can view all the tools is pretty handy! Besides, the pallet was already built!
However I kept finding this one standard pallet, although with beefed up pallet planks, didn’t quite give me all the storage I needed as my tools continued to grow. The width of your pallets determines how deep your shelves are.
So I decided to mimic an authentic pallet, using random reclaimed wood planks to get the look in a much larger size!
And I’m really glad I did, because wow… the flexibility a few more boards made for added workshop storage is pretty impressive!
Since pallets don’t come in the precise size you may desire, I decided to use pallet-building principals to come up with this simple DIY pallet style tool shelf to my exact size requirements this round.
And the result? Let’s just say… there’s not a thing extra on the table. In fact, I didn’t even fill all the shelves up!
What took me so long?
This new rustic pallet shelf that involves very simple frames, now goes right to the ceiling while taking up barely any work table space! And the shallow shelves would be perfect for woodworking tools, workshop storage, paint shelves, crafts, or even perhaps a pallet bookshelf.
Could you use a large pallet rack system as well for increased load capacity for your woodworking tools too?
Here’s how I built this DIY shelf you can customize for anywhere for additional storage space!
This post contains some affiliate links in which I earn a small percentage if you purchase anything through these links, at no extra cost to you. Thank-you for helping to support my blog! Read my full advertising disclosures HERE
DIY pallet shelves, with any reclaimed wood

Supplies I used
Finished shelf size shown: 38″ wide x 59″ tall.
- Sides – 4 reclaimed wood cedar planks – 5.5″ w x 59″ long
- Shelves – reclaimed wood cedar fence planks – 5.75″ x 38″ long
THIS post shares how I collect reclaimed wood.
Cordless drill, drill bits and screws
A small wood crate that fits the bins (or build one to suit)
Nail gun is optional. I didn’t use one.
Tape measure

Building the frame
1. Decide how large you desire your shelf to be by measuring out your space.
2. Cut 4 long planks to desired height you wish your shelf to be.
You can use stains or paint for the wood before installation, however I left my reclaimed wood just the way I found it.
3. Measure then cut various horizontal beams that will work as shelves to the desired width you wish your shelf to be.
Note: All the shelving pieces should ultimately be the exact same sized boards, however you can use slightly shallow shelf boards by using longer screws to bridge the spaces IF you use your largest depth boards for the top and bottom of your shelf.
4. Place a shelf board on its side, then lay two side planks flat against each shelf edge, attach with screws. (shown above)
I started with one screw on each board so I could ‘rock the shelf’ straight against a construction square to square-it-up later.

Tip: I suggest to pre-drill holes before inserting screws, since you’ll be screwing into the boards very close to their edges which can lead to wood-splitting.

5. Attach another shelf board to the bottom, shown above.
6. Use a construction square to adjust all four corners as needed, then add more screws to the corners for more stability.

Adding the shelves
7. Slip the shelving boards under the frame, then standing them on their sides, measure and adjust their positioning.
This is the time to determine what will ultimately go on each shelf. Laying down your drills, tools, spray paint, and other merchandise will help guide your shelf and beam levels.
8. Attach the shelves to the side boards with screws, measuring and squaring-up as you build.
I used one screw per side on each board, thinking I’d add more screws later, but I didn’t end up needing to!
This shelving is for light duty, but I suggest using more screws if you desire to add some real weight to the shelves.

9. Flip the shelving over to the other side so it lays face down.
10. Attach the last two sides.
How easy is that?!

Adding a crate for cubbies
11. Add accessories to the shelf for added storage if desired. Then sand any rough edges once it’s completed.
I had this little pre-made crate that fit some storage cubbies perfectly, so the crate was attached to the underside of one shelf.
Now that the simple build was complete, it was time to play, stacking it with tools! I couldn’t wait to check out how this looked in place!

The pallet shelf loaded up
And boy… what an epic fit it is!
I first repainted the wall white to start things off fresh, then mounted the shelf to the wall with screws through the back side panels.
This wood pallet shelf is basically used for the cordless drills and accessories. So screws, drill bits and some other handy building supplies are all out in the open, easy to find and grab.
With room to spare!

A pallet-styled shelf was a perfect fit, since I had the garage door ceiling rails to contend with.
This shelf honestly takes up very little space, since it’s so tall and the depth is so shallow. It’s perfect for tight spaces!

Organizing the shelves
I love having all the drill bits in separate jars. They are easy to grab, dump and use as desired.
And the antique drain covers that house the sandpaper for the palm sander made a return too. They are too perfect and have a fun, junky gritty appeal to them!

Adding cubby storage
My all-time fav part are the organizing cubbies borrowed from a plastic organizer. They tip, allowing for easy screw grabbing without removing the entire cubby unless you desire too. Then to keep the sawdust out, flip them right back up again when done.

Mason jar screw storage
Here’s another easy way to store screws… in these little squishy mason jars!
A little stainless dish serves as a dumping ground for odds and ends that can be sorted later, or handy to use while you build.
A vintage muffin tin came in handy to house odds and ends where nails or other screw inventory comes into play.
And the lower shelf was positioned perfectly to allow just enough room for tape measures, a stud finder, exacto knife, sticky notes or whatever else is needed.

Stacked wood with hooks for hanging
To the far right of the shelf, I also slightly revamped this random hooks area that is super productive, as well as for decoration!
Reclaimed wood planks were stacked then screwed to the wall, then various hooks or screws acting as hooks made hanging up a brush, and basket filled with gloves super accessible. I usually use the wire basket to throw rags in as well.
I’m personally thrilled with the progress the garage is taking on lately! It’s becoming emptier, cleaner and more functional by the minute!
And makes me want to build more stuff to keep mess at bay… which is always a plus.
Think you’ll build some DIY pallet shelves to organize something? What could you use them for?
Visit the entire workshop series HERE

Update: Here’s a newer, smaller version of this same pallet shelf design in the NEWER single car garage workshop series HERE!
Other DIY pallet ideas to make:

General Store junk cubby with paint shelf extension

How I built a dream up-cycled workshop for free! Take the full tour here.

Visit TONS of other cool and quirky reclaimed wood shelving ideas HERE
Visit many other unique shelving ideas HERE
Check out my guide on must-have DIY tools
Visit more workshop organizing ideas HERE
And many other tool-themed project posts HERE
I am loving that last little shelf with the string! What a great idea! Your workshop is so organized! I have trouble keeping mine organized, I do a great job organizing it but after I work on a project I have trouble putting everything back!
Gosh, I love how you organized and styled your garage so much! It reminds me of my paternal grandfather’s workshop growing up. He was a cabinet maker and everything had its place using old crates, handmade shelving, and glass canning jars for screws and whatnots. I would enjoy working in a space like this so much.