You CAN build a shed door from scratch! Follow along as I frame out a doorway and door, including other shed framing tips on saving this old shed!
The little rustic garden shed is looking VERY different these days! Not long ago, the back was completely busted out and the front frame let goat the base. It was a complete Willy Wonka styled mess and I thought it couldn’t be saved.
But I was reluctant to build a new shed because I didn’t want to spend thousands on a structure that only stored firewood!
As of today, the shed is as sound as can be, thanks to a few 2x4s and a whole lot of determination! Plus… I made a real door!
Lookit me, an official builder now…
So today I’m continuing the Save the Shed series with the framing story, valuable beginner building tips, how to build a shed door from scratch, lessons learned and more!
This post contains some affiliate links in which I earn a small percentage if you purchase anything through these links, at no extra cost to you. Thank-you for helping to support my blog!
How to build a shed door, with shed framing tips – Part 2

Save the Shed series
Part 1 – Repairing a shed with demo tips
2 – Framing a shed with door making tips (you are HERE)
3 – Adding reclaimed wood siding and a shingled gable
4 – Building a shed barn door with rusty junk hardware
5 – Adding facia boards and decorating the shed for fall
Visit all installments to date HERE


So after the big BIG clean up, I set up a workstation outside by the shed, using these main tools:
Helpful framing tools:
.
Brand new non-treated pine 2x4s planks
Lumber – Treated landscape ties
Outdoor durable 3″ copper screws
Miter saw (in hindsight, I would set it up next to the shed next round!)
Speed square (to measure angles, but I suggest a Magnetic angle locator)
Grinder power tool with a heavy duty metal cutting disc
Extension cord (I suggest to get a retractable extension cord HERE so it never tangles!)
Wheelbarrow – I used to cart the tools inside each evening, leaving the waterproof table outdoors

Repairing the foundation first
.
- Cut back to sound wood
- Rebuilt what use to be there and attach it to past sound wood
Creating a sound foundation was first.
Honestly, this step gave me the most frustration because I didn’t know what to do. Give me written instructions and I’d be good to go! I nearly quit at this point. And maybe if tearing the shed down wouldn’t have been even more work, I may have…
After lots of needed breaks, I kept on it. I ended up using new treated landscape ties to copy what had been there previously. Which are sitting on top of attached buried chunks of wood to further stabilize.
BUT if you really want to do it right, cement footings are suggested so the wood doesn’t touch the ground at all.
Removing nails with a grinder
.
- Outfit your grinder with a new heavy duty metal disc
- Use a grinder to cut off nail tips that can’t be pulled out
- Wear protective gear: gloves / safety glasses / hearing protection
- Be aware sparks will occur
- Take your time and get comfortable with it. It gets easier.
I then had to overcome my fear of grinders. I’m not a fan of the sparks they create. So after outfitting my grinder with a brand new metal disk, I got my brave on, outfitted with protective eyewear and hearing protection (less sound = less scary!) and ground away each nail tip in the way.
The grinder cut off the nails like slicing through butter!
Since I was dealing with sparks and very dry firewood, I misted water over the fire wood and framing before and after using the grinder and had the water hose near me to be on the safe side.

Supporting the back
.
- Jack up the back
- Rebuild base first, then main supports next
What I think I really needed was a carpenter jack of sorts to push and hold the roof up as I rebuilt. But I didn’t want to purchase one, so I YouTubed a DIY one HERE made out of wood. It worked to a point, but was difficult to do on my own.
I ended up smacking a treated reclaimed wood post into place with a hammer as best as I could, attached it and called it good.
But a proper jack would have hired the roof a little more which would have likely been best. I’ll be buying a jack for my next shed fix for sure.

Fixing the front
.
- Take pictures of the before for reference later
- Cut back rot
- Rebuild with new
Everything in the front of the shed was relatively sound except for the left side, which had separated from the base.
After cutting away the rot, I replaced the treated landscape ties with new, and attached them to the previously sound wood. Then all the rest of the framing was copied from what had been there previously, referring to past pictures… often.

Joining with toenail or pocket holes
.
Most wall structures are pre-built, then set into place. But because of working with a pre-built structure and all the crazy amount of angles to recreate, I ended up attaching one board at a time.
Pocket holes used with the Kreig Jig in some cases saved me! Especially since I was using screws for all the wood joins.
Later in the game, I got more proficient at toenailing the joints together (angling the screws to join two boards), so I ended up relying on pocket holes less.
Video – How to use a Kreig Jig
.
Click above to learn how to work with a Kreig Jig. It’s very easy!
Visit my project tutorials using Kreg Jig HERE
How to measure angles
.
While I love this quirky shed shape, measuring out all the angle cuts gave me the most grief.
I hacked pieces of paper, wood and whatever else came to mind and limped along, frustrated with nearly every cut.
The most helpful tool I happened to have on hand was a speed square (to measure angles) but I definitely suggest a Magnetic angle locator instead, which I picked up later!
HERE’s a Youtube video on how to find angles using a speed square.
After the bottom and left side was complete, I plunked in the original door and it was good to go!
Next up, let’s finish the side and back… with a surprise addition… a new shed door!

Framing the shed back
.
- Cut away rot
- Replace with new materials, attaching it to the original structure
- For framing, start with the base and top first, then fill in the middles
Since the exterior side and entire back had rotted out, there was a fair amount of wall frame replacing to be done.
The horizontal base and top boards were rebuilt first where applicable, then I filled in the middles with vertical supports.
And I nearly framed the entire back of the shed closed up, until I had a lightbulb moment… I wanted to try building my first ever shed door!
Why not? This provided the perfect opportunity, plus, who can’t use an extra garden shed door?
In hindsight, the 2nd shed door came in super handy since I ended up storing lawn furniture and reclaimed wood to build with near the back! So keep a desired door height and width in mind, depending what you plan to store inside.


How to build a shed door opening
.
- Determine desired door size
- Build a rectangle with an open bottom
- Position into place, then frame around it to secure
The front door frame design was copied, which made the build much easier.
I measured the front doorway height and width of the door opening, then built a 3-sided rectangle with new 2x4s the same size, leaving the bottom open.
Once the 3 boards were positioned into place, it was secured by adding additional framing supports around it. Instant doorway!
Additional header boards were added above the door placed vertically.
Looks pretty official, huh?!
However it was about to get even better…

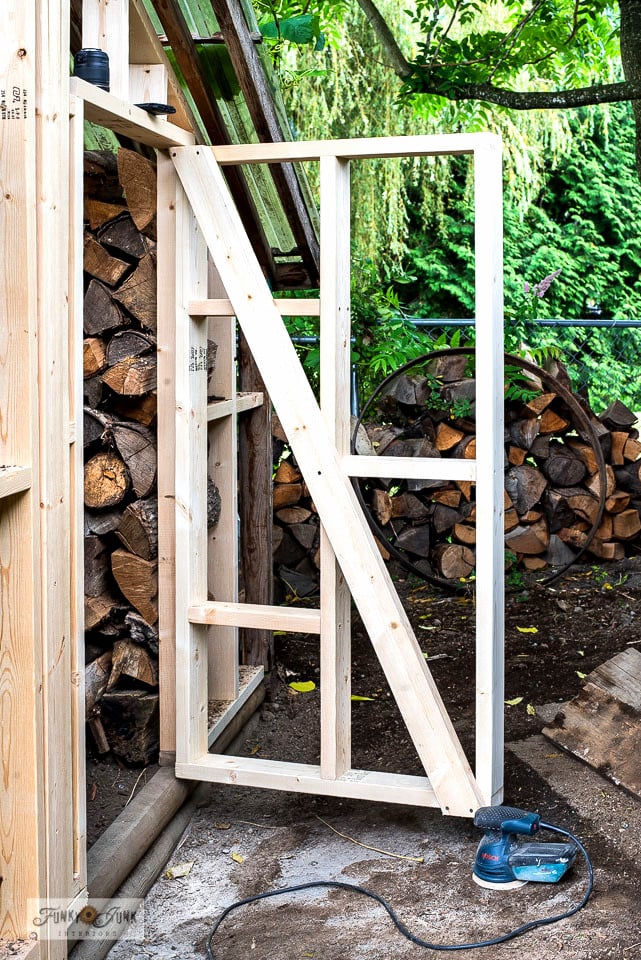
How to build a shed door frame
.
- Build a closed rectangle out of 2x4s, slightly smaller than the door opening
- Dry-fit the door inside the doorway frame to ensure it fits. Adjust if needed.
- Add a middle board running through the centre vertically, then add inside supports horizontally, plus a diagonal brace to help keep the door square.
I’m sure there are many types of shed door ideas out there. But since I copied the door on the other shed side, that made building this door design relatively easy.
A rectangle measuring about an overall inch smaller than the doorway frame was built out of 2x4s, then added supports were attached inside, with a cross-brace to help keep it hung square.
The door size ended up being little tight for opening and closing, so instead of rebuilding, I sanded down some edges with an orbital sander which trims it up until it swung open and closed perfectly.
Installing the shed door
.
- Position the door by placing wood scraps below it and shims on the sides of it.
- Attach 3 heavy-duty door hinges to one side of the door frame and door framework.
To install, the door was first wedged into position by inserting spacers or wood scraps and shims under it and beside it on both sides.
Two door hinges were then attached. In hindsight, my preference would have been to use 3 gate-styled hinges since it was so heavy, but this is what I had on hand.
When installing hinges, just remember that the top hinge should be positioned closer to the top vs. the bottom hinge a little further up the door.
By golly friends… and that is how to build a shed door. I made a real swinging door! I must have stared at this for hours in amazement.
Here’s how I positioned screen door hinges.
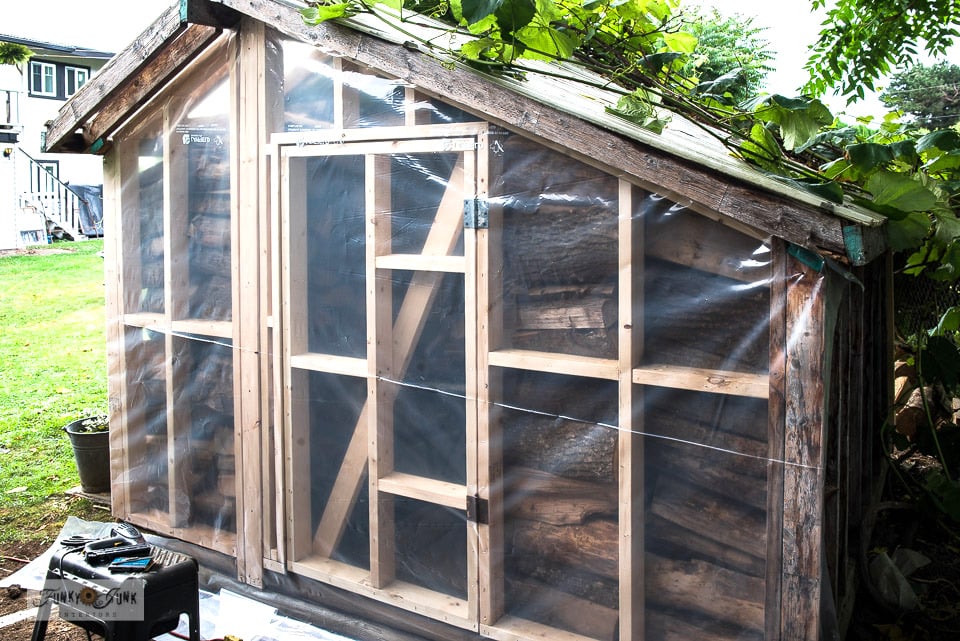
In Part 3 HERE, you’ll see the shed door protected from moisture with plastic.


All framed up!
.
And then there it was… the shed was all snug and completely sound. I actually managed to save this shed! I never thought I’d see this day coming.
So after this big, new adventure, here are some main takeaways I got out of this BIG shed framing save:
Fav framing tips
.
- Take plenty of before pictures to use as reference. You may need them as you rebuild.
- Bring the miter saw near your work area… or prepare to do LOTS of walking.
- Buy a proper angle tool if you are going to be working with angles.
- A grinder with a new metal disc makes cutting off nail tips like butter!
- Take your time. I did a small section at a time which helped save my sanity.
- Frame with gloves on = no slivers.
- Use a retractable extension cord… it’s so much easier to haul around tangle free.
- You will want to give up. Rest up instead. You can do this!

Coming up next:
.
After framing, the obvious next step is to figure out how to waterproof and finish the structure.
Since this is a greenhouse structure, I plan to cover it in heavy gauge plastic, then pretty it up with reclaimed wood cedar fence posts I landed for FREE! once again. Wait until you see that motherload land…
The above picture is similar to what I yet again wish to accomplish. But with a few new twists!
Visit all the rustic shed posts HERE

Was it worth the big save?
.
In a nutshell, learning how to build a shed door and all the other framing steps was a big job. I can’t even tell you how many times I sat on the ground, dirty from head-to-toe, in total frustration with tears welling up. I mean, this vs. vacationing in Hawaii, this was a tough pill to swallow. What a summer, huh?
But the key was, I didn’t give up. Taking this framing on in do-able sections at a time gave me plenty of healing time in between. Mentally and physically.
Plus, it taught me SO much, that the 2nd garden shed save HERE yet to come doesn’t feel quite as intimidating now! Doing more makes you grow more, so at least there’s that!
And now I can say building a DIY shed door is not nearly as intimidating as I thought it would be!
So stay tuned… because the VERY best is yet to come… including some pretty fun DIY projects!
Save the Shed series
Part 1 – Repairing a shed with demo tips
2 – Framing a shed with door making tips (you are HERE)
3 – Adding reclaimed wood siding and a shingled gable
4 – Building a shed barn door with rusty junk hardware
5 – Adding facia boards and decorating the shed for fall
Visit all installments to date HERE

Visit all the rustic shed posts HERE
And the stencils used to make the garden shutters HERE

Visit this dramatic 2nd shed & area makeover series HERE
More to come on this one too!
I am so proud of you! Way to go Donna. I’m seriously so impressed with your skills, and applaud you for not giving up!
Thanks Kim! I actually gave up several times over… and would have loved to light the thing up with a match! But we have forest fire issues out here so I had to be good. LOL
Amazing job! Donna
Keep up the good work!
Thanks Nancy! The next installment will be much prettier than these past 2! Cannot wait…
You are the girl! Such a project to tackle. You are brave and persistent.
That is what is needed to tackle such a project. All the aches/pains/tears fade away when you finish and think “I really accomplished that”. You are correct; learning as you go…taking it on in several time frames. Very proud of you. You are braver that most. I would have voted for the trip instead if it hadn’t been for the world health issue!! That trip might come next year.
Thanks Eloise! I’m holding out hope that trips can safely resume at some point soon! But until then, having guts is coming in mighty handy! haha
Donna, your determination, willingness to learn and can-do spirit blows me away. You’ve done such an amazing job on your shed restoration. You’ve had one crazy busy summer and should be so proud of all that you’ve accomplished. You Go Girl!!!
Donna,
I’m always so impressed with your projects. You push yourself to new ground and succeed which is fantastic. This is inspiring and I’m looking forward to seeing what’s next…
75 year old single woman farmer here. Currently building a 11×10 1/4″ hardware cloth enclosed pole building to keep the squirrels out of my fruit trees. Probably going to make 3 more. Was looking for a door idea and ran across your site.
And yes, the KREG system is a girl’s best friend. I have found that with the poor quality of wood nowadays, I use thin screws or drywall screws. For most things I build, the KREG screws are overkill – and way too expensive.
One thing I’ve learned is not to screw the screw in all the way on the first go around, especially when working with pine or cedar strips. It will definitely crack the wood. I usually screw in, then reverse, doing this twice or maybe even three times for a 3″ screw.
Oddly enough I also found my cheap Ryobi cordless works better than my high dollar Makita. Reason being the Makita has too much torque and it is very hard to not over-torque and then the wood cracks.
Keep up the Good Works!
Excellent advice Purity! I’ve found pretty much everything you said to be true! I’ve found a good local source for higher quality wood and I can attest, it indeed makes a BIG difference!