![]()

This post contains some affiliate links in which I earn a small percentage from qualifying purchases through these links, at no extra cost to you. Thank-you for helping to support my blog!
How to stencil on wood

1. Choose your brush
There are two kinds of stencil brushes on the market. Dome-tipped and flat-tipped.
Dome-tipped have slightly rounded tips that to me, help distribute the paint more evenly when stenciling since there is more brush touching the surface.
Flat-tipped distributes paint to surface by direct tapping up and down.
My personal preference is using dome-tipped stencil brushes as they appear to give a smoother finish, as well as making a swirling application easier to achieve.
Some others also like sponge brushes and makeup sponges to stencil with. On glass in particular, I like to use a high density roller like I did in THIS WINDOW PROJECT.
![]()
2. Choose your paint
Nearly any paint can be used for stenciling. However, what you choose can make a difference.
There’s paint for floors, walls, ceilings, craft paints, and furniture. And since each type of paint is made slightly different, you’ll be required to practice each one on your surface of choice.
For most of my own DIY projects, I like to use Fusion Mineral Paint. It’s a DIY furniture paint that is extremely durable, the pigment covers well and it dries very quickly with no top coat required.


3. Load brush with paint
- pour a small amount of paint onto a surface
- load stencil brush with paint
- remove most paint onto a rag until brush feels dry
When you first load your stencil brush with paint, there’s too much paint on the end of your brush. This will lead to excessive paint bleed underneath the stencil because there’s really nothing to stop the paint.
The fix is to remove most of the paint off the brush until it’s pretty much dry-to-the-touch.
I like to use a piece of scrap wood which you commonly see in my stencil video tutorials, however you can also use a paper towel or rags.

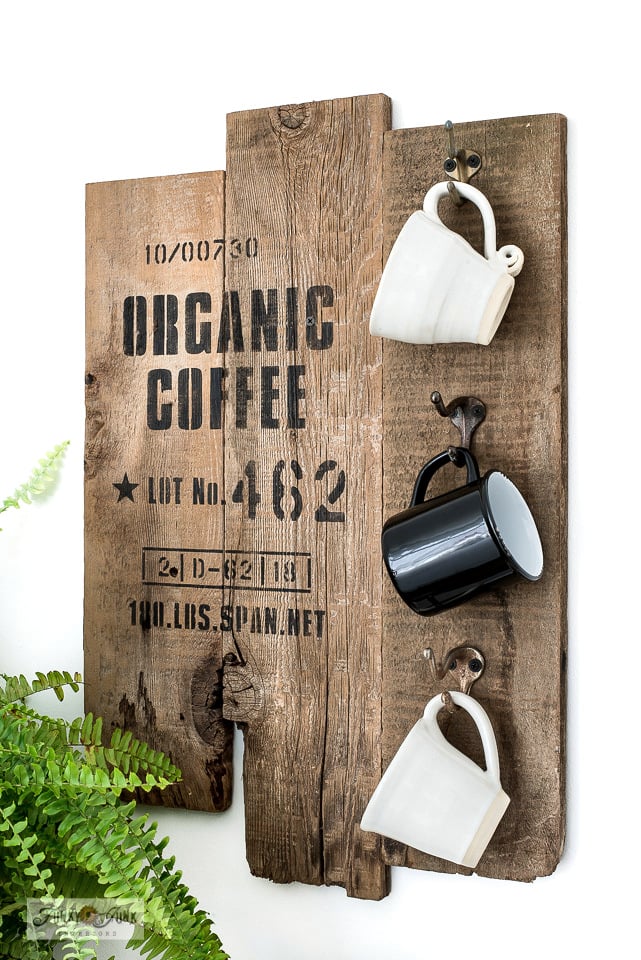
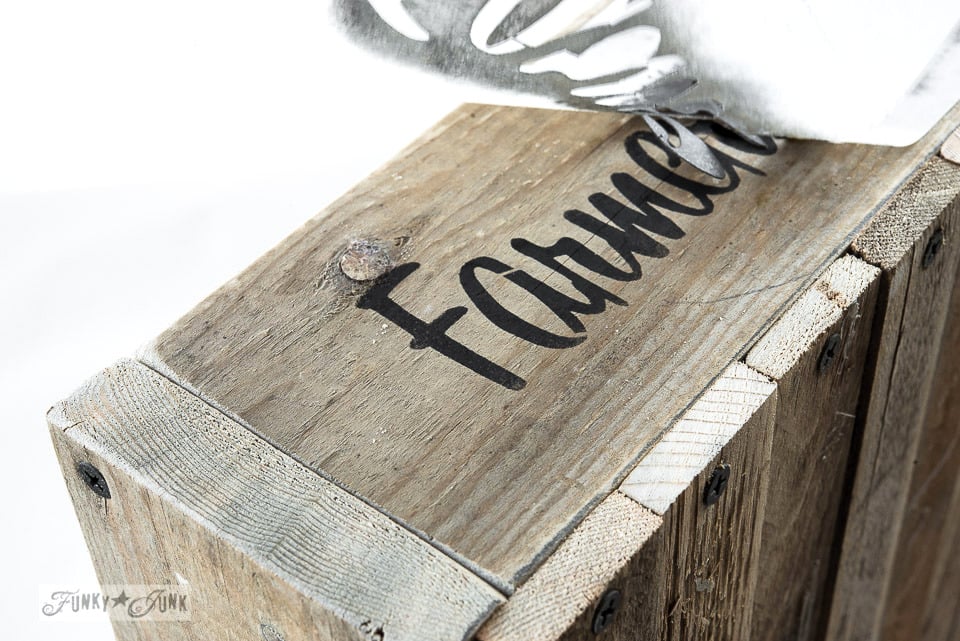
View current Farmers’ Market stencil now available HERE
4. Consider stencil spray adhesive
- flip stencil upside down
- spray a light coat on the back of the stencil with spray adhesive
- allow to set until it feels only slightly tacky
Stencil spray adhesive is a spray you apply underneath the stencil which creates a slightly tacky surface. This helps reduce stencil bleed and also helps hold the stencil in place.
What I don’t love about adhesive is it never really leaves the back of your stencil, so over time, your stencil will collect dust and lint. I just prefer my stencils adhesive-free so they stay cleaner.
If you master the dry-feeling-brush technique, you won’t require stencil spray adhesive.

5. Tape over off-limit areas
If there’s an area that is in close proximity to the stenciled images to come, I suggest to place some masking tape to protect the surface. Stenciling over the edge of the stencil is a common potential, so may as well play it safe.
Good quality painter’s tape like Martha Stewart’s blue craft tape or Frog tape are great choices, however even cheap masking tape can help seal away the excess paint perfectly fine.

6. Position stencil where desired
Position the stencil where desired, holding it in place with masking tape.

Since the most common position is in the middle of your project, you’ll find nearly all THESE STENCILS with middle registration marks make it effortless to center your stencil.

7. Tap or swirl brush through stencil
There are two techniques I like to use when stenciling.
Tapping is using an up and down motion, that can have a patchy look at first. Just keep stenciling until the coverage you wish is desired.
Swirling offers a more smooth, and somewhat transparent appearance. I swirl on most of my own stencil these days but it works easier if you use a dome-tipped brush and master the art of a dry feeling brush first.
Tip: for a more transparent look, wet the brush with water first, then dry off with a rag. The paint will disperse more easy with a water-conditioned brush.
8. Stenciling on wood vs. other materials
Stenciling on wood grain is a little different than stenciling on say, a pre-painted surface or fabric. Each surface accepts paint a little differently, so it pays to test out the amount of paint you apply on a scrap piece of surface if you are uncertain.
- Wood grain is slightly absorbent so it’s relatively forgiving and easy to stencil with good results.
- Fabric such as stenciling pillows absorbs more paint, so you may need more paint.
- Pre-painted surfaces are already sealed, so you’ll need less paint.
- Stenciling on glass like THIS window project requires very little paint and a special touch. We suggest a sponge roller.
- Stenciling metal (such as these metal planters) does not absorb paint, so you will need less.

Stencil all your letters at once so they have a nice, even finish.

Tip: get more out of your stencils by using small sections of them in creative ways.

9. Lift stencil from surface
Remove the stencil once the stenciling is complete.
If you used spray adhesive, lift slowly to avoid damaging the stencil or your surface.
Tip: Tape along one side of the stencil to create a door hinge. This will allow you to lift the stencil to check your work before completely removing it.

10. Wait for paint to dry
Allow paint to feel dry to the touch before using your project.
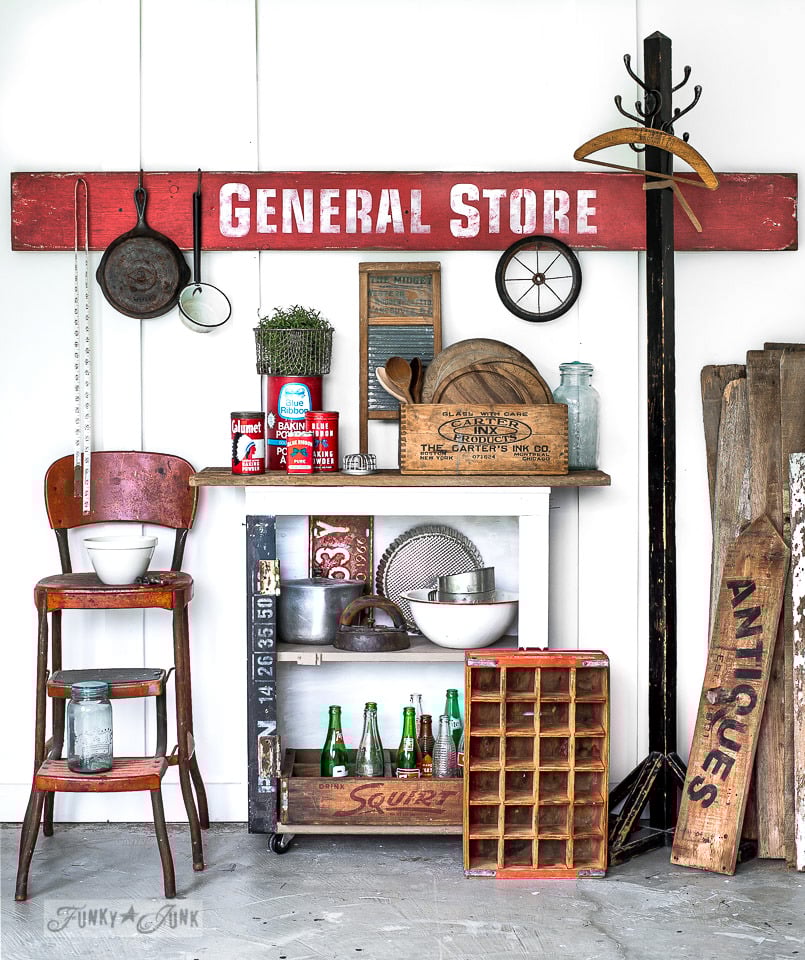
View General Store tutorial HERE
11. How to distress stenciling
Distressing is a way to achieve an older sign look to your stenciling efforts.
- Ensure paint is 100% dry or it will smear.
- Use a variable speed orbital sander set on a very low speed, or hand sand with a sanding sponge.
- Use a higher grit sandpaper so you avoid removing too much paint.
- Gently scuff the surface of the lettering until you achieve the effect you’re after.

12. Clean stencils if desired
Cleaning your stencils is completely optional. I personally don’t clean my stencils. I ensure the cut edges are free of paint buildup, then allow them to dry until they are needed again.
However, many prefer to clean them, especially if they are heavily used for workshop classes. This reduces the paint build up on them.
How to clean stencils
- Soak stencils in soapy water right after using.
- Try using baby wipes to ‘rub’ them clean.
- Simple Green works great!

See how the smallest markings can become the cutest highlights?
Learn how to make the crate HERE


I love my little pallet wood crate paper sorter! Made cuter with a little bit of stenciling of course!
Now that you know how to stencil, what will you tackle?
Other helpful stencil tip posts

Everything you need to know about stenciling – mega post!
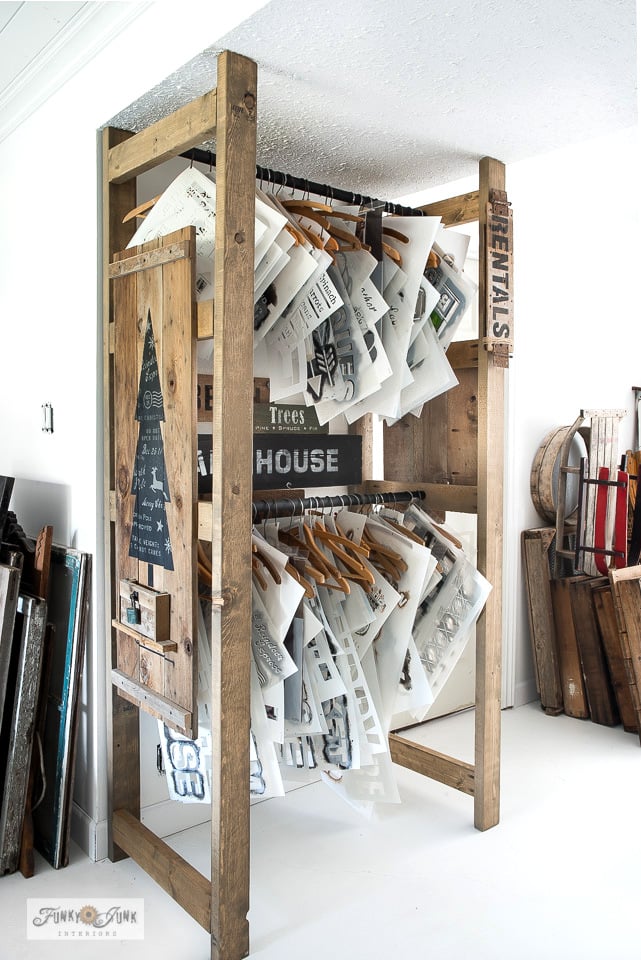
Create this epic stencil storage rack
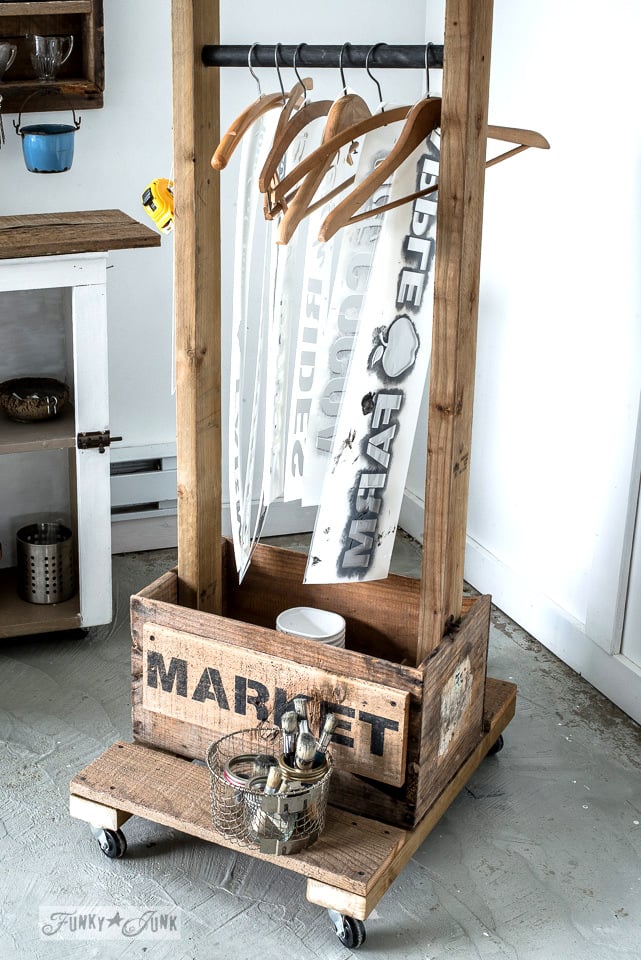
Create a handy, compact stencil storage trolley from an old crate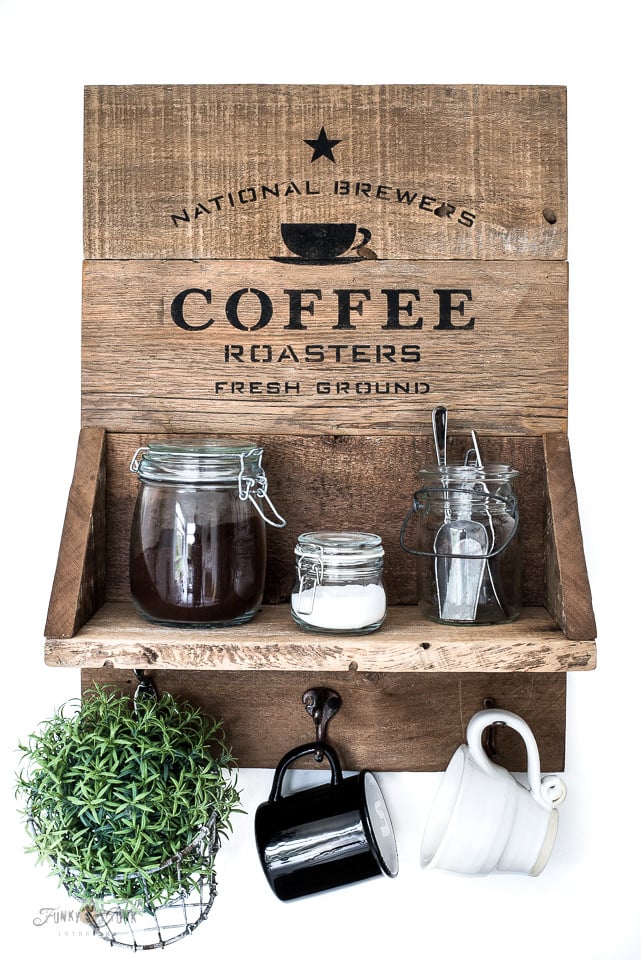
Learn how to stencil old wood signs

View all stencil projects from newest to oldest
Visit stencil store listings for ALL project ideas
![]()
Love the stencils..congrats on your new store; wish you much success.
Stencils are HOT for all types of multimedia art these days. You might want to consider doing some smaller for canvas art..6 x 6 or 12 x 12″ for scrapbookers and other paper artist. It is a different market but your art with wood/junk fits right in.
Thanks for your idea Eloise,I like the idea of some smaller additions for sure. I’ll be adding some letters and numbers at the very least soon! The flavour will always lean towards old signs though so we’ll see where it goes!
Thank you so much for the tutorial! I bought the Farmer’s Market stencil already and was anxious to try it because I do better with instructions. Can’t wait to use it now!
It’s long overdue Ginger, thanks for your patience, and for your purchase! 🙂
Great tutorial. I will definitely use these tips on my next stencil project. Best wishes and good luck with your new stencil store and I can’t wait til your next project with them.
Thanks Tracy! Another one with Route 66 is nearly complete… and it’s VERY funky! Maybe too much… 😀
Yahoo! A funky junk store! I bought two of the stencils previously. Just waiting for some time to try them out. Maybe in the future your store might have some of your creations for sale??? (hint hint – like your toolbox kits or some type of pallet wood kits? (I’m keeping my fingers crossed! LOL) You have definitely been a positive influence in my creativity. Thank you for that. When I go to estate sales or garage sales, I now look for old rusty hardware and banged up abused furniture to use for “projects”. I love the element of recycling and saving the stuff from going to a landfill!
Thanks Sharon!
I know, I thought of selling the kits because not everyone has nor desires to work with saws But I’m still hoping to change that. 🙂
Still brainstorming how to do that, as each one is so different and it would be pretty labour intensive to document each one…
I think I just need to sell a cheap ebook on HOW to do it which would also include video clips. It would be filled with cutting tips and working with tools. Or host a live workshop/webinair.
I just think the value of doing all the work is more valuable than purchasing. 🙂 But don’t worry, I’ve been thinking about it for a long time.
What a beautiful store, Donna. Congratulations.
I love this stencil and your fun box! Great idea to use just part of the stencil, it makes it look like it was once part of a larger sign:-)
Oh, the new stencils are absolutely fantastic…you should be very proud of these, Donna! Many happy congratulations on the expansion of your stencil business, too…I hope it will be wildly successful for you! And these were great stenciling tips, as well…personally, I like that you opted for a quirkier look because it adds to the interest of the piece. I’m looking very forward to seeing the future post which shows us how you made that very cool crate!
Congrats! I love signs and can’t wait to try a couple of your stencils. I like how you mix the font and add character to each one like the tree farm stencil. I was thrilled that the coffee stencil featured Seattle…fav place for us. Thanks for the tips..I’m on the hunt for my pieces of wood and maybe a small table for the coffee stencil.
Thank you soooo much!! I’ve always wanted to know the perfect technique for stenciling, and this tutorial is great. Can’t wait to try it out!
Fantastic!! You are such an awesome woman, and an inspiration to us all. 🙂
WOW!!! I must own them all! But maybe one or two at a time
Will you really release an ebook? If yes, then I can’t wait! WOO HOO!!!!!
We just received our stencils and are anxious to begin creating. Can we use spray paint on them? Have ever tried it?
Thanks!
Hi Cindy! We already spoke via email, but just saw this now. Felt it was a good question to leave up. I have never tried it and my fear would be a fine mist seeping in under the stencil. But if you tried stencil adhesive, that would certainly help.
Let us know how you make out if you go for it! I’d just suggest to do light sweeps, not heavy.
Donna,
I purchased some of your stencils some time back. I love them! They are heavy, and can handle my roughhouse ways! When it comes to cleaning them up, I wash them in water and a soapy brush, but still a film is left behind and maybe a little paint. However it seems to clean up well with alcohol! Looking forward to seeing more stencils!
Sherrie
Thank-you Sherrie! Isn’t the weight of them amazing?! I’ve personally stopped cleaning mine and they work perfectly still. LOL As long as you don’t leave massive clumps of paint on the edges, they are good to go again. But if you can take the time and do it right, absolutely better. I’m working on a Holiday collection as I type…
Hi could I just ask what paint can I use to do stencilling I have a couple of projects to do I would like to finish them Of with a stencil design first project is wood bathroom cabinet and second project is just on a wall but getting confused on what type of paints I can use. Also do I need to use anything over the top to seal it over I am new to all this but going to give it a go please help me kind Regards Tracy x
Hi Tracy! You can use any acrylic craft paint for stenciling. I also like to Fusion Mineral Paint. It’s an acrylic based furniture paint that doesn’t require a top coat. You could seal or topcoat stenciling if you wished, however I never have. Fusion has a product that’s called Tough Coat that works really well!
Hello,
I am loving your stencils! I have a shop in Ohio that I would love to make some signs for using your stencils. Would that be ok?
Also do you know if the spray adhesive does okay on a painted surface versus bare wood?
Warmly,
Melissa
Hi Melissa!
The stencils were designed for anyone to make signs! If you are referencing to sell, you absolutely can sell what you create with them!
I honestly have stopped using spray adhesive myself. I’ve just learned to tape the stencil in place, hold it with my fingers as I go along and use a VERY DRY brush. It works wonderful, and that way you don’t have to worry about the sticky stuff. I didn’t notice any residue from the adhesive, but I’d always test an area out to be sure.
Have fun, and thanks for your interest!
Thanks so much!
Hi, I just got my stencils in the mail. I was wondering, do you ever use a roller to paint the stencils? I have tried it on some and had some luck, and then not so lucky. I think I put too much paint on. but it is so much faster. LOVE my new garden stencils! thank you!
Hi Mary!
I have only personally used a roller when stencilling on glass. I myself prefer to use a brush. A little trick you could try would be to wet the bristles of your brush, dry, then load with paint, and ‘swirl’ your brush instead of tap. It gives a nice smooth finish! Just be very careful to remove most of the paint off your brush again. That’s the key to super sharp lines.
Thank you for purchasing the garden stencils! I hope you have a blast creating with them!
I am an avid *junkie* too! I LOVE dumpster diving or finding things that folks consider *trash* and remake it into something fabulous. It is so. very. addictive!
I just discovered this site.. It looks like it’s right up my alley! I’m now a subscriber and look forward to reading your current and future posts.
Thank you! 🙂
If you are doing a large Mandela piece (18 inch.) with several different colors, do you leave the stencil in place until It’s done or do you lift and replace as each color grouping dries
Hi Kenna! I’d suggest to leave the stencil in place. If your brush is super dry to the touch with paint loaded, it should be ok!
fantastic instructions….best I’ve read yet. Gotta’ try this. Thank you!
I loved your blog on how to stencil. I picked up some pallet art boxes on clearance and I want to repaint and stencil over that. what do recommend how to start. If I sand them it becomes smooth and loses it rough pallet look. Should I use primer and then repaint, which primer would you recomment?
Hi Namy!
I personally leave the wood natural and rustic myself. A light sanding just to remove the splinters is all a sign really needs.
If you wish to use primer and paint you can, however it doesn’t generally last that long outdoors if the wood is already aged. Indoors would be fine.
You’ll also want to figure out what kind of paint is on the boxes already, oil or latex? Your primer will work according to that. If latex, you may not even require a primer, just paint.
Have fun!
Hello? Thank you for all the awesome tips and ideas!
I have never stenciled before and would really like to learn, my question is probably gonna sound really stupid but I have to ask! I’m confused on the paint, some pics it looks like powder??♀️ And if it’s actual wet paint, how is it gonna be dry to the touch after dipping?
Also What do you put the paint in, like a cup or something? Thank you!
Hi Reisha!
When you load the brush with paint, you can off-load most of the paint by using a rag. Once it ‘feels’ dry to the touch, your brush is ready to stencil.
I use mainly liquid paint so I’m unsure about the powder comment. The effect it leaves or the paint itself?
Milk paint comes in powder form that you add water to.
I pour the paint into a shallow container or onto a flat surface so it’s easier to grab just a little at a time.
I have plenty of video tutorials that you’ll learn lots from! Visit them at:
https://www.funkyjunkinteriors.net/video-tutorials-stencil-projects