
Have I ever shared with you that I’m not really a green thumb?
I think I have.. yes… in this faux plants fireplace spring mantel decorating post. Taking that concept one step beyond, I decided to create a little green and message with this inspiring moss topiaries in a crate idea using Michaels craft supplies once again.
I realize one of these is not a topiary but let’s just pretend it is for the sake of a shorter blog title. 🙂

It’s my belief that if we do a little growing each day, we will just become that much more successful in every possible way, because we’re simply armed with more to offer.
Armed with Michaels crafts once again, let’s create!

How to make Inspiring Moss Topiaries in a Crate
You’ll need:
Clay pots
A crate
Chalkboard tags
Plants
Moss
Styrofoam shapes
Dowels
Brown and white craft paint
Syrofoam filler for pots
Twine
A drill, palm sander and glue gun

1. Water down dark brown acrylic craft paint, then brush on the clay pot in smooth strokes.
Work very quickly because it’ll dry nearly instantly.

2. For added detail, flick paint from the brush, like you’re washing a toothbrush with your finger, splattering paint all over the pot.

3. Cut a chunk of styrofoam to fit inside the clay pot. I used a bread knife… worked great!

4. Drill a hole into the centre of the styrofoam, add hot glue, then insert dowel.

Add more glue on top for good measure and allow to set. Also glue the bottom of the styrofoam to the inside of the clay pot.

5. Stuff the inside of the pot with a plastic bag or other filler.

Do the same steps to a plant like this too, except no need to drill.

6. Hot glue moss into place on top of the filler inside pot.
This bag of mixed moss is so cool! You can get different looks depending which moss you choose.

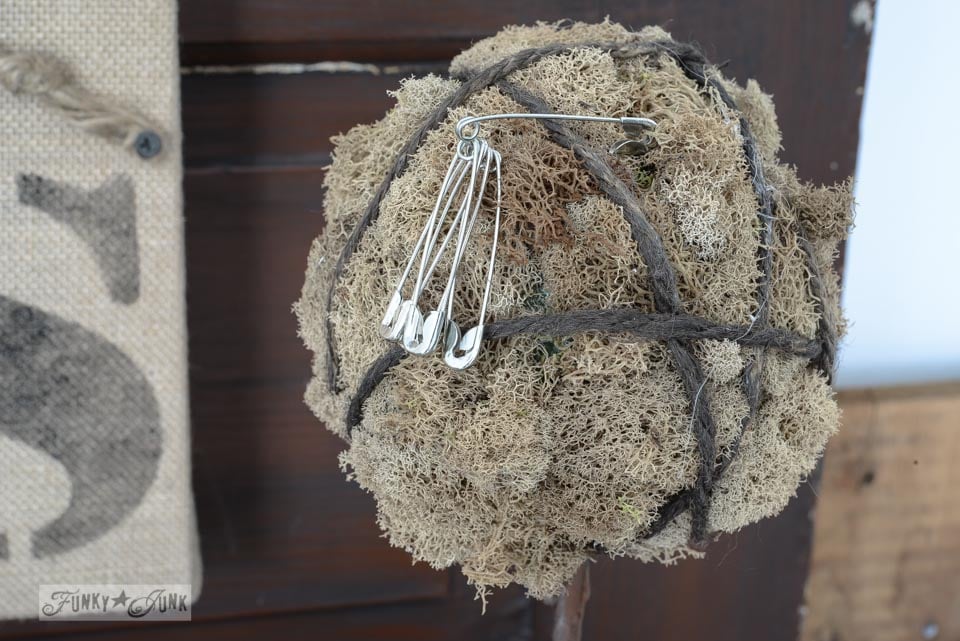
7. For both the ball and cone topiaries, drizzle hot glue on the styrofoam form, then stick on moss. For the cone, mostly green moss was used with a little brown.
The cone fit perfectly into the pot. No hot glue was needed but you could anyway.
Fun fact: when the hot glue hits the green, you’ll hear a crackling sound like milk over rice crispies! Yes, it was worth mentioning. 🙂

8. For the moss ball, paint twine in your dark brown wash you used for the pot, then wind around the ball once dry.

9. To make the dowel look more like bark, hot glue was drizzled onto the sides, then painted once dry.

To see how this little crate was aged and handles put on, visit THIS post.

10. Paint the chalkboard tags in white around the chalk, and use the dark brown pot wash for the stems. Write on the tags, stick in pots, insert plants in crate and play with your new creation!

I just KNEW they’d look awesome in that bathroom window!

These little inspiring moss topiaries in a crate look mighty comfy in the bathroom… and it’s rather a nice way to encourage a good start to each day, don’t you think?
p.s. Best part? Not only will I hopefully never die inside because I’ll be working on that inspiring message, neither will they! 🙂
I’ll be taking this project with me to the Michaels Hometalk Pinterest Event on Sunday demoing some steps. Wanna make one? Come on down!
Click below to visit all my crafts!

Antique mason jar crate display / distressing mason jar rims and aging a crate

Burlap yard stick message centre / Burlap notes, mason jar organizer, yardstick organizer

Inspiring topiaries in a crate / creating topiaries, aging clay pots


Disclosure / I have partnered with Michaels and Hometalk, but all ideas and opinions are my own.
You had me fooled with the Rosemary. I thought it was real, my friend. Cute craft. Love the tote – crate.
It’s Rosemary?! How cool! We both learned something today! 🙂 Thanks Holly!
These turned out so cute Donna!
Thanks Tammy! I’m a little excited that they can’t get browner than the brown moss… I’m loving my no water plants just fine! 🙂
These are the cutest! Thanks for sharing!
Cute Donna! Great way to welcome a bit of Spring. Even if it’s only indoors. lol!
hugs,
Jann
Thanks Jan! I’ll take anything, even if it’s only on one window sill!
You always come up with something so cute to make.
Thanx Joanne
Thanks Joanne! These were a first for sure. LOVE that moss!
Donna,
I have to laugh because every time I browse through my Bloglovin’ feed, your projects always catch my eye first! I love this, it is adorable, and I’m thinking one on the kitchen window would be perfect,as the view to my neighbor’s back yard shed is not nearly as inspiring. Thanks for sharing!
Cori
Haha! Too funny! Does that mean I ought to shake up my style a little? Too predictable perhaps? That will never do! 😀
Oh there is that gorgeous bathroom…and “the topiaries in a crate” look great in the window…Now, I am with ya as far as the green thumb thing…I will take a great moss topiary over a real one…I always hate it when my “real” ivy topiaries croak and not for lack of care!..Now if I can only find a great faux fiddle leaf fig I would be very happy!..Thanks for the tutorials Donna!..Have fun at the Hometalk/Michaels event!!
Donna, I absolutely love your blog! Where did you get the plants and moss? I always have a hard time finding fake plants that look real, and these look so good!
Thank you for sharing this great idea! You are very talented =)
Sincerely,
Alex
Hey Alex! Sorry I didn’t make that clearer in the post. These are all craft supplies from Michaels! Will go tweak my post now. 🙂 And thank-you!
I love this and I happen to have all the materials on hand!! I think I might be making one this weekend. Pinned and ready to go.
Hi there, every time i used to check webpage posts here early in the dawn, because i like to gain knowledge of more and more.