
Make this $7.00 burlap coffee bean bag window treatment
I love coffee bean sacks! Not only is the burlap perfectly rustic, the added stamped graphics give them the ability to turn something ho hum into art.
There’s a bank of 3 windows in the kitchen I thought could use some warming up.
So after I landed a certain burlap coffee bean bag from a local coffee roaster, my brainstorm kicked in. Faux window roll shades (that are really window valances) could be an amazing rustic kitchen window treatment!
They’d add just enough warmth to make an impact, but wouldn’t ever be in the way.

And here’s how they turned out! Aren’t they fun? And they couldn’t be easier to make!
Here’s how!
Make this $7.00 burlap coffee bean bag
window treatment
.
This post contains some affiliate links in which I earn a small percentage if you purchase anything through these links, at no extra cost to you. Thank-you for helping to support my blog!
Supplies I used:
.
2 closet dowel brackets per window
wooden closet dowel (1 per window)
cut up coffee bean sacks (found mine for $1@ from a local coffee roaster!)
liner fabric (close colour to burlap)

View Organic Coffee stencil HERE
Stencils to help achieve this look:
.
Don’t have any authentic burlap bean sacks on hand? You can make your own! Purchase some burlap material (or land a price efficient burlap sand bag), and stencil the images using these various stencils:
Organic Coffee (bean sack stencil design)
Visit all Funky Junk’s Old Sign Stencils HERE for other cool variations
How-to:
.


Cut dowels to size
.
1. Cut a wooden closet dowel just short of the full width of your window. You’ll need 1 dowel per burlap coffee bean bag window treatment.


2. Gather up a drill, drill bits (for pre-drilling and screwing) and 2 closet dowel brackets.

Installing closet dowels
.
3. Hold up the closet dowel bracket at desired position, then pencil in the hole.
Position the bracket closer towards the front of the window as shown in the picture.
Remove bracket, then pre-drill a hole.
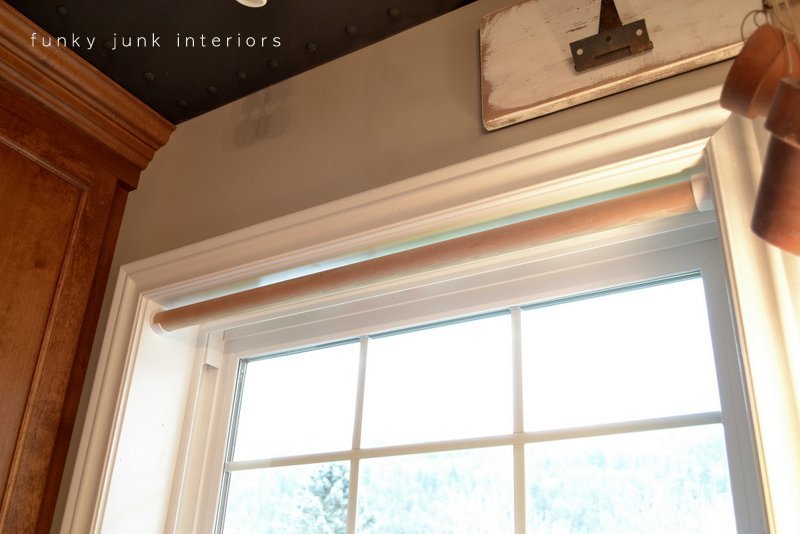
4. Screw in 2 brackets per window, then mount the closet dowel into place.
Easy!


Attach burlap bean sack to dowel
.
5. Remove the wooden closet dowel and lay it across a coffee bean sack. Cut the sack to the width of the dowel.
I used 1/2 a sack per shade, however you can add more fabric to yours if you wish for them to hang lower than a typical valance.

6. Slightly fray all four edges.

7. Cut a liner of some sort for a backing.
The burlap coffee bean bag window treatment is very transparent as-is, so if you wish for the graphics to show up, a liner does the trick. I used a linen material from my stash that was a burlap-like colour.

Add liner with hot glue
.
8. Hot glue the liner to the burlap just along the top edge, so the two will roll into each other smoothly without bunching up.
If you find the liner won’t sit flat with the burlap, you could use glue along all 4 edges if desired.
Don’t overdo the glue or it will seep through the materials.

Attaching closet dowel to window treatment
.
9. Flip fabric with liner to right side facing down. Run a bead of hot glue along the top edge of the fabric, then stick it to the dowel.

10. Roll until material meets material, and then adjust to length of hanging fabric desired.
You could run another glue bead at the end sticking point as well if desired, but I didn’t need to.

The finished window treatment shades!
.
11. Hang up the shade and you have yourself some pretty cute burlap coffee bean bag window treatments!
If you are finding that the blinds want to unroll, here’s how to stop that:
- predrill a small hole into the side of one closet bracket
- insert a screw that punctures the bracket until it reaches the dowel


I added a few junky trinkets as pulls just for fun!


Then add a few green faux plants for a no upkeep window area and…
…go decorate the rest of the kitchen to work with your new windows of course. I’m on it. 🙂
Think you’ll try a few?!
Other funky window treatments you may appreciate:
.

How to DIY a wooden screen for challenging windows

How to create a farmhouse window with stock lumber!

Create easy wooden gate window screens

Learn how to make pipe curtain rods with sheet curtains!
Visit all my window treatment posts HERE
They look wonderful in your kitchen…wonderful with the decor…so smart
This is such a great idea……
My mind is racing with ideas about what I can transform around here with coffee bean sacks……
Today I actually recovered my Coastal Style Cane Barstool cushions with cool teatowels……$4.00. I’m still smiling ;o)
Tania xx
Scandi Coast Home Australia
Thank look great Donna! Thrifty and full of charm, my favorite!
xo Becca
What a cute idea! I’ve got a coffee shop in mind that I’m gonna ask them if they’d be willing to donate their sacks to me. Fingers crossed.
Michael
Fabulous…I really like the hanging trinkets!! So cool!!
Hugs
SUeAnn
You are so wonderfully resourceful! They look marvellous. Well done.
Di
X
Great idea Donna. They really look fabulous in your kitchen. Love the little trinkets hanging from them. Great job.
Hugs, Deb
Very nice & incredibly easy! xo wendy
Love them, Donna! They have a warm, rustic look and the lettering really steps it up a notch. I’ve got a stash of old seed bags that will hopefully become my kitchen curtains, as soon I get a new window in my kitchen that is getting very slowwwwly remodeled.
Blessings,
Angie @ Knick of Time
Love the dowel idea and you could do that with any fabric. The grainsacks are perfect for your home.
Great idea again Donna! This one will be viral too I’m sure! I love it and if you don’t have real coffee bags I’m sure you could replicate the same kind of thing on burlap with stencils! I really like the idea that they don’t roll down, a great valance!
Susan
Homeroad
great idea – especially using the closet pole bracket for hanging – they look perfect in your space!
Looks Fabulous. I actually tried this in my kitchen… had them hanging @ Christmas time, but mine did not iron out well & didn’t hang as straight. Another great job by Donna! Blessings!
Great idea. Love this!
I LOVE this Donna! And your junky “trinkets” are the perfect touch 🙂 Laurel
Oh my gosh Donna I am pretty much in love with your shades! They are sooooo cool! I also love how you have decorated your window area ~ It is beautiful!
Those are too cute! The trinkets and the plants and the sign…. all of it!
Have a great week.
These look terrific!
Love the rustic accent the window treatments add to your kitchen!
Great idea. Please let us know how they hold up to the rolling! Also, my experience with coffee bean burlap bags is that they have a strong burlap and oil, not to mention coffee, odor. How did you handle this issue?
Hey Jennair,
These are ‘dummy’ panels and just stay as shown. (I don’t require privacy in this area of my home) And for some reason, this burlap had no odor to it. Guess I lucked out this round because I know exactly what you mean!
I love the burlap idea for a window shade. And I also LOVE the tanish paint you used in the kitchen. Do you recall the color/brand??
Thank you!! helloimbarb@gmail.com
Hey Barb!
The colour is a really nice neutral mocha, called Bamboo Beach by Cloverdale Paint in Canada. It’s the perfect undertone… not green or pink, just a nice clean brown. Goes on strange when wet and dries to perfection. Looks darker in smaller rooms, lighter in larger. This colour is throughout my entire home.
Adore-ably rustic! They look great in your windows, Donna! The perfect spot. Been working with burlap and coffee bean sacks a lot lately but have yet to make any window treatments. I’d really like to try it! Thanks for the how-to as well. Great instructions.
Those are beautiful!!! And you can use any type of scrap fabrics that might be laying around, too!!!!!!!! *cuz I might have some!
Donna, those tutorials are the neatest and easiest to see and understand! Thank you, from a seriously visual learner!!!
I’m sharing this with everyone!!!
xo
~K
Those are cute, pinning them, and who knows maybe they will be my next magazine copy cat challenge!
~Bliss~
OMG these are seriously amazing! I swear this is EXACTLY how I dream of my kitchen looking!! And you make the project simple and easy! Love the curtains!
What an awesome idea, Donna! I LOVE these! Thanks for the tutorial!
sandraallen260@centurytel.net
Absolutely, awesome!!! Just the right touch.
Love’em! Goes great with your kitchen!!
Love the Sack Curtains. I have a question about the Tin on the ceiling….What color is that painted and how did you do it with the tin and attachment to the ceiling? What products are used? Looks awesome…..Great Job.
Anastasia
Hey Anastasia, the black ceiling pieces are MDF painted out black. The rivits are wood plugs. The works was screwed into place. The concept was dreamed up by artist friend Dan Sawatzky at ImaginagionCorporation.com in order to hide ceiling damage from removed cupboard headers. Pretty sneaky! 🙂
Such a great idea and it looks so perfect in your kitchen – thanks for sharing!
Wow! those are so cute! My inspirational wheels are turning! Thanks.
Absolutely love those!
Great look Donna. Well done.
Audrey Z. @ Timeless Treasures.
I love these Donna! Great tutorial also, I could use some new window treatments in the kitchen too! thanks, t.xoxoxo
I saw someone pinned this on pinterest today and HAD to make one for myself because I already had the items on hand! Thanks for such a great idea and tutorial!
http://thebaezablog.blogspot.com/2012/04/coffee-sack-shade.html
Another one of your awesome ideas. These look so good on your row of three windows. Thanks for the easy to follow tutorial.
Perfect for your coffee lovin’ self! Great, no-sew valances! 🙂
Your windows look so nice..
I love the idea and you didn’t have to sew them..
They are so cute! You amaze me! Thank you for the turorial also. lin
They look great Donna and so stinkin’ easy ~ you are brilliant once again ~ but you already know that I love ya!
Great invention! Another unique idea from you. It has already been repined 190 times. What number makes it officially viral? Ann
Love! they look perfect…as if they were meant to be right where ya put them.
Now aren’t you clever!…..well done
very cool!! (of course!) =)
sweet blessings
barbara jean
WOW! This looks freakin amazing!! Seriously LOVE it!!
Your newest follower,
Samm
http://www.LittleHouseintheBigD.com
That looks fantastic, Donna. Perfect for your decor. Any no sew project is tops with me.
Cute, cute, love them!
Hugs,
Jann
Thanks for the tip on the liner! Yours look fabulous, Marcia
Wow! Great idea! Most of our huge pottery (at my job) come wrapped in burlap bags and they are everywhere in our back room. I should ask for a couple and try this myself! I love burlap as it reminds me of younger days when my parents worked at the local chocolate factory and my dad would bring home cocoa shells to mulch our garden and we always had the smell of cocoa from the burlap bags as well as the garden especially after it rained. As a matter of fact, when my dad retired, the president of the company gave him a dry cleaned burlap cocoa bean bag (you can still smell the cocoa) and my mom just gave it to me. Although I am using that for another project or two, I will have to inquire at work about the others. Your blog inspires me so much and I have “borrowed” many an idea from you….you are so very creative and I check everyday to see what you are up too! Thank you!
Great idea, and just perfect for your kitchen. I hope you enter it in some contests or magazines, because I sense some more awards in your future.
Thanks Julie! This means a lot coming from a real builder. 🙂
Another winner! Love them.
Donna– love the curtains.
Loved the post. Good job showing off your mad-driver-skills.
Way to get a handle on the lingo…
This is a cute way to get a nice impact with very little money!
Loved it.
~Pat
They look great! They fit perfectly with your other decor.I love your unique handmade style. Michele
These are adorable! I love them and I want them..I don’t even have windows in my kitchen (thanks to apartment living) but I can assure you when I do I will be making these! I also love the farmers market sign! Too cute!
I am in love I really want to make these for my sunroom. Thanks so much for sharing!
My post magically disappeared as I scrolled down the page. Fun times.
Cute idea for the sacks!
I recently came into possession of three coffee bean bags for free (from a local coffee roaster). I’ve got a lot of ideas on how to use them, including making a mannequin for photographing my jewelry.
Thanks for sharing this. 🙂
I love it! I’m a total junk decorator too!
LOVE!!! and pinning and now adding ‘coffee bags’ to my list. Thank you for sharing the tutorial.
I am having a hard time finding cheap coffee sacks 🙁 any ideas? Does the place you bought yours from ship them?! Thanks,
a girl who just wants coffee sacks!!
I’m not certain if they ship. You could try emailing them at: backporch@shaw.ca
Great idea and one I’m hoping to steal, I mean, copy myself. Excuse me for asking a dumb guy question but for a liner, would pretty much anything work like a old t-shirt or pillow case or does it need to be something else? Really liking this site!!
Hey Doug, I’d think anything that would be close to the same colour as the sack itself would be perfect. The liner is basically there to avoid the light penetrating through the somewhat transparent burlap. And… thank-you!
Where have you been all my life?! Your blog is amazing – it’s so refreshing to find a blog that isn’t all crisp & white… my style is identical to yours, and I’m so excited to have found you!!! I absolutely love the curtains, they actually make me giddy… thanks for the tut!
Tabitha, I’ll probably be the last one on earth that doesn’t have a white kitchen. 🙂 I truly like my stuff very woodsy and rustic… nice to have found someone with similar taste! 🙂
love this idea! where do you suggest getting that kind of burlap fabric..not every fabric store sells burlap right? p.s. i live in canada
Those are absolutely awesome. I love them. I think I may have to expand on the idea and purchase some of the roll up shades as we do get a lot of sun in the evening. Those are so cool. Where did you find the great coffee sacks?
Donna,
Thanks for the great DIY! I’ve been wanting to make some shades doe my, odd sized, windows. Now, I know just what to do!
JP
I just love these and you blog also, I will be selling some coffee sacks in my Etsy shop soon and will direct anyone who is thinking of buying them to this great page for inspiration, if that’s OK with you?
Love it.
Mary
That would be fabulous, Mary! Thank-you!
I love this SO MUCH!!! Now, to find a new house with windows in the kitchen… 😉
Absolutely adorable! I think it’s time to change up my red gingham valances. These will be just the perfect update. I just found your blog…such a happy day! Anxious to spend some time looking back to see what I’ve been missing. Thanks so much for sharing.
Welcome Nancy! Glad you like them! They are certainly a little different!
Those shades look fantastic!! I have a 40 yr old home that has rustic wood paneling in the den. It is a light honey color. I’m thinking these shades would be perfect on my windows on one wall. They are three large windows.
We are thinking of selling our home, and I think this would be a real “enhancement” to the out-dated paneling. I dont want to go to the expense of tearing this out, when I could actually work with this issue!
Thanx for your ideas! I love your creative passion!!
Thanx again!!
Joy Privett
770-480-4199
I love this! May you please tell me what your wall color is? Having a very hard time finding one we like
Hi Tiff! It’s called Bamboo Beach by Cloverdale Paint in Canada. It’s the PERFECT soft mocha tone, with no pink nor green undertones. Just crisp and perfect and goes with anything. It looks even more beautiful at half strength, which I’m going to slowly change over to. If you visit my most recent bathroom redo, it’ll show you what that looks like. Thank-you!
…I always have been and allways will be a fan of your kitchen windows…now you just put it over the top!
Love this idea! I am making a few changes in our rustic kitchen and love your paint color…do you know what color and brand it is?
Hi Misty!
It’s called Bamboo Beach, by Cloverdale Paint in Canada. 🙂 Glad you like it! I’m actually in the process of lightening it up to ¼ strength. More on that soon!
I absolutely love this, my favorite thing however is that ceiling! What is the Black trim around the ceiling?
Hi Pam! A header use to run around the kitchen ceiling that was removed when it was renovated. That left holes in the ceiling, so some mdf was cut to resemble metal, then screwed over top of the damage. 🙂 Glad you like it!
Where can I buy these bean bags, been wanting to do this to my windows forever now. Love your idea, but I can’t ever find where to purchase the bags. Any help or where to buy them would be greatly appreciated ? Thank you
Hi Denise! I’d try looking for a local coffee roaster in your area, or Amazon. Hope you find some!
Thank you just seen your message
Love the kitchen look.
Question Where do you get the coffee bean sack for that cheap?
Love your ideas! Thanks!
I LOVE these coffee bean burlap valances. Can you tell me where I can find this burlap with this writing on it? I want to do the same thing. Thanks.
Hi Linda! I’d suggest to check coffee places that roast coffee near you. Should that fail, antique shops or flea markets would be next. There’s always lots on eBay too. Hope you find some!
Where can I find a large enough size coffee sack from ?
Hi Ashley, I’d suggest to check out a coffee roaster local to your area, or try eBay. 🙂 Hope you find some!
I love this. I am in the process of making this shade and I’m wondering if you washed them? My sacks are shedding and I am not sure what to do with it. Any suggestions on how to prep the burlap? Thanks for your creativity, love love love your windows.
Hi there! I didn’t wash mine. If you did, you may wish to hand wash and hang dry. I didn’t prep the burlap with anything and just dusted them from time to time. Being valances in a kitchen helped to keep them clean.
Perfectly imperfect! I swear I could happily live forever in your kitchen – simply beautiful.
Where did you get you burlap?
The burlap was from coffee bean bags purchased from a local coffee roaster. Or you can purchase burlap new from fabric stores.
Oh my gosh! I couldn’t love this more Donna, and the junky pulls. Perfect!