Learn how to make the cutest, affordable wood Christmas ornaments from scrap wood in two styles! Includes Buffalo Checked presents and wood slice snowflakes. Includes a helpful video teaching you how to stencil a Buffalo Check pattern to any surface.

Once again, I was desiring a whole new look for this year’s Christmas tree.
But have you noticed how expensive purchasing all new Christmas ornaments can be? Collecting the odd special ornament is affordable of course, however if you desire to fill your tree with an all new look, that can really add up to a big price!
I’ve made plenty of unique and affordable Christmas ornaments in the past you can see HERE
However once again, I was desiring a whole new look while saving some money. So it was time to head to my own workshop to see what new ornament idea I could come up with this round.

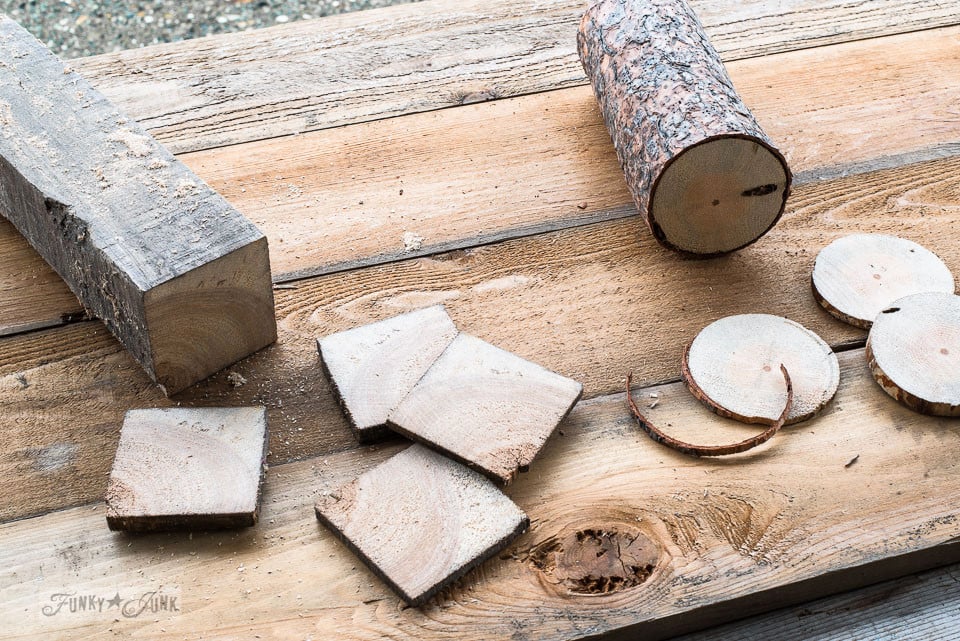
Making ornaments with a square post and fire log
Reclaimed wood is always plentiful and a great starting point for Christmas ornaments! And free since I had some firewood and a square post on hand. They were sized nicely to become potential wood ornaments, so it was worth a try!
Plus, I’d get two kinds of wood Christmas decorations, thanks to the two different shapes of wood!
However I needed a little extra help with a couple of super universal Christmas stencils to get the desired look I was going for. Which makes what I did super easy to copy!
As for the outcome? They turned out adorable, and were so easy to make! Plus, thanks to the natural edges of the wood, they have a true homespun look which I love.
Plus they’d make great gifts too, with a little farmhouse charm thrown in for good measure.
Desire a fresh, new look for your Christmas tree this year too? Here’s how you too can make these easy and affordable holiday ornaments in a quick afternoon!
Here’s the tutorial:
Buffalo Check and snowflake wood Christmas ornaments made from scrap wood!
Supplies you’ll need:
Any desired stencil design you may have on hand might do, however these are the stencils I used:
Buffalo Check stencil from HERE
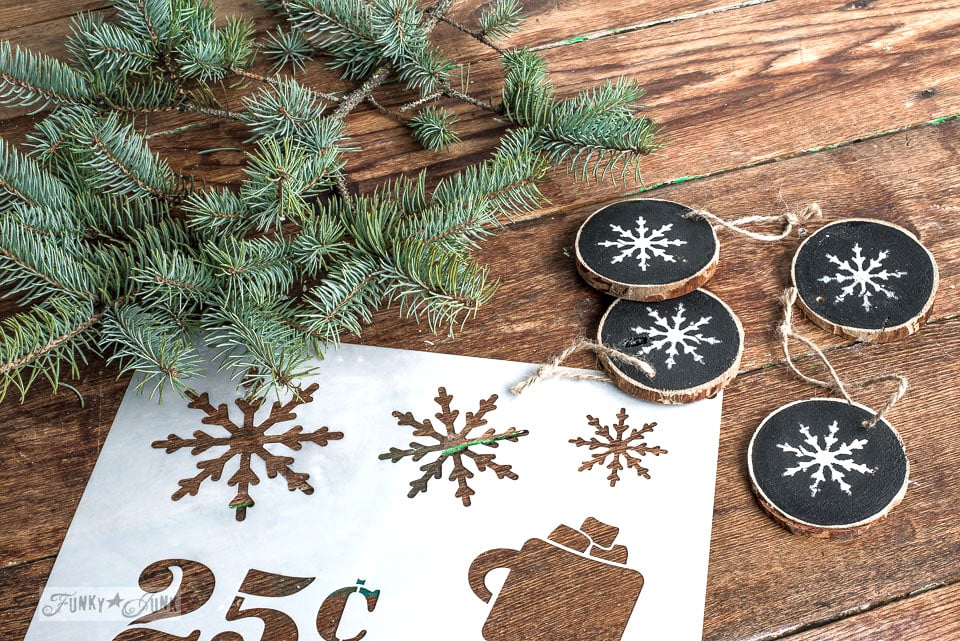
Winter Graphics stencil from HERE
Firewood log with bark on it
Squarish small post – about 3″ x 3″
Or purchase plain square wood ornaments HERE
Fusion Mineral Paint (get10% off all products)
Slightly wider artist paint brush
Cordless drill bit to create holes
Wood slice snowflake ornaments
1. Using a mitre saw, cut slices from a wood log about .25″ thick.
I’d suggest to choose the straightest wood log you have, so it can be secured into your mitre saw easier before cutting.
You could also pick up some wood round slices HERE
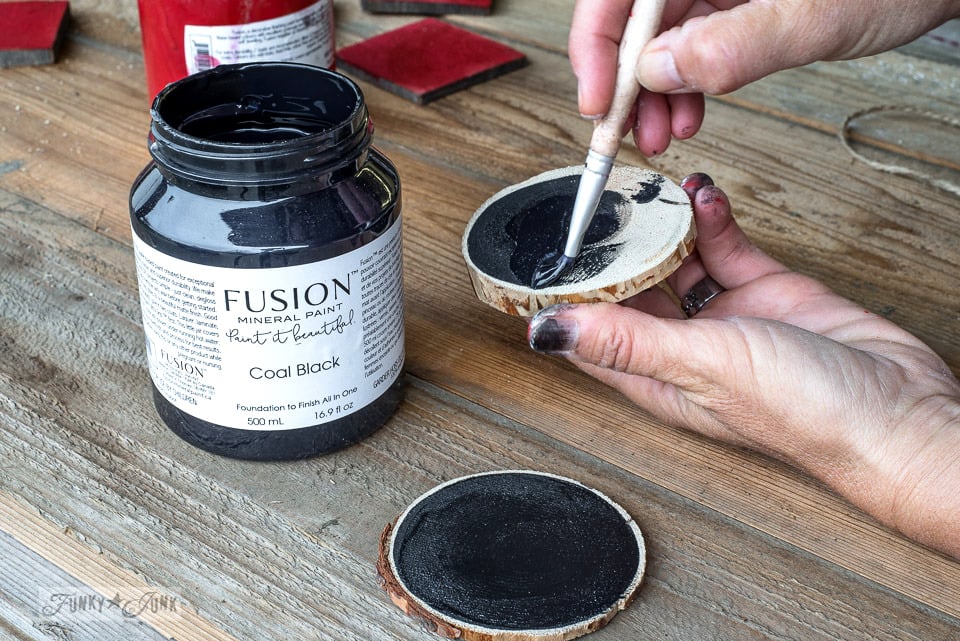
Painting the wood slices black
2. Using a slightly wider artist brush, paint the inside of the wood rounds in Coal Black.
Be careful to miss painting that gorgeous wood bark! That’s the part that makes them so woodland-like!
Tip: I found not painting right to the edge of the bark looked better. Just keep a wet brush as you move around the edges to achieve sharp paint lines.

Winter Graphics stencil from HERE
Stenciling snowflakes on the ornaments
3. Position the smallest snowflake in the Winter Graphics stencil in the middle of the wood round.
This stencil was designed to offer some unique elements to Christmas directional signs you can see done up HERE. However the images are so universal, you can use them most anywhere.
4. Stencil with Fusion’s Casement.
How to stencil for sharp results with no paint bleed:
- Load stencil brush with paint.
- Remove most paint onto a rag until your brush feels dry.
- Tap or swirl paint through stencil until desired outcome is achieved.
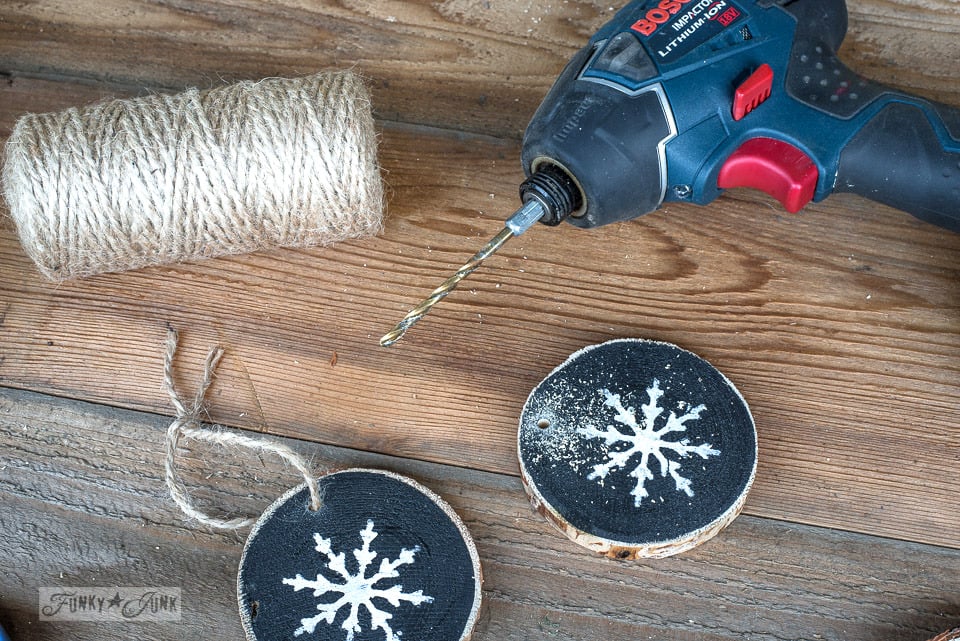
Hanging the ornaments
5. Drill a small hole into the top of each wood round ornament, then thread some thin twine through the hole. Create a knot at the end.
Tip: For the ornament to hang facing out (as opposed to sideways), tie a double knot against the ornament right after threading through, then leave a hanging gap, closing it up with a final knot.
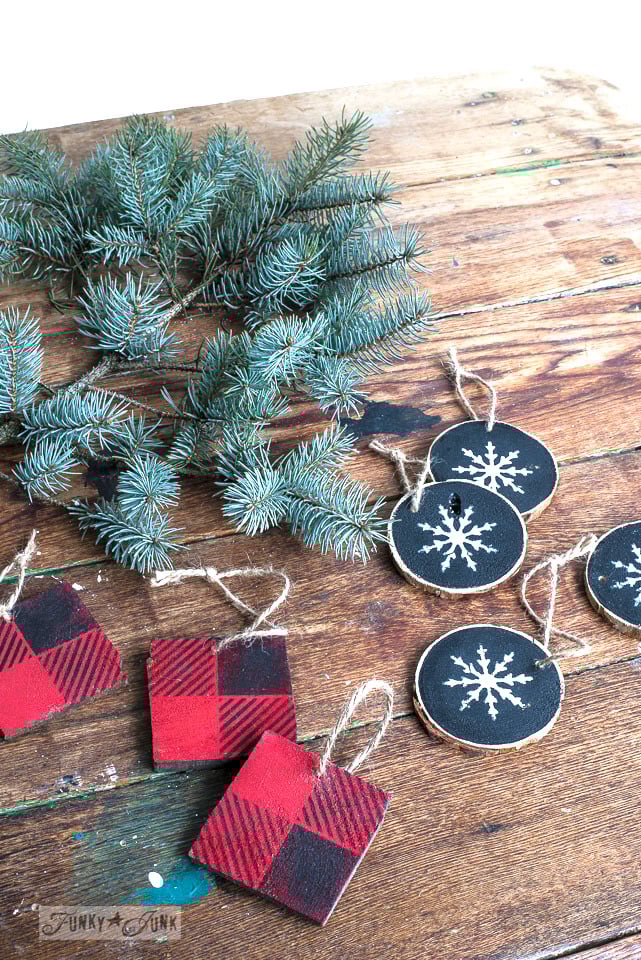
The finished wood round snowflake ornaments
Instant snowflake ornaments! Aren’t they cute?! The black backdrop resembles a mini chalk board that really makes the white snowflakes pop!
And you just can’t beat the homespun vibe thanks to the natural woodsy shapes! Yet they look professionally done.
Let’s make some cute cabin-styled Buffalo Check ornaments next!

Buffalo Check stencil from HERE
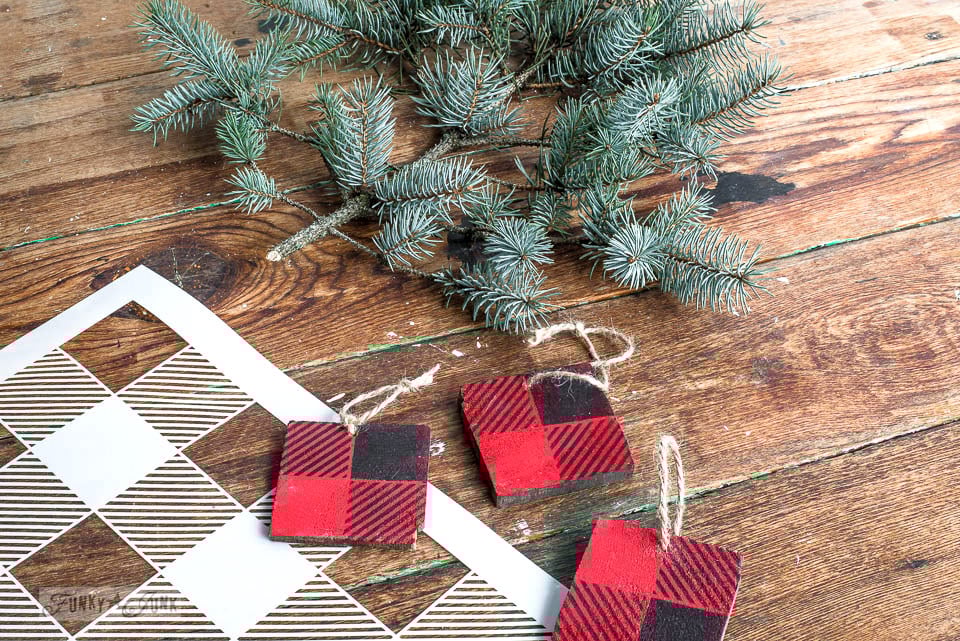
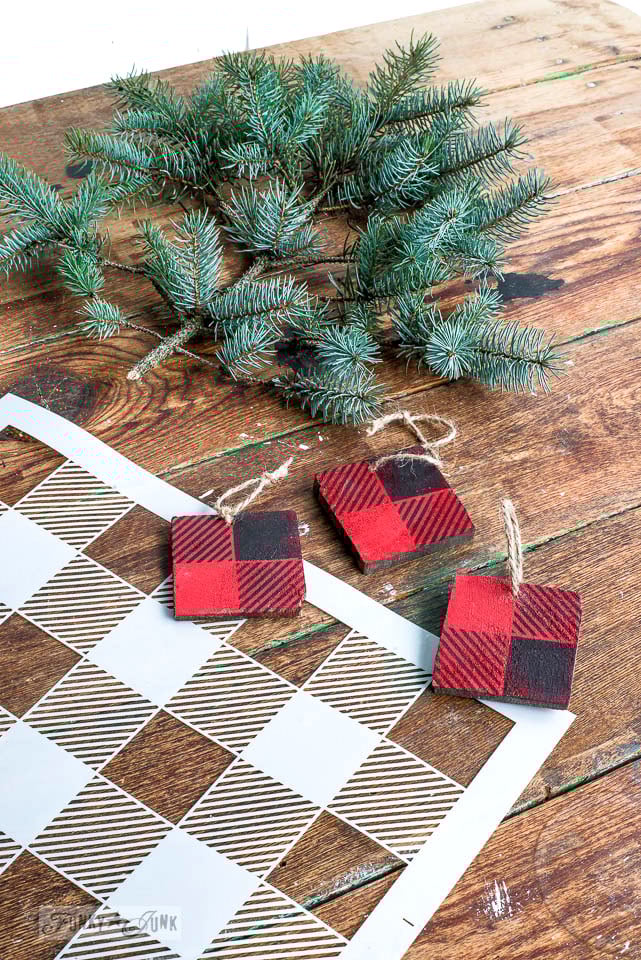
Buffalo Check ornaments – quilt squares or presents
1. Cut slices out of a 3″ x 3″ square post to about .25″ thick.
Or pick up some plain square wood ornaments HERE
2. Paint with Fusion Mineral Paint in Fort York Red.
3. Position the Buffalo Check stencil over the ornaments so the middle of 4 squares lands in the centre of the wood piece.
So you’ll end up with 2 thin lined squares, one solid square and one blocked out square. This will create the Buffalo Plaid pattern we all know and love.
4. Stencil the Buffalo Check pattern with Fusion’s Coal Black.
Tips to stenciling Buffalo Check:
- Stencil the solid square first, to offload the brush moreso. Dry is better for the next step.
- Swipe the stencil brush in the direction of the little lines.
Video tutorial: How to stencil any surface with Buffalo Check
.
View the short video above to see how to stencil a buffalo check pattern on any kind of surface desired!
Learn more at: How to stencil a Buffalo Check pattern to anything HERE
Hanging the ornaments
5. Drill holes in each square, then thread twine through to hang.
So cute and easy! They resemble cozy quilt squares! Here’s one more idea to try…
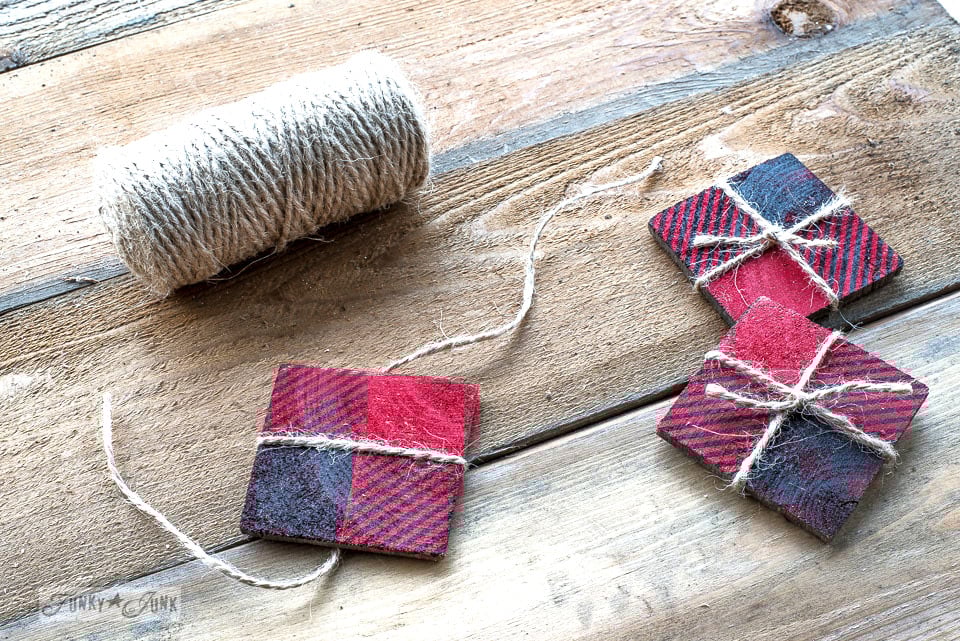
How to get a wrapped present look
Wrap each square ornament with twine like present ribbon.
- start the twine across the front
- wrap towards back
- cross over in the back and bring the twine forward again
- knot to secure
Drill a hole in a corner or where desired, then thread through the twine for hanging.
I decided to have them resemble little quilt squares because I felt…

…they looked cute mixed together! So simpler was better for now.
Both ornaments mixed together
Now that we’re all stocked with adorable wooden ornaments in abundance, let’s hang them on a tree!

The finished ornaments on a mini Christmas tree
I first grabbed a smaller faux Christmas tree I had on hand. Just a few of the snowflake and Buffalo Checked ornaments were enough.
Super cute! But since I had so many handmade ornaments, let’s give some a new home on a bigger tree too.
Get the look:

Antiques crate Christmas tree skirt
Here’s the wood slice snowflake ornaments hanging from this larger Christmas tree tucked in an antique crate tree skirt! I love how the black chimes in with the black Antiques crate tree skirt.
Other ways to display wood Christmas ornaments:
- decorate an evergreen garland
- hang from a wood branch
- place on small hooks throughout the house
- attach to gifts as part of the gift wrap
- creates the perfect gift
- hang them in wreaths
- display on an outdoor tree (after protecting the wood)
These DIY ornaments were so fun to make!
And now I have all that extra saved money to buy a few presents! Hmmm… maybe I’ll make a few more ornaments…
Think you’ll give this easy tutorial a try?
Check out many other unique Christmas tree ornaments to make HERE
My love of buffalo checks continues! I love this look!
Donna, this is really cute, I got my Christmas stuff down to one box and it’s mostly sentimental stuff that I’m tired of using it. This set up you’ve created is great and I think you may have inspired me…. I thought about just skipping the decorating this year because RV life is so different… Simple but there are a few things I miss about having a home which made me realize time to start designing our Tiny House. Anyways love this tree and ornaments now I have to ponder what I can come up with. -Carole
Aww they’re so cute. Who needs to buy expensive tack when you’ve got gorgeous talent like yours. Well done Donna they look so nice on your mini Xmas tree
A very clever and cute way to use scraps and I like the idea of shopping in your workshop.
Great Idea! Look what you can do with two pieces of wood! So much better than buying Christmas Plastic Junk at the store. Love your stencils!
I have a Christmas Tree that is a real tree trunk base with artificial branches -that I use every year. And I have gathered a box of pine cones from my pine trees in the yard. And I have a box of glass prisms from old broken chandeliers I have collected from yard sales….
Tomorrow is Thanksgiving here in the U.S. So the day after tomorrow I will be putting away the Ceramic Turkey and getting out Christmas things…
Thanks for the inspiration!
Well Donna I am glad you went back home and came up with something yourself. I know what you mean about the crafts being done already and expensive to boot. I like trying to make something myself also. Yeah it’s more cost effective but what draws me to making my own is the sheer enjoyment of the process and enjoying the final product. There are quite a lot of wood scraps in my garage that my hubby brings home from school for our wood stove. He gathers them from the woodworking class at school. He is a teacher. Some of the wood has the coolest shapes and my mind gets to dreaming of what to do with them. It’s the ideas that excite me. And so you have inspired me once again. I will have time to play with my wood as I am off for a while due to a health problem. And I am enjoying myself immensely. Thanks Donna for being “you”. And for sharing “you”.
these are right up my alley & I could also see a garland!
I thought I would buy a few new things, but ended up using what I have!
Those are very pretty. I’m also imagining a star made with two of the squares- one laid down as a square and the other glued on top in the direction of a diamond.
Love these, Donna. Homemade ornaments are always a winner IMHO. Each one is filled with love and little imperfections that remind you of when or how they were made. I still have all the ornaments my kids made when they were little people. Sadly most of them are tucked away safely in a box so the purr babies can’t get to them. One day I’ll figure out a way to put them on display.