How to stencil a Buffalo Check pattern ANY surface with this stencil!
Love a cozy Buffalo Checked pattern too? Here’s a helpful step-by-step guide to paint this cozy plaid pattern on any surface easily with this stencil!
I’ve LONG loved the Buffalo Check or Buffalo Plaid look. Few patterns offer the look of a truly cozy flannel shirt like this pattern does, don’t you think?
However, creating this cozy pattern by hand can get complicated. Tape lines with painters tape is certainly possible!
But is there an easier way out there without losing patience while attempting taped horizontal lines and vertical lines?
Imagine a way to add a Buffalo Check or buffalo plaid trend to any of your home decor projects in minutes instead of hours!
Well, I’ve got some good news for you.
There IS an easy way to DIY a buffalo plaid look on any surface you desire, thanks to this family of Buffalo Check stencils!

A special thank-you.
View Organized Clutter’s Buffalo Checked JOY sign HERE
View all Organized Clutter’s Buffalo Checked projects HERE
First off, I’d like to publicly thank my blog buddy Carlene from Organized Clutter for this stencil pattern idea, because it was a good one!
Carlene also loved the look and suggested I come up with a Buffalo Check stencil so anyone could add this cozy pattern to any project desired!
So that’s what I did.
I won’t lie. This stencil was involved to create. The amount of detail that was needed to get a truly authentic buffalo check look took many hours and trials. But I’m happy to report, it got done, and now anyone can Buffalo Check to their heart’s content!
Pay a visit and view this astounding collection of Buffalo Checked projects Carlene has made with this stencil HERE!
So! Here’s a run down on where to find the stencils, how to use them, and project ideas you can make.
This post contains some Amazon affiliate links in which I earn a small percentage from qualifying purchases through these links, at no extra cost to you. Thank-you for helping to support my blog!
How to Buffalo Check ANY surface with this stencil!

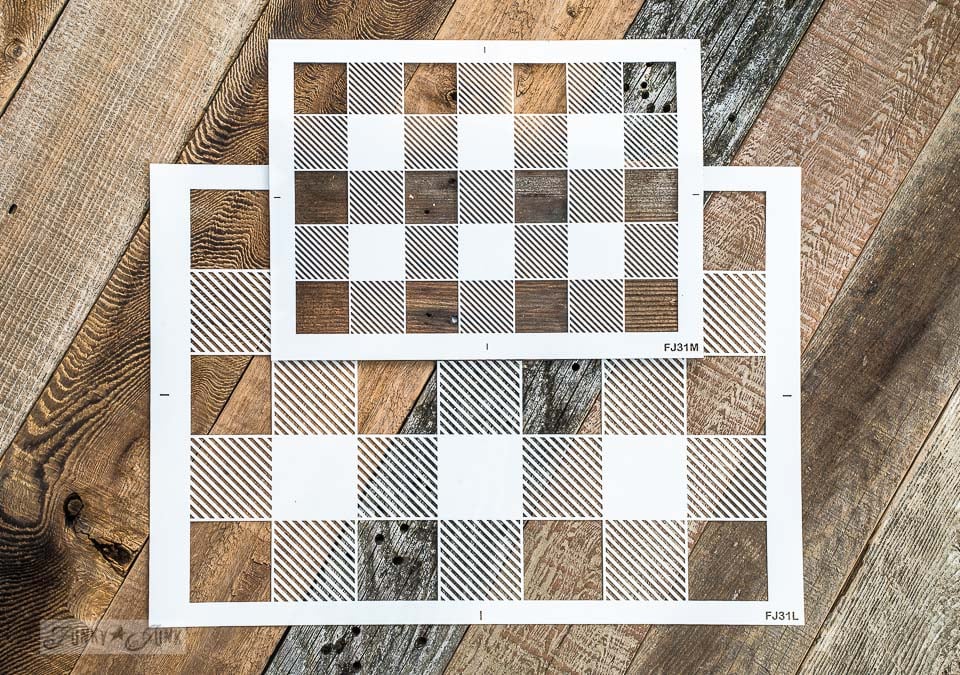
About the Buffalo Check Stencils
View all 5 Buffalo Check stencils HERE
Buffalo Check from Funky Junk’s Old Sign Stencils is a highly detailed pattern stencil made out of a durable 10 mil mylar, that comes in a variety of sizes so you can achieve different plaid effects.
1. Buffalo Check – Medium (original 14″)
2. Buffalo Check – Large (a much larger scale and size)
3. Buffalo Check – Long – original 22″ (only avail near Christmas)
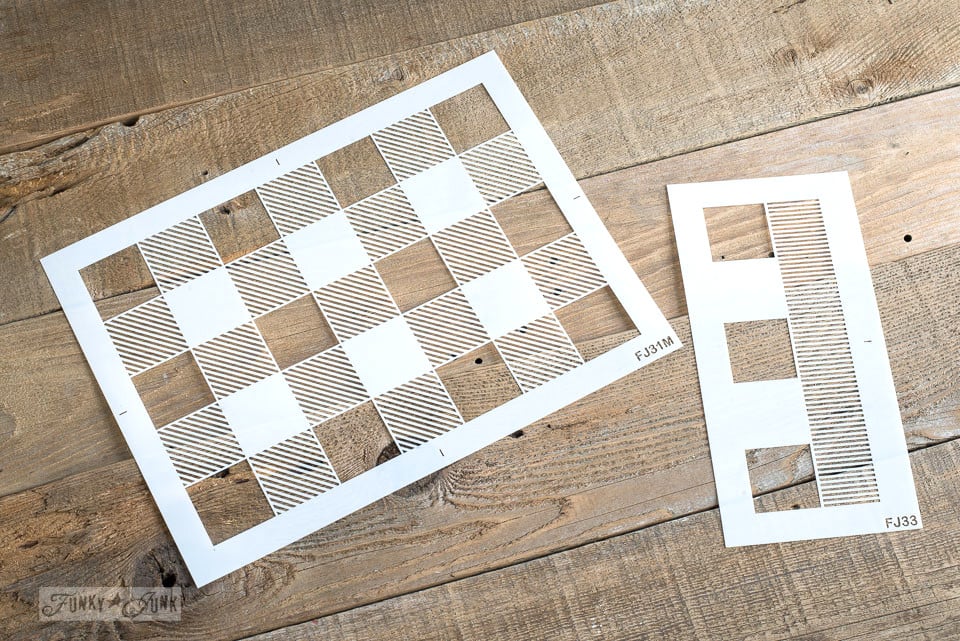
Companion stencils for more effects
4. Fringe
Fringe (sold separately) is a Buffalo Check companion that creates a table runner effect along the edges to Buffalo Check Original.

5. Plaid Shirt
This Plaid Shirt stencil is a 2-piece plaid pattern stencil that is scaled the same as Buffalo Check Medium, so you have the ability to layer on more plaid effects right on top of Buffalo Check!

Supplies to stock:
Your desired project
Paint of choice – I used Fusion Mineral Paint’s Casement (white), Coal Black, and Fort York Red
Stencil brushes – I like to stock all sizes depending which stencil is used
Paint brushes – to paint first coats on projects
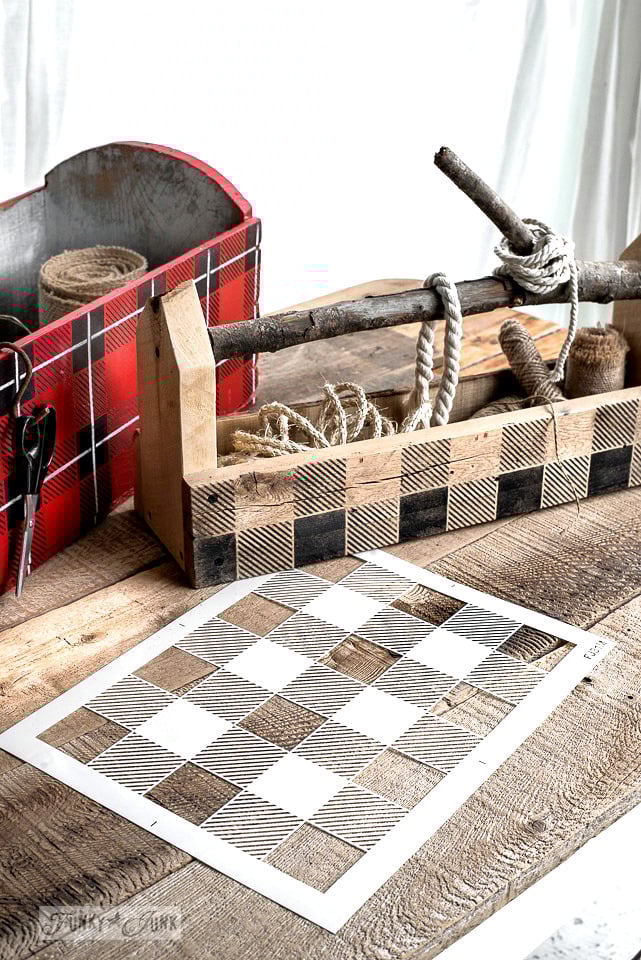
So let’s start with a 1 color, 1 layer pattern first on this little round table project.
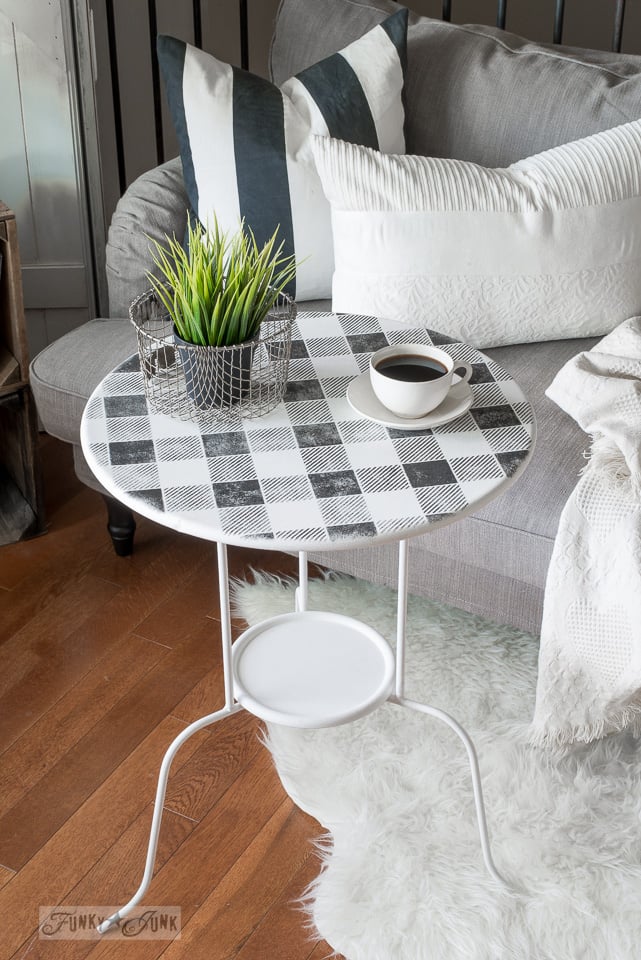
Black and white Buffalo Checked Table


Coat surface with paint
1. Paint your project with a coat of paint of your choice.
This first coat of paint will become one of your background colours for the buffalo plaid pattern.
Shown: Fusion Mineral Paint’s Casement, the perfect white.
This little metal side table was already white, but needed a fresh coat of paint. 2 coats of Casement worked perfectly!
Add another base coat if needed.
Then allow the paint to fully dry before stenciling.

Center stencil on project
2. Position the Buffalo Check stencil in the middle of your project, then secure with a piece of tape or 2 so the stencil doesn’t shift around.


How to stencil with no paint bleed
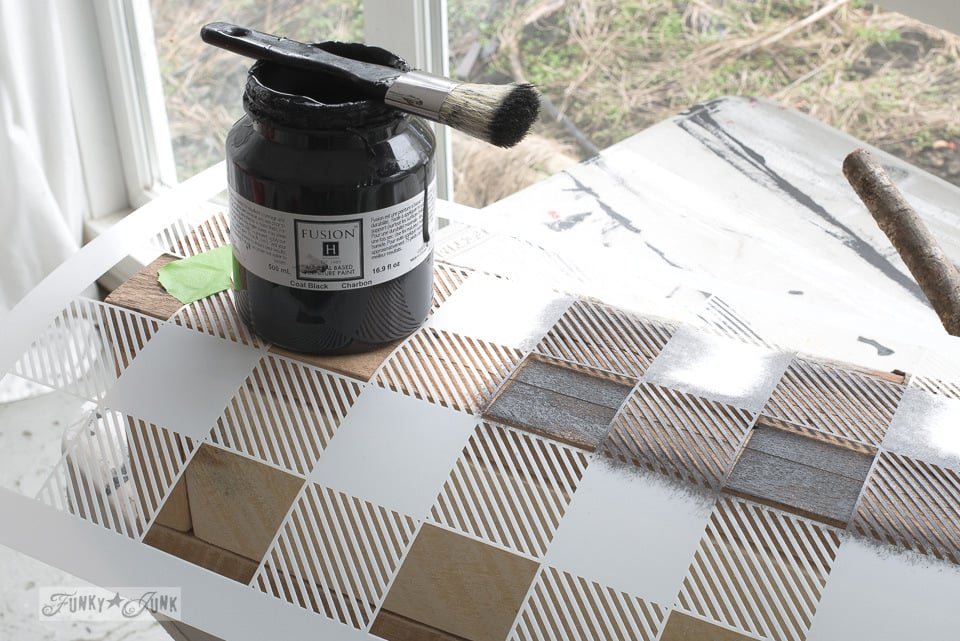
3. Stencil the image in black.
- Select a larger sized stencil brush (over 1″) for the most even coverage.
- Load brush with paint, then remove most onto a rag. The brush should feel dry.
- Walk your fingers along where you are stenciling.
- Tap or swirl brush through the larger empty squares first. This helps to dry the brush more.
- To stencil the thin lines, gently swipe in the direction of the lines for the cleanest look.
- Repeat steps until coverage is complete.
Shown: Fusion Mineral Paint’s Coal Black.
I love the weathered finish this one took on!
You can learn more about how to stencil HERE.


How to continue the pattern
4. Ensure the underside of the stencil is dry before continuing.
5. Continue the pattern by lifting the stencil, then lining up the stencil to a painted area, overlapping along the edges of both until they match.
As long as the pattern matches, you are good to go!
6. Keep stenciling until your entire surface is covered.

The finished table
Works pretty slick, doesn’t it?!
Using a black and white color scheme is how to use this never out of style, trendy look year around!
So this stenciling was done on a pre-painted surface. Let’s try on bare wood next, which is even easier!

Buffalo Check on wood grain
Stenciling this pattern on top of bare wood grain looks so unbelievably cool and even easier to do!
Reason being, bare wood allows paint to soak in, so your stenciled outcome will be even crisper.
How to stencil to achieve crisp images
1. Tap or swirl paint on large squares first.
2. Then gently swipe in the direction of the thin lines.

The buffalo plaid outcome is outstanding each and every time!

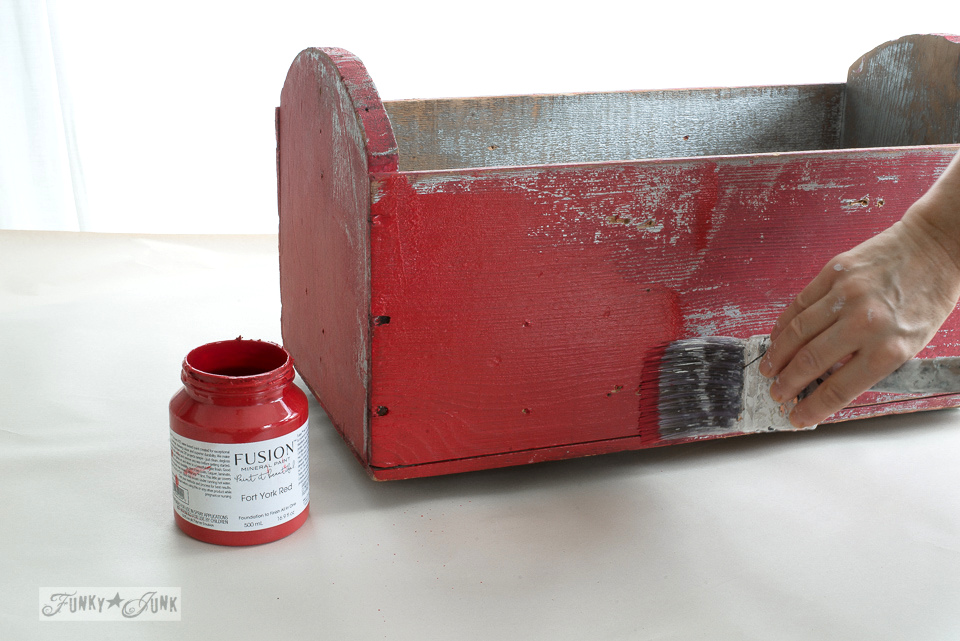
Buffalo Check on painted tote
This more traditional red and black color combo turns out so well, and couldn’t be simpler to create!
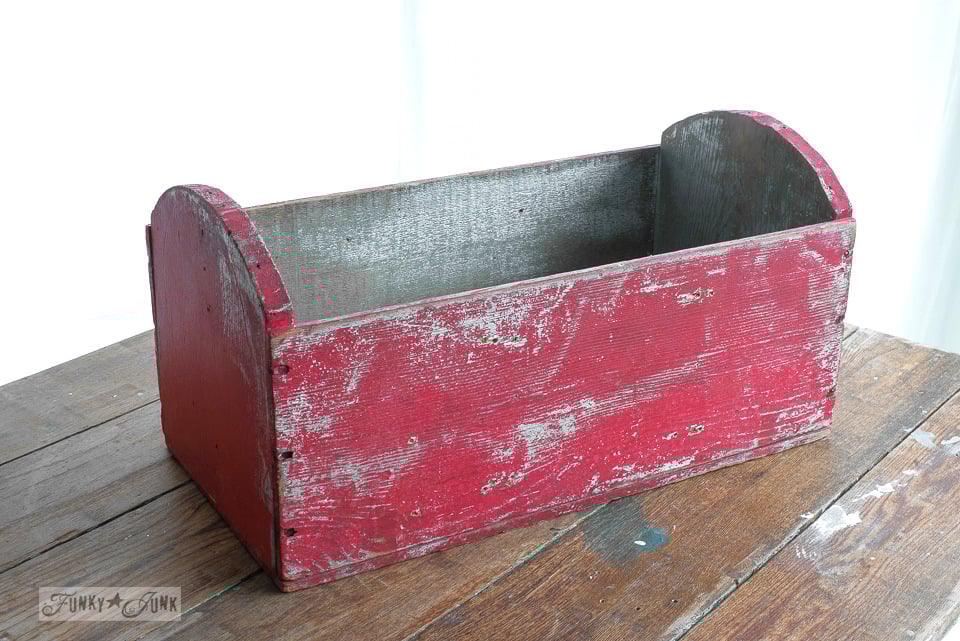
1. Coat out your piece in your fav red paint.
Shown: Fusion Mineral Paint’s Fort York Red
2. After red is dry, apply the Buffalo Check pattern using black paint.
Shown: Fusion Mineral Paint’s Coal Black
Isn’t the outcome outstanding?!

Adding a Fringe effect

Fringe (sold separately) is a clever little add-on that offers a fringe styled edge to Buffalo Check to give you a table runner effect.
Find Fringe stencil HERE
Learn how to stencil with Fringe HERE
Layering Buffalo Check with Plaid Shirt

Plaid Shirt (a 2 piece plaid stencil kit) is designed to mix and match with Buffalo Check, so you can achieve even more plaid designs!
Learn how to layer Buffalo Check with Plaid Shirt HERE
Video – How to Buffalo Check on anything!
.
Click above to learn how to add this cabin-cozy look to any surface with flawless results!

And there you have it. How to Buffalo Check ANY surface desired is quick and easy, thanks to a stencil!
Spying anything in your home you could enhance with this cozy look?

View Buffalo Check stencil HERE
Learn how to use Plaid Shirt HERE
Buffalo Check projects to make:

Make this Buffalo Check checkers board

How to create this JOY sign with buffalo plaid ornament

Buffalo Checked TV tray makeover

How to Buffalo Check a doormat for the front door

Buffalo Checked pumpkins in a wagon fall sign
View many other Buffalo Check projects HERE
SO. DARN. GOOD!!!!!
Oh goodness Sarah, you have no idea how long this took to develop! I have to thank Carlene via Organized Clutter for the idea. Cuz it was a good one! Glad you like!
I will legit thank Carlene, LOL!! Just shared it on my page, and clearly I’m not the only one who loves it.
So. Darn. Good. via Saddie Seasongoods
Oh Donna, I just LOVE that Buffalo check stencil! Especially on the little red stool!
Oh my Oh my! How wonderful is this! Love Love Love ❤️ a
D….
You’re kidding me with this, right!? OH SNAP!! This might be my favorite stencil YET!! The possibilities are ENDLESS!! I can’t wait to see what you do with this.
xo Michael
The Buffalo check table is adorable. Great job!
Love, Love, Love this !
Oh wow! Buffalo check is one of my favorite patterns. Great job.
Carol b
Donna, I am so excited to try these! You did real GOOD!
Thank YOUUUUU for the idea Carlene! I’m having too much fun with this one… hope you do too! 🙂
Donna, I love how true you stay to your soul. You spend your time on projects that fit you. That’s so special.
Is the red wood from the barn?
🙂
Hey Kathy! Everything in this post was painted. I haven’t yet played with the red barn wood. But at least it’s now pressure washed and nails finally removed! Getting there… And thanks for the very kind words!
Seriously?! Buffalo check is my favourite! Anything I see with this pattern, I buy. Now I can make my own stuff! Thanks for this!!
**The number of exclamation points in four sentences is truly indicative of my level of excitement.
HAHA I do the exclamation point thing as well. I think it’s my natural period! <--- seeeee? Thanks for the kudos! 🙂
Buffalo Plaid . . . I flippin LOVE this . . . okay, now I have to find something to do this on.
Hello There,
Oh my how I love the Buffallo check stencil..I have actually been drawing mine out on things i want to stencil..and yes it is such a long grueling process..lol..I dream of the day for a cricut..Im hoping my husband takes mercy on me and buys me a cricut for Christmas. I love all the work you do..Everything you put together always comes out so well and organized in the end..it seems everything i do is unorganized and the things i make have to be scattered about because i have so much junk..seriously..just unorganized junk..my house is too small for what i have..when my mom passed I couldnt throw her stuff out..I felt like I was throwing her away when I did and thats been over 5 years now!! Im sorry I kind of got off subject and started rambling..anywho, you need to put your buffalo check stencils on sale just for lil ole me..BAHAHAHAHAHA…HOLIDAY SALE FOR MRS HOOD…LMBO Im also the one who asked you to leave me the key to your condo in Hawaii under the plant for me..you be like dang lady..loL..JK…I love to try and find humor in every thing I do..or try to any way..Have a nice day my fellow Junkaholic..
PSS..hmmm..I womder if they have JA Anonymous meetings for people like us??..would they have door prizes..heck yeah, i would hit every one on the block!!
Haha! Well, between you and me, I did a demo of the buffalo check in vinyl and I’d never do it again! The stencil is super highly detailed and mylar IS the way to go for sure on this one. Plus, it’s so good on rustic wood, something vinyl does not adhere to well.
I know you were kidding but I’d like to explain anyway…
The prices are based on laser cut time, so since it’s detailed, it is what it is. IMO the investment is one time and it pays for itself first use +!
My place is total chaos when I create. I share it in that state LOTS on instagram stories. Follow me there if you don’t yet and I shall show you… haha
https://www.instagram.com/funkyjunkinteriors/