
Learn how to make your own custom IKEA wood crates planter boxes for flowers, herbs or plants using garden stencils, stain and funky hardware details!
Those who know me know my love for collecting reclaimed wood and vintage crates. For the most part, I generally have lots on hand to create with.
However I also recognize not everyone comes across reclaimed wood that has been graciously dumped on your driveway, or antique crates found for a low price. I’ve found thrift store shopping isn’t so thrifty any longer where antiques are concerned.
So during my last shopping trip to Ikea, when I came across these amazing little IKEA crates for under $10, I was smitten!
But what could I make them into?
And that’s when wooden box planters came to mind! Especially if a given wooden crate was further customized to house flowers, herbs or plants with garden signs!
So I promptly designed some garden stencils to work specifically on IKEA crates!
But taking it one step further… adding some hardware and craft supplies to the mix made the wood crates even more customized! They turned out adorable and I proudly use them to display flowers, plants, or just to be storage containers for pens and pencils! Or anything you wish!
So here’s an easy DIY project that will give any wood crates a totally custom look, to use for anything you wish! Plant-theme this round…
This post contains some affiliate links in which I earn a small percentage from qualifying purchases through these links, at no extra cost to you. Thank-you for helping to support my blog!
DIY stenciled IKEA wood crates for
flowers, herbs and plants
Supplies Used
3 garden-themed stencils from HERE
Ikea Knagglig Crates (Width: 9 “Depth: 12 ¼ “Height: 6 “)
Fusion’s Stain and Finishing Oil in various tones, details below.
Find a local Fusion merchant from HERE
.

About Ikea crates
Ikea unassembled crates are made of a super nice quality, and as always, very easy to assemble complete with predrilled holes and all the screws required. The wood crates come untreated, making them perfect to put your own custom ideas on.
These Ikea crates are small. Here’s how I created a Christmas tree crate with one.
I have also used a large Ikea crate for this cool coffee station here!
So picking up a few Ikea crates in small, I visioned seeing a few stamped with Herbs, Flowers, and other such related sayings.
Then I promptly designed 4 new garden stencil designs to work on these crates, that were similar in style so they could easily be mixed and matched to create your own custom designs! FUN!
These cute little crates were about to get a whole lot prettier!
Locate these small unassembled IKEA crates on Amazon HERE

How to stain wood crates
1. Un-package crates and dust off with a tack cloth.
2. Before assembling the crates, brush on stain, allow to sit a few minutes, then wipe off with a cloth.
3. Leave overnight to dry.
4. The next day, lightly sand each piece with 300 grit sandpaper to create a butter-smooth finish.
A video at the end of this post shares how I stained the crates.
You can learn how I used this stain from THIS IKEA SHELF and THIS IKEA TRESTLE DESK.
First up, each crate was stained before assembling.
For staining, I used Fusion Mineral Paint’s Stain and Finishing Oil once again.
However instead of my original go-to custom mix of Golden Pine with a shot of Cappuccino, I used 2 other tones on their own this round. I figured this was a wonderful opportunity to get a side-by-side comparison of the tones on a quality wood piece!
And I was right. It proved to be a great move. Each single coat of stain on the wood slats gave the crates a different ‘personality’ making it easy to choose which design went on which!

Stenciling the crates
Stenciling the crates is so easy!
- Position stencil where desired with masking tape.
- Dip stencil brush into paint, then remove most paint onto a rag until brush feels dry.
- Tap or swirl paint through stencil for desired effect.
Stencil Tips
Stenciling can either be done before the crates are assembled, or after as well.
Don’t forget to take advantage of all the subtitles on the stencils and the different sides of the crates!

Locally Grown Herbs stencil / stained with Fusion’s Golden Pine mixed with a little Cappuccino / stenciled in Fusion’s Coal Black.
![]()
See all garden-themed stencils HERE
Locally Grown Herbs stencil
First up, Locally Grown herbs was stenciled onto my #1 standby, Golden Pine mixed with a little Cappuccino.
Scrumptious! As always.
I love the look of crate stampings and this combo never fails.
Because the entire stencil didn’t fit on the crates, I separated the graphics to add subtext to the crate ends. They turned out very cute!
Learn how to stencil from THIS post.
Stencil Tip: I myself prefer to use a dome-tipped stencil brush like THIS one for the best effects!


Wild Flower Seeds stencil / stained with Fusion’s Driftwood / stenciled in Fusion’s Coal Black.
Wild Flower Seeds stencil
Oh Driftwood, you may be my newest favorite stain yet!
This tone has a weathered beachy-barnwood feel to it. I found it a little more transparent than the other tones, so I ended up added a 2nd coat on most outer pieces.
Adored the outcome so much! And looks decadent with the black text.


Fresh Cut Flowers stencil / stained with Fusion’s White Stain / stenciled in Fusion’s Coal Black.
Fresh Cut Flowers stencil
And finally, White!
This white stain really toned down the orange-yellow wood tones while still leaving the woodgrain intact. It’s a pretty, fresh white that at first looked transparent but it fools you! When I compared the stained against the unstained, huge difference!
The flowers and leaves graphics and 25 cents were stenciled on each crate end.

Assembling the wood crates
Once stained and stenciled, the wood crates assembled in seconds with the help of a cordless drill.
As with every Ikea kit, the crates came with predrilled holes and all the screws needed.
4 screws held the 4 sides together.

Then the bottom was attached last with 4 remaining screws in each corner. So fast and simple!
The crates themselves are such a nice quality! They are well finished, and adding such a nice stain (with built-in top coat) just polished them right off.

The stenciled wood crates
Aren’t they just the cutest?!
The above showcase a few faux plants.

But you know me, yes? This was a great start. Let’s add a few more craft supplies, handles, casters and hardware to really bring these little crates to life!.

Adding hardware and craft supply details
Gathering casters, door pulls, cotton rope, thick twine and corner brackets for decoration, each crate got a slightly different treatment.
Most hardware is easily attached with screws using a cordless drill and easily found at any Home Depot hardware store, or check online on Amazon.
Most other craft supplies can be picked up at any craft store such as Hobby Lobby or Michael’s.
And this is why it’s fabulous to collect buckets of rusty junk, friends…
So here’s all the finished garden-themed wood crates all decked out as the cutest wooden box planters in the land!

Find Locally Grown Herbs stencil HERE
Locally Grown Herbs crate
On Locally Grown Herbs, I added some tiny castors I had in my junk stash, along with metal corner brackets (new from any hardware store), and galvanized door pulls I found from a salvage yard.
Here’s a search on ‘one screw corner brackets’ found on Amazon.
And here’s where to find ‘mini casters on Amazon’.
Locate ‘antique-look door pulls’ HERE


Aren’t the corner brackets and pulls fabulous?!
And note, every side of that crate was detailed with stencils and hardware, so the crate looks wonderful in any position.


And then I played with real flowers. So cute!
Which then gave me the idea of outfitting this crate with just the right sized clay pots for home office supplies. I’m totally doing that… so count on seeing these guys sneak in other photo shoots down the road.
Search out some clay pots HERE


Find the Fresh Cut Flowers stencil HERE
Fresh Flowers crate
The white Fresh Cut Flowers crate was loaded with fresh cut flowers of course!
A few antique aqua mason jars filled with water proved to be the perfect vases. It’s the perfect little fresh flower vignette for anywhere you wish.
The ends of the crate got wrapped with some small white cotton rope and the front has two tiny white brackets attached along the top of the crate for a little extra hardware detail.
Check out some white cotton rope or thick twine HERE

Find Wild Flower Seeds stencil HERE
Wild Flower Seeds Crate
And my fav Wild Flower Seeds in the driftwood stain! I love how the clay pots pop against the greyed wood.
The extra bling on this one was adding a flourish to one end of the crate…

… and the 10 LB. crate marking on the other end. Everything just fit so perfectly!
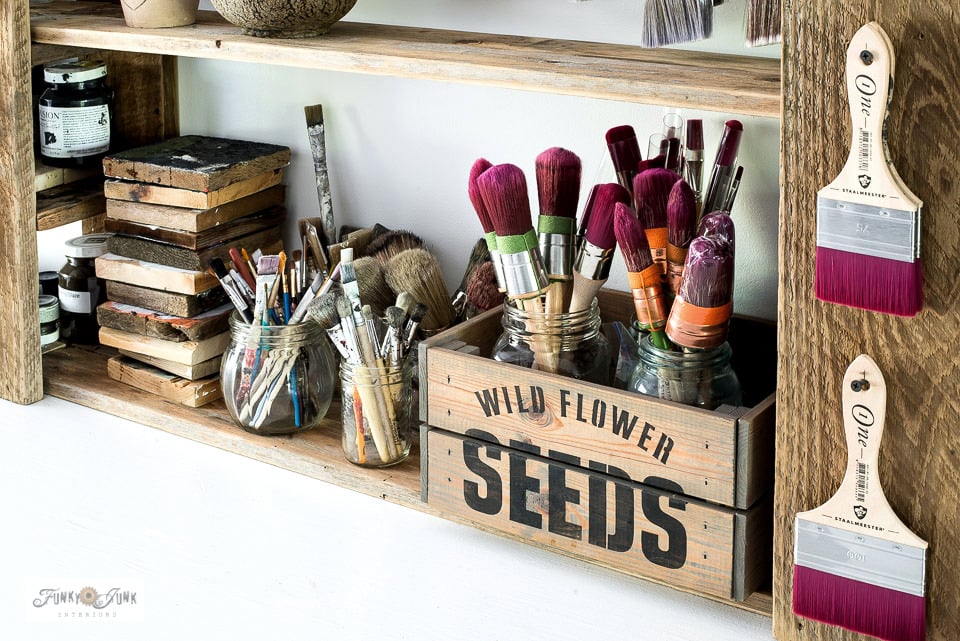
This crate ended up coming in mighty handy keeping clutter at bay by neatly organizing paint brushes in THIS paint shelving!
Which makes me think we need some paint-themed stencils… I’ll be working on that!
But isn’t that driftwood tone something? Yup. You’ll be seeing this stain again.
.
Click above to watch a short video of the staining process not shown in this post.
Ways to use these crates
All I know is, these crates that offer a old crate or vintage crates look become some mighty powerful tools for so many usage ideas!
- planters
- tool organizers
- office supplies
- storage space for anything
- attach to wall as planters
- stack on sides as shelves
So if you’re in the market for a fun spring / summer project for yourself or as a small business workshop idea, I’m certainly a fan of these little garden crates myself!
Which garden crate is your favorite? How would you use them?

Find the 4 new garden stencils HERE
Visit more stencil projects HERE

More garden-themed projects:
Potting Shed entry sign with ladder shelving
She Shed soil sifter garden sign
Garden and Potting Shed crate desk in an entry
Oversized tulip crate flower bed
Visit ALL garden junk projects HERE
These crates are so cute. I think I can make either crates or signs for my garden club. I am excited for some blooms to make their way up in my flower beds.
I love this project! I’ve always looked at those crates at IKEA & wondered what I could do with them. Now I know!
My pick is the HERB crate. I love all the extra bling you added to it, as well as the HERB signage. Sweet.
L.o.v.e it!!! It looks so yummy (can I say it about wood??) ;))
Ikea, here I come!
Wow are these cute! You’ve really got me looking forward to spring. . . as I sit here on a 15 degree snow day. 😉 thank you for all the stencil tips. I’m looking forward to doing my own version of these crates soon.
Donna, these are adorable! I’m off to get more colors of Fusion stains and order some crates (even though they are !$21! on Amazon). I’m getting a new screened porch in a couple of months and can hardly wait to use these for herb pots out there.
BYW, your site and your comments are so visually appealing – creative and unique!
I’m excited to hear about where you’re going with this Pam! And thanks so much for the kind words! Yeah, Amazon can be a little more but it sure is convenient! I hope you share what you ultimately make!
Using garden stencils, stain, and adding funky hardware details really elevates the basic IKEA crate. It’s the perfect way to create stylish, personalized planter boxes without breaking the bank.
I love how you’re blending your passion for reclaimed wood and vintage crates with a more accessible, budget-friendly option like IKEA. It’s so inspiring to see how you can take something simple and give it a character-filled makeover.