
Find out how I did a camper door replacement fix for $1.67 instead of getting a new one! Easy fix that just takes a little bit of your time.
A travel trailer door replacement was not exactly on my agenda. Not really sure when the rv entry door deterioration transpired, but one evening I went to go put something in the trailer and the old door wouldn’t shut.
Bending down to take a closer look, it appeared part of the wood frame had broken away from the hinges. Oh no… only when we want to plan a camping trip of course!
A quote for a new door was so high…
So I got on the phone to price out a new rv replacement door. Quoted at $750 for a new door and a few weeks delay before a next rv vacation, I wasn’t a happy camper! (sorry, had to)
However one trailer salesman didn’t try to sell me a door. He quite simply asked what exactly was WRONG with the door.
I had to think for a moment. “It’s coming apart where it’s latched on. A chunk of wood is rotten.”
Then he told me to just fix it myself.
His reply? “Fix it yourself.”
And that’s when I hit a wall. Me?! A camper door replacement? My thoughts ran, “I’m gonna sell this thing!” “The replacement parts or repair kits will be costly!” “I won’t have the right tools!”
Ever notice how expensive having an extensive amount of rv parts costs?
I always get this way when something goes wrong with the unit. It’s aging and every year brings a new bill to the table it seems. That’s just the way old stuff works.
The I decided to take a closer look at the door one more time. Hmmm… it didn’t look all that difficult to figure out. What did I have to lose?
And I’m so glad I did. Because not only did I manage to fix the camper door, it cost me a whoppin’ $1.67 and we got off to our camping trip as planned!
Here’s how I did this camper door replacement fix for next to nothing.
This post contains some Amazon affiliate links in which I earn a small percentage from qualifying purchases through these links, at no extra cost to you. Thank-you for helping to support my blog!
RV door replacement that cost $1.67!

1. Assess the issue.
When I swung the travel trailer door open, a small chunk of wood fell right out of the frame. Not good. And then the words of my friend Dan taunted me.
“Anything is fixable. Anything.”
I first felt resistance. I don’t know how to fix rv doors.
So I coaxed myself… “Break it down…break it down. Step one… unscrew the thing. Work backwards to a build. Take it apart.”
Oh, and right here is where I’d suggest to start taking pictures before removing any bolts or screws. Photos come in handy for reference when you assemble the door again.

2. Remove the door
Deep breath… 3 screws per latch. “Do it. You have nothing to lose and you might save $750. Do it!”
So I did.
Grabbing a cordless drill, the door rv hinges were unscrewed in just a few moments.

And the travel trailer door came off, just like that. Huh! Camper door replacement, coming right up!

The peanut gallery (cats inside the trailer) were in an uproar. “Bravo! Bravo!!!!!”
Yes. My cats come camping with me wherever I go. We are joined at the hip us 3. And they love the trailer. Cats loving a trailer. Well I’ll be…
Check out many of our travel trailer adventures HERE!

3. Repair the frame
And this is what I found. A simple chunk of wood rotted in the door frame. And it just needed replacing. Everything else was perfectly fine!
So after a quick measure, I ran to the nearest hardware store, hoping they sold wood planks in this very size.
They did. Which I found for a whole $1.67. No fancy exterior door parts would be required this round!

4. Replace the wood strip
The wood simply fell into place and was almost a perfect fit!
My goodness. I think this new rv door fix stage is when I started to laugh and feel all amazing and genius-like. Invincible even! This was going to happen!

But… the wood needed some shaping. It was a tiny bit larger than the travel door opening.
So I tried to sand it down with an orbital sander, but it wasn’t heavy duty enough.
Then I borrowed neighbour Otto’s belt sander. No again.
But here’s what did work…

Clamp the wood down with a Workmate
.
Before I move on with the camper door replacement fix, this is worth a BIG mention. I should have taken a picture of the entire thing, but that wood is clamped into a Workmate I landed at a thrift store for $10.
A Workmate is a collapsible mini woodworking table that is meant for clamping stuff down while you work on it. The table is very intuitive and hugs wood in all the right places.
Some newer workmakes are made with metal tops, but this one is an old school with a real wood top. I LOVE it. If you don’t have one of these, I recommend getting one.
And that’s when Otto came back with the tool that DID work!
View many Workmates on Amazon HERE

Shaping the wood with a wood planer
.
A wood planer was the ticket. This thing is on my shopping list!

A wood planer shaves down wood with each swipe, which is much quicker and an easier way to shape wood than sanding.
And it’s mobile too, making it a great tool for travel trailer door repairs.
Check out lots of wood planers on Amazon HERE

This is where the work went fast so I didn’t take pictures (I needed my hands). The wood was slightly shaved down so the outer moulding could fit on top of it easier.
I didn’t use any caulking but I think it could use some so the wood doesn’t rot again. That’s on the list too.
Travel Trailer Door Repair Steps:
.
- Assess the damage
- Unscrew the door
- Remove the rotted wood
- Shape the new wood
- Insert the wood in the door edge
- Reinstall the door moulding over the wood piece
- Caulk for waterproofing
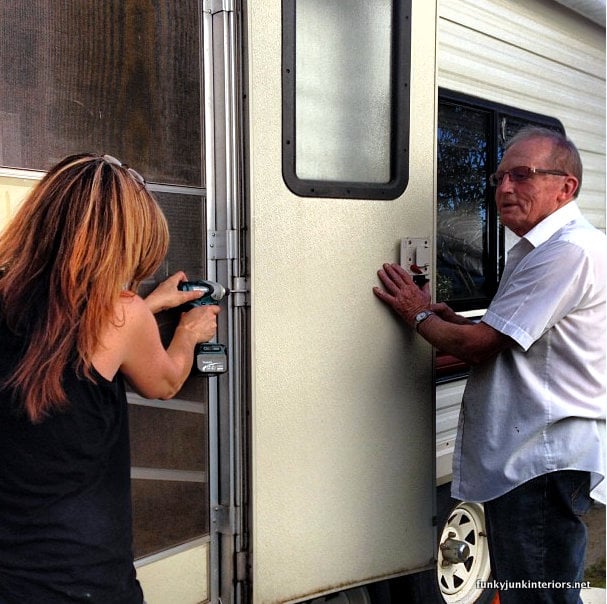
5. Reinstalling the travel trailer door
.
“Well, since you ARE here Otto… wouldja mind holding the 20000 ton door up so I can attach it again?”
So the door hinges were attached to the trailer once again. Having another to help hold the door made this easy.
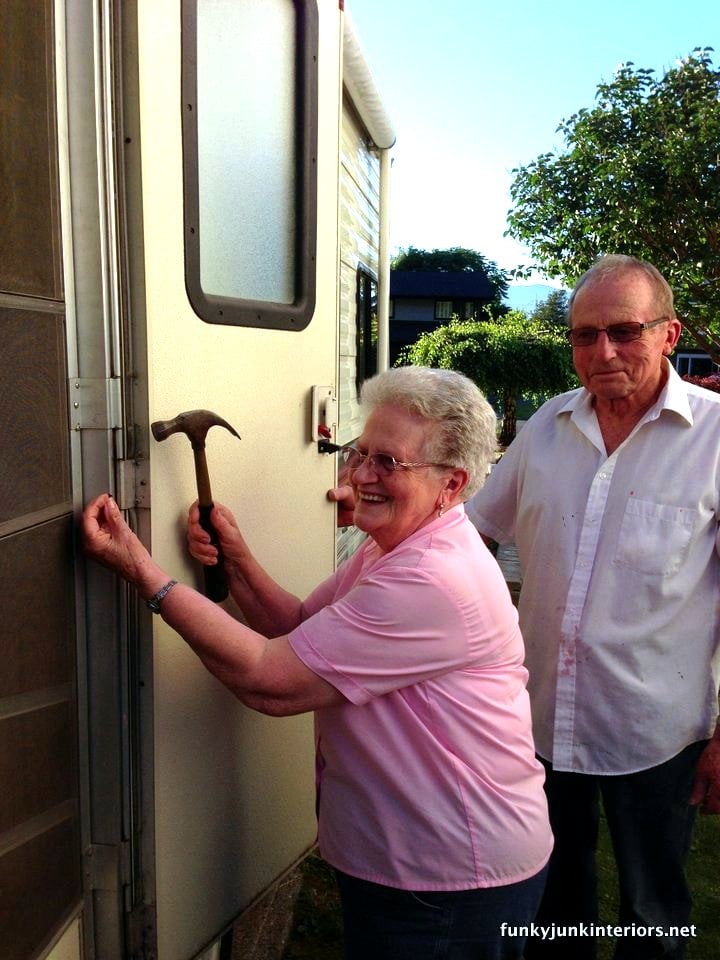
Nevermind. Kathy did a better job! Ok, truth be told, these two are a great team. Kathy also found every single screw I dropped and guided us on doing things better.
Everyone needs an Otto and Kathy for a little added support. ADORE these two!
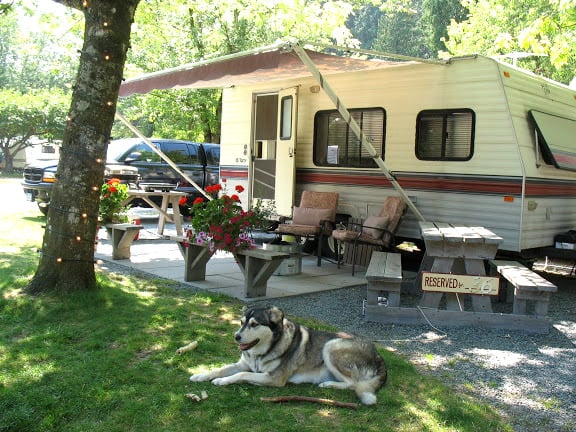
The fixed door!
.
The travel trailer door is fixed and road worthy! And know what? The door works better than it did before it needed fixing. No more slamming, nor frustrating rv locks issues… just a nice quiet *click.* Wow.
Should we even tell door manufacturers this secret?

I DID IT!
And THIS is what this post is all about. The feeling that’s left when you went after something you thought you couldn’t do. And it worked! Ok, and because you saved a ton of money does not hurt!
Everything is fixable
.
I remember a similar conversation with that same friend. Being a homeowner on my own absolutely daunting at the time. I didn’t know how to fix anything and here I was buying my own place. But even then he said…
“Everything is fixable.”
So here’s my advice when you come across something you aren’t sure you can fix. It truly is all about mechanics.
How to fix anything
.
- Look for screws. Most everything built has them. Then start unscrewing.
- Take pictures of something you are taking apart first so you remember how they fit back together again.
- Ask for help or guidance if needed.
- Borrow or buy tools that do the job.
- Watch YouTube for advice.
- Or read a blog post like this one to help guide you!
The task as a whole may seem daunting, but if you just take your time and think about what you’re doing, it’s true.
Everything IS fixable! Even a camper door replacement. All you need to do is give it a try.
Have you fixed anything on your trailer you thought was impossible?
Check out all my Amazon store favs in one spot!
.

Winterizing accessories for your RV

Other related posts you may enjoy:
BEST TIPS on camping with a travel trailer
Includes: best supplies to get / how to backup a trailer easily / easy septic tank setup and more!
How to winterize a travel trailer by blowing out the lines
Visit all my travel trailer posts HERE
more proof that we dont know what we can do, till we try~!
I just had this experience last week when I built my own door sidelights.. so I understand your elation..
applause applause- well done, indeed.~!
Hit the road, Jack! Don’t forget the sunscreen….have a great time you-3! Enjoy your vacation….and if you make it to FL, you can plug-in for free (we are 30 min. from Mickey). We have a pool and we’d love to have you. The pitcher of sweet tea is ready.
Great story… I love your humor.
Just bought an older camper, loved the door repair story!
Im so proud of you, and I don’t even know you! As a fellow single woman vintage trailer owner and days-from-being a first time homeowner, your post is pure inspiration and encouragement. Thanks for the lift and brava!
I’ve never done anything that ambitious❤
Way to go! I am so proud of you! I can believe you did this – you use big girl tools all the time! My hubby won’t let me use the ‘real’ tools so I have never learned to do all you do. As a result I have to wait for him to do the stuff I want done.
And you are so blessed to have that sweet couple to help you out! God bless you all!
I had a husband like that Jill. He now sees the error of his ways. LOL I suggest you ask your husband to guide you with something simple to start with because you’d like to learn, not to take his job away. It’s incredibly rewarding in every way!
I love reading your stuff because you’re so real! This was such a great message – we tend to shut down at repairs like this, when a guy typically just goes at it. No reason we can’t do the same – just need the right mind set! I love that encouragement, that anything can be fixed and to start step-by-step unbuilding it ’til you get to what needs to be repaired. Perfect! Good for you – and thanks for the reminder that girls CAN do it! 🙂
Great story! There’s definitely a moral to this story that we all choose to follow sometimes or get mad and never return. And what great $AVINGS!
Hooray! Well done and great friends Kathy and Otto are!!
So where are you off to?
Great post! You always inject just the right amount of humor while reminding us girls that we can tackle anything. I work in accounting & a good friend told me once that there is “no mistake that cant be fixed” I’ve always remembered that throughout my 35 year career & its come in handy more than once. So i loved your friend telling you “anything can be fixed!!” and i especially liked your “work backwards to a build” statement. SO TRUE!! When you break it down in increments, the task doesnt get so overwhelming! Love your post -you are one of my favorites & are encouraging to all of us girls that we can do these things! Keep up the good work & enjoy your camping!!!
Good Job! I would have cried first, and maybe during, if I’d had the guts to go for it. Enjoy your camping trip!
I may or may not have added a few frustrating tears to that tantrum… 🙂
You did a great job Donna. And you watched and learned. YOU GO GIRL!!!
Wow! I am so impressed with that! You always inspire me to try something that is just out of my comfort zone. Btw my potting bench has been very useful this gardening season, but I need to put longer screws in as some of the pieces are not secure. Thanks for the great story!
Good going Paulette! Yes, longer screws are the answer. I learned that one through trial and error too! I love to hear that you’re building AND learning what did or didn’t work!
Everyone could use those words of encouragement. Sometimes as you said, we find things needing repair and are completely overwhelmed. I’m going to swipe the WorkMate Mom has at her place!
Girl Power! I need to try to be more capable myself, but usually rely on my husband when it comes to fixing things. Only when a must-do-now situation comes up and he’s not around do I really find out what I can do, and it’s really satisfying!
Hurray for you!! You continue to inspire me to tackle things that I wasn’t sure I could handle…keep it up!
Personally, I love this post! Real. Inspiring. Successful. Yay!
Very inspirational… now to find myself an Otto and Kathy!
You’re my hero! I love it when things look impossible and then get accomplished!! Yay!
I just did the exact same thing with my camper!! I love that ‘we can fix it’ attitude. I guess my dad instilled that in me. Isn’t it rewarding to be able to do it yourself?!
OMG am so proud of you Donna! and your cool neighbors & tools but the best yet, THE CATS LOVE TO GO WITH YOU!!!!!!! that is the cooolesst news yet!!! you those too! am traveling up to your place and “catnapping them” (ok jokeing!) but post more pics of them pleassssse!:)
I’m holding myself back. Just call me the Crazy Junker Cat Lady. I LOVE these two!!
Brava!! You did great! My husband has exactly that same saying “anything is fixable”. Then we work together to figure it out and fix it. (OK, mainly him.) He’s wonderful!! I come up with the ideas, and he figures out how to do it (fix it)!!
T
Ok, so I love that you have the help and support of your husband. Bravo! I miss that.
BUT… there is a but. My mom went through her entire married life not handling one tool. When Dad passed on, she was in serious limbo. Kinda the same with me.
Please ask that amazingly supportive husband to teach you some beginner fixes. You’ll be so glad you did!
Oh yes! I have my own drill, staple gun, and a drawerful of pliers, screwdrivers, wire cutters, hammers and scissors. I love having my own tools, so I don’t have to go hunt up his. Mine are always available, and much used. Thanks for the advice! You go girl!!!
Got to love it! Anything can be fixed, I believe that! I think I drive people or family members crazy with that.
I LOVE this post. I’ve been pushing myself out of my comfort zone lately too. I’m nearly 50 and I decided it’s time I try to fix things on my own too. I totally understand that feeling of satisfaction when you complete a job, and it works!!
Way to go. I love that you saved the $750!!!!!
Good job!! I did a similar project. I wanted to replace the overhead light in my bedroom with a small chandelier but know very little about electricity. I was going to wait for my son to help (read as do it) but he was tied up. Finally I realized he was just going to read the instructions – so I could also. I paid special attention as I took down the old light in case I had to put it back up and also to see how it all works. I hung the new light myself and am really proud of myself.
Brilliant! The most important part to any electrical work is flicking off that breaker first. Electricity is a super important thing NOT to get wrong. I’m glad you had something to guide you.
But for anyone totally unfamiliar with electricity, I do recommend getting some guidance. A wrong move could burn your house down.
One of my FAVORITE POSTS EVER!!!
I LOVE that feeling.
You are da bomb! I think this should be a demo at Lucketts next year!
Xox,
Beth
Great job. I think the post is a good reminder that even if you don’t think you know how to do something you shouldn’t be afraid to try. Love your kitty helpers, mine like to sew.
Yay! Go, YOU!!
-b.
This was absolutely worth posting. God for you girl! You took the bull by the horns and got the job done. Way to go!!!
if i wasnt allready married i think i would love you
WOW, am I ever impressed, I would never even think of attempting a job like this! You are just about the coolest chick ever Donna !!! Congrats on a job well done and thanks for sharing with us. I LOVE your posts and look forward to them every day. Happy Camping 🙂
I’m very proud of you. We women think we’re not able to do things but we can usually figure things out if we will just try. I once sold a lady a small metal table. She wanted it another color, so I told her to spray paint it. She told me she had never done anything like that and didn’t know how. OUCH
One thing I actually have done is remove ‘try’ out of my vocabulary. I know it’s meant as an encouragement to go for something you are unfamiliar with, but it can also lead to you giving up if you come to a cross road. My new word is DO. There’s no stopping until it’s a done deal.
Sounds like that gal could have used a spray paint lesson. Maybe you need to set up a workshop… haha
NEVER under-estimate the power of a woman! Not only did you prove to yourself that you are capable of more than you give yourself credit for, but you probably saved yourself more than the $748.33 (minus the wood) because I guarantee you that not only would you have been charged for the door, but you would have been charged the labor to replace that wood and they probably still would have stuck you with a new door. I have learned on my own to tile, do plumbing, electrical, framing, you name it, I will figure out how to do it. I can build a house by now. After getting rediculous quotes on projects, I decided to just teach myself how to do my own work and save myself literally thousands and thousands of dollars. The end result will probably be better anyway because I have to live with the final result. Don’t be intimidated. Just do it! Congratulations on your accomplishment and pride of being a DIYer.
Hi Donna 🙂 I love your posts! I always look forward to seeing what you are up to next, and what your kitty kids are up to too! I’m not on Facebook or Instagram so I guess I’ll be missing out on lots of your adventures 🙁 I love that you tackled your camper door by yourself and for a whopping $1.67, and that you had the helpful assistance of your loving neighbors. Wish we had neighbors like them. You are a lucky girl. You give encouragement to me to try because “anything is fixable” and you’ve proven that without spending a fortune. 🙂 Are you going adventurously on your trip or do you have a plan? Have a wonderful time 🙂 I’ll be looking forward to an update.
Hey Nancy! The links shown for Facebook and Instagram can both be viewed online without your own account! At least I’m pretty sure. Try clicking and see if you can see them!
We are possibly off to Harrison Hot Springs and if they are full, we’ll wing it! 🙂 Our fab house sitter is on plant duty. Yay!
Thanks Donna! I am so goofy, I always thought I had to have an account .. another opportunity to check it out instead of figuring I can’t. So I will check in and see what’s up, yea! Looks like, from your picture, the kitties are ready to get going. I hope they get in lots of pictures 🙂 Have a great time.
You are a super woman and nothing is too big if you set your mind to it and you sure prove that. I love reading and look forward to your blog. Stay strong and keep on keeping on.
What a great story! Love your site, and you ! 🙂
Yeah Donna!!!! I feel really inspired, because we just tore apart the inside of our trailer, and now I’ve been wondering what the heck I was thinking when I suggested it. It needed (I wanted) a makeover badly, but we had to gut it down to the “bones” before we could start. I’m just hoping we can get it done before all our kids move out!!
Way to go, Donna!! Hope you have an awesome camping trip!
Jeanette
Good for you for tackling the door and not giving up! Your friends seem like really nice people too.
Donna, I just knew that there was a happy ending to the story…I am so surprised that you doubted yourself as you are so talented in the DIY world!…Your Otto and Kathy are the cutest!!!…and have to tell you that my hubby has that old Black and Decker Workmate..I think he bought it when they first came out and it is still in great shape…Happy and safe travels Donna!!!
I once framed in a window and put the new window in. My dad and I did the first one and then I took out the old huge window and replaced it with a smaller and more energy efficient window. I am so proud of myself for doing it. Sadly that house is long gone. Being on your own means learning how to do lots of stuff. If I had questions, I could call Dad but I could usually figure it out on my own.
Great post! Like when there is lots of good photos. My door is in pretty good shape but have had to fix the screen several times thanks to a certain beagle with sharp claws. Looks like you had fun doing it. Cheers Ray
Was a bit leery, at this project, but my seester does it again. Cheers to you brave soul. So proud of you too an the great find and the cute helpers inside your trailer and out. Do you hire them out? Love you, have fun camping!
Awesome job. As I’ve found out through expensive mistakes throughout the years and the courage to explore, there are many “repairs” that we can do ourselves…and gender holds no relevancy here. I didn’t know I could completely dismantle my dryer (after unplugging it) order a new motor from the internet and have a nearly new dryer. Taking pics on the tear down is important too. One more hint, if you want to make a piece of wood water repellent, Thompson’s Water Repellent (sold at any hardware, big box hardware store) has it. Or, if it needs to be waterproof, go to http://www.rotdoctor.com and review “CPES” resin. It’s not that hard to mix and it repairs rotten wood as well. Good luck on your future repair projects. (Loved the photos too.) Mark
LOL…I do a bit of cussing right out of the gate when things do just work johnny-on-the spot. I’m glad you got your camper in working order. With the crazy cool ideas you come up with I’m surprised you haven’t started in on the camper too. My ex-husband had an older camper trailer; it was in good working order but man was it ugly. I thought alot about giving it a makeover but when he left he took his camper, too….dang I like that camper.
Way to go…great job!!! I’m officially inspired!
I LOVE this post!! I am SOOOOO happy for you. Excellent advice—it can always be fixed. I hope you have an awesome time.
LOVED this!
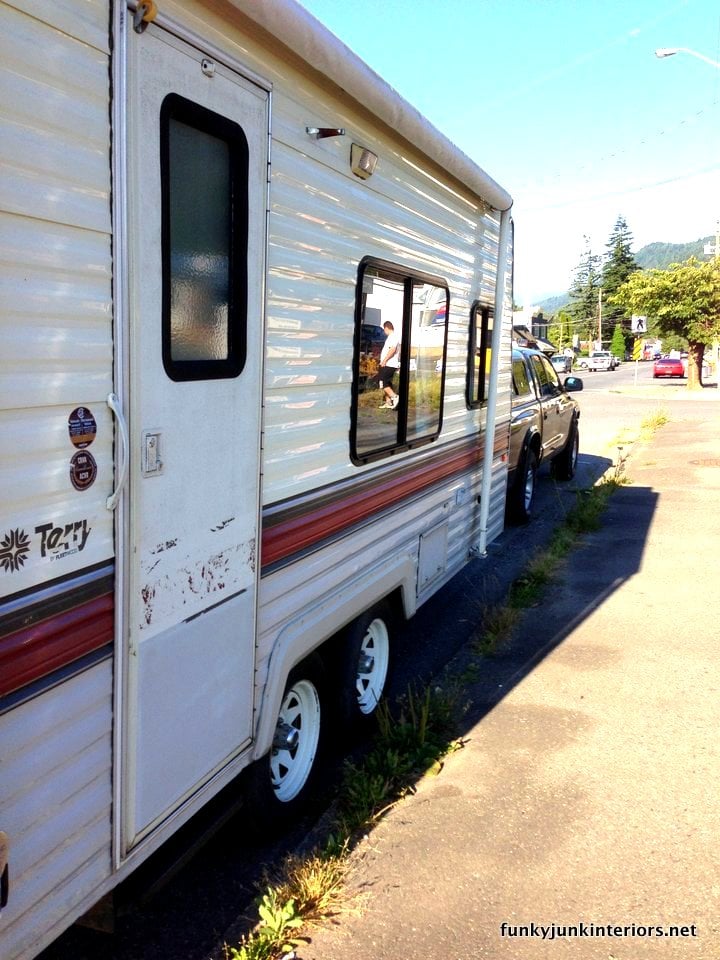
Now, here’s my question……….. my husband and I love to tent camp but, when I retire in two years, we’d like to buy a trailer and go cross-country. Here’s the “but”- I’m the only driver and am terrified of pulling a trailer. So, the questions:
1. How big is your trailer?
2. What kind of a car/truck do you have to pull it (I couldn’t tell from the pic).
3. What’s it like driving?
Thanks,
Penny
Hey Penny!
I drive a Dodge Dakota 4×4 and pull a 16 foot travel trailer. I think in a perfect world my truck should be bigger for longer tows but nearby within a couple hours it can handle ok. I might suggest to look into the new tent trailers that pop up with hard tops, they would be much lighter weight for towing long distances, have air and are insulated. The only downfall of course is no bathroom facilities nor showers.
Towing isn’t difficult, but the longer unit you pull, the trickier it can get where tighter spaces are concerned. I’m not afraid at all to tow, I just wish my truck had more oomph.
Here’s the very best towing trick in the WORLD where towing comes into play. If you want your trailer to go left, put your hand on the bottom of the steering wheel and turn left. Same applies to right. Once you have that trick down, it’s effortless to tow. 🙂
THIS is why I love your blog & you! You go girl! And how have I not heard about a wood planer before!?!? That is now on my shopping list as well!!!
Hi, the follow up comments I was receiving through my email were for “The $1.67 travel trailer door repair…”
I went to the bottom as you suggested and clicked on the link, it said I wasn’t subscribed to anything, so maybe I’ve fixed it?!
Thanks so much, you are truly an inspiration! 🙂
You are so inspiring! Thanks!
BRAVO!! Well done!!! I love this post. This is the kind of post I love/crave. You fixed it without a lot of $$ or fancypants stuff. The real deal. Excellent!
btw, those two kittens are terminally cute—but you know that 🙂
Now get tow that camper somewhere and all 5 of you go have a great adventure.
Thank you for sharing 🙂
Great post! Congratulations! That’s so awesome that you were not only able to fix it but you did it so inexpensively and saved SOOOO much money! Wooo hoo! How great you must feel too. 😀
I loved seeing Kitty peeking out the door ! And those two remind me of my mom and dad….sure miss them. Good for you, Donna ! great job !
see you on the road…. meet ya at the RV park !!
You did an awesome fix! Thanks for the inspiration.
Atta girl!! I used to come unglued every time my Sears tractor would breakdown. I was a single Mom living on an acre with no budget for repairs. I “learned by doing” and pretty soon I could rattle off things like “I just changed the jackshaft assembly” or when the steering wheel came right off in my hands while I was mowing along the canal bank, first I cried, then I stopped, thought about what to do, then ran back to the garage and grabbed a pair of vice-grips to clamp on the steering post and finished mowing before calling the Sears parts dept. I’m a lot older now, but feeling empowered by those memories and proud to be a DIYer still. Can relate completely! Thanks for reminding me!!
Don’t you love it when a project turns out to be a quick and cheap project!
Amazing what we can do when we put our minds to it! Great story 🙂
Was happy to stumble on this post today~ I have a 15ft Terry Resort and it has the same colored stripes! i haven’t had any problems with the door but appreciated the tips if I ever do encounter rotting wood there. I remodeling the interior this past year by painting all the ugly wood veneer and wallpaper inside and even the ceiling. It feels much brighter and lighter inside now. I sewed up some great new paisley curtains, made a duvet and pillows for the bed, and put new stick on parquet tiles on the floor. It feels like a brand new trailer! (its actually 24 yrs. old)
Thanks for the tips…and the humor. Fixed my Terry door yesterday took a couple of hours but now it is solid and actually closes like it should!
Enjoy the road.
This has just been a lifesaver!! As i sit at work, lol, I’m so excited to get off work today and tackle this!!! Words can not describe!!! I also have a peanut gallery, 2 weenie dogs, lol, and only wish to read their minds as they watch me!!!! Thanks so much for your encouraging words !!!
Michelle Long
P.s. I just bought my camper last weekend, 1968 tagalong and she is already making huge improvements. lol
Just don’t take the screws out of anything by/over the sink. 🙁
I removed the screws from the hinges where the door is screwed on and … nothing! The hinges appear to be welded on!
Its like they won’t come off. Didn’t try a cold chisel yet but I’m blown away. I do not even begin to understand the logic of having a door that is welded to the hinges. Its insane.
Loved this story! Especially since I am a single lady with a house AND a camper and old motorhome. I related particularly to the pouting, tantrum throwing part!!!! Love the way you think and how you tell a story. Thanks for sharing. I have found out I CAN do stuff I didn’t think I could, mainly because I am too cheap to hire someone else to do it.
Hi, I have a Fleetwood Terry just like yours, colors and all. It also needs new door so your tutorial is coming in handy for me. Thanks so Much!
Loving your attitude. I bought a 1997 Class C RV…….. and I’m still in RV 101……… am amazed at how many suggestions I am receiving… telling me to sell and get NEW or at least a newer……
Guess, I fell in love with this Baby Blue………..
Dealer did “hide” things I should have known……….
Biggest challenge is the de lamination on one side……….. An “angel” owner of a RV repair shop is assisting me………….
Wonderful brother n law who just does……….
I don’t need monthly payments…. Doing a little at a time makes me feel comfortable…..
Thanks for the positive swing to problems………
Thanks!! I was also stressing out over my door, and what can I do to fix it… I thought of “welding a piece of steel on” etc.. Yep, any idea went through my head. Then I came across your thread! If YOU can do it, so can I!! SOO, I’m gonna tackle it too! Thanks soo very much!! Ps. I should take pictures too, just to show you my attempt…lol
Have a similar problem. But not only is the wood at the bottom of the door missing the bottom part of the door frame is gone as well. any clue as to where I could find that piece???
Thanks
Hi Joanne, I’ve found the older pieces can be really tough to locate. A salvage yard for RVs may be your best bet. Or just check with a major RV place first, to see if they carry the older lines. Worst case scenario, you make something yourself that resembles what was there.
Good luck, it is a challenge repairing an older unit!
I just found your blog and love it. I just got a Holiday Ramblette needs a little work but my kids and I love it. Hoping to fix the minor stuff first then take it for a camping trip see how it acts then get it ready for a road trip to Disney world. Your Blog is inspiration to do it myself and try diy. Love the whole blog junking is a cool thing. Thanks for taking the time to write. Roy.
Wow Roy, that would be an amazing trip!
So glad you’ve found something to inspire you! It truly is so gratifying learning and doing for ourselves! Happy travels to you!
Thank you for the how to fix a trailer door post….!!!
Just what I need…
Love. Love. Love. Found your site. Have same door dry rot issue. Thanks for the photo diy. I’m 67 and on a tight budget with other unexpected expenses. Now I have the confidence to try this repair project and save several hundred dollars. Thank you. Thank you. Thank you.
Awesome, Karen! At the very least, try. If it doesn’t work, then you can replace.
Love this article! I know well that feeling of accomplishing something you didn’t think you could do. I recently ended my marriage and moved into a travel trailer alone. Things started falling about almost immediately and I was panicking big time. But I took one thing at a time and before I knew it I was replacing rotted floors (supports too!) and a busted water pump on my own. I even fixed an electrical problem in my truck that I was sure would be expensive but wasn’t – because I found the problem myself! Anyway, great work! —Beth
Thanks for taking the time to post this. I have an all metel Avion and I need to be a tin smith to fix mine.
I really enjoyed ur story and am hoping that this is the only reason my son’s trailer door won’t stay shut as well. If u know of any where to see other reasons for travel trailer doors not shutting, please let me know.
Thank you
Thanks for this helpful hint. I don’t have to fix my door yet but i do need to remove it. I just realized 2 days before the old second hand trailer is delivered to my driveway, that the door will be to close to the house to open. So removing it before they back in will allow me to get in and out while i clean and paint it. I’ll just put it back on each night just not screwed in and maybe even wedge a piece of wood to keep it closed. knowing that you did this repair gives me the guts to try it. VBG Glorybe
Definitely pin worthy! New to this myself and breathe a sigh of relief when I come across a blog about REAL PEOPLE who are dealing with the same hardships (without copious amounts of time and money… wouldn’t that be nice?).
Thank you, and BRAVO! on fixing the door!
-Amanda
About a month ago, my wife slammed the back door on our ’89 Dutchman Classic travel trailer, (which we bought 2 years ago and is on a permanent site) because she was having trouble closing it – Lo and behold, the rotted bottom of the door fell part way off! I removed the bottom, but I didn’t dismantle the door from the frame, due to stripped heads on the screws.
I had removed the dinette/benches last fall, and put in a small table and 2 chairs, so I had the wood in the storage shed out there. I found a piece that fit beautifully except for having to trim 2 inches off the end. Fixed it in about a hour, and now it closes better than before.
It goes against my nature to buy something that I can repair myself. Comes from being the child of parents who lived through the Great Depression.
Great writer….should write a book!
I really had no need to read this Pin but something made me open it anyway and am glad I did. I, too, felt intimidated by fixing things and expected my hubby to be able to do the handyman chores. He was not very good at it. We got a Used Class C RV two years ago and all was well for awhile. Then things began coming apart or quit working altogether. My hubby just wanted to take it somewhere to be fixed but that soon began to add up $$$. So, I got on YouTube and started doing the maintenance and repairs myself. You are right, take things apart step by step and put them back step by step. You CAN do it.
My trailer door is rotting at the bottom as the strip keeps falling off. I need to replace this as well. Thanks for the tip!
I am a single lade, Kathy, and I am working on my trailer myself…. I have to do the same thing.. we had such wind a couple weeks ago, came to check on it and the door was on the ground… OMG.. thank goodness not near anything or anyone….I will fix it, so I used the stabilizer beams and military grade zip ties to hold it until I fix it….thanks for the input…
Thank you. You gave us the encouragement we need to do this ourselves this weekend.
When will women quit thinking they can’t do things that are
foolishly labeled “Things men do.” Most problems don’t require any
other body part than your brain.
Maureen, I think those that do have men in their lives are fortunate enough that they do things like this for them. But because I don’t, it was a first, and a real push to try. New stuff just flat out takes more effort.
Here’s to many NEW things to come! Because ultimately, we can do it without issue. Just as soon as we learn. 🙂
Proud of you, we just redid the interior of our 1987 14′ GoTagALong, was solid but we just didn’t care for the previous owner’s decor. Congratulations
I have a husband but he doesn’t fix anything for me. His favorite line is “you can do it, I have faith in you.” And you know what, most of the time I can.
Great article and very inspiring! I have pinned it for future reference. I am new to the camping world, having just purchased a 21 year old travel trailer. And I, too, have 3 cats that will be camping with me! I am a DIY-ER but it’s always so helpful to be reminded that “you can do this!” Thanks for sharing! Happy camping!
Too funny my camper door looks just like that and I have been waiting for my husband to fix it for 2 years. I have just started to try my hand on some things around my house. I agree everything is fixable… will be taking on this project next week
Thanks for the tutorial
Mary
Such a great site. You are my kind of lady! I have a husband but I am the “tool belt” wearer in this family. We have a 17 ft. travel trailer and I LOVE fixing things in it. The only time I have to ask for help is when I am actually not strong enough to do something. hahaha The trailer was “bare” when we bought it new (no wall cabinets in bathroom) but I found a cute jewelry cabinet at a thrift store ($2) and hung it for the medicine chest. Everything would fall out when I opened its door so I glued clear colored rulers on the end of the shelves facing the door and it keeps everything in its place and you can still see the contents. I hung a shower curtain rod in the shower to hang clothes (because we always use the facilities at the campground) and hung three strip lights (table, sink and over the bed). To keep the kitchen cabinets opened I just used wooden rulers pried between the bottom of the cabinet and the recessed part of the top of the door. No drawers anywhere so I put a wooden ruler inside the kitchen cabinet with command strips to hang knives (they fit perfect on the recessed part of the door between the cabinet wall and the ruler) and the cutlery is in a small wire basket…saves space. I put a small curtain hanger behind the toilet from one wall to the other and our shoes rest behind it. So many things can be done and not cost an arm and a leg. I just realized…I have A LOT of rulers don’t I? And I’m not even a school teacher! Enjoy your site and will follow ya.
Vickie, your DIYs sound fascinating! I’ve yet to do any real redos in the trailer but would like to! Thank you for inspiring me!
Thanks for sharing this. I knew I had to investigate why my door was all whacky and hard to close. Sadly, mine was in worse condition than yours. I look forward to that nice quiet “click”!!!
I hope you can fix it Monica!
My door is doing the same thing and ive been looking for a good poat and i sure found it. Thank you!!! Awesome job. I will def be doing the same thing. 🙂
I’m having the same problem with my old class A motorhome. I just put some screws through the door into the wood, but still have to slam it. I will follow your lead and remove the door to see what I’m up against. Thanks!
I’m a 41 year old Career Fire Fighter in BC and I just wanted to thank you for your awesome quick EASY repair LESSON. Not afraid of much, however did not want to open that can of worms until I read your Post…
Happy, Happy, Happy!
Took 45 minutes. Now better than ever!!
Thank you
Everything is fixable, except a smashed mirror!
Haha! I love that.
My husband and I just recently purchased a used travel trailer to vacation with and I’ve been busy cleaning it up. Have you decorated yours? I love your decorating ideas for your home and was curious if you have done your trailer. I’m looking around for ideas like peel and stick backsplash. I’m still in the cleanup mode but hope to start with a little decorating soon. Thanks for the rv posts!
You know Catherine, I always dreamed about renovating the travel trailer. I made it prettier with staging, but never did bring out the actual paint. It was always about working hard to get back to the campsite.
And then I eventually sold it.
One day I’d love to do a bumper to bumper trailer reno though!
Thanks,
Great idea will save money.
Richie
I love my B&D Workmate. There are two latches under the screw handles that you use to clamp tight whatever you’re working on. Place one foot on the wide step, pull both releases towards you like gun triggers and the handles like the grip of a gun, and then lift gently up and away from you. Folding is the reverse.
Sorry, I couldn’t help but notice he was slumped over trying to sand that board when it can be done easier at waist height.
THANK YOU SO VERY MUCH FOR THIS ARTICLE! You have a GREAT perspective and one thing my father instilled in me when I would say “I wonder if….” was “all they can do is tell you no” (if it was a permission-based issue) or “you’ll never know if you don’t try” (if it was a capabilities-based issue) or “it’s already broke, right?” (if I was worried about breaking the thing). I’ve also thrown in my own “I’ve wasted that much money on dumb/useless shit” (if it’s a monetary-based issue).
BUT thank you also for sharing your experience regarding your work on your camper. I’m armpit-deep in a COMPLETE remodel/refurbishment of a 20ft 1975 Empire Travel Trailer (all the way to the frame and axles) so your projects are likely to be quite similar to mine. THANKS FOR THE INSPIRATION AND HELP!
Peace, Love, Light, Roll Tide & Go Chiefs! ~Danni
Thanks Danielle, glad you got something out of the write-up! It’s so easy to be caught off guard when things go wrong but in more cases than not, if you look closely… there’s screws to work with and ways to fix anything! Just gotta ditch the fear and try. 😀
I love it! I just recently bought a 1976 travel trailer and the door prices are outrageous. So I’ll just be rebuilding mine. When a woman is determined there is nothing that can stop us even stupid doors 😁
Lol! So I was wondering if we could install a larger door in our camper because we can’t fit my trike in, and I must of typed just the right phrase in Google and who pops up but you! An oldie but a goodie from 2013 so I had to leave a comment. It’s been 12 years, how are Otto and Kathy?