
This stenciled wooden Christmas tree sign is such an easy way to create a porch sign! However it’s the 3D tree skirt that makes a festive project extra special! Read on for the full tutorial.
Vertical Christmas porch signs are so popular!
Reason being? Vertical porch signs don’t take up much horizontal space, and they are easy to store. Plus, you can save even more storage space after Christmas by designing both sides of the sign with different themes if you wish!
And they’re even more fun to make using scrap wood!
I’ve created a few Christmas porch signs myself and they sure are fun to make! Here’s a few:
Noel porch sign gift tag style!
Buffalo Check JOY Ornament sign
However I had a new idea this round…
Most vertical signs have words. But this round, I visualized a pencil Christmas tree standing inside a tree skirt crate, sitting on top of a sleigh. With limitless options to decorate both tree and crate. Neat idea, right?
To make it easy, I visioned a Christmas stencil that could be grabbed year after year that made it super easy to customize wooden trees to create a new look each year…
Now that’s a fun alternative Christmas tree!
Read on for the full tutorial.
Stencils used for this project:
.

View stencil: Tall Christmas Tree in Crate HERE
Christmas tree stencil
Tall Christmas Tree in Crate is a tall, vertical Christmas sign stencil with a ton of decorating potential. Both the tree and crate can be decorated as desired!
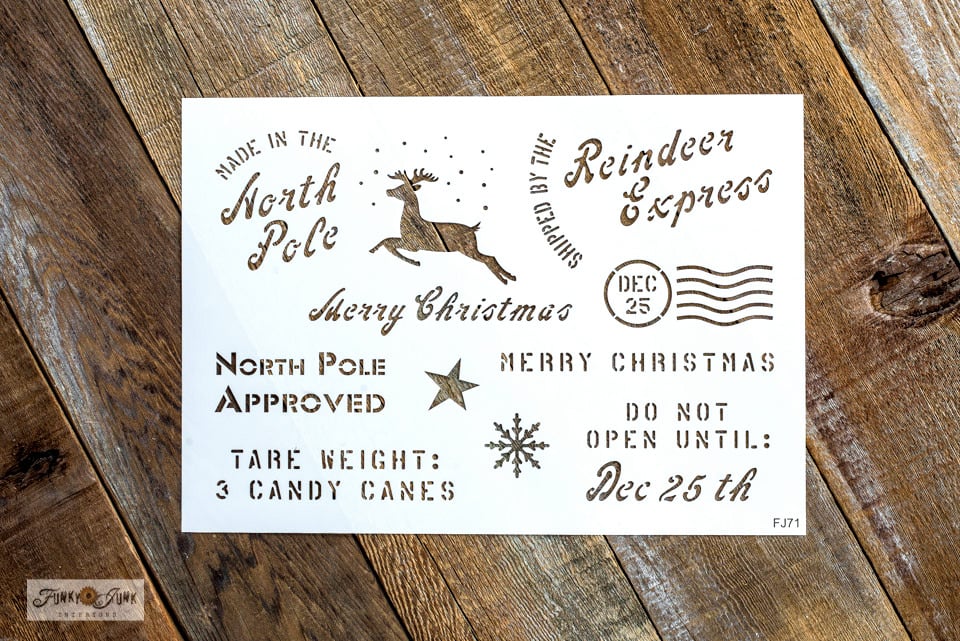
View stencil: Christmas Crates HERE
Christmas crate stencil
Christmas Crates is a super versatile sheet of various Christmas crate styled messages that chime in with sending, crates, pallets and more!
In fact, an added stencil called Mini Christmas Tree Signs was also designed to letter the crate on the stencil with!
However, I took a slightly different direction…
I decided to have some fun and add a 3D tree skirt to the sign as well. But how to decorate the tree…
And that’s when the tree theme popped into my head. This was going to become a Christmas Crates-themed tree!
This wooden Christmas with tree skirt sign turned out SO cool! The sign can be displayed inside as wall art or placed outside on the front porch. But it’s the tree skirt that really makes this one shine in a special way…
Here’s what I did:
This post contains some affiliate links in which I earn a small percentage from qualifying purchases through these links, at no extra cost to you. Thank-you for helping to support my blog!
Stenciled wooden Christmas tree with tree skirt
.
Supplies I used:
.
Tall Christmas Tree in Crate stencil
3 long reclaimed wood cedar planks (5.25″ x 4′ each)
2 smaller side support boards (1×2 16″ long each)
Fusion Mineral Paintin Coal Black andAlgonquin (get 10% off if you purchase Fusion online HERE)
(search for a local Fusion retailer HERE)
Cordless drill and screws
Air nailer gun (optional)

View stencil: Tall Christmas Tree in Crate HERE
Preparing the tree sign base
1. Cut reclaimed sign boards to desired size, along with two smaller support boards.
My overall sign measures 16″ wide x 4′ high.
Boards used:
- Three 5.25″ x 48″ reclaimed cedar fence planks
- Two 1×2 16″ long support boards

2. If you wish to add a 3D crate, cut additional boards to fit as desired.
I’ll be sharing more on how I made my own crate further down this post.


View stencil: Tall Christmas Tree in Crate HERE
Painting the Christmas tree
![]()
Paint colors used:

Fusion Mineral Paint – get 10% off if you purchase through HERE
Or use code funkyjunkinteriorsfmp at checkout.
3. If using a 3D crate, reposition stencil around crate to fit.
This is the time to dry fit your chosen 3D crate with the tree stencil to ensure the tree and sleigh will be centered on your boards after you add your 3D crate, if it’s larger than the crate on the stencil.
4. Paint or stencil tree.
Now this is about the time I would normally say, ‘Grab your favorite stencil brush!’
However, since this tree area was so large, I painted the tree with a regular paint brush, taking care to tap along the edges like I would with a stencil brush so no paint bled underneath.
When you get to the edges, try a combo of brushing towards the centre of the tree as well as some tapping.
It works great!
I painted the tree in Fusion’s Coal Black using THIS angled paint brush.
Adore the black finish for something different!
View the short video at the bottom of this post to see how I did it.

5. Reposition the stencil to incorporate your 3D crate, then stencil in the sleigh rails.

View stencil: Christmas Crates HERE
Decorating the Christmas tree
Here’s where you can leave the tree plain and just add different decoration along with mini string lights or fairy lights each year! However, I desired my tree to have a pattern that was all about holiday decor…
I honestly had planned to use the Christmas Sweater stencil. But once again, the reclaimed pallet wood vibe took over and I took another direction…
Grabbing Christmas Crates instead, I decided to decorate the Christmas tree with Christmas crate stayings that chimed in perfectly with the theme of the sign and the season!

View stencil: Christmas Crates HERE
How to stencil the tree
6. Position stencil the way it was designed, starting from the bottom of the tree, working up.
- position stencil with masking tape
- load stencil brush, then off-load most paint until brush feels dry
- tap or swirl paint through stencil for desired effect
- to continue the pattern, reposition stencil, then paint again until coverage is complete
I didn’t juggle the words. I just used them they way they were designed on the sheet. It turned out amazing!
As I neared the top of the tree, I shifted the graphics around to fit.
The paint colour chosen is Fusion’s Algonquin, because it had a crate tone which ended up being perfect!

View both stencils:
Tall Christmas Tree in Crate HERE
Christmas crates indeed! I LOVE the way this rustic Christmas tree vertical sign took on a true crate-theme with these pallet-styled fonts and graphics! Totally unexpected… and perfectly themed.
Two ways to make a wooden tree skirt


Simple crate tree skirt
So let’s chat about 3D crates.
My first choice was to build a very simple crate with 2 blocks of wood shown above.
You can also create a gap inside the crate if you add some spacer boards underneath.
Here’s what I ended up doing…


Detailed crate tree skirt with space inside
I wanted my little crate to resemble a real rustic feel crate made from unfinished wood planks, along with a space inside to tuck things. What a fun focal point for additional Christmas decorations!
So I played blocks, cutting small pieces of reclaimed wood down to desired sizes, then attaching them together with an air nail gun. It turned out so cute!
I don’t grab my air nail gun enough. I know I’d use it more if I had a battery powered air nail gun LIKE THIS. It’s on my wish list!
The two boards that resemble rabbit ears were slipped underneath to create a space inside the crate.

Attaching the tree crate
The crate was positioned into place with two L-brackets tucked behind and over top of the crate.
I really like the black L-brackets in this group!
Then the crate was moved so the L-brackets could be screwed to the board.

The crate was then slipped back into place and attached to the L-brackets with short black screws.
I personally favor short drywall screws or black truss head screws HERE.
For a fun crate detail, I added a small green antique padlock! What luck!
Other tree decorating ideas
- add a string of fairy or Christmas lights
- attach hooks to hang Christmas ornaments
- create tree garland with ribbon or twine
- add small clippings of evergreen branches or holly to the crate
And with the rustic Christmas tree vertical sign now complete, here’s how it turned out!

Tree Christmas card holder
The little crate was designed to be the perfect size to hold Christmas cards if desired. How cute is that?!
Gotta love a productive Christmas sign, right?
I just found THESE mini Buffalo Checked stockings. They would look ADORABLE hung from the crate! Or perhaps wood block mini Christmas presents… There is NO end to the Christmas decorating options!
However once the wooden Christmas tree sign was carried into my living room where it will stay…


Christmas tree wall art or porch sign
… the crate turned into the perfect place to tuck in a few Christmas decorations along with some fresh cut greens!

Real evergreen branches were tucked inside the crate gap, along with a couple of candy canes and an ornament, finished off with a traditional red and black buffalo checked bow.
So cute! I honestly love it both ways. And who knows… it may change again once I decorate my entire living room!
And that black background really makes those Christmas Crate designs pop.

It looks SO good on my new cozied-up quirky board and batten living room wall!
This is the very wall that I stare at the most, so why not treat myself to something cool to look at?
Stenciled wooden Christmas tree with tree skirt
Tools:
Supplies:
- Tall Christmas Tree in Crate stencil
- Christmas Crates stencil
- 3 long reclaimed wood cedar planks 5.25" x 4' each
- Fusion Mineral Paint in Coal Black
- Fusion Mineral Paint in Algonquin
- stencil brush (I love dome-tipped)
- small L-brackets
- Fusion's synthetic bristle angled paint brush
- 2 smaller support boards top and bottom of sign 1 x 2 cut to width of your sign
- screws to suit your wood thickness (I like black drywall screws)
Instructions:
- Cut boards to fit behind the Christmas Tree In Crate stencil. My overall sign boards measured 16" wide x 4 feet long.

- Line up the main boards side-by-side, then attach two horizontal support boards along the top and bottom with screws. Mine measure 1 x 2 at 16" long.
- Position the tree stencil with masking tape holding it in place.Tall Christmas Tree in Crate stencil
- If using a 3D crate, cut your crate pieces first, then dry-fit with stencil for final positioning. Note: if you wish for sled blades under your crate, may need to modify stencil positioning to accommodate.
- Paint the large tree image with a wider paint brush, taking care to swipe away or tap stencil edges to avoid paint bleed.Fusion Mineral Paint in Coal Black

- Stencil any parts of the crate or sleigh blades as desired.
- Leave the tree stencil in place, then position Christmas Crates on top. Position stencil the way it was designed, starting from the bottom of the tree, working up.Christmas Crates stencil
- Stencil the images in Fusion's Algonquin.Fusion Mineral Paint in Algonquin
- As you near the top of the tree, shift graphics to fit.
- Remove both stencils.
- Attach your 3D wood crate. (L brackets, nail gun, screws or glue)
Notes
Video – how to paint the tree
.
Click above to watch the super short video on how to paint the tree!
Music: Photo Album by Bensound.com
This rustic wooden Christmas tree vertical sign is a perfect fit! Size and style-wise.
Hmm… looks like my theme is leaning towards rustic crates this year…
I’m all over that one for sure…
Merry Christmas to me! And next up, to you! Great for your own personal use or makes great gifts. How would you decorate the tree to suit your own porch?
How would you decorate the tree to suit your home?
View both stencils:
Tall Christmas Tree in Crate HERE
See all Christmas stencils HERE
Other wood Christmas trees and signs to make:
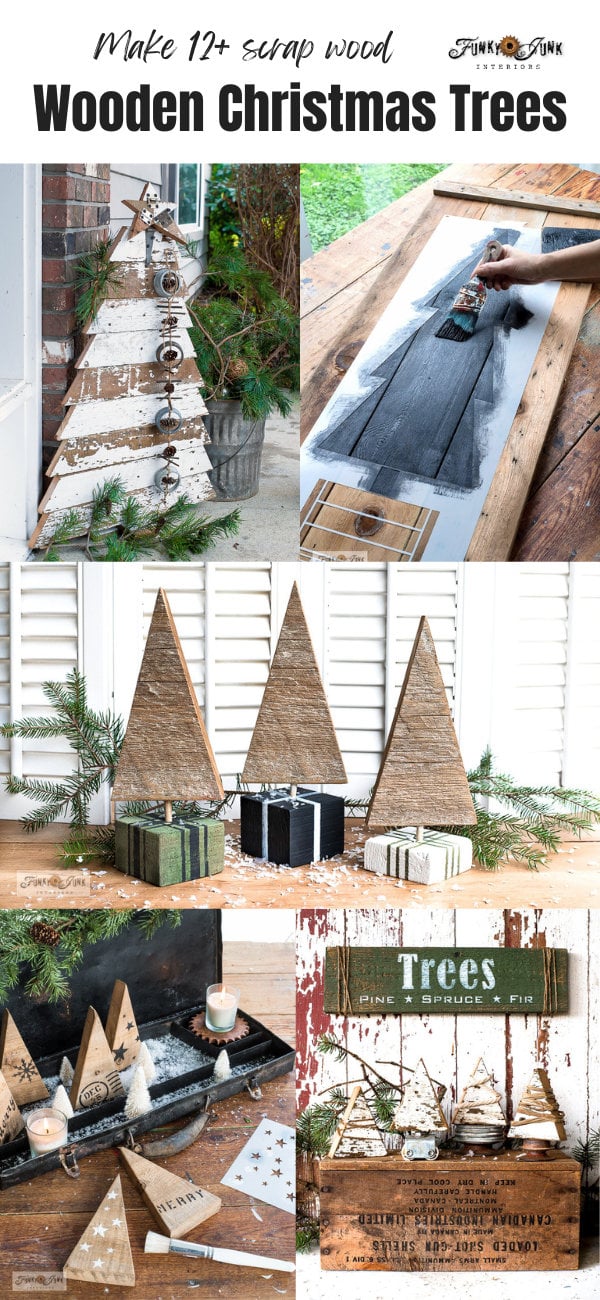
Make 12+ Wooden Christmas trees from scrap wood!

Rustic Joy vertical Christmas sign on barnwood shiplap

Joy vertical Christmas sign with Buffalo Checked ornament
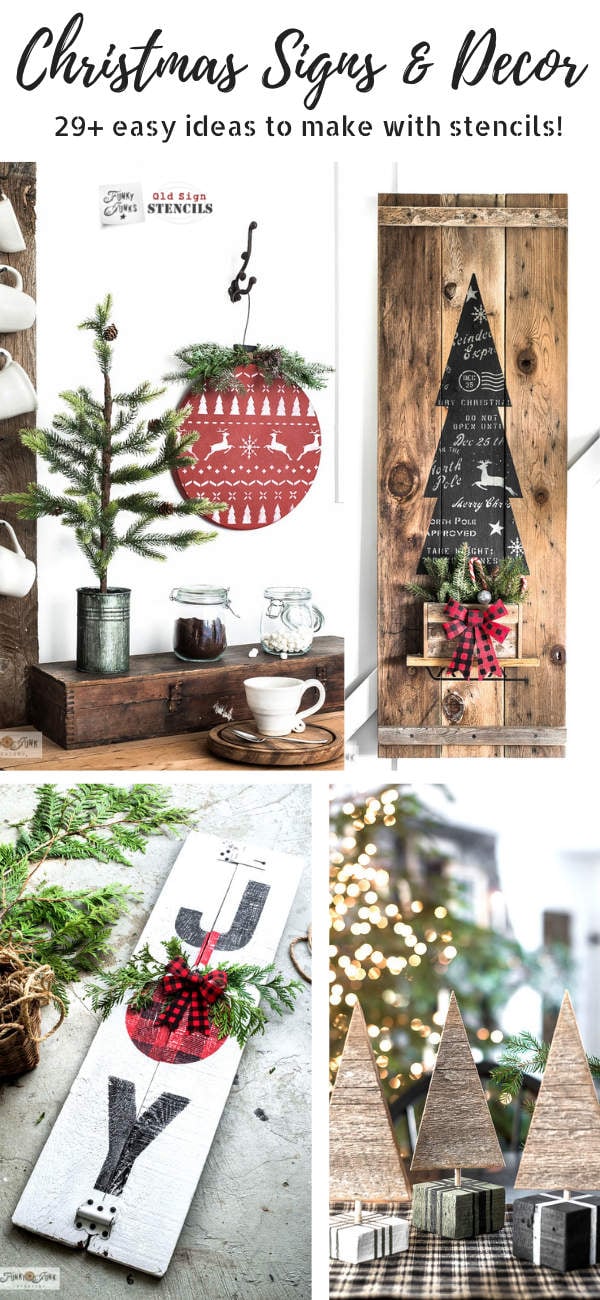
Visit 29+ Easy Christmas Signs and Decor to make!
See all my other Christmas sign projects HERE
Visit the entire collection of Christmas Tree Signs to make HERE
View other wooden Christmas tree ideas HERE
It’s truly magnificent! Love your 3D sign ideas!
Thank-you Carlene! I think I’m really going to enjoy changing the little crate out! I adored your variation as well SO much! The sage green is just epic!
See Carlene’s amazing version at:
https://www.organizedclutter.net/2020/11/create-amazing-sweater-tree-sign-on.html
I love this, Donna, especially the rustic 3D effect! What a great idea for a Christmas card holder too.
Thanks Marie! I had so much fun with this one!
what an incredibly clever project while marketing your latest creation!
Yep! It’s just perfect Donna!
Fabulous creation !!
I can’t tell you how many times I’ve wished that there was some kind of “beam me up Scotty” machine that would magically transport me to another place. Canada would be my first choice so I can visit the kids and pack my suitcase full of your gorgeous stencils. Love, love the Christmas tree. There’s no ways our purr babies would be able to take that one down 😀